Introduction
Overview
Teaching: 30 min
Exercises: 0 minQuestions
How can I engage with this material?
Objectives
Understand the layout and delivery of this workshop
Know how to use or reuse this content
Acknowledgement of country
We wish to acknowledge the custodians of the land we reside on, for the developers of these lessons, these are the Wadjuk (Perth region) people of the Nyoongar nation. We would like to pay our respect to their Elders past, present and emerging and we acknowledge and respect their continuing culture and the contribution they make to the life of this city and this region.
Outline of the workshop
This workshop consists of three modules of work, which will nominally be conducted over three half days. The timing of the workshop is intended to be three half days separated by a week each such that people can apply their new skills to their own code-base before the next workshop. Spacing the modules by a week is also meant to encourage people to experiment and come up with problems / solutions / questions that can be addressed at the start of the following module (or incorporated into the wrap-up session).
Delivery
This workshop will be presented online via Webex, hosted by Curtin.
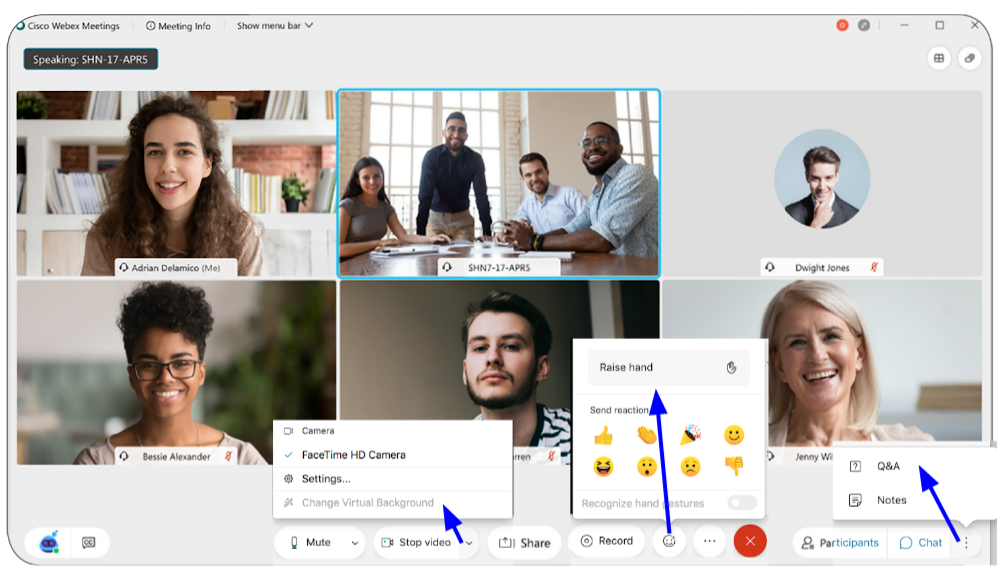
Features used
- Microphone - please mute
- Camera - please turn on, virtual backgrounds available
- Chat - use the chat for more general discussions and to request 1:1 help
- Q&A - use this panel for specific questions you want answered by the instructor/helpers
- Icons - raise your hand and/or send reactions
- Share - for screen sharing, please do not do this unless asked
- Breakout Rooms - we may assign you to breakout rooms for smaller group discussions or challenges
- There will be a pop up to join a breakout room when you are first assigned, you can also find a join button at the top of the participants pane
- To ask for help while in a breakout session click the grey button within the top green box in the participant pane -> this will notify a helper
- To leave the breakout session click the red door in the bottom bar
- choose ‘Leave Session’ to return to the main room
- choose ‘Leave Meeting’ to leave the meeting
Virtual etiquette
We ask you to please:
- Put yourself on mute to eliminate background noise.
- Turn on your camera if you can
- If you have a question:
- Content related question
- For answers by the helpers/instructor use the Q&A section,
- For more general questions and discussions use the chat.
- Raise your hand virtually using the icon to request help and mention this in the chat.
- We will address questions for each episode.
- Be respectful of all participants, through choosing your words purposefully, by giving each other ‘room to speak’ especially in break-out rooms, and by supporting - each other.
Please note our Code of Conduct
Communication
During workshops
- Webex - See email for connection details
- Slack - ADACS-training
Between workshops
Software requirements
The workshop modules will be taught online, using this website as a point of reference. The code examples and any required data are hosted on the companion gitlab repo MAP21A-JCarlin-ExampleCodes.
See setup for details of the software that is required.
Use and re-use
The workshops are designed to be facilitated by an ADACS trainer, however they can also be consumed in a self-paced environment. The initial deployment of this workshop will be facilitated for the OzGrav team who requested the training, and then the content will be advertised / linked to from the ADACS website for anyone to use as a self-paced option. For Australian astronomers, a facilitated version of this workshop can be requested as part of the ADACS merit allocation program.
Key Points
Experiment and implement between modules
Be nice
Ask questions of peers and facilitators
Apply for ADACS support for a re-run of this workshop
Packaging, testing, and documentation
Overview
Teaching: 120 min
Exercises: 60 minQuestions
How to set up a module/package in Python?
How/why do I write tests?
How is documentation different from commenting?
How/why do I write documentation?
Objectives
Set up a directory/file structure for packaging code
Understand how to test code
Understand how/when/where to document code
In this module we will learn how and why we can document code, test code, and bundle code into a library/module that can be used by others. We will start with the packaging code section as this will lay out the framework of where we place our various files.
Packaging code
What is a python module?
A python module is a library of code that can be distributed and used by others.
Common modules that you would have used before include numpy, scipy, and astropy.
Modules primarily do one or both of the following:
- to provide functionality to other software (a library)
- to execute a task (a software package)
Because of the above dual purpose people tend to use the words package and module interchangeably.
Common python modules
What other python modules/packages have you used?
Examples
matplotlib
sklearn
pymc3
Why make a module?
A common mantra of software development is don’t repeat yourself (or others). This effectively means that you should write code once, and then use it multiple times. At the most basic level, it means that code that is used many times should be put into a function, which is then called often. This means that you have only one place for the bug to occur/fix, aiding your debug/development cycle.
If you find yourself copying functions between different code that you write, you should consider packaging those functions into a module and then just importing that module.
Packaging your software into a module will allow you to share your work more broadly via a software repository such as github, or even the python package index (pypi.org). Having your software shared online will increase the visibility of your work, which can lead to greater recognition of your work through software citation.
Developing or contributing to a software package that is widely used is another way that your effort can be recognized and can be used to strengthen a grant, scholarship, or job application.
How are python modules structured?
Python modules can contain a variety of elements including python code, C/Fortran or other language code, data, documentation, scripts, and many other things. The example that we will be dealing with today is the simplest example as it only contains python code.
Python modules mirror the underlying directory/file structure.
If you want to create a module called mymodule all you need to do is create a directory called mymodule and make sure that it has a special file in it called __init__.py.
This file can be empty and you’ll still have defined a module.
Let’s try that out now:
Challenge: make a module
Create a directory with a name of your choice and put an empty file in it called
__init__.py. Once this is done, open a python terminal and try toimportyour module.Example
mkdir mymodule
touch mymodule/__init__.py
python
Python 3.8.10 (default, Jun  2 2021, 10:49:15)
[GCC 9.4.0] on linux
Type "help", "copyright", "credits" or "license" for more information.
>>> import mymodule
>>> dir(mymodule)
['__builtins__', '__cached__', '__doc__', '__file__', '__loader__', '__name__', '__package__', '__path__', '__spec__']
Note that even with an empty file your module already has a bunch of attributes assigned to it.
The __path__ and __file__ attributes will be the path to the module directory and filename of the __init__.py file that you created.
Try the following to verify:
print(mymodule.__path__, mymodule.__file__)
Congratulations, you have just created a python module. It doesn’t do anything useful yet but we’ll get to that later on. Firstly we should discuss the contents and structure of a typical python package.
Package contents and structure.
Recommended content/structure is:
/docs
/mymodule
/mymodule/data
/scripts
/tests
LICENSE
README.md
requirements.txt
setup.py
The files and directories are as follows:
/docsis where you should store the stand-alone documentation for your package./mymoduleis both the name of your module, and the location that the module code should be kept/mymodule/datais where you should store data that are required by your module. Not always needed. Maybe you have some constants or templates that you use to make your life easier. They should be stored here./scriptsis where you put the scripts that a user will interact with from the command line. Typically without the.pyextension./testsis where you put all the code and data that are required for testing your packageLICENSEis for licencing your code. Be as permissive as possible, check with your institute as to what they recommend you use. (They may not care).README.mdis not documentation. This should contain a high level description of your package. It is what GitHub will display on the front page of your repository.requirements.txtis where you list all of your code dependencies (like numpy etc). This makes it easier for people to install your package.setup.pyis a script that will allow package managers likepipto auto-magically install your package. It can also be run directly.
We’ll come back to each of these things later in this course but for now let’s just focus on the mymodule and scripts directories.
An example code repository has been set up at MAP21A-JCarlin-ExampleCodes, which contains the above structure. For the remainder of this workshop we will be building on this template to make a fully documented and tested python package. So that we don’t all step on each other’s toes, everyone should fork the repo on github and then clone this new version.
Fork and clone the repo
- Navigate to https://gitlab.com/adacs/map21a-jcarlin-examplecodes
- Ensure that you are logged into gitlab
- Click the fork button (top right)
- On your forked version of the repo click the blue clone button
- copy the link that starts with
git@gitlab.com- In a terminal on your computer run
git clone <link-from-above>- If you don’t want to use git, then use the
download source codeoption and unzip to some place on your computer.
If you are familiar with git then feel free to commit changes to your repo as we progress through the following. (See next workshop for git instructions).
Making a not-empty python package
Now that we have our template python package we will add some super basic functionality to it.
Edit
__init__.pyEdit
mymodule/__init__.pyso that it does two things:
- Prints “Hello from module `mymodule`” when it is run.
- Defines a function called
funcwhich prints “You just ran the function called `func` from module `mymodule`”Expected behavior
python mymodule/__init__pyHello from `mymodule`Python 3.8.10 (default, Jun 2 2021, 10:49:15) [GCC 9.4.0] on linux Type "help", "copyright", "credits" or "license" for more information. >>> import mymodule Hello from `mymodule` >>> dir(mymodule) ['__builtins__', '__cached__', '__doc__', '__file__', '__loader__', '__name__', '__package__', '__path__', '__spec__', 'func'] >>> mymodule.func() You just ran the function called `func` from module `mymodule`
Submodules
Note that some packages like scipy like to use sub-modules to organize code based on functionality.
Sub-modules can be easily created in one of two ways:
- a file within the directory
mymodulecalledsubmod1.py - a directory within
mymodulecalledsubmod2with an__init__.pyfile within it.
Either way the sub-module can be imported as:
from mymodule import submod1, submod2
By default all of the sumbodules will be imported so you can also access functions within submod1 like this:
import mymodule

mymodule.submod1.func()
To control which sub-modules are imported we can define a variable within the __init__.py file which is __all__ and then define which sub-modules should automatically be imported.
Challenge: automatically import only some modules
- Create two sub-modules of
mymodulecalleddefaultandother.- Edit the
__init__.pyfile so that onlydefaultis imported when you importmymodule- Confirm that
othercan still be explicitly importedSolution
touch mymodule/{default,other}.py
echo "__all__ = ['default']" >> mymodule/__init__.py
python -c "import mymodule; print(dir(mymodule))"
Hello from `mymodule`
['__all__', '__builtins__', '__cached__', '__doc__', '__file__', '__loader__', '__name__', '__package__', '__path__', '__spec__', 'func']
python -c "from mymodule import default, other; print(dir())"
Hello from `mymodule`
['__annotations__', '__builtins__', '__doc__', '__loader__', '__name__', '__package__', '__spec__', 'default', 'other']
By importing only the modules that are going to be used, we can reduce the amount of time taken to load a module, as well as the total memory overhead of python.
What else is __init__.py good for?
You should consider defining the following in your __init__.py:
- A docstring appropriate for the module, see later
- “private” variables such as
__version__,__date__,__author__,__citation__ - “public” constants (IN_ALL_CAPS=True)
Package level scripts
If your package is providing a piece of software that does a thing then you will typically want a command line entry point for users rather than having them write their own code. Essentially a script is just a command line interface for the code in your module.
Challenge write a script
In the
scriptsfolder create a new file calledrunme. The script should importmymoduleand then runfuncand then exit. Bonus: accept user input and echo it back to them.Solution
touch scripts/runme
chmod ugo+x scripts/runme
In file
runme#! /usr/bin/env python from mymodule import func import sys func() print(sys.argv) sys.exit()Test by running
./scripts/runmeNote that you may need do the following to get the imports to work
export PYTHONPATH=.:$PYTHONPATHthis is because your package is not installed. See here for how to install packages.
Installing a package
We can make our software package installable by adding some content to the setup.py file.
Currently this file is empty so we shall fill it with some useful content.
Update setup.py so that it contains the following information
#! /usr/bin/env python
"""
Set up for mymodule
"""
from setuptools import setup

requirements = ['scipy>=1.0',
                # others
                ]

setup(
    name='mymodule',
    version=0.1,
    install_requires=requirements,
    python_requires='>=3.6',
    scripts=['scripts/runme']
)
You should now be able to install the package by running:
pip install -e .
Note the -e directive, which means that the module will be ‘editable’ after install.
Normally the code/data/scripts are all copied to some central location when they are installed, however the -e directive will instead link the files to that location.
This means that you don’t have to install your module every time you make a small change.
Now that the module has been installed you should be able to import this module from python regardless of which directory you are working in.
Similarly, because we provided scripts=['scripts/runme'], we should have access to this script from anywhere on our system.
Try it out!
Publishing a package on pypi
With some extensions to the setup.py file we can publish our package on the pypi.org registry.
For instructions on how to do this see the instructions on python.org.
Testing code
We now have a package that can be installed but it might be trash as it’s un-tested and un-documented.
In order to understand testing we should have some code that is doing something more than just printing to the screen.
In the default sub-module add the following silly function:
def hard_compute(number,
                word,
                option=None
                ):
    if not option:
        return number
    result = '.'.join([word,str(option)])
    return result
The desired behavior of the function can be summarized as:
hard_compute(1,'hello') == 1
hard_compute(1,'test',7) == "test.7"
hard_compute(None,'hello') == -1
Note: the function doesn’t actually work as intended.
We’ll learn how to write a test harness that will determine if the function hard_compute obeys the above expectations.
How to write and run tests
Depending on how you will run your test harness you will write tests in different ways.
For this workshop we’ll focus on pytest (docs) as it is both a great starting point for beginners, and also a very capable testing tool for advanced users.
pytest can be installed via pip:
pip install pytest
In order to use pytest we need to structure our test code in a particular way.
Firstly we need a directory called tests which contain test modules named as test_<item>.py which in turn have functions called test_<thing>.
The functions themselves need to do one of two things:
- return
Noneif the test was successful - raise an exception if the test failed
Here is an example test in the file `tests/test_module.py:
def test_module_import():
    try:
        import mymodule
    except Exception as e:
        raise AssertionError("Failed to import mymodule")
    return
With pytest installed we simply navigate to our package directory and run pytest:
============================ test session starts ============================
platform linux -- Python 3.8.10, pytest-6.2.4, py-1.10.0, pluggy-0.13.1
rootdir: /data/alpha/hancock/ADACS/MAP21A-JCarlin-ExampleCodes
collected 1 item

tests/test_module.py .                                                [100%]

============================= 1 passed in 0.01s =============================
pytest will automatically look for directories/files/functions of the required format and run them.
If you decide that a test is no longer needed (or not valid, or still in development), you can turn it off by changing the name so that it doesn’t start with test.
I like to change test_thing so that it becomes dont_test_thing.
This way you can keep the test code, but it just wont run.
Bonus note
Eventually the number of tests that you create will be large and take a while to run. In order that you can test individual sections of your code base the following python-fu may be useful:
if __name__ == "__main__":
    # introspect and run all the functions starting with 'test'
    for f in dir():
        if f.startswith('test'):
            print(f)
            globals()[f]()
with the above you can run all the tests within a file just by running that file.
Testing hard_compute
Let’s now return to our previous example and design a set of tests for the hard_compute function in the mymodule.default module.
Challenge write a test
- Create a file
tests/test_defaultand within it a functiontest_hard_compute.- Use the desired behavior listed above as the three test cases
test_hard_computeshould returnNoneif all cases passedtest_hard_computeshould raise anAssertionErrorwith a sensible note if a test failsIf you include the code from the bonus not above you can quickly run just this test.
When you have a test that you are happy with run it using
pytestSolution
def test_hard_compute():
    from mymodule.default import hard_compute

    answer = hard_compute(1, 'help')
    expected = 1
    if answer != expected:
        raise AssertionError(f"hard_compute(1,'help') should return {expected} but
                               returned {answer}")

    answer = hard_compute(1, 'test', 7)
    expected = "test.7"
    if answer != expected:
        raise AssertionError(f"hard_compute(1,'test', 7) should return {expected} but
                               returned {answer}")

    answer = hard_compute(None,'hello')
    expected = -1
    if answer != expected: # "is" instead of "==" since expected is None
        raise AssertionError(f"hard_compute(None,'hello') should return {expected}
                               but returned {answer}")

    return

if __name__ == "__main__":
    # introspect and run all the functions starting with 'test'
    for f in dir():
        if f.startswith('test'):
            print(f)
            globals()[f]()
If your test code works as intended you should get the following output from
pytest============================================================= short test summary info > ============================================================= FAILED tests/test_default.py::test_hard_compute - AssertionError: hard_compute(None,> 'hello') should return -1 but returned None =========================================================== 1 failed, 1 passed in 0.> 11s ===========================================================
The fact that the failed tests are reported individually, and the assertion errors are reported for each failure, should be an encouragement to write useful things as your error messages.
Note that in the above we ran all three tests in the same function. If the first test failed, then the second two are not run. If the subsequent tests are dependent on the success of the first then this is a good design technique. However, if the tests are independent then it might be a good idea to split the tests into individual functions.
Testing modes
Broadly speaking there are two classes of testing: functional and non-functional.
| Testing type | Goal | Automated? |
|---|---|---|
| Functional testing | ||
| - Unit testing | Ensure individual function/class works as intended | yes |
| - Integration testing | Ensure that functions/classes can work together | yes |
| - System testing | End-to-end test of a software package | partly |
| - Acceptance testing | Ensure that software meets business goals | no |
| Non-functional testing | ||
| - Performance testing | Test of speed/capacity/throughput of the software in a range of use cases | yes |
| - Security testing | Identify loopholes or security risks in the software | partly |
| - Usability testing | Ensure the user experience is to standard | no |
| - Compatibility testing | Ensure the software works on a range of platforms or with different version of dependent libraries | yes |
The different testing methods are conducted by different people and have different aims. Not all of the testing can be automated, and not all of it is relevant to all software packages. As someone who is developing code for personal use, use within a research group, or use within the astronomical community the following test modalities are relevant.
Unit testing
In this mode each function/class is tested independently with a set of known input/output/behavior. The goal here is to explore the desired behavior, capture edge cases, and ideally test every line of code within a function. Unit testing can be easily automated, and because the desired behaviors of a function are often known ahead of time, unit tests can be written before the code even exists.
Integration testing
Integration testing is a level above unit testing. Integration testing is where you test that functions/classes interact with each other as documented/desired. It is possible for code to pass unit testing but to fail integration testing. For example the individual functions may work properly, but the format or order in which data are passed/returned may be different. Integration tests can be automated. If the software development plan is detailed enough then integration tests can be written before the code exists.
System testing
System testing is Integration testing, but with integration over the full software stack. If software has a command line interface then system testing can be run as a sequence of bash commands.
Performance testing
Performance testing is an extension of benchmarking and profiling. During a performance test, the software is run and profiled and passing the test means meeting some predefined criteria. These criteria can be set in terms of:
- peak or average RAM use
- (temporary) I/O usage
- execution time
- cpu/gpu utilization
Performance testing can be automated, but the target architecture needs to be well specified in order to make useful comparisons. Whilst unit/integration/system testing typically aims to cover all aspects of a software package, performance testing may only be required for some subset of the software. For software that will have a long execution time on production/typical data, testing can be time-consuming and therefore it is often best to have a smaller data set which can be run in a shorter amount of time as a pre-amble to the longer running test case.
Compatibility testing
Compatibility testing is all about ensuring that the software will run in a number of target environments or on a set of target infrastructure. Examples could be that the software should run on:
- Python 3.6,3.7,3.8
- OSX, Windows, and Linux
- Pawsey, NCI, and OzStar
- Azure, AWS, and Google Cloud
- iPhone and Android
Compatibility testing requires testing environments that provide the given combination of software/hardware. Compatibility testing typically makes a lot of use of containers to test different environments or operating systems. Supporting a diverse range of systems can add a large overhead to the development/test cycle of a software project.
Developing tests
Ultimately tests are put in place to ensure that the actual and desired operation of your software are in agreement. The actual operation of the software is encoded in the software itself. The desired operation of the software should also be recorded for reference and the best place to do this is in the user/developer documenation (see below).
One strategy for developing test code is to write tests for each bug or failure mode that is identified. In this strategy, when a bug is identified, the first course of action is to develop a test case that will expose the bug. Once the test is in place, the code is altered until the test passes. This strategy can be very useful for preventing bugs from reoccurring, or at least identifying them when they do reoccur so that they don’t make their way into production.
Test metrics
As well has having all your tests pass when run, another consideration is the fraction of code which is actually tested. A basic measure of this is called the testing coverage, which is the fraction of lines of code being executed during the test run. Code that isn’t tested can’t be validated, so the coverage metric helps you to find parts of your code that are not being run during the test.
Example coverage
Run
python -m pytest --cov=mymodule --cov-report=term tests/test_module.pyto see the coverage report for this test/module.result
python -m pytest --cov=mymodule --cov-report=term tests/test_module.py
================================================================ test session starts =================================================================
platform linux -- Python 3.8.10, pytest-6.2.5, py-1.10.0, pluggy-1.0.0
rootdir: /data/alpha/hancock/ADACS/MAP21A-JCarlin-ExampleCodes
plugins: cov-2.12.1, anyio-3.3.0
collected 1 item

tests/test_module.py .                                                                                                                         [100%]

---------- coverage: platform linux, python 3.8.10-final-0 -----------
Name                   Stmts   Miss  Cover
------------------------------------------
mymodule/__init__.py       6      2    67%
mymodule/default.py       17     17     0%
mymodule/other.py          0      0   100%
------------------------------------------
TOTAL                     23     19    17%


================================================================= 1 passed in 0.05s ==================================================================
Note that default.py has 0% coverage because we didn’t use it in the test_module.py test.
We could have run the test_default.py test, but that would have failed and not generated a coverage report.
Also note that other.py has 100% coverage because there are no lines of code to be tested.
Finally, the __init__.py code has only 2/6 of the statements being executed.
We can have a better look at the coverage report by writing an html formatted report:
python -m pytest --cov=mymodule --cov-report html:coverage tests/test_module.py
This will give use a report for each file in the directory coverage.
Let’s open up the file mymodule___init___py.html (note the 3x underscores in the name), and see what statements were hit/missed during the testing.
An exercise for the keen student
Adjust the code/testing for mymodule such that all the functions are tested, all the tests pass, and you achieve 100% coverage on the coverage report.
Automated testing
We have already learned about the pytest package that will run all our tests and summarize the results.
This is one form of automation, but it relies on the user/developer remembering to run the tests after altering the code.
Another form of automation is to have a dedicated workflow that will detect code changes, run the tests, and then report the results.
GitHub (and GitLab) have continuous integration (CI) tools that you can make use of to run a suite of tests every time you push a new commit, or make a pull request.
We will explore these features in the day 3 content.
Documentation
To avoid simulating the entire python interpreter in our minds, it is often easier to document the (intended) behavior of our code in a human readable format.
Python offers the builtin function help() to display the documentation for a given function.
Let’s try that now.
Challenge: Get some help
Get some help on the python builtin function
enumeratehelp(enumerate)Solution
Help on class enumerate in module builtins:

class enumerate(object)
 |  enumerate(iterable, start=0)
 |
 |  Return an enumerate object.
 |
 |    iterable
 |      an object supporting iteration
 |
 |  The enumerate object yields pairs containing a count (from start, which
 |  defaults to zero) and a value yielded by the iterable argument.
 |
 |  enumerate is useful for obtaining an indexed list:
 |      (0, seq[0]), (1, seq[1]), (2, seq[2]), ...
Where does help() get all this information from?
In part, the information provided by help is part of the docstring for the enumerate function.
We can view the docstring by viewing the __doc__ attribute of the function as follows:
Example
print(enumerate.__doc__)Output
[2] 'Return an enumerate object.\n\n iterable\n an object supporting iteration\n\nThe enumerate object yields pairs containing a count (from start, which\ndefaults to zero) and a value yielded by the iterable argument.\n\nenumerate is useful for obtaining an indexed list:\n (0, seq[0]), (1, seq[1]), (2, seq[2]), ...'
Compare the help shown above to the official python documentation here.
Documentation vs commenting
There are two ways in which you can and should describe your code - documentation and commenting. These two ways of describing code have two audiences (which may overlap) - documentation is for the people who will use your code, whilst comments are for people who will develop your code. Both of these audiences include you, the original developer, some 6 months in the future when you have forgotten all the details about what you were doing. Quite simply:
Documentation is a love letter that you write to your future self.
– Damian Conway
Comments
Comments should include design decisions, or explanations of difficult to interpret code chunks.
Comments can include known/expected bugs or shortcomings in the code.
Things that are not yet implemented, or hacks that deal with bugs in other modules, should also be in comments.
Python comments come in two flavours: a single or part line comment which begins with a #, or a multiline comment which is any string literal.
'''
A comment that covers more than one line
because it is just so long
'''

def my_func(num):
  # assume that num is some numeric type, or at the very least
  # an object which supports division against an integer
  ans = num / 2 # A partial line comment
  return ans
The partial-line comment plus multi-line commands can be used to great effect when defining functions, dictionaries, or lists:
dict = {'key1': 0, # note about this item
        'key2': 1, # another note
        }

def my_func(num,
            ax,            # a matplotlib axes object
            verbose=True,  # TODO update to be logger.isEnabledFor(logging.DEBUG)
            **kwargs)
When python is interpreted (or compiled to byte-code), the interpreter will ignore the comments. The comments therefore only exist in the source code. Commenting your code has no effect on the behavior of your code, but it will (hopefully) increase your ability to understand what you did. Because the comments are ignored by the python interpreter only people with access to your source code will read them (developer usually), so this is a bad place to describe how your code should be used. For notes about code usage we instead use documentation.
Docstrings
Python provides a way for use to document the code inline, using docstrings. Docstrings can be attached to functions, classes, or modules, and are defined using a simple syntax as follows:
Example
def my_func():
  """
  This is the doc-string for the function my_func.
  I can type anything I like in here.
  The only constraint is that I start and end with tripe quotes (' or ")
  I can use multi-line strings like this, or just a single line string if I prefer.
  """
  return
Docstrings can be any valid string literal, meaning that they can be encased in either single or double quotes, but they need to be triple quoted. Raw and unicode strings are also fine.
Docstrings can be included anywhere in your code, however unless they immediately follow the beginning of a file (for modules) or the definition of a class or function, they will be ignored by the compiler.
The docstrings which are defined at the start of a module/class/function will be saved to the __doc__ attribute of that object, and can be accessed by normal python introspection.
Docstring formats
While it is possible to include any information in any format within a docstring it is clearly better to have some consistency in the formatting.
There are, unfortunately, many ‘standard’ formats for python documentation, though they are all similarly human readable so the difference between the formats is mostly about consistency and automated documentation (see day 3 lessons).
Scipy, Numpy, and astropy, all use the numpydoc format which is particularly easy to read. We will be working with the numpydoc format in this workshop.
Let’s have a look at an extensive example from the numpydoc website.
example.py
"""Docstring for the example.py module.

Modules names should have short, all-lowercase names.  The module name may
have underscores if this improves readability.

Every module should have a docstring at the very top of the file.  The
module's docstring may extend over multiple lines.  If your docstring does
extend over multiple lines, the closing three quotation marks must be on
a line by itself, preferably preceded by a blank line.

"""
from __future__ import division, absolute_import, print_function

import os  # standard library imports first

# Do NOT import using *, e.g. from numpy import *
#
# Import the module using
#
#   import numpy
#
# instead or import individual functions as needed, e.g
#
#  from numpy import array, zeros
#
# If you prefer the use of abbreviated module names, we suggest the
# convention used by NumPy itself::

import numpy as np
import matplotlib as mpl
import matplotlib.pyplot as plt

# These abbreviated names are not to be used in docstrings; users must
# be able to paste and execute docstrings after importing only the
# numpy module itself, unabbreviated.


def foo(var1, var2, *args, long_var_name='hi', **kwargs):
    r"""Summarize the function in one line.

    Several sentences providing an extended description. Refer to
    variables using back-ticks, e.g. `var`.

    Parameters
    ----------
    var1 : array_like
        Array_like means all those objects -- lists, nested lists, etc. --
        that can be converted to an array.  We can also refer to
        variables like `var1`.
    var2 : int
        The type above can either refer to an actual Python type
        (e.g. ``int``), or describe the type of the variable in more
        detail, e.g. ``(N,) ndarray`` or ``array_like``.
    *args : iterable
        Other arguments.
    long_var_name : {'hi', 'ho'}, optional
        Choices in brackets, default first when optional.
    **kwargs : dict
        Keyword arguments.

    Returns
    -------
    type
        Explanation of anonymous return value of type ``type``.
    describe : type
        Explanation of return value named `describe`.
    out : type
        Explanation of `out`.
    type_without_description

    Other Parameters
    ----------------
    only_seldom_used_keywords : type
        Explanation.
    common_parameters_listed_above : type
        Explanation.

    Raises
    ------
    BadException
        Because you shouldn't have done that.

    See Also
    --------
    numpy.array : Relationship (optional).
    numpy.ndarray : Relationship (optional), which could be fairly long, in
                    which case the line wraps here.
    numpy.dot, numpy.linalg.norm, numpy.eye

    Notes
    -----
    Notes about the implementation algorithm (if needed).

    This can have multiple paragraphs.

    You may include some math:

    .. math:: X(e^{j\omega } ) = x(n)e^{ - j\omega n}

    And even use a Greek symbol like :math:`\omega` inline.

    References
    ----------
    Cite the relevant literature, e.g. [1]_.  You may also cite these
    references in the notes section above.

    .. [1] O. McNoleg, "The integration of GIS, remote sensing,
       expert systems and adaptive co-kriging for environmental habitat
       modelling of the Highland Haggis using object-oriented, fuzzy-logic
       and neural-network techniques," Computers & Geosciences, vol. 22,
       pp. 585-588, 1996.

    Examples
    --------
    These are written in doctest format, and should illustrate how to
    use the function.

    >>> a = [1, 2, 3]
    >>> print([x + 3 for x in a])
    [4, 5, 6]
    >>> print("a\nb")
    a
    b
    """
    # After closing class docstring, there should be one blank line to
    # separate following codes (according to PEP257).
    # But for function, method and module, there should be no blank lines
    # after closing the docstring.
    pass
The example above is intentionally extensive, but you should be able to see what is going on. There are a few parts to the documentation format, some of which are considered essential, good practice, or optional.
Before we write any documentation, lets first create a function that is a little more interesting than our hard_compute example from before.
Create a non-silly example function
sed -i '1 a import numpy as np' mymodule/default.py
cat <<END >>mymodule/default.py


def deg2hms(x):
    if not np.isfinite(x):
        return 'XX:XX:XX.XX'
    # wrap negative RA's
    if x < 0:
        x += 360
    x /= 15.0
    h = int(x)
    x = (x - h) * 60
    m = int(x)
    s = (x - m) * 60
    return f"{h:02d}:{m:02d}:{s:05.2f}"
END
Essential documentation
The main goal of documentation is to describe the desired behavior or intended use of the code. As such every docstring should contain at least a one line statement that shows the intent of the code.
Document deg2hms v1
For our
deg2hmsexample above add a few lines of documentation to describe the intent of the function.Solution
def deg2hms(x):
    """
    Format decimal degrees into sexigessimal HH:MM:SS.SS
    """
    if not np.isfinite(x):
        return 'XX:XX:XX.XX'
    # wrap negative RA's
    if x < 0:
        x += 360
    x /= 15.0
    h = int(x)
    x = (x - h) * 60
    m = int(x)
    s = (x - m) * 60
    return f"{h:02d}:{m:02d}:{s:05.2f}"
Good practice documentation
It is good practice to describe the expected input and output (or behavior) of your functions.
In the numpydoc format we put these into two sections:
- Parameters: for the input
- Returns: for the output
There is no “Modifies” section for the documentation (though you could add one if you like). If the function modifies an input but does not return the modified version as an output then this should be included as part of the long form description.
Document deg2hms v2
Extend our documentation for
deg2hmsso that it includes a Parameters and Returns section.Solution
def deg2hms(x):
    """
    Format decimal degrees into sexigessimal HH:MM:SS.SS

    Parameters
    ----------
    x : float
        Angle in degrees. Assumed to be in [-360,360]

    Returns
    -------
    hms : string
        Sexigessimal representation of x, in the format HH:MM:SS.SS
        If x is np.nan, or np.inf then return "XX:XX:XX.XX" instead
    """
    if not np.isfinite(x):
        return 'XX:XX:XX.XX'
    # wrap negative RA's
    if x < 0:
        x += 360
    x /= 15.0
    h = int(x)
    x = (x - h) * 60
    m = int(x)
    s = (x - m) * 60
    return f"{h:02d}:{m:02d}:{s:05.2f}"
Optional documentation
The type of errors that are raised, and under what conditions, can be documented in the Raises section.
Notes, References, and Examples, are also useful sections but usually applicable to all functions or classes that you will be writing.
If I have used code snippets from stack-overflow or similar, then I find Notes/References section to be a good place to acknowledge and link to those resources.
The Examples section can be used to show intended use.
There is an automated testing suite called doctest which will scan your docstrings looking for segments starting with >>> and then running those segments in an interactive python interpreter.
A solid test suite will typically contain many tests for a single function, thus trying to embed all the tests into your docstrings just makes for very long docstrings.
It is preferable to keep your testing code in the tests module/directory of your python module, and to use the Examples section only for demonstrating functionality to the end user.
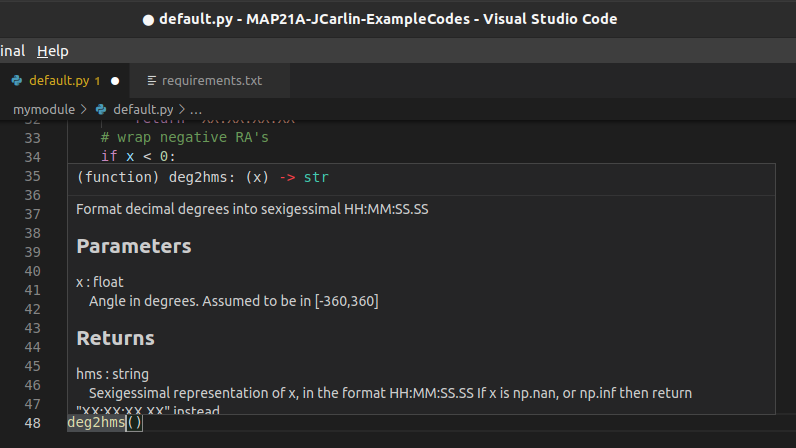
Making use of documentation
Some IDEs (the good ones) provide syntax highlighting, linting, and inline help as you write code. By providing docstrings for all your functions you can make use of the linting and inline help. Below is an example from VSCode in which the docstring for a function is being shown to me as I code.
You can use the help from the python console like this:
Python 3.8.10 (default, Jun  2 2021, 10:49:15)
[GCC 9.4.0] on linux
Type "help", "copyright", "credits" or "license" for more information.
>>> from mymodule import default
Hello from `mymodule`
>>> help(default.deg2hms)
Help on function deg2hms in module mymodule.default:

deg2hms(x)
    Format decimal degrees into sexigessimal HH:MM:SS.SS

    Parameters
    ----------
    x : float
        Angle in degrees. Assumed to be in [-360,360]

    Returns
    -------
    hms : string
        Sexigessimal representation of x, in the format HH:MM:SS.SS
        If x is np.nan, or np.inf then return "XX:XX:XX.XX" instead
>>>
Additionally you can compile all the documentation into a website or other document using an automated documentation tool as described in the next section.
Automated Documentation
If your docstrings are formatted in a regular way then you can make use of an automated documentation tool. There are many such tools available with a range of sophistication.
The simplest to use is the pdoc package which can be obtained from pypi.org.
Install and use pdoc
Install the pdoc module and then run it on our documented code using:
pip install pdoc
pdoc mymodule
By default pdoc will start a mini web sever with the documentation on it. This should be opened in your browser by default but if it isn’t you can navigate to
localhost:8080or127.0.0.1:8080. Use<ctrl>+Cwhen you want to stop the web server.Have an explore of the documentation so far and see how your docstrings map onto what is being shown on the web-pages.
To make documentation that is less ephemeral you can use the the -d docs option to cause all the documentation to be built and then placed into the docs folder.
pdoc only supports html output, however other auto-documentation packages such as sphinx can write latex (and thus pdf), ePub, man pages, or plain text.
Other forms of documentation
Compiling all your docstrings into an easy to find and navigate website is great, but this typically does not do a good job of documenting your software project as a whole. What is required here is something that deals with the intent of the software, a description of the problem that it is solving, and how users can install and begin to use the software. For this you have a few options:
- a
README.mdin your repository - a user guide document (html or PDF)
- a wiki or rtfd.io style website
Within any of the above you would want to include things such as:
- a guide for downloading/compiling/installing your software
- a ‘quick-start’ guide or set of examples for new users
- a Frequently Asked Questions (FAQ) section to address common problems
- tutorials to demonstrate some of the key features of your software (Jupyter notebooks are great here)
GitHub and GitLab both provide a wiki for each project. Additionally both platforms will allow you to set up Continuous Integration (CI) tools that will automatically build and publish your documentation to a third party website.
Bringing it all together
A typical development cycle will consist of writing code, testing code, and writing documentation. The order in which this is done depends on the software development strategies that you set out for your project, or simply personal preference. At the end of the day the process is cyclic - with the end goal of having code, tests, and documentation that are all in agreement. Once your code/tests/documentation are consistent then you can package your code into a module and publish it for others to use.
Key Points
Write a function doc-string
Write a function test
Write a function
Iterate until the three converge
Collect functions in a package/module
Compile documentation
Publish code and documentation
Version Control for Collaborative and CI Workflows
Overview
Teaching: 120 min
Exercises: 60 minQuestions
How do I collaborate on GitLab?
How do I set up continuous integration?
Objectives
Set up projects and collaborators on Gitlab
Explore collaborative workflow including dealing with conflicts, branching and merging
Demonstrate a CI workflow.
Questions from previous modules
TBC
Recap
For this lesson we assume that you already know how to track files on your own computer and that you are comfortable with the basic git workflow:
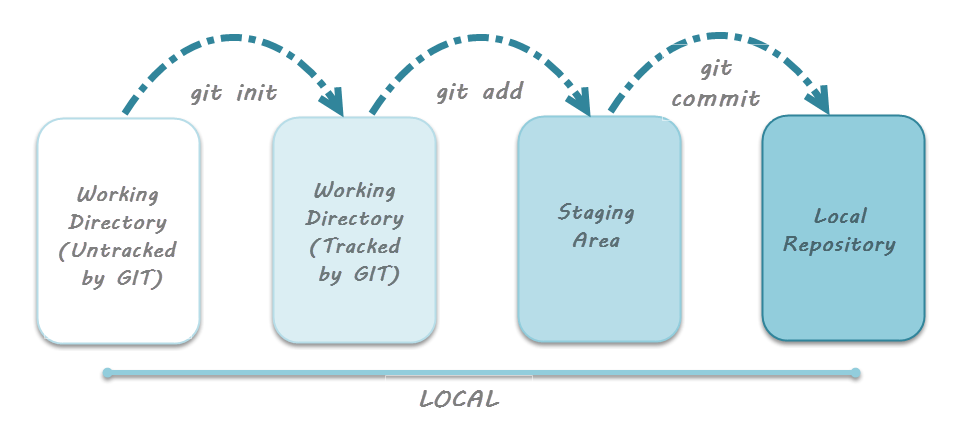
image credit: toolsqa
Working With Remote Repositories
Version control really comes into its own when we begin to collaborate with other people. Git makes collaboration easy as each party has their own complete copy of a repository and can make the required changes independently from a connection to a central repository.
In practice, however, the simplest way to work collaboratively is to use a central copy of the repository(considered to be the “truth”) to which everyone adds their changes. Most programmers use hosting services like GitHub, Bitbucket or GitLab to hold this central copy which is called a remote repository.
To interact with a remote repository the above workflow gets extended by a push and pull step to send and retrieve changes from the remote repo, respectively:
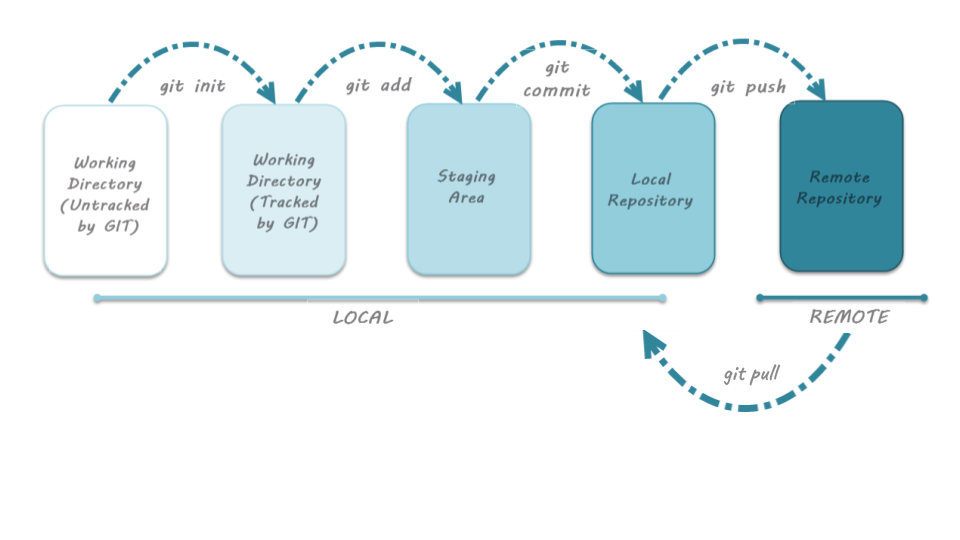 image credit: toolsqa
For this lesson we will be using GitLab examples where possible.
Why use a remote hosting service?
- Version Control remotely
- Visible code and reproducibility
- Open code and reuse
- Collaborative code development
- Open code development
Working collaboratively
As mentioned above, working remotely and collaboratively is supported by various hosting services.
Everyone has their own complete copy of the entire repository and can make changes as required.
From there changes are committed (pushed) to a central repository and all collaborators can implement these changes in their own local repositories by running the pull command.
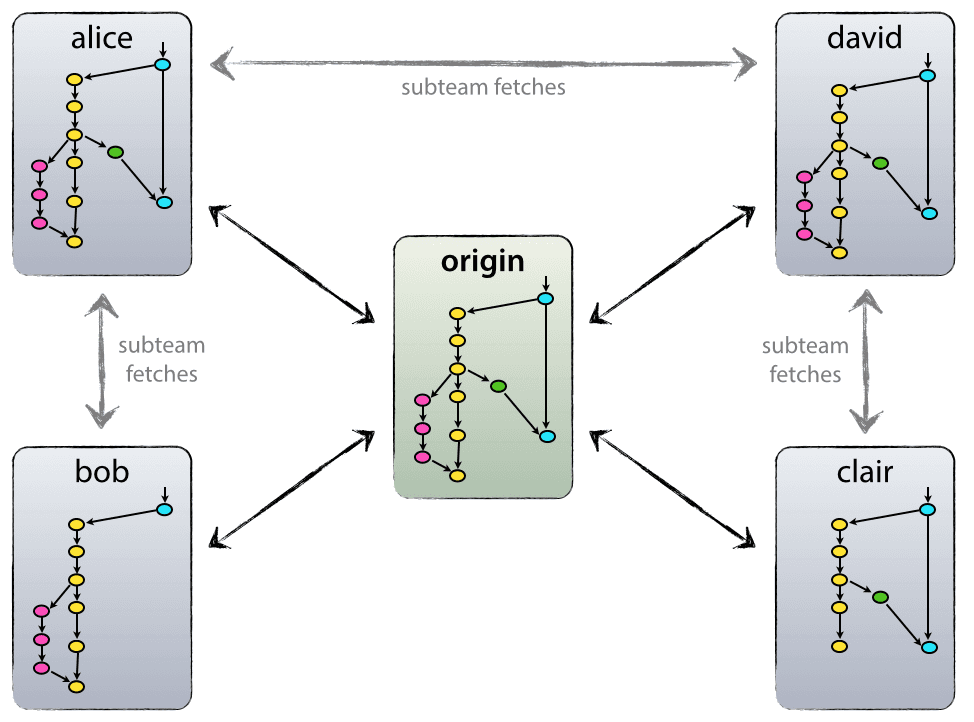
To be able to integrate one’s changes in the remote repository the author will need to have write access, if they do not have these they can submit a pull request or merge request and a repository owner/maintainer can then approve and merge these changes.
git remote add origin [URL]    # link an (empty) remote repo to your local repo, nickname it origin
git push origin main           # push your local changes to the main branch of the remote repo called origin
git pull origin main           # pull changes from the main branch of the remote repo called origin
$ git remote -v                # show nickname(s) and url(s) of associated remote repo(s)

$ git clone [URL] [location]   # clone a remote repository from [URL] to your computer into the optionally  specified [location]
Let’s try it out
The Premise Wolfman and Dracula have been hired by Universal Missions (a space services spinoff from Euphoric State University) to investigate if it is possible to send their next planetary lander to Mars. During the exploration phase, Wolfman and Dracula want to be able to work on the plans at the same time, but they have run into problems doing this in the past. If they take turns, each one will spend a lot of time waiting for the other to finish, but if they work on their own copies and email changes back and forth things will be lost, overwritten, or duplicated. A colleague suggests using version control to manage their work. Their exploration notes are in the ADACS planets repo.
For the next step we will add you as collaborators to the ADACS planets repo. The goal is that you, as collaborator, add changes into this repo to get familiar with the commands and to learn about potential conflicts.
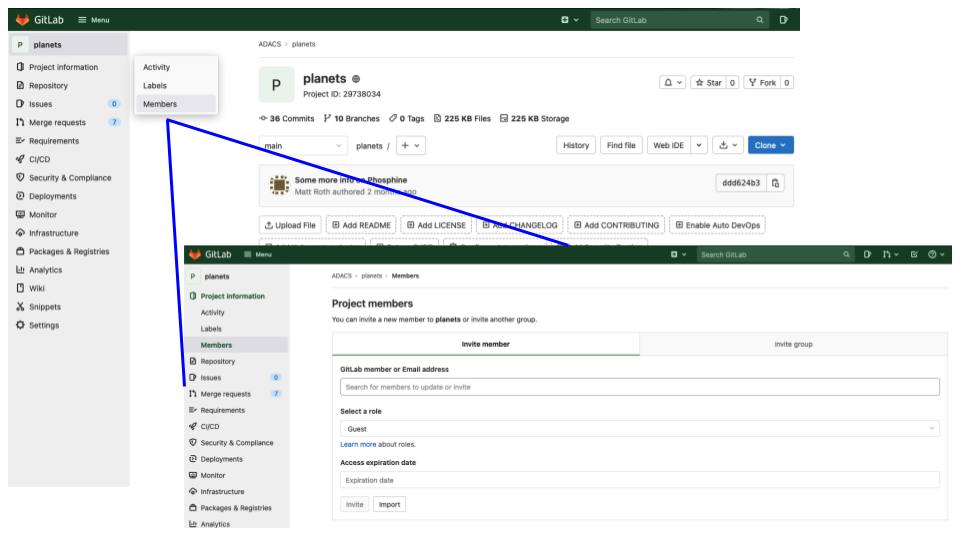
The Owner of a repository needs to give the Collaborator access. On GitLab this is done by clicking on Project information in the left hand menu and selecting Members. At the top of the Project members page is a form to invite new members (using their username or email), the form also allows for selection of the role (and associated privileges) as well as an expiration date for the membership.
Next, you will need to download a copy of the repository to your machine. This is called “cloning a repo”:
$ git clone https://gitlab.com/adacs/planets ~/Desktop/planets
If you choose to clone without the clone path
(~/Desktop/planets) specified at the end,
you will clone the repo into whichever folder you are currently in, so make sure you are not already in a git repository!
You, the Collaborator can now make a changes in your clone of the repository, exactly the same way as you would in a repository you set up yourself:
Try it out
Chose a file in the local version of the planets repo and go through the version control process, i.e., edit the file, add the changes and commit them. Now add the extra step of pushing your changes to the remote repository using
git push origin mainNote, that we didn’t have to create a remote called
origin: Git uses this name by default when we clone a repository. Take a look at the planets repository on GitLab again, and you should be able to see any new commit made by a collaborator. You may need to refresh your browser to see the new commit. To download and add changes made by other contributors rungit pull origin mainNow the repositories (Owner’s local, Collaboratorss local, and Owner’s on GitLab) are back in sync.
Some more about remotes
In this episode our local repository has had a single “remote”, called
origin. A remote is a copy of the repository that is hosted somewhere else, that we can push to and pull from, and there’s no reason that you have to work with only one. For example, on some large projects you might have your own copy in your own GitLab account (you’d probably call thisorigin) and also the main “upstream” project repository (let’s call thisupstreamfor the sake of examples). You would pull fromupstreamfrom time to time to get the latest updates that other people have committed.Remember that the name you give to a remote only exists locally. It’s an alias that you choose - whether
origin, orupstream, orfred- and not something intrinstic to the remote repository.The
git remotefamily of commands is used to set up and alter the remotes associated with a repository. Here are some of the most useful ones:
git remote -vlists all the remotes that are configured (we already used this in the last episode)git remote add [name] [url]is used to add a new remotegit remote remove [name]removes a remote. Note that it doesn’t affect the remote repository at all - it just removes the link to it from the local repo.git remote set-url [name] [newurl]changes the URL that is associated with the remote. This is useful if it has moved, e.g. to a different GitLab account, or from GitLab to a different hosting service. Or, if we made a typo when adding it!git remote rename [oldname] [newname]changes the local alias by which a remote is known - its name. For example, one could use this to changeupstreamtofred.
A Basic Collaborative Workflow
In practice, it is good to be sure that you have an updated version of the repository you are collaborating on, so you should
git pullbefore making changes. The basic collaborative workflow would be:
- update your local repo with
git pull origin main,- make your changes and stage them with
git add,- commit your changes with
git commit -m, and- upload the changes to GitLab with
git push origin mainIt is better to make many commits with smaller changes rather than of one commit with massive changes: small commits are easier to read and review.
Conflicts
As soon as people can work in parallel, they’ll likely step on each other’s toes. This will even happen with a single person: if we are working on a piece of software on both our laptop and a server in the lab, we could make different changes to each copy. Version control helps us manage these conflicts by giving us tools to resolve overlapping changes.
To see how we can resolve conflicts, we must first create one. At the beginning of the lesson,
the file mars.txt looked like this:
$ cat mars.txt
Cold and dry, but everything is my favourite colour.
The two moons may be a problem for Wolfman.
But the mummy will appreaciate the lack of humidity.
We will have to manufacture our own oxygen.

When we colonise, we really should make a chocolate factory a priority.

Phoebe and Deimos are taunting me.


Has the most massive storms.

First colonised by Matt Damon in the mid-2010s.

I hope one day to find some friends. It's been so lonely since my last friends left.

History:
First colonised by Matthew Damon in the mid-2010s.

MARS UNSUITABLE FOR WOLFMAN!!! ABORT
Let’s add a line to the owner’s copy only:
$ nano mars.txt
$ cat mars.txt
Cold and dry, but everything is my favourite colour.
The two moons may be a problem for Wolfman.
But the mummy will appreaciate the lack of humidity.
We will have to manufacture our own oxygen.

When we colonise, we really should make a chocolate factory a priority.

Phoebe and Deimos are taunting me.


Has the most massive storms.

First colonised by Matt Damon in the mid-2010s.

I hope one day to find some friends. It's been so lonely since my last friends left.

History:
First colonised by Matthew Damon in the mid-2010s.

MARS UNSUITABLE FOR WOLFMAN!!! ABORT

This line is added to Rebecca's copy
and then push the change to GitLab:
$ git add mars.txt
$ git commit -m "Add a line in to Rebecca's copy"
$ git push origin main
[main 7f4c257] Add a line in to Rebecca's copy
 1 file changed, 2 insertions(+)


 Enumerating objects: 5, done.
Counting objects: 100% (5/5), done.
Delta compression using up to 8 threads
Compressing objects: 100% (3/3), done.
Writing objects: 100% (3/3), 340 bytes | 340.00 KiB/s, done.
Total 3 (delta 2), reused 0 (delta 0), pack-reused 0
To gitlab.com:adacs/planets.git
   ccbeb02..7f4c257  main -> main
Now let’s have Paul make a different change to their copy without updating from GitLab:
$ nano mars.txt
$ cat mars.txt
Cold and dry, but everything is my favourite colour.
The two moons may be a problem for Wolfman.
But the mummy will appreaciate the lack of humidity.
We will have to manufacture our own oxygen.

When we colonise, we really should make a chocolate factory a priority.

Phoebe and Deimos are taunting me.


Has the most massive storms.

First colonised by Matt Damon in the mid-2010s.

I hope one day to find some friends. It's been so lonely since my last friends left.

History:
First colonised by Matthew Damon in the mid-2010s.

MARS UNSUITABLE FOR WOLFMAN!!! ABORT

We added a different line in the other copy
We can commit the change locally:
$ git add mars.txt
$ git commit -m "Add a line in Paul's copy"
but Git won’t let us push it to GitLab:
$ git push origin main
To gitlab.com:adacs/planets.git
 ! [rejected]        main -> main (fetch first)
error: failed to push some refs to 'git@gitlab.com:adacs/planets.git'
hint: Updates were rejected because the remote contains work that you do
hint: not have locally. This is usually caused by another repository pushing
hint: to the same ref. You may want to first integrate the remote changes
hint: (e.g., 'git pull ...') before pushing again.
hint: See the 'Note about fast-forwards' in 'git push --help' for details.

Git rejects the push because it detects that the remote repository has new updates that have not been incorporated into the local branch. What we have to do is pull the changes from GitLab, merge them into the copy we’re currently working in, and then push that. Let’s start by pulling:
$ git pull origin main
...
remote: Enumerating objects: 3, done.
remote: Counting objects: 100% (3/3), done.
remote: Compressing objects: 100% (3/3), done.
remote: Total 3 (delta 0), reused 0 (delta 0), pack-reused 0
Unpacking objects: 100% (3/3), 1.05 KiB | 1.05 MiB/s, done.
From gitlab.com:adacs/planets
 * branch            main       -> FETCH_HEAD
   ccbeb02..7f4c257  main       -> origin/main
Auto-merging mars.txt
CONFLICT (content): Merge conflict in mars.txt
Automatic merge failed; fix conflicts and then commit the result.
The git pull command updates the local repository to include those
changes already included in the remote repository.
After the changes from the remote branch have been fetched, Git detects that changes made to the local copy
overlap with those made to the remote repository, and therefore refuses to merge the two versions to
stop us from trampling on our previous work. The conflict is marked in
in the affected file:
$ cat mars.txt
Cold and dry, but everything is my favourite colour.
The two moons may be a problem for Wolfman.
But the mummy will appreaciate the lack of humidity.
We will have to manufacture our own oxygen.

When we colonise, we really should make a chocolate factory a priority.

Phoebe and Deimos are taunting me.


Has the most massive storms.

First colonised by Matt Damon in the mid-2010s.

I hope one day to find some friends. It's been so lonely since my last friends left.

History:
First colonised by Matthew Damon in the mid-2010s.

MARS UNSUITABLE FOR WOLFMAN!!! ABORT

<<<<<<< HEAD
We added a different line in the other copy
=======
This line is added to Rebecca's copy
>>>>>>> 7f4c25737460c1015c9045909c88aeeb190614e4
Our change is preceded by <<<<<<< HEAD.
Git has then inserted ======= as a separator between the conflicting changes
and marked the end of the content downloaded from GitLab with >>>>>>>.
(The string of letters and digits after that marker
identifies the commit we’ve just downloaded.)
It is now up to us to edit this file to remove these markers and reconcile the changes. We can do anything we want: keep the change made in the local repository, keep the change made in the remote repository, write something new to replace both, or get rid of the change entirely. Let’s replace both so that the file looks like this:
$ cat mars.txt
Cold and dry, but everything is my favourite colour.
The two moons may be a problem for Wolfman.
But the mummy will appreaciate the lack of humidity.
We will have to manufacture our own oxygen.

When we colonise, we really should make a chocolate factory a priority.

Phoebe and Deimos are taunting me.


Has the most massive storms.

First colonised by Matt Damon in the mid-2010s.

I hope one day to find some friends. It's been so lonely since my last friends left.

History:
First colonised by Matthew Damon in the mid-2010s.

MARS UNSUITABLE FOR WOLFMAN!!! ABORT

We removed the conflict on this line
To finish merging,
we add mars.txt to the changes being made by the merge and then commit:
$ git add mars.txt
$ git status
On branch main
All conflicts fixed but you are still merging.
  (use "git commit" to conclude merge)

Changes to be committed:

	modified:   mars.txt
$ git commit
[main 68f21e8] Merge branch 'main' of gitlab.com:adacs/planets into main
Now we can push our changes to GitLab:
$ git push origin main
Enumerating objects: 10, done.
Counting objects: 100% (10/10), done.
Delta compression using up to 8 threads
Compressing objects: 100% (6/6), done.
Writing objects: 100% (6/6), 683 bytes | 683.00 KiB/s, done.
Total 6 (delta 4), reused 0 (delta 0)
To gitlab.com:adacs/planets.git
   7f4c257..68f21e8  main -> main
Git keeps track of what we’ve merged with what, so we don’t have to fix things by hand again. When Rebecca, who made the first change, pulls again, she doesn’t need to merge again because Git knows Paul has already done that.
Git’s ability to resolve conflicts is very useful, but conflict resolution costs time and effort, and can introduce errors if conflicts are not resolved correctly.
Conflicts on Non-textual files
What does Git do when there is a conflict in an image or some other non-textual file that is stored in version control?
Solution
Let’s try it. Suppose Dracula takes a picture of Martian surface and calls it
mars.jpg.If you do not have an image file of Mars available, you can create a dummy binary file like this:
$ head -c 1024 /dev/urandom > mars.jpg
$ ls -lh mars.jpg
-rw-r--r-- 1 vlad 57095 1.0K Mar 8 20:24 mars.jpg
lsshows us that this created a 1-kilobyte file. It is full of random bytes read from the special file,/dev/urandom.Now, suppose Dracula adds
mars.jpgto his repository:$ git add mars.jpg $ git commit -m "Add picture of Martian surface"[main 8e4115c] Add picture of Martian surface 1 file changed, 0 insertions(+), 0 deletions(-) create mode 100644 mars.jpgSuppose that Wolfman has added a similar picture in the meantime. His is a picture of the Martian sky, but it is also called
mars.jpg. When Dracula tries to push, he gets a familiar message:$ git push origin mainTo https://github.com/vlad/planets.git ! [rejected] main -> main (fetch first) error: failed to push some refs to 'https://github.com/vlad/planets.git' hint: Updates were rejected because the remote contains work that you do hint: not have locally. This is usually caused by another repository pushing hint: to the same ref. You may want to first integrate the remote changes hint: (e.g., 'git pull ...') before pushing again. hint: See the 'Note about fast-forwards' in 'git push --help' for details.We’ve learned that we must pull first and resolve any conflicts:
$ git pull origin mainWhen there is a conflict on an image or other binary file, git prints a message like this:
$ git pull origin main
remote: Counting objects: 3, done.
remote: Compressing objects: 100% (3/3), done.
remote: Total 3 (delta 0), reused 0 (delta 0)
Unpacking objects: 100% (3/3), done.
From https://github.com/vlad/planets.git
 * branch            main     -> FETCH_HEAD
   6a67967..439dc8c  main     -> origin/main
warning: Cannot merge binary files: mars.jpg (HEAD vs. 439dc8c08869c342438f6dc4a2b615b05b93c76e)
Auto-merging mars.jpg
CONFLICT (add/add): Merge conflict in mars.jpg
Automatic merge failed; fix conflicts and then commit the result.
The conflict message here is mostly the same as it was for
mars.txt, but there is one key additional line:warning: Cannot merge binary files: mars.jpg (HEAD vs. 439dc8c08869c342438f6dc4a2b615b05b93c76e)Git cannot automatically insert conflict markers into an image as it does for text files. So, instead of editing the image file, we must check out the version we want to keep. Then we can add and commit this version.
On the key line above, Git has conveniently given us commit identifiers for the two versions of
mars.jpg. Our version isHEAD, and Wolfman’s version is439dc8c0.... If we want to use our version, we can usegit checkout:$ git checkout HEAD mars.jpg $ git add mars.jpg $ git commit -m "Use image of surface instead of sky"[main 21032c3] Use image of surface instead of skyIf instead we want to use Wolfman’s version, we can use
git checkoutwith Wolfman’s commit identifier,439dc8c0:$ git checkout 439dc8c0 mars.jpg $ git add mars.jpg $ git commit -m "Use image of sky instead of surface"[main da21b34] Use image of sky instead of surfaceWe can also keep both images. The catch is that we cannot keep them under the same name. But, we can check out each version in succession and rename it, then add the renamed versions. First, check out each image and rename it:
$ git checkout HEAD mars.jpg
$ git mv mars.jpg mars-surface.jpg
$ git checkout 439dc8c0 mars.jpg
$ mv mars.jpg mars-sky.jpg
Then, remove the old
mars.jpgand add the two new files:$ git rm mars.jpg $ git add mars-surface.jpg $ git add mars-sky.jpg $ git commit -m "Use two images: surface and sky"[main 94ae08c] Use two images: surface and sky 2 files changed, 0 insertions(+), 0 deletions(-) create mode 100644 mars-sky.jpg rename mars.jpg => mars-surface.jpg (100%)Now both images of Mars are checked into the repository, and
mars.jpgno longer exists.
Reducing Conflicts
If you find yourself resolving a lot of conflicts in a project, consider these technical approaches to reducing them:
- Pull from upstream more frequently, especially before starting new work
- Use topic branches to segregate work, merging to main when complete
- Make smaller more atomic commits
- Where logically appropriate, break large files into smaller ones so that it is less likely that two authors will alter the same file simultaneously
Conflicts can also be minimized with project management strategies:
- Clarify who is responsible for what areas with your collaborators
- Discuss what order tasks should be carried out in with your collaborators so that tasks expected to change the same lines won’t be worked on simultaneously
- If the conflicts are stylistic churn (e.g. tabs vs. spaces), establish a project convention that is governing and use code style tools (e.g.
htmltidy,perltidy,rubocop, etc.) to enforce, if necessary
Branching
Git can store multiple concurrent sets of the changes made to the files and directories in a git repo. Each of these parallel instances is called a branch and main (or master) is Git’s default working branch.
A new branch can be created from any commit and will have a divergent history starting from this commit. Branches can also be merged together.
Why are branches useful?
Developing software we want to try out some new ideas,
but we’re not sure yet whether they’ll work or if we’ll keep them.
While this development work is going on we want to make sure that our working version of the software is unaffected.
To do this we can create a branch, e.g. ‘feature1’, and keep our main branch clean.
When we’re done developing the feature and we are sure that we want to include it
in our program, we can merge the feature branch with the main branch.
This keeps all the work-in-progress separate from the main branch, which
contains tested, working code.
When we merge our feature branch with main, git creates a new commit which
contains merged files from main and feature1.
After the merge we can continue developing (and making commits) in feature1 as well.
The merged branch is not deleted.
Branching workflows
One popular model is the Gitflow model:

- A
mainbranch, representing a released version of the code - A release branch, representing the beginnings of the next release - a branch where the code is still undergoing testing
- Various feature and/or developer-specific branches representing work-in-progress, new features, bug fixes etc
There are different possible workflows when using Git for code development. If you want to learn more about different workflows with Git, have a look at this discussion on the Atlassian website.
Branching in practice
$ git branch [branch-name]         create a branch with name [branch-name]

$ git checkout [branch-name]       switch onto branch with name [branch-name]
$ git switch [branch name]

$ git checkout -b [branch-name]    create and switch onto a branch [branch-name] in one step

$ git push <remote> <branch-name>  push changes in [branch-name] to the remote [remote]
Continuing with our planets repo, we want to add information on Dune but we are not sure whether we can collate enough information to justify adding it as a possible base to explore for Wolfman, Dracula and their colleagues.
To start, Rebecca creates a new branch called dune:
$ git checkout -b dune
Switched to a new branch 'dune'
She then creates a sub-folder and adds an overview document (Readme file) to assign a planet to each participant to explore, before adding, committing and pushing the changes:
$ mkdir Dune
$ touch Dune/Readme.md
$ nano Dune/Readme.md
$ git add Dune/README.md
$ git commit -m "add Dune planet assignment readme"
 1 file changed, 7 insertions(+)
 create mode 100644 Dune/README.md
$ git push origin dune
Enumerating objects: 5, done.
Counting objects: 100% (5/5), done.
Delta compression using up to 8 threads
Compressing objects: 100% (3/3), done.
Writing objects: 100% (4/4), 485 bytes | 485.00 KiB/s, done.
Total 4 (delta 1), reused 0 (delta 0), pack-reused 0
remote:
remote: To create a merge request for dune, visit:
remote:   https://gitlab.com/adacs/planets/-/merge_requests/new?merge_request%5Bsource_branch%5D=dune
remote:
To gitlab.com:adacs/planets.git
 * [new branch]      dune -> dune
Your turn:
Pull the changes from the remote repository and switch onto the new branch. You can check all branches with
git branch -a.Check which planet you have been assigned and create a new branch diverging from
dunefollowing the naming convention dune_[yourname]Create a document for your planet (in the Dune folder) and add a few lines. Add, commit and push your changes.
Do not merge any changes yet!
GitLab - pushing a new branch
When you push your new branch to GitLab it will automatically show you an option to create a merge request on the repo page. We will dismiss this option for now.

Consolidating Changes
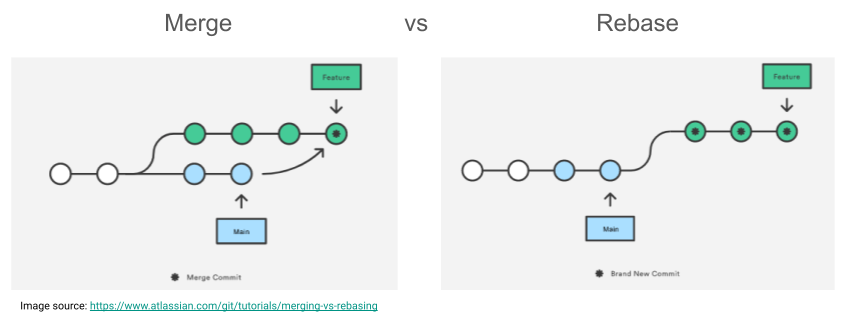
Merging vs Rebasing
In essence, both git merge and git rebase achieve the same thing, that is integrating changes from one branch into another branch.
However, how this is done differs:
-
git mergecreates a new commmit that integrates the changes from branch a (e.g.main) into branch b (e.g.feature). The existing branches are not changed in any way. -
git rebasemoves the entire branch b (iefeature) to the tip of branch a (iemain), effectively incorporating all changes from branch a and leaving you with a linear history. Rebasing rewrites your project history!
The image below visualises the difference between git merge and git rebase.
We will look at using both, but to read a good comparison visit the Atlassian Merging vs. Rebasing page.
Rebase
With GitLab you can:
- rebase from the command line, automatically or interactively, or
- rebase from the UI

Remember: Rebasing rewrites your history
You should not rebase a shared branch as this can lead to complex merge issues.
Worked Example
The example below shows a rebase of the dune branch that happened after Rebecca and Paul solved their merge conflicts on the main branch. Before continuing to edit files on branch dune Rebecca wanted to include the changes from main without creating a merge commit, to do this she followed these steps:
- Fetch the latest changes from
main - Checkout the feature branch
dune - Rebase against
main - Force push your changes. Be careful with this! Check the gitlab documentation.
Before you rebase it is a good idea to back up your branch so you don’t lose any changes.
git checkout -b dune-backup
Switched to a new branch 'dune-backup'
git checkout dune
Switched to branch 'dune'
git fetch origin main
remote: Enumerating objects: 10, done.
remote: Counting objects: 100% (10/10), done.
remote: Compressing objects: 100% (6/6), done.
remote: Total 6 (delta 4), reused 0 (delta 0), pack-reused 0
Unpacking objects: 100% (6/6), 663 bytes | 60.00 KiB/s, done.
From gitlab.com:adacs/planets
 * branch            main       -> FETCH_HEAD
   7f4c257..68f21e8  main       -> origin/main
git checkout dune
Switched to branch 'dune'
git rebase origin/main
Successfully rebased and updated refs/heads/dune.
git push --force-with-lease origin dune
Enumerating objects: 5, done.
Counting objects: 100% (5/5), done.
Delta compression using up to 8 threads
Compressing objects: 100% (3/3), done.
Writing objects: 100% (4/4), 492 bytes | 492.00 KiB/s, done.
Total 4 (delta 1), reused 0 (delta 0), pack-reused 0
remote:
remote: To create a merge request for dune, visit:
remote:   https://gitlab.com/adacs/planets/-/merge_requests/new?merge_request%5Bsource_branch%5D=dune
remote:
To gitlab.com:adacs/planets.git
 + 481e544...c1f0a83 dune -> dune (forced update)
After this rebase our branch graph has changed, instead of the dune branch diverging from the “Merge branch ‘tidy-files’ into ‘main’” it now diverges from the conflict resolution commit done by Paul.

Recover your changes
If you need to recover your changes you can reset
duneagainstdune-backup:git checkout dune git reset --hard dune-backupNote, if you have added changes to
dunesince creating the back-up branch those changes will be lost doing the hard reset.
Rebase from the GitLab UI
You can rebase your feature branch directly from the merge request through a quick action, if all of these conditions are met:
- No merge conflicts exist for your feature branch.
- You have the Developer role for the source project. This role grants you permission to push to the source branch for the source project.
- If the merge request is in a fork, the fork must allow commits from members of the upstream project.
To rebase from the UI:
- Go to your merge request.
- Type /rebase in a comment.
- Select Comment.
GitLab schedules a rebase of the feature branch against the default branch and executes it as soon as possible.
Interactive Rebase
git rebase -i will open an interactive rebasing session. This provides an opportunity to edit, delete, combine, and reorder individual commits as they are moved onto the new base commit. This can be useful for cleaning up the history before sharing it with others.
Worked Example
Rebecca rebased the dune branch onto origin/main after her and Paul’s merge conflict was resolved on the main branch (see worked example above).
She also realised that there was a typo in her original commit to the dune branch which she corrected with git comit --amend. However, as this commit had already been pushed to GitLab this led to a further merge conflict with origin/dune. After working on adding instructions to the README file and fixing some typos the recent history of the dune branch has become a little convoluted. Rebecca is now trying to rewrite this recent history using an interactive rebase.
git log --oneline
6c45347 (HEAD -> dune) fix another typo
27c6f7f fix typo
b94e389 add instructions to readme
54130ab (origin/dune) Merge branch 'dune' of gitlab.com:adacs/planets into dune
d636801 add Dune planet assignment readme
8996bc5 add Dune planet assignemtn readme
68f21e8 (origin/main, main) Merge branch 'main' of gitlab.com:adacs/planets into main
e6c7a83 Add a line in Paul's copy
7f4c257 Add a line in to Rebecca's copy
ccbeb02 Update .gitignore
2928bc6 Update README.md
48ba03b Merge branch 'tidy-files' into 'main'
To use git rebase to rewrite our recent history we use a specific commit ID (or number relative to HEAD) as our base:
git rebase -i HEAD~5
This will open the interactive rebase file in your default editor:
pick d636801 add Dune planet assignment readme
pick 8996bc5 add Dune planet assignemtn readme
pick b94e389 add instructions to readme
pick 27c6f7f fix typo
pick 6c45347 fix another typo

# Rebase 68f21e8..6c45347 onto 68f21e8 (5 commands)
#
# Commands:
# p, pick <commit> = use commit
# r, reword <commit> = use commit, but edit the commit message
# e, edit <commit> = use commit, but stop for amending
# s, squash <commit> = use commit, but meld into previous commit
# f, fixup <commit> = like "squash", but discard this commit's log message
# x, exec <command> = run command (the rest of the line) using shell
# b, break = stop here (continue rebase later with 'git rebase --continue')
# d, drop <commit> = remove commit
# l, label <label> = label current HEAD with a name
# t, reset <label> = reset HEAD to a label
# m, merge [-C <commit> | -c <commit>] <label> [# <oneline>]
# .       create a merge commit using the original merge commit's
# .       message (or the oneline, if no original merge commit was
# .       specified). Use -c <commit> to reword the commit message.
#
# These lines can be re-ordered; they are executed from top to bottom.
#
# If you remove a line here THAT COMMIT WILL BE LOST.
#
# However, if you remove everything, the rebase will be aborted.
#
Rebecca now changes this to the following before saving the file:
p d636801 add Dune planet assignment readme
d 8996bc5 add Dune planet assignemtn readme
p b94e389 add instructions to readme
s 27c6f7f fix typo
s 6c45347 fix another typo
As she is attempting to squash the last few commits she can now chose the commit message associated with this:
# This is a combination of 3 commits.
# This is the 1st commit message:

add instructions to readme

# This is the commit message #2:

fix typo

# This is the commit message #3:

fix another typo

# Please enter the commit message for your changes. Lines starting
# with '#' will be ignored, and an empty message aborts the commit.
#
# Date:      Wed Oct 6 15:08:55 2021 +0800
#
# interactive rebase in progress; onto 68f21e8
# Last commands done (5 commands done):
#    squash 27c6f7f fix typo
#    squash 6c45347 fix another typo
# No commands remaining.
# You are currently rebasing branch 'dune' on '68f21e8'.
#
# Changes to be committed:
#       modified:   Dune/README.md
#
She decides to keep only the first commit message:
add instructions to readme
The final step is to force push these changes to origin/dune:
git push --force-with-lease origin dune
The force push here is necessary as we had created a merge commit that has now been dropped from our local history but still exists in the remote branch.
The --force-with-lease flag is a saver option of the --force flag as it does not overwrite any commits made to the remote (by e.g. your collaborator) since you started working on it locally, see this stackoverflow post.
The new history now looks like this:
16947f5 (HEAD -> dune, origin/dune) add instructions to readme
d636801 add Dune planet assignment readme
68f21e8 (origin/main, main) Merge branch 'main' of gitlab.com:adacs/planets into main
e6c7a83 Add a line in Paul's copy
7f4c257 Add a line in to Rebecca's copy
ccbeb02 Update .gitignore
2928bc6 Update README.md
48ba03b Merge branch 'tidy-files' into 'main'
Merging
In GitLab, you typically use a merge request to merge your changes, instead of using the command line.
However, if you want to use the command line you can do so as well, however, this will not create a merge request and the associated functionalities like assigning a reviewer and the option to discuss changes before they get merged.
Worked Example
Rebecca has the dune-backup branch from when she wanted to rebase the dune branch.
More work has now been done on the dune branch and Rebecca wants to merge this changes into dune-backup. Checkout this Atlassian tutorial for more detail.
Confirm the receiving branch
Execute git status to ensure that HEAD is pointing to the correct merge-receiving branch. If needed, execute git checkout to switch to the receiving branch.
git checkout dune-backup
git status
On branch dune-backup
nothing to commit, working tree clean
Fetch latest remote commits
Make sure the receiving branch dune-backup and the merging branch dune are up-to-date with the latest remote changes. In Rebecca’s case dune-backup only exists locally, however, dune is connected to the remote, so she does a git pull on dune
git fetch origin dune
From gitlab.com:adacs/planets
 * branch            dune       -> FETCH_HEAD
Merging
A merge can be initiated by executing git merge [branch-to-merge] where [branch-to-merge] is the name of the branch that will be merged into the receiving branch.
git merge dune
CONFLICT (add/add): Merge conflict in Dune/README.md
Auto-merging Dune/README.md
Automatic merge failed; fix conflicts and then commit the result.
Rebecca now checks Dune/README.md and resolves the conflicts
git status
On branch dune-backup
You have unmerged paths.
  (fix conflicts and run "git commit")
  (use "git merge --abort" to abort the merge)

Changes to be committed:
	modified:   .gitignore
	modified:   README.md
	modified:   mars.txt

Unmerged paths:
  (use "git add <file>..." to mark resolution)
	both added:      Dune/README.md
<<<<<<< HEAD
=======
Please find your name in the list below, next to it is the
planet from the Dune universe assigned to you.

1. Create a new branch (branching of `dune`) called `dune_[yourname]`
(first name is enough)
  a. First make sure you are on branch `dune`: `git switch dune`
  b. You can check the branch you are on with `git branch` it will
     show your local branches and highlight the branch you are working on
  c. Then create yout branch and switch onto it:
     `git checkout -b dune_[yourname]`
  d. Feel free to double check the branch you are on as in step b.
2. Create a text file in the Dune folder for your planet and add
some info to it.
3. Track your changes using `git add`. `git commit` and
`git push origin [your-branch]`
4. Repeat a few times: change your file and track the changes to build
up a short git history on your branch.

>>>>>>> dune
Julian Carlin               - Arrakis
Kariuki Chege               - Caladan
Liam Dunn                   - Giedi Prime
Yi Shuen (Christine) Lee    - Kaitain
Hannah Middleton            - Ix
Lucy Strang                 - Poritrin
Andrés Vargas               - Salusa Secundus
Rebecca cleans up the README file and then runs git add and git commit to finalise the merge
git add Dune/README.md
git commit
[dune-backup c2a376f] Merge branch 'dune' into dune-backup
Merge Requests
There are several ways you can submit a merge request:
- Go to the Merge Request (MR) tab of you repo, e.g. planets repo merge request
- When you push changes of your branch to GitLab, the output message includes a link to create a MR, see below
- If you have an issue you are trying to fix you can create a MR from the issue (this will create a new branch for you)
- to reference an existing issues in an MR you can add a comment in the MR description
Fixes #[issue-number](GitLab should help with auto-completion)
Using Milestones, Issues and Epics can help you manage your project, more on that in the next lesson.
 ...
 remote: To create a merge request for docs-new-merge-request, visit:
 remote:   https://gitlab.example.com/my-group/my-project/merge_requests/new?merge_request%5Bsource_branch%5D=my-new-branch
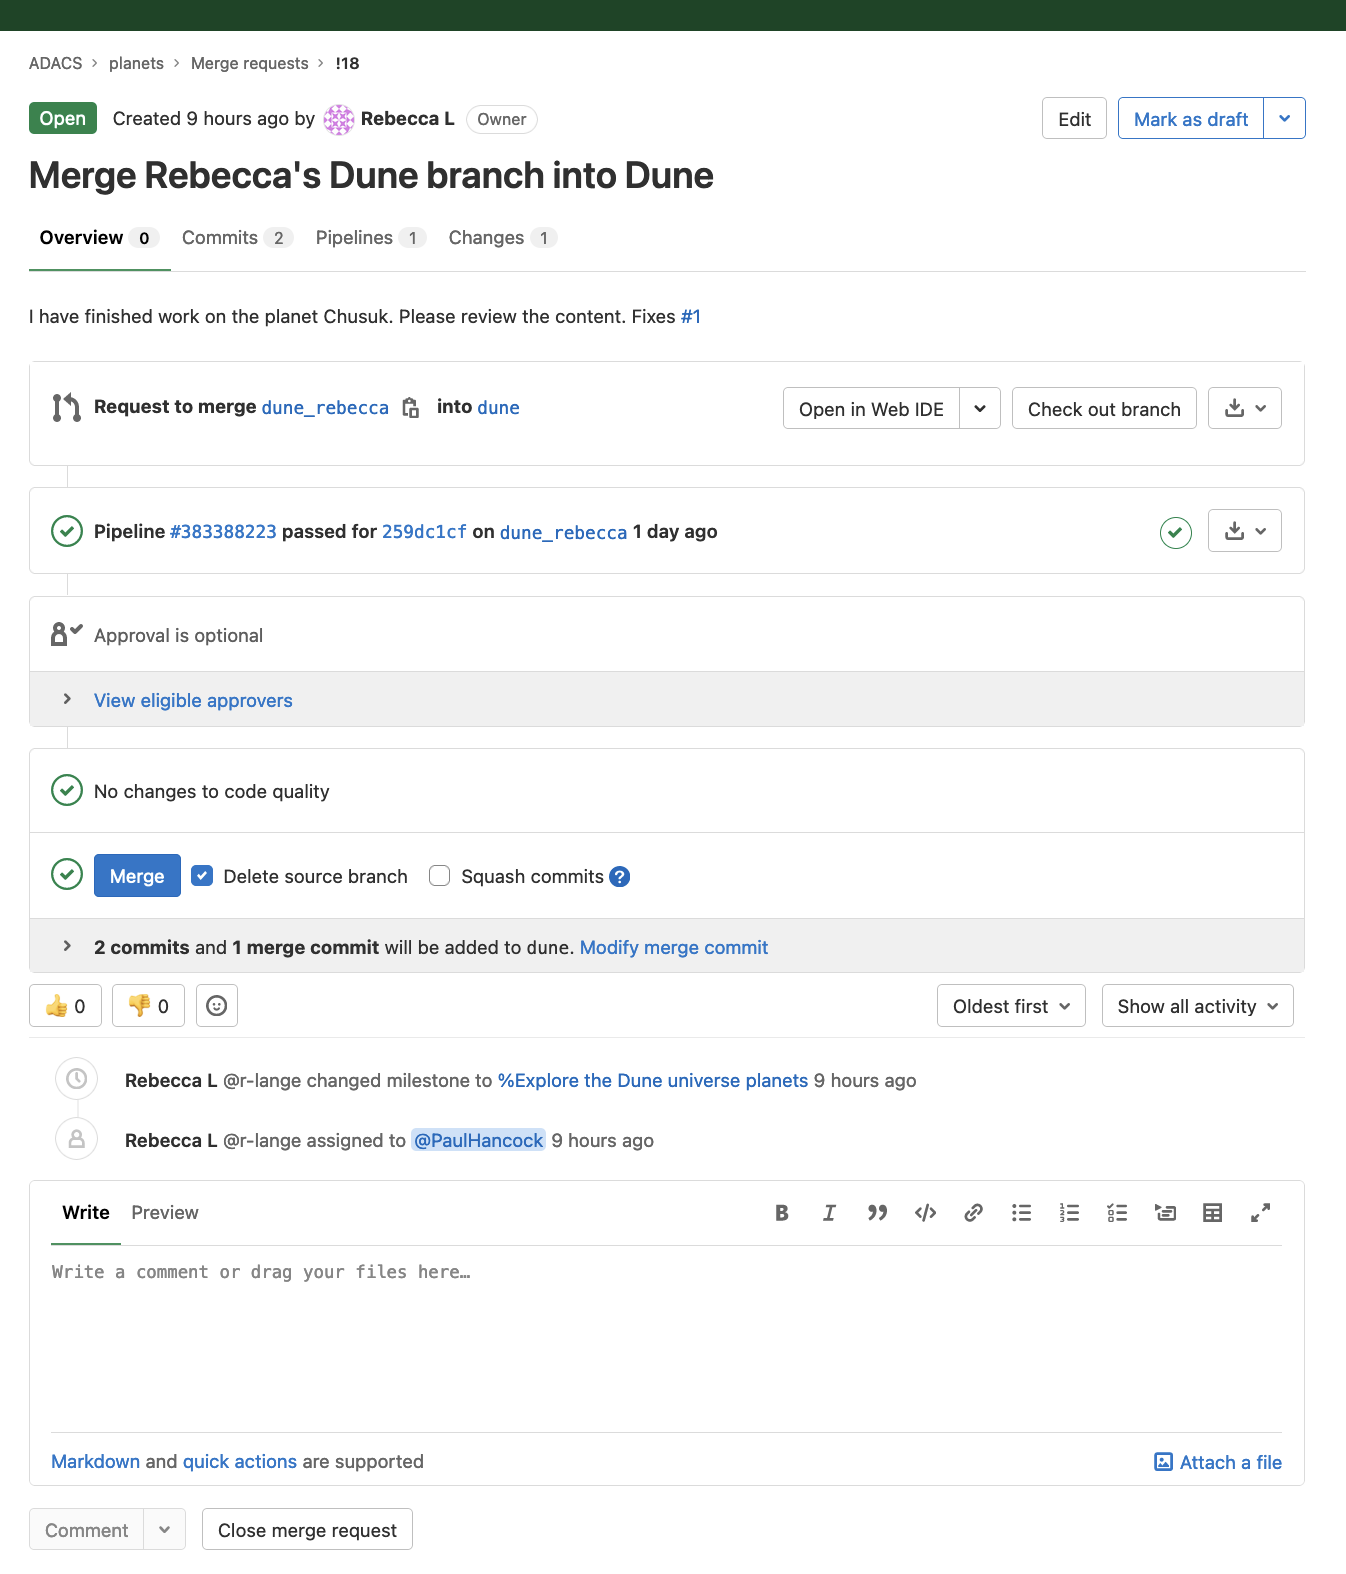
Let’s work through some rebasing and merging of your branches
- Use an interactive rebase to clean up the git history of your branch
dune_[yourname]- Create a merge request for your branch into
duneSolution
Use
git rebase -i HEAD~[n]to start your interactive rebase, where HEAD~[n] specifies the commit you want to use as your base, i.e. [n] commits into the past. Pick, squash, edit, … your commits, resolve any squash comment or other issues and then (force) push your branch to origin/dune_[yourname]a. When you pushed your above changes to the remote repository the output should have included a link to create a merge request:
...
remote: To create a merge request for docs-new-merge-request, visit:
remote:   https://gitlab.example.com/my-group/my-project/merge_requests/new?merge_request%5Bsource_branch%5D=my-new-branch
Copy the link and open it in your browser. Make sure you check which branch you are merging into! We want to merge
dune_[yourname]intodune, click the Change branches link if this is not the case.b. After you pushed your changes you can create a new merge request from the GitLab repository UI. As in a), make sure you set up the merge request to merge
dune_[yourname]intodune.
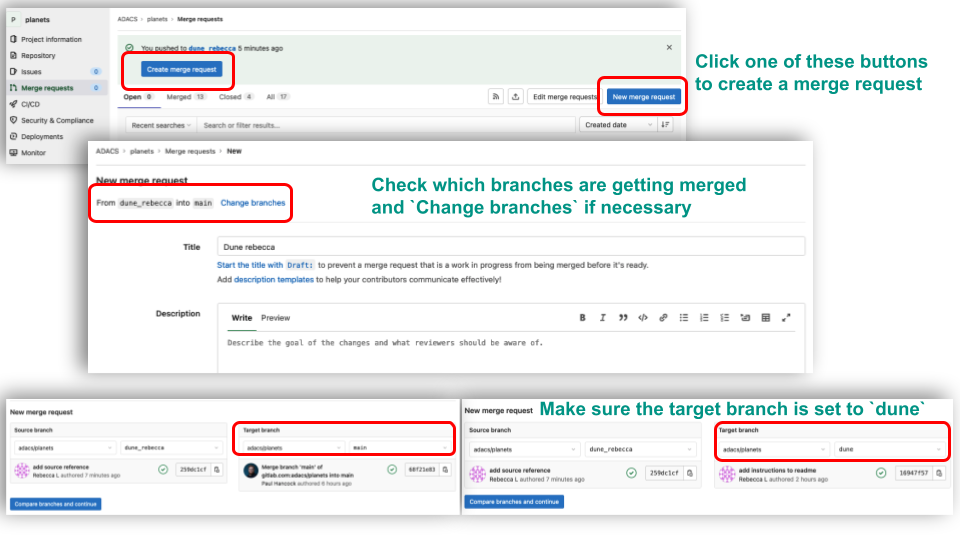
Summary
- A branch is a divergent history from the
mainbranch starting at a specific commit- You can think of them as pointers to a specific commit
- You should develop new code on a branch so that your
mainalways remains in working order- branch early, and branch often
- there is no storage / memory overhead with making many branches, it’s easier to logically divide up your work than have big beefy branches which are more likely to cause merge conflicts.
- Merging creates a new commit that integrates the changes and existing branches are not changed.
- Rebasing moves your changes to the tip of the existing branch and will re-write history to give you a linear workflow. You should not do it in shared branches!
CI/CD in GitLab
In this weeks lesson we will introduce what automations are possible for continuous integration/development/deployment/delivery within GitLab. In next week’s lesson we will look at a worked example based on the ‘example codes’ repo.
Continuous Integration is the practice of integrating code into a shared repository and building/testing each change automatically, as early as possible - usually several times a day.
- Detects errors as quickly as possible
- Fix while fresh in your mind
- Reduces integration problems
- Smaller problems are easier to digest
- Don’t compound problems
- Allows teams to develop faster, with more confidence
Continuous Delivery adds that the software can be released to production at any time, often by automatically pushing changes to a staging system.
- Ensures that every change to the system is releasable
- Lowers risk of each release - makes releases “boring”
- Delivers value more frequently
- Get fast feedback on what users care about
Continuous Deployment goes further and pushes changes to production automatically.
GitLab CI/CD features
Multi-platform: you can execute builds on Unix, Windows, OSX, and any other platform that supports Go.
Multi-language: build scripts are command line driven and work with Java, PHP, Ruby, C, and any other language.
Parallel builds: GitLab CI splits builds over multiple machines, for fast execution.
Autoscaling: you can automatically spin up and down VM’s or Kubernetes pods to make sure your builds get processed immediately while minimizing costs.
Realtime logging: a link in the merge request takes you to the current build log that updates dynamically.
Versioned tests: a .gitlab-ci.yml file that contains your tests, allowing developers to contribute changes and ensuring every branch gets the tests it needs.
Pipeline: define multiple jobs per stage and even trigger other pipelines.
Build artifacts: upload binaries and other build artifacts to GitLab and browse and download them.
Test locally: reproduce tests locally using gitlab-runner exec.
Docker support and container registry: use custom Docker images, run on Kubernetes, built-in container registry to store, share, and use container images.
GitLab for Education and GitLab for Open Source provide qualifying projects the top GitLab tier, plus 50,000 CI minutes per month.
The .gitlab-ci.yml file all tiers
To use GitLab CI/CD, you need:
- Application code hosted in a Git repository.
- A file called
.gitlab-ci.ymlin the root of your repository, which contains the CI/CD configuration.
In the .gitlab-ci.yml file, you can define:
- The scripts you want to run.
- Other configuration files and templates you want to include.
- Dependencies and caches.
- The commands you want to run in sequence and those you want to run in parallel.
- The location to deploy your application to.
- Whether you want to run the scripts automatically or trigger any of them manually.
GitLab detects the .gitlab-ci.yml in your repo and an application called GitLab Runner runs the scripts defined in the jobs every time changes are pushed to any branch in the project.
Organise your scripts and jobs into stages that follow a sequence appropriate for your repo. Imagine the scripts you add to jobs are the same as shell commands you run on your computer.
Use the pipeline editor to edit your .gitlab-ci.yml configuration file. The editor will validate your file against the schema, there is also a lint tool to test the validity of your changes before committing them.
The editor also lets you visualise your pipeline, which is useful to check workflows and dependencies for more complex configurations.
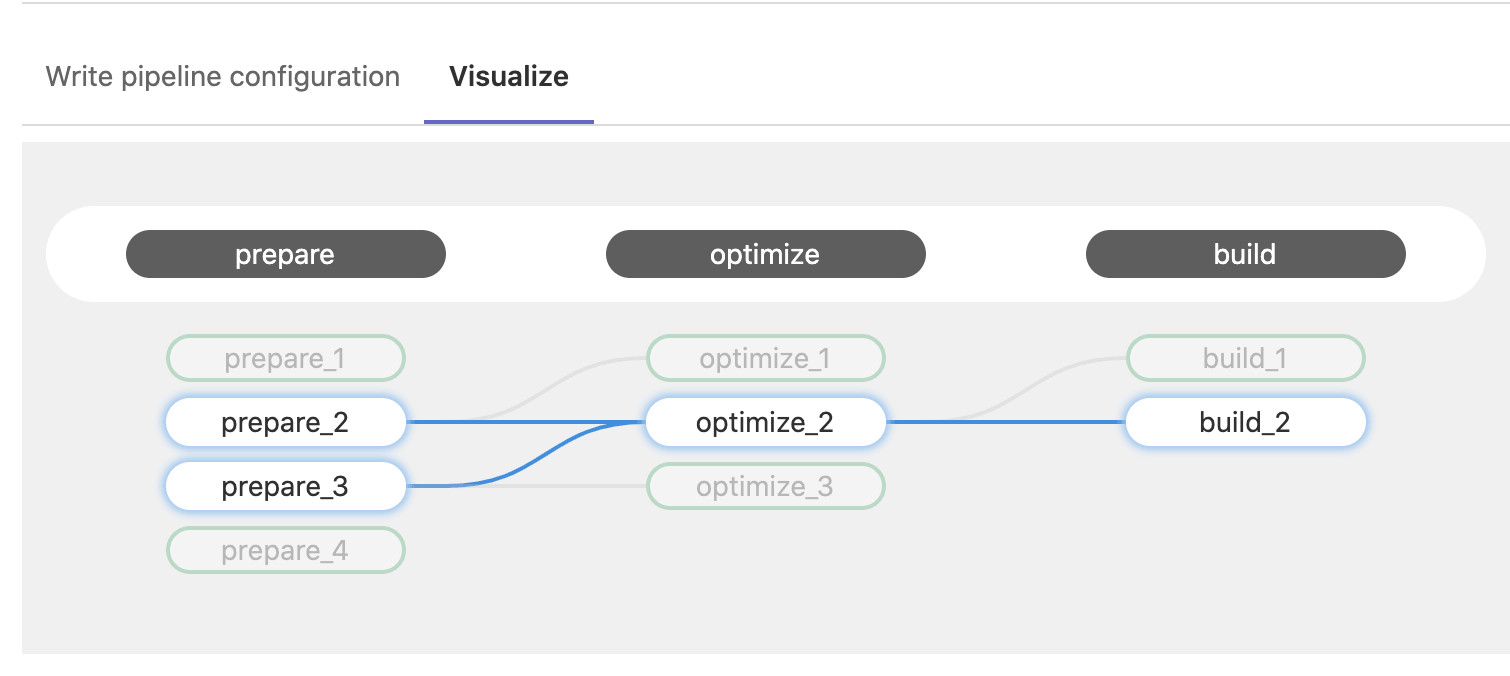 GitLab also maintains a repository of CI/CD templates.
Example
stages:
  - build
  - test
  - deploy

build-job:
  stage: build
  script:
    - echo "Hello, $GITLAB_USER_LOGIN!"

test-job1:
  stage: test
  script:
    - echo "This job tests something"

test-job2:
  stage: test
  script:
    - echo "This job tests something, but takes more time than test-job1."
    - echo "After the echo commands complete, it runs the sleep command for 20 seconds"
    - echo "which simulates a test that runs 20 seconds longer than test-job1"
    - sleep 20

deploy-prod:
  stage: deploy
  script:
    - echo "This job deploys something from the $CI_COMMIT_BRANCH branch."
The example consists of various scripts run in four jobs which are grouped into three stages.
The build-job job in the build stage runs first, on successful completion the two test-jobs in the test stage are run in parallel, followed by the deploy-prod job in the deploy stage.
Let’s have a look at this script implemented in the Planets repo.
Acknowledgements
This lesson is based on and adapted from:
- The Software Carpentries lesson on Version Control, specifically episodes 8 and 9
- Gerard Capes SWC-style lessons on git, specifically the episode on branching
- The gitlab ci/cd page
- GitLab’s CI Community Day 2020 materials
- GitLab Why CI/CD presentation
Key Points
start a new branch for each new feature development
use a GitLab CI/CD template or create your own to keep track of development status/goals
submit pull request from a feature branch and run CI to test all is working.
Automation and Collaboration
Overview
Teaching: 90 min
Exercises: 30 minQuestions
How do I automate documentation?
How do I use GitLab CI tools?
How can I work collaboratively?
Objectives
Build your codebase and documentation.
Create a CI workflow on GitLab.
Consider collaborative code review.
Consider how to share the load, e.g. run agile dev?
Questions from previous modules
- What is a virtual environment and how do I set one up?
Virtual environments
From the python documentation:
Python applications will often use packages and modules that don’t come as part of the standard library. Applications will sometimes need a specific version of a library, because the application may require that a particular bug has been fixed or the application may be written using an obsolete version of the library’s interface.
This means it may not be possible for one Python installation to meet the requirements of every application. If application A needs version 1.0 of a particular module but application B needs version 2.0, then the requirements are in conflict and installing either version 1.0 or 2.0 will leave one application unable to run.
The solution for this problem is to create a virtual environment, a self-contained directory tree that contains a Python installation for a particular version of Python, plus a number of additional packages.
Different applications can then use different virtual environments. To resolve the earlier example of conflicting requirements, application A can have its own virtual environment with version 1.0 installed while application B has another virtual environment with version 2.0. If application B requires a library be upgraded to version 3.0, this will not affect application A’s environment.
A virtual environment can be set up in the following way.
python -m venv [--prompt PROMPT] ENV_DIR
By default the PROMPT is equal to the ENV_DIR.
Once set up you can activate the environment via:
source ENV_DIR/bin/activate
Once you have activated the environment your command line will be prepended with (PROMPT) to remind you that you are using the given environment. To exit the environment you can either activate a different one (they don’t “stack”), or type deactivate.
Here is how I set up an environment for generic use:
python -m venv --prompt py3 ~/.py3-generic
echo 'alias py3="source ~/.py3-generic/bin/activate"' >> ~/.bash_aliases
py3
pip install scipy numpy astropy matplotlib jupyterlab
In order to port your virtual environment to another machine, the best practice is to set up a file such as requirements.txt that contains all the modules and module versions that you want to have in the environment.
You can install modules from a files using:
pip install -r requirements.txt
And to create a requirements file from an existing environment you can use:
pip freeze > requirements.txt
Note that the pip freeze command will show not only the modules that you explicitly installed, but also all of their dependencies.
Auto-documentation
The pdoc module that we used on day 1 was nice, but more sophisticated options are available.
Many of the documentation pages that you may have viewed (such as scipy, numpy, or astropy), use the Sphinx python documentation generator.
The not only will Sphinx generate documentation from your docstrings, but it will also allow you to write documentation in reStructuredText which can then be rendered into HTML, PDF, ePub, and other document formats.
For publishing code to a website such as readthedocs, Sphinx is an essential choice.
All of the documentation work that we did in the first module will not be wasted. Sphinx understands a range of documentation styles and can fairly reliably auto-detect which one you are using (even if you change throughout your project!).
Example
Use Sphinx to build documentation for the code that we worked on from the first module.
pip install -U sphinx
cd docs
sphinx-quickstart
Welcome to the Sphinx 4.1.2 quickstart utility. Please enter values for the following settings (just press Enter to accept a default value, if one is given in brackets). Selected root path: . You have two options for placing the build directory for Sphinx output. Either, you use a directory "_build" within the root path, or you separate "source" and "build" directories within the root path. > Separate source and build directories (y/n) [n]: y The project name will occur in several places in the built documentation. > Project name: MyProject > Author name(s): Me > Project release []: If the documents are to be written in a language other than English, you can select a language here by its language code. Sphinx will then translate text that it generates into that language. For a list of supported codes, see https://www.sphinx-doc.org/en/master/usage/configuration.html#confval-language. > Project language [en]: Creating file /data/alpha/hancock/ADACS/MAP21A-JCarlin-ExampleCodes/docs/source/conf.py. Creating file /data/alpha/hancock/ADACS/MAP21A-JCarlin-ExampleCodes/docs/source/index.rst. Creating file /data/alpha/hancock/ADACS/MAP21A-JCarlin-ExampleCodes/docs/Makefile. Creating file /data/alpha/hancock/ADACS/MAP21A-JCarlin-ExampleCodes/docs/make.bat. Finished: An initial directory structure has been created. You should now populate your master file /data/alpha/hancock/ADACS/MAP21A-JCarlin-ExampleCodes/docs/source/index.rst and create other documentation source files. Use the Makefile to build the docs, like so: make builder where "builder" is one of the supported builders, e.g. html, latex or linkcheck.This will create a
buildandsourcedirectory for your documentation
Now we can build the documentation using the following
cd docs
make html
Which will create a website in the docs/build/html directory.
Navigate to the docs/build/html/index.html file in the directory using your web-browser to see the results.
What you see here is the contents of the docs/source/index.md
Sphinx has an auto documentation feature that will build webpages for all our modules and functions, however it requires that we are able to import the module. Therefore we need to install our module using:
pip install -e .
Then we can activate some of the sphinx extensions by editing the file docs/source/conf.py so that it has the following:
# Add any Sphinx extension module names here, as strings. They can be
# extensions coming with Sphinx (named 'sphinx.ext.*') or your custom
# ones.
extensions = ['sphinx.ext.autodoc',
              'sphinx.ext.mathjax',
              'sphinx.ext.viewcode']

...

html_theme = 'sphinx_rtd_theme'
The last line uses a more familiar theme that will be beneficial later on. If you want to explore more themes then you should visit the sphinx-themes gallery.
Let us now change our index page to include the following at the end of the file:
Modules
=======

.. automodule:: mymodule.default
   :members:
If we then rebuild using make html, and then refresh the website, we should see our help text included on the web site.
Cross-linking your docstrings
Sphinx provides a mechanism that will allow you to make links between different parts of your documentation. Two main uses for this are for your “see also” section, where you would link to similar functions/modules, or in your parameter descriptions where you want to say that a parameter is some custom object type.
To make these links you simply use back-tics around the module/function/class you want to reference:
"""
  ...

  See Also
  --------
  :func:`mymodule.default.hard_compute`
"""
The :func: tells Sphinx that this is a reference to a function.
Also available are:
:py:mod:- Reference a module/package.
:py:func:- Reference a Python function.
:py:data:- Reference a module-level variable.
:py:const:- Reference a “defined” constant.
:py:class:- Reference a class.
:py:meth:- Reference a method of an object.
:py:attr:- Reference a data attribute or property of an object.
:py:exc:- Reference an exception.
If we want to link to modules from another project Sphinx will let us do that if we enable the extension intersphinx.
To do that we adjust the conf.py file again:
# Add any Sphinx extension module names here, as strings. They can be
# extensions coming with Sphinx (named 'sphinx.ext.*') or your custom
# ones.
extensions = ['sphinx.ext.autodoc',
              'sphinx.ext.mathjax',
              'sphinx.ext.viewcode',
              'sphinx.ext.intersphinx',
              ]

# Add mappings
intersphinx_mapping = {
   'numpy': ('https://numpy.org/doc/stable/', None),
   'python': ('http://docs.python.org/3', None),
}
The first part above will enable the extension, whilst the second will map our use of numpy to the numpy docs, and python to the python docs (for builtins).
Let’s try this:
# mymodule/default.py
# docstring for deg2hms
"""
...

    Parameters
    ----------
    x : float or :py:class:`numpy.ndarray`
        Angle in degrees. Assumed to be in [-360,360]
"""
Regenerate the documentation and see how the page has changed. Confirm that the numpy link works as expected by clicking it.
Including other documents
By default Sphinx can render any document that is in reStructuredText format.
In the docs/source directory you’ll see a file index.rst which has been auto-generated by Sphinx.
This file will contain some content and directives for generating content:
Welcome to MyProject's documentation!
=====================================

.. toctree::
   :maxdepth: 2
   :caption: Contents:

Indices and tables
==================

* :ref:`genindex`
* :ref:`modindex`
* :ref:`search`
Currently the table of contents is empty and not shown on the main page, and the left pane just shows the section headers for the current page. The content on the main page has been generated from all the docstrings in your module(s). In order to include additional documentation you can add your own content pages and link to them from here.
Example - including custom pages
Create a new file called
docs/source/example.rst, and then add some content. Save the file. Now edit thedocs/source/index.rstto link to this page by doing the following:Welcome to MyProject's documentation! ===================================== .. toctree:: :maxdepth: 2 :caption: Contents: exampleOnce complete, run
make htmlin thedocs/directory and reload your webpage.
You can now build an entire website using this strategy. You can link to pages using :ref:`page_name`, where `page_name` is the name of the file/page.
Using markdown
If you don’t like rst, and would prefer markdown you can write markdown for your custom pages. This is particularly useful if you already have pages in markdown format (eg from an existing wiki).
Example - including markdown pages
First we must install a parser for Spinx that will enable markdown files to be parsed. Install the
myst-parsermodule:pip install myst-parserand then edit
docs/source/conf.pyto have:# Add any Sphinx extension module names here, as strings. They can be # extensions coming with Sphinx (named 'sphinx.ext.*') or your custom # ones. extensions = ['sphinx.ext.autodoc', 'sphinx.ext.mathjax', 'sphinx.ext.viewcode', 'sphinx.ext.intersphinx', 'myst_parser'] source_suffix = {'.rst':'restructuredtext', '.md':'markdown'}Now you can use markdown files (.md) in place of reStructuredText files (.rst) whenever you like, and Sphinx will know how to parse each.
Continuous Integration (CI) tools
Continuous integration is a practice in which all changes to a code base are automatically built and tested each time the changes are pushed to the code repository. This means that every push to every branch of your project can be tested against a set of metrics to ensure code quality. By testing often, you catch bugs and errors early. By testing on all branches, you avoid introducing errors into the main/stable branch which will impact users. Continuous integration (CI) is separate from continuous delivery or deployment (CD), neither of which are discussed here. See GitLab for a short discussion about the difference between these practices.
The types of actions that can be performed as part of a CI workflow include:
- ensure code will build/install without error
- ensure tests pass without error
- check that code coverage does not decrease or fall below some critical threshold
- check that documentation will build
- scan for passwords, keys, and other project secrets are not part of the git commit history
- scan for known security vulnerabilities
- just about any other scripted process that you can design.
GitLab and GitHub both provide an inbuilt CI workflow management system. GitHub refers to these as GitHub actions, whilst GitLab calls them CI/CD pipelines. We’ll explore the GitLab pipelines in this section.
CI/CD pipelines on GitLab
We will develop a CI pipeline for the map21a-jcarlin-examplecodes repository.
To do this we must first make a fork of the repo so that we can work on separate versions of the code.
Navigate to the GitLab page, login, and then click the Fork button as indicated below.
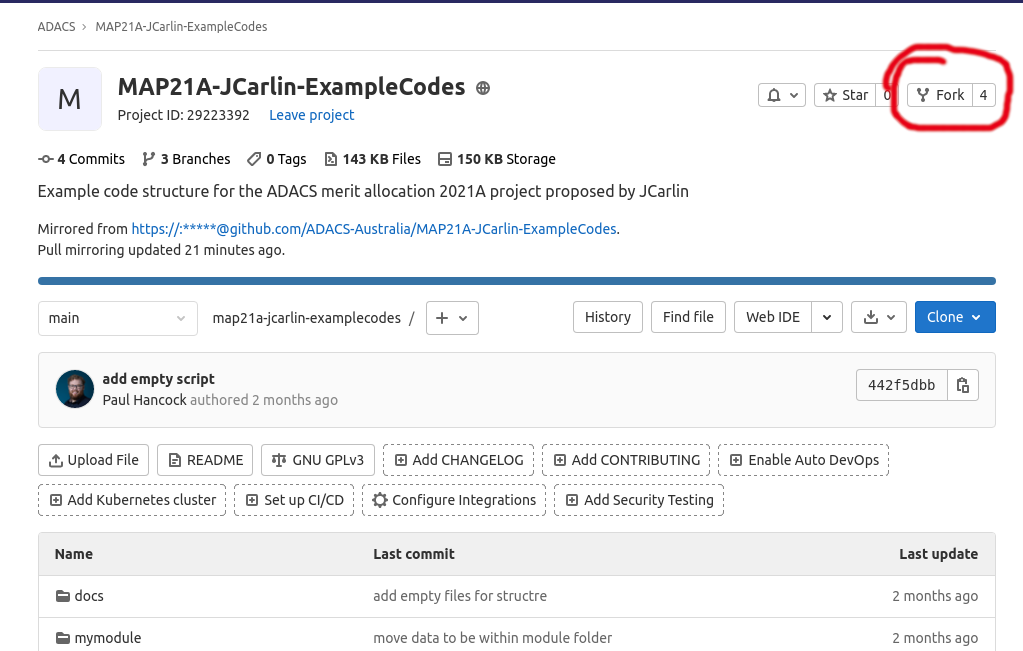
Once you have forked the repo, we can use the online editors to set up the CI workflow. In order to have some consistency between what you will see, and what is shown here, I recommend that you work on the ‘dev’ branch.
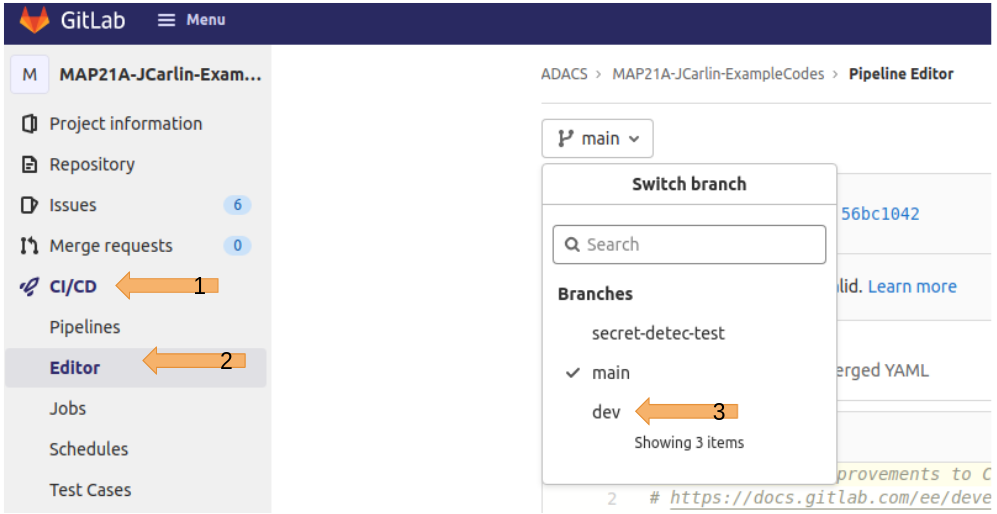
From here you’ll see the editor for making a new workflow.
Your workflows are described in a document called .gitlab-ci.yml which lives in the root of your repository.
To begin with it’ll be filled with some example (dummy) scripts that just echo things to the command line, along with some comments.
Things to note:
- the workflow is executed in stages
- stages are executed in order
- stages contain 1 or more jobs
- each job contains a script (work to do) and optionally some configuration/environment settings
Since our project is based on python code, we should start by using the Python template from the templates repo.
The file Python.gitlab-ci.yml contains a basic workflow for Python, which I have modified for simplicity below.
I recommend that you copy/paste this template below into your .gitlab-ci.yml file:
File .gitlab-ci.yml
# To contribute improvements to CI/CD templates, please follow the Development guide at:
# https://docs.gitlab.com/ee/development/cicd/templates.html
# This specific template is located at:
# https://gitlab.com/gitlab-org/gitlab/-/blob/master/lib/gitlab/ci/templates/Python.gitlab-ci.yml

# Official language image. Look for the different tagged releases at:
# https://hub.docker.com/r/library/python/tags/
image: python:latest

# Change pip's cache directory to be inside the project directory since we can
# only cache local items.
variables:
  PIP_CACHE_DIR: "$CI_PROJECT_DIR/.cache/pip"

# Pip's cache doesn't store the python packages
# https://pip.pypa.io/en/stable/reference/pip_install/#caching
#
# If you want to also cache the installed packages, you have to install
# them in a virtualenv and cache it as well.
cache:
  paths:
    - .cache/pip
    - venv/

before_script:
  - python -V  # Print out python version for debugging
  - pip install virtualenv
  - virtualenv venv
  - source venv/bin/activate

stages:
    - build
    - test

build-job:       # This job runs in the build stage, which runs first.
  stage: build
  script:
    - echo "Installing MyModule"
    - pip install -r requirements.txt
    - echo "Install complete."

unit-test-job:   # This job runs in the test stage.
  stage: test    # It only starts when the job in the build stage completes successfully.
  script:
    - echo "Running unit tests..."
    - pytest          # run tests
    - echo "Done"

doc-test-job:   # This job also runs in the test stage.
  stage: test    # It can run at the same time as unit-test-job (in parallel).
  script:
    - echo "Building documentation"
    - make -C docs html                    # Build documentation
    - echo "Docs built"
  artifacts:
    paths:
      - docs/build/html/
    expire_in: 1 week
The online editor will check the validity of our workflow, and allow you to visualize it, all without having to commit the changes, or run the workflow. Lets try that now:
Visualize the workflow
Click on the “Visualize” tab to see how the jobs are grouped by stages and how they are named.
View
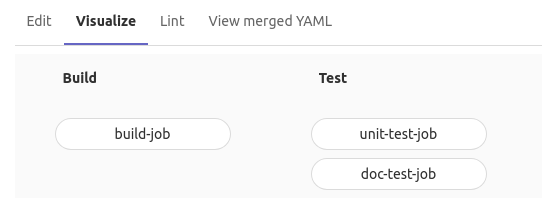
Check out the Lint tab as well.
Here you will see each of the jobs and the code that will be run on them.
Select the lint tab
Note the following:
- the interaction of the
before_script, and thescriptsection of each job,- The naming and grouping of jobs and how it relates to the Visualize section above,
- The Only/When sections (which we didn’t define).
View
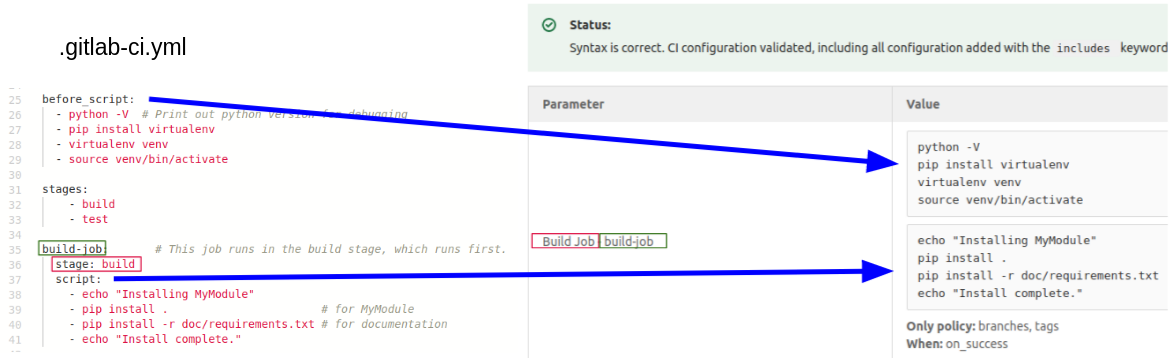
For our project we have defined the following tasks to complete:
- install the dependencies, and our module
- run the test suite
- build the documentation
The documentation job will produce files that we want to be able to retrieve from the job when it is complete.
GitLab refers to such items as artifacts and there is a subsection of the job block that allows you to define what the artifacts are (files/directories), and how long they should be kept.
Finally, to see our workflow run, commit the new file to the dev branch.
You’ll see a note at the top of the page that looks like the following:

Click the “view pipeline” button and you should see the jobs that are queued and those that are running. Eventually you should see the jobs complete.
View artifacts
Once the doc-test-job completes you can view the artifacts from the panel on the right
View
Clicking browse and then navigating to
docs/build/html/index.htmlwill let you view the built documentation! From here you can browse around to make sure it’s doing what you want it to.
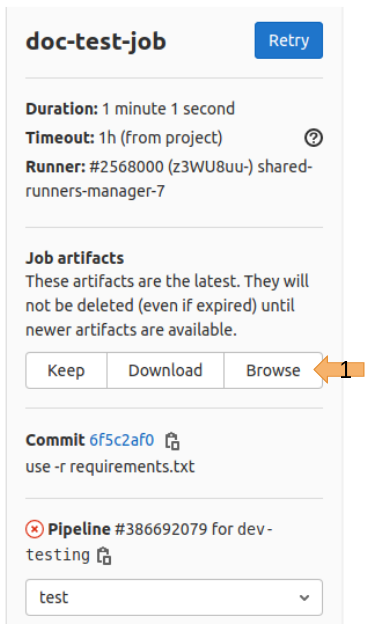
Note that the unit-test-job will fail because the tests that are run will also fail.
Collaborative code development
So far all of the tools and skills that we have discussed have been motivated by making the individual software developers life easier. In practice, all of these tools and skills will make it easier for people to work in a group, even if only because everyone is working with the same mindset.
GitLab and GitHub provide a range of tools for project and team management. We’ll explore some of the GitLab tools.
Issue tracking
The first point of call is the issue tracker.
In my experience this is the most useful collaborative tool.
You can access the issue tracker from from the left pane of your GitLab repo:
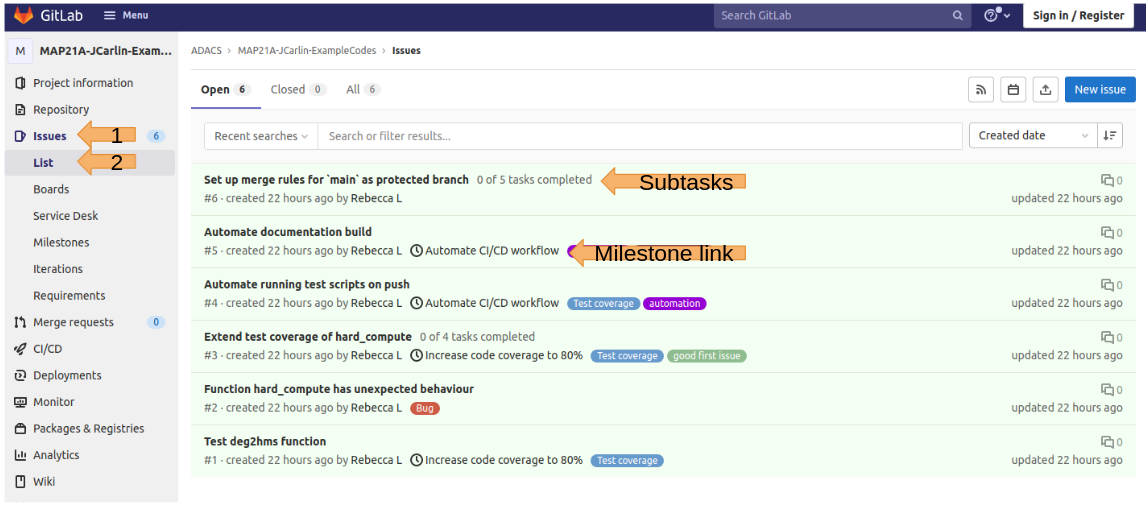 The issues are labeled (number and description), and can have tags to categorize them.
Issues can be linked to project milestones, and can have subtasks (todo lists) for completion.
The issues are labeled (number and description), and can have tags to categorize them.
Issues can be linked to project milestones, and can have subtasks (todo lists) for completion.
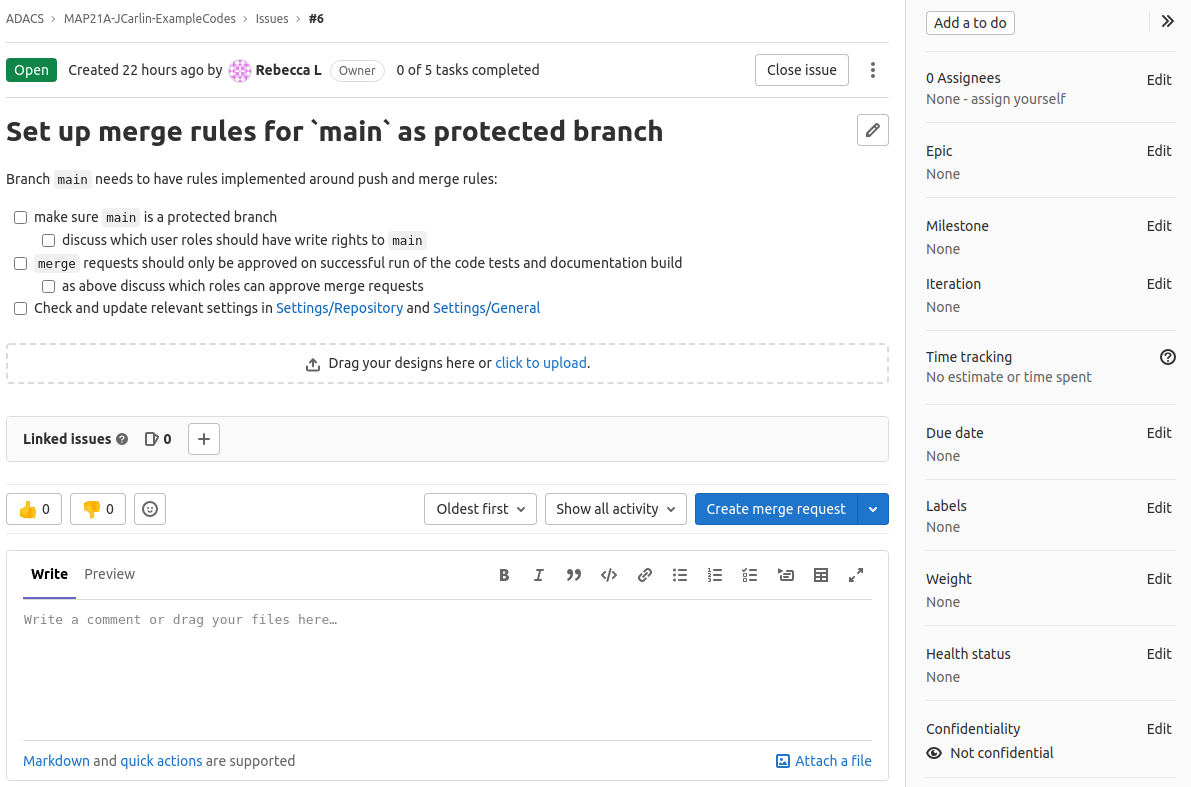 If we click on a link we can see a panel on the right that allows us to use a lot of project/team management tools including:
- assigning an issue to someone
- linking to epics/milestones
- setting a due date
- time tracking
- linking
A super useful capability to note is that each issue has a unique number (6 in the image above), and that you can make links to that issue in the git commits or other issues,simply by referring to it via #6.
The discussion thread of each issue will then be automatically populated with a link to that commit.
Similarly, milestones can be referenced by using the %"Milestone name" syntax.
Merge/Pull requests
It is good practice to set one of your branches as THE branch which will always work.
Typically this is the main branch.
In GitLab you can prevent people from committing changes directly to this branch by making it a protected branch.
People will be unable to push changes to a protected branch, the only way to make changes is via a merge request.
To begin a merge request we click the blue button here:
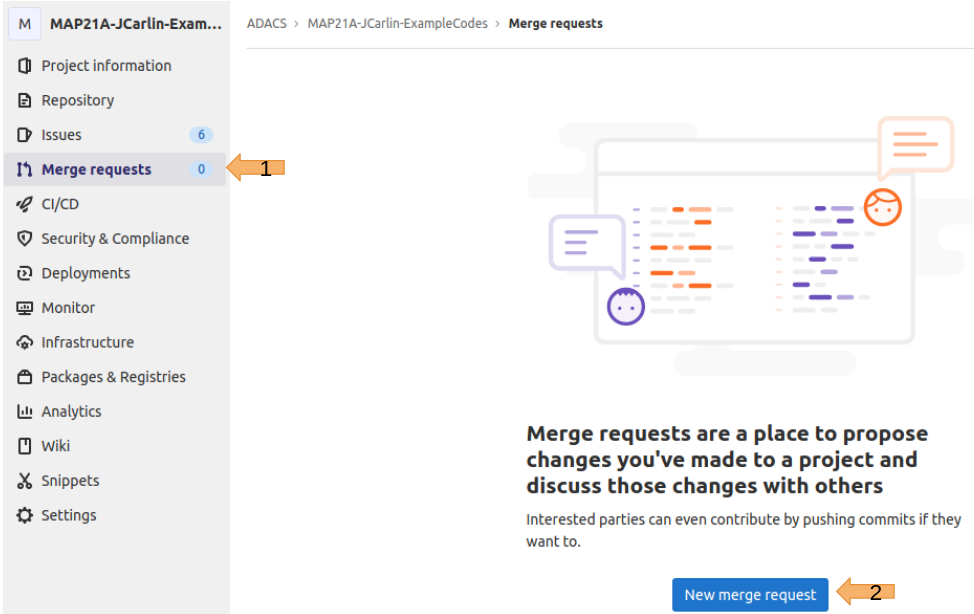
And then select the branch that has the changes we want to merge from (the source branch) and the branch we want to apply the changes onto (the target branch):
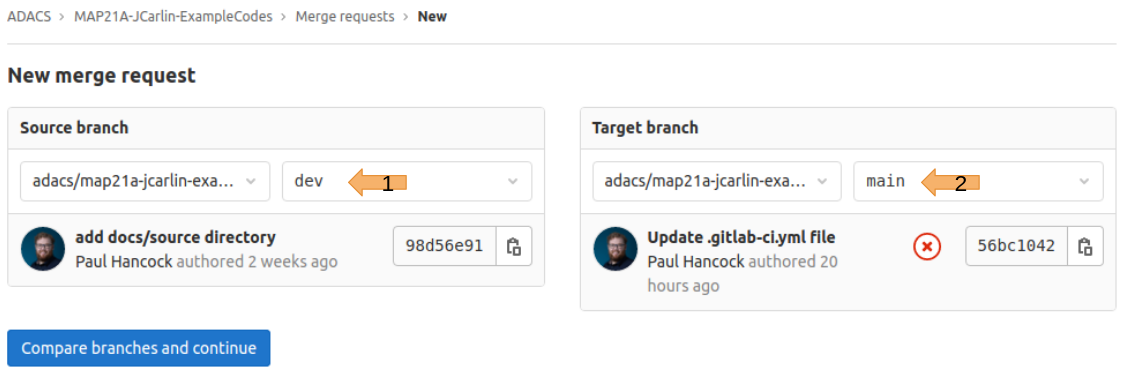
A merge request is essentially a special kind of issue so it’ll get a number just like an issue would.
You can link to this merge request in the same way you would with an issue.
Additionally a merge request can set an assignee for the merge request - this is the person who will sort out any conflicts or issues.
You can also assign a reviewer - this is the person that will identify issues, and approve the merge request.
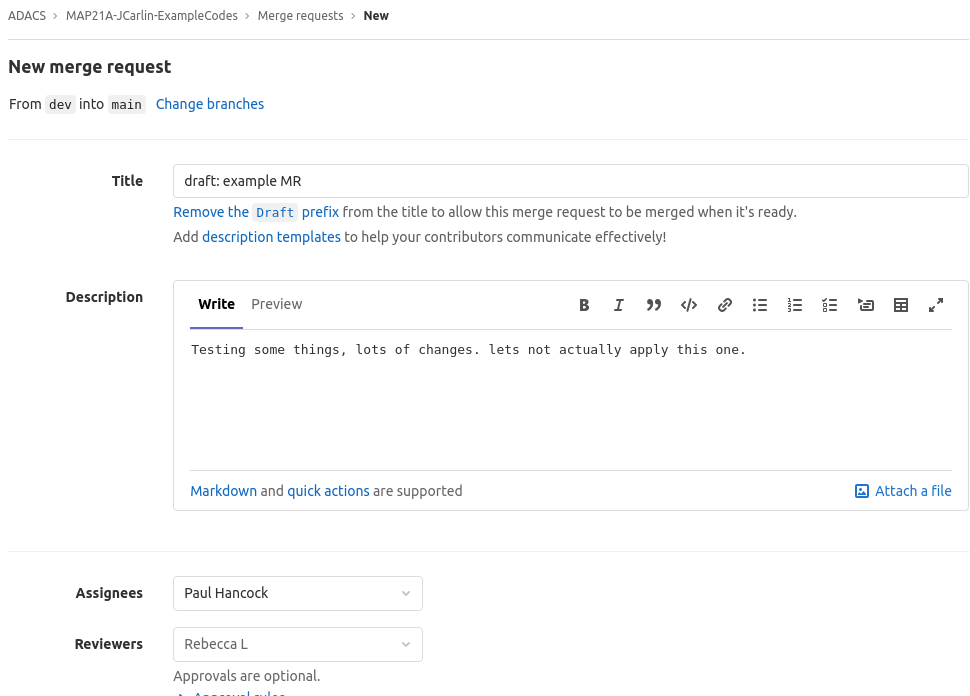
Once the merge request has been created GitLab will show you which commits will be included, which files will be changed, and if there are any conflicts.
If there are conflicts that cannot be automatically resolved, you will not be able to do the merge until the conflicts are resolve and the approver has signed off (if assigned).
Behind the scenes a merge request is just doing git merge (or git rebase depending on what you choose).
Code review
Code review is the process of consciously and systematically checking that new or updated code is up to spec according to a set of standards. Code review is an important phase of the development cycle for any code base, and whilst it will take time to complete, it will save you time and stress in the long term.
Before new code is accepted into the code-base a review takes place to ensure that the code meets the project standards. Standards can include:
- existing tests still pass
- new code has accompanying tests (which pass)
- test coverage for new/changed code is at least 80%
- documentation has been updated to align with adjustments to code
- code is formatted according to project guidelines (eg, PEP8)
It is generally a good idea to document the standards and procedures for accepting a pull request for your code base.
The CONTRIBUTING.md file in the root of your repo is a good place to outline these standards/procedures.
Not only is code review good for your project, but it is good for your developers. By frequently discussing how and why code is being written, and analyzing each other’s code, you will learn new software development skills. In general, academics are rather scared to share their “garbage code” with others, but, just like paper writing, it’s only through peer review and self-reflection that you can improve your skills.
Who performs code review?
GitHub and GitLab both provide an interface for performing code review at the pull/merge request stage. Additionally, CI features (above) can be set up such that they will compile documentation, run tests, and report coverage, for each merge/pull request and then comment with their results.
Even with the above automated features there is usually a final requirement that someone is responsible for signing off on a set of changes. Code review should not just be performed by one person, even if they are the senior developer. Code review is in everyone’s interest and the opportunity/responsibility should be shared.
Forms of code review
Discussion based - where the code is shared among the team and input is sought. Strengths and weaknesses are highlighted along with potential alternatives. This work well for a small group of dedicated people.
Pair programming - where the review is happening during the development phase. You and a buddy work on the same problem or same piece of code and continually share your solutions. This is an excellent way to up-skill new members and introduce them to the procedures and standards of your project.
Informal - where new/changed code is discussed with a colleague over a hot-beverage at your desk. This may break out into pair programming, or be elevated to a larger group discussion, and is thus a great place to start your code-review.
Tool assisted - where much of the review process is done by the computer. Checking that tests pass and coverage quotas are met is a simple task for a computer. Ensuring that code obeys a style guide such as PEP8 can be done by your IDE as you work. Templates for doc-strings and new files to align with project style can also be provided to your IDE.
Management Tools
The follow software tools can be extremely useful for the development and management of a software project.
- Software hosting: GitHub, GitLab
- (Public) Documentation: GitHub/GitLab wikis, readthedocs.org (api/auto-documentation)
- (Private) Documentation and document control: GoogleDrive, OneDrive, DropBox
- Communication and coordination: Slack, Teams
- Project planning: Jira, Trello
Share your tool tips
What tools are part of your software development ecosystem?
Key Points
Automate testing and documentation
Use a CI workflow to automatically check your code
Project management strategies and tools save time