Automation and Collaboration
Overview
Teaching: 90 min
Exercises: 30 minQuestions
How do I automate documentation?
How do I use GitLab CI tools?
How can I work collaboratively?
Objectives
Build your codebase and documentation.
Create a CI workflow on GitLab.
Consider collaborative code review.
Consider how to share the load, e.g. run agile dev?
Questions from previous modules
- What is a virtual environment and how do I set one up?
Virtual environments
From the python documentation:
Python applications will often use packages and modules that don’t come as part of the standard library. Applications will sometimes need a specific version of a library, because the application may require that a particular bug has been fixed or the application may be written using an obsolete version of the library’s interface.
This means it may not be possible for one Python installation to meet the requirements of every application. If application A needs version 1.0 of a particular module but application B needs version 2.0, then the requirements are in conflict and installing either version 1.0 or 2.0 will leave one application unable to run.
The solution for this problem is to create a virtual environment, a self-contained directory tree that contains a Python installation for a particular version of Python, plus a number of additional packages.
Different applications can then use different virtual environments. To resolve the earlier example of conflicting requirements, application A can have its own virtual environment with version 1.0 installed while application B has another virtual environment with version 2.0. If application B requires a library be upgraded to version 3.0, this will not affect application A’s environment.
A virtual environment can be set up in the following way.
python -m venv [--prompt PROMPT] ENV_DIR
By default the PROMPT is equal to the ENV_DIR.
Once set up you can activate the environment via:
source ENV_DIR/bin/activate
Once you have activated the environment your command line will be prepended with (PROMPT) to remind you that you are using the given environment. To exit the environment you can either activate a different one (they don’t “stack”), or type deactivate.
Here is how I set up an environment for generic use:
python -m venv --prompt py3 ~/.py3-generic
echo 'alias py3="source ~/.py3-generic/bin/activate"' >> ~/.bash_aliases
py3
pip install scipy numpy astropy matplotlib jupyterlab
In order to port your virtual environment to another machine, the best practice is to set up a file such as requirements.txt that contains all the modules and module versions that you want to have in the environment.
You can install modules from a files using:
pip install -r requirements.txt
And to create a requirements file from an existing environment you can use:
pip freeze > requirements.txt
Note that the pip freeze command will show not only the modules that you explicitly installed, but also all of their dependencies.
Auto-documentation
The pdoc module that we used on day 1 was nice, but more sophisticated options are available.
Many of the documentation pages that you may have viewed (such as scipy, numpy, or astropy), use the Sphinx python documentation generator.
The not only will Sphinx generate documentation from your docstrings, but it will also allow you to write documentation in reStructuredText which can then be rendered into HTML, PDF, ePub, and other document formats.
For publishing code to a website such as readthedocs, Sphinx is an essential choice.
All of the documentation work that we did in the first module will not be wasted. Sphinx understands a range of documentation styles and can fairly reliably auto-detect which one you are using (even if you change throughout your project!).
Example
Use Sphinx to build documentation for the code that we worked on from the first module.
pip install -U sphinx
cd docs
sphinx-quickstart
Welcome to the Sphinx 4.1.2 quickstart utility. Please enter values for the following settings (just press Enter to accept a default value, if one is given in brackets). Selected root path: . You have two options for placing the build directory for Sphinx output. Either, you use a directory "_build" within the root path, or you separate "source" and "build" directories within the root path. > Separate source and build directories (y/n) [n]: y The project name will occur in several places in the built documentation. > Project name: MyProject > Author name(s): Me > Project release []: If the documents are to be written in a language other than English, you can select a language here by its language code. Sphinx will then translate text that it generates into that language. For a list of supported codes, see https://www.sphinx-doc.org/en/master/usage/configuration.html#confval-language. > Project language [en]: Creating file /data/alpha/hancock/ADACS/MAP21A-JCarlin-ExampleCodes/docs/source/conf.py. Creating file /data/alpha/hancock/ADACS/MAP21A-JCarlin-ExampleCodes/docs/source/index.rst. Creating file /data/alpha/hancock/ADACS/MAP21A-JCarlin-ExampleCodes/docs/Makefile. Creating file /data/alpha/hancock/ADACS/MAP21A-JCarlin-ExampleCodes/docs/make.bat. Finished: An initial directory structure has been created. You should now populate your master file /data/alpha/hancock/ADACS/MAP21A-JCarlin-ExampleCodes/docs/source/index.rst and create other documentation source files. Use the Makefile to build the docs, like so: make builder where "builder" is one of the supported builders, e.g. html, latex or linkcheck.This will create a
buildandsourcedirectory for your documentation
Now we can build the documentation using the following
cd docs
make html
Which will create a website in the docs/build/html directory.
Navigate to the docs/build/html/index.html file in the directory using your web-browser to see the results.
What you see here is the contents of the docs/source/index.md
Sphinx has an auto documentation feature that will build webpages for all our modules and functions, however it requires that we are able to import the module. Therefore we need to install our module using:
pip install -e .
Then we can activate some of the sphinx extensions by editing the file docs/source/conf.py so that it has the following:
# Add any Sphinx extension module names here, as strings. They can be
# extensions coming with Sphinx (named 'sphinx.ext.*') or your custom
# ones.
extensions = ['sphinx.ext.autodoc',
              'sphinx.ext.mathjax',
              'sphinx.ext.viewcode']

...

html_theme = 'sphinx_rtd_theme'
The last line uses a more familiar theme that will be beneficial later on. If you want to explore more themes then you should visit the sphinx-themes gallery.
Let us now change our index page to include the following at the end of the file:
Modules
=======

.. automodule:: mymodule.default
   :members:
If we then rebuild using make html, and then refresh the website, we should see our help text included on the web site.
Cross-linking your docstrings
Sphinx provides a mechanism that will allow you to make links between different parts of your documentation. Two main uses for this are for your “see also” section, where you would link to similar functions/modules, or in your parameter descriptions where you want to say that a parameter is some custom object type.
To make these links you simply use back-tics around the module/function/class you want to reference:
"""
  ...

  See Also
  --------
  :func:`mymodule.default.hard_compute`
"""
The :func: tells Sphinx that this is a reference to a function.
Also available are:
:py:mod:- Reference a module/package.
:py:func:- Reference a Python function.
:py:data:- Reference a module-level variable.
:py:const:- Reference a “defined” constant.
:py:class:- Reference a class.
:py:meth:- Reference a method of an object.
:py:attr:- Reference a data attribute or property of an object.
:py:exc:- Reference an exception.
If we want to link to modules from another project Sphinx will let us do that if we enable the extension intersphinx.
To do that we adjust the conf.py file again:
# Add any Sphinx extension module names here, as strings. They can be
# extensions coming with Sphinx (named 'sphinx.ext.*') or your custom
# ones.
extensions = ['sphinx.ext.autodoc',
              'sphinx.ext.mathjax',
              'sphinx.ext.viewcode',
              'sphinx.ext.intersphinx',
              ]

# Add mappings
intersphinx_mapping = {
   'numpy': ('https://numpy.org/doc/stable/', None),
   'python': ('http://docs.python.org/3', None),
}
The first part above will enable the extension, whilst the second will map our use of numpy to the numpy docs, and python to the python docs (for builtins).
Let’s try this:
# mymodule/default.py
# docstring for deg2hms
"""
...

    Parameters
    ----------
    x : float or :py:class:`numpy.ndarray`
        Angle in degrees. Assumed to be in [-360,360]
"""
Regenerate the documentation and see how the page has changed. Confirm that the numpy link works as expected by clicking it.
Including other documents
By default Sphinx can render any document that is in reStructuredText format.
In the docs/source directory you’ll see a file index.rst which has been auto-generated by Sphinx.
This file will contain some content and directives for generating content:
Welcome to MyProject's documentation!
=====================================

.. toctree::
   :maxdepth: 2
   :caption: Contents:

Indices and tables
==================

* :ref:`genindex`
* :ref:`modindex`
* :ref:`search`
Currently the table of contents is empty and not shown on the main page, and the left pane just shows the section headers for the current page. The content on the main page has been generated from all the docstrings in your module(s). In order to include additional documentation you can add your own content pages and link to them from here.
Example - including custom pages
Create a new file called
docs/source/example.rst, and then add some content. Save the file. Now edit thedocs/source/index.rstto link to this page by doing the following:Welcome to MyProject's documentation! ===================================== .. toctree:: :maxdepth: 2 :caption: Contents: exampleOnce complete, run
make htmlin thedocs/directory and reload your webpage.
You can now build an entire website using this strategy. You can link to pages using :ref:`page_name`, where `page_name` is the name of the file/page.
Using markdown
If you don’t like rst, and would prefer markdown you can write markdown for your custom pages. This is particularly useful if you already have pages in markdown format (eg from an existing wiki).
Example - including markdown pages
First we must install a parser for Spinx that will enable markdown files to be parsed. Install the
myst-parsermodule:pip install myst-parserand then edit
docs/source/conf.pyto have:# Add any Sphinx extension module names here, as strings. They can be # extensions coming with Sphinx (named 'sphinx.ext.*') or your custom # ones. extensions = ['sphinx.ext.autodoc', 'sphinx.ext.mathjax', 'sphinx.ext.viewcode', 'sphinx.ext.intersphinx', 'myst_parser'] source_suffix = {'.rst':'restructuredtext', '.md':'markdown'}Now you can use markdown files (.md) in place of reStructuredText files (.rst) whenever you like, and Sphinx will know how to parse each.
Continuous Integration (CI) tools
Continuous integration is a practice in which all changes to a code base are automatically built and tested each time the changes are pushed to the code repository. This means that every push to every branch of your project can be tested against a set of metrics to ensure code quality. By testing often, you catch bugs and errors early. By testing on all branches, you avoid introducing errors into the main/stable branch which will impact users. Continuous integration (CI) is separate from continuous delivery or deployment (CD), neither of which are discussed here. See GitLab for a short discussion about the difference between these practices.
The types of actions that can be performed as part of a CI workflow include:
- ensure code will build/install without error
- ensure tests pass without error
- check that code coverage does not decrease or fall below some critical threshold
- check that documentation will build
- scan for passwords, keys, and other project secrets are not part of the git commit history
- scan for known security vulnerabilities
- just about any other scripted process that you can design.
GitLab and GitHub both provide an inbuilt CI workflow management system. GitHub refers to these as GitHub actions, whilst GitLab calls them CI/CD pipelines. We’ll explore the GitLab pipelines in this section.
CI/CD pipelines on GitLab
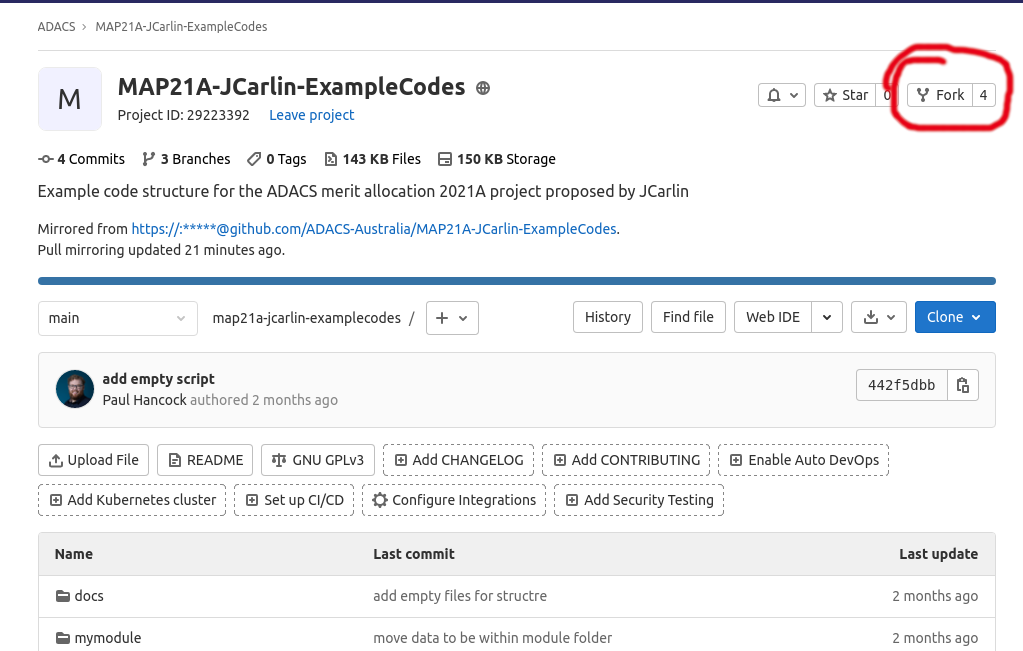
We will develop a CI pipeline for the map21a-jcarlin-examplecodes repository.
To do this we must first make a fork of the repo so that we can work on separate versions of the code.
Navigate to the GitLab page, login, and then click the Fork button as indicated below.
Once you have forked the repo, we can use the online editors to set up the CI workflow. In order to have some consistency between what you will see, and what is shown here, I recommend that you work on the ‘dev’ branch.
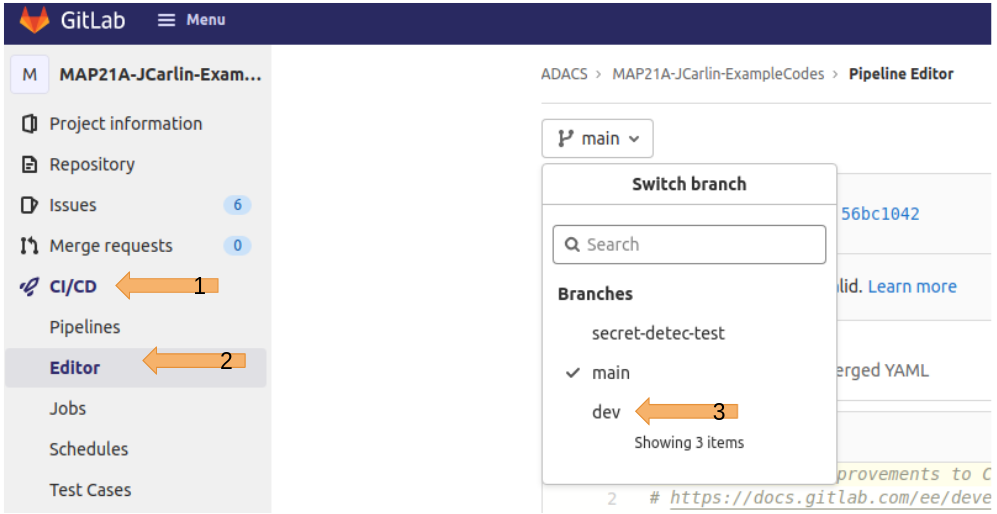
From here you’ll see the editor for making a new workflow.
Your workflows are described in a document called .gitlab-ci.yml which lives in the root of your repository.
To begin with it’ll be filled with some example (dummy) scripts that just echo things to the command line, along with some comments.
Things to note:
- the workflow is executed in stages
- stages are executed in order
- stages contain 1 or more jobs
- each job contains a script (work to do) and optionally some configuration/environment settings
Since our project is based on python code, we should start by using the Python template from the templates repo.
The file Python.gitlab-ci.yml contains a basic workflow for Python, which I have modified for simplicity below.
I recommend that you copy/paste this template below into your .gitlab-ci.yml file:
File .gitlab-ci.yml
# To contribute improvements to CI/CD templates, please follow the Development guide at:
# https://docs.gitlab.com/ee/development/cicd/templates.html
# This specific template is located at:
# https://gitlab.com/gitlab-org/gitlab/-/blob/master/lib/gitlab/ci/templates/Python.gitlab-ci.yml

# Official language image. Look for the different tagged releases at:
# https://hub.docker.com/r/library/python/tags/
image: python:latest

# Change pip's cache directory to be inside the project directory since we can
# only cache local items.
variables:
  PIP_CACHE_DIR: "$CI_PROJECT_DIR/.cache/pip"

# Pip's cache doesn't store the python packages
# https://pip.pypa.io/en/stable/reference/pip_install/#caching
#
# If you want to also cache the installed packages, you have to install
# them in a virtualenv and cache it as well.
cache:
  paths:
    - .cache/pip
    - venv/

before_script:
  - python -V  # Print out python version for debugging
  - pip install virtualenv
  - virtualenv venv
  - source venv/bin/activate

stages:
    - build
    - test

build-job:       # This job runs in the build stage, which runs first.
  stage: build
  script:
    - echo "Installing MyModule"
    - pip install -r requirements.txt
    - echo "Install complete."

unit-test-job:   # This job runs in the test stage.
  stage: test    # It only starts when the job in the build stage completes successfully.
  script:
    - echo "Running unit tests..."
    - pytest          # run tests
    - echo "Done"

doc-test-job:   # This job also runs in the test stage.
  stage: test    # It can run at the same time as unit-test-job (in parallel).
  script:
    - echo "Building documentation"
    - make -C docs html                    # Build documentation
    - echo "Docs built"
  artifacts:
    paths:
      - docs/build/html/
    expire_in: 1 week
The online editor will check the validity of our workflow, and allow you to visualize it, all without having to commit the changes, or run the workflow. Lets try that now:
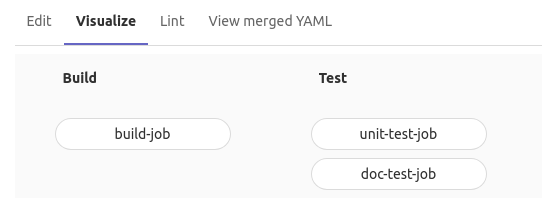
Visualize the workflow
Click on the “Visualize” tab to see how the jobs are grouped by stages and how they are named.
View
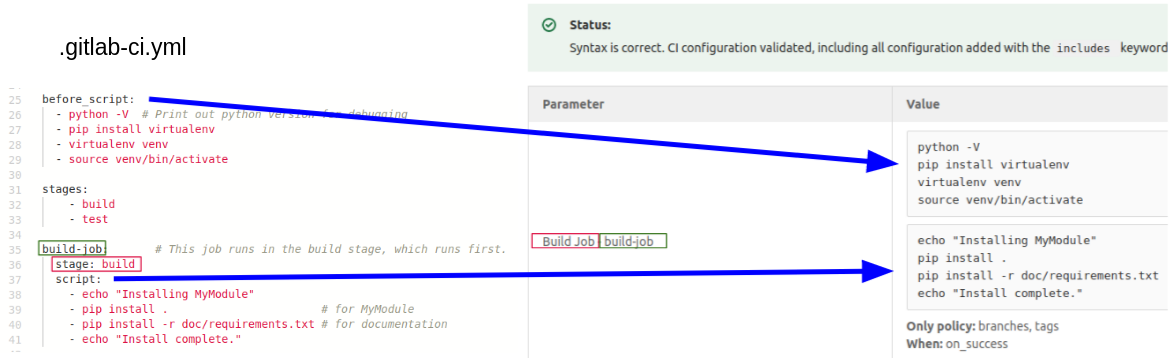
Check out the Lint tab as well.
Here you will see each of the jobs and the code that will be run on them.
Select the lint tab
Note the following:
- the interaction of the
before_script, and thescriptsection of each job,- The naming and grouping of jobs and how it relates to the Visualize section above,
- The Only/When sections (which we didn’t define).
View
For our project we have defined the following tasks to complete:
- install the dependencies, and our module
- run the test suite
- build the documentation
The documentation job will produce files that we want to be able to retrieve from the job when it is complete.
GitLab refers to such items as artifacts and there is a subsection of the job block that allows you to define what the artifacts are (files/directories), and how long they should be kept.
Finally, to see our workflow run, commit the new file to the dev branch.
You’ll see a note at the top of the page that looks like the following:

Click the “view pipeline” button and you should see the jobs that are queued and those that are running. Eventually you should see the jobs complete.
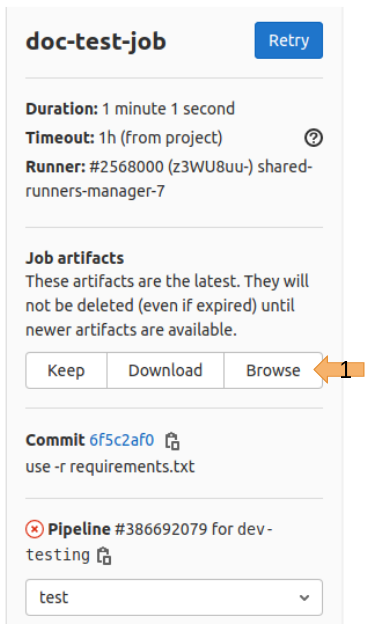
View artifacts
Once the doc-test-job completes you can view the artifacts from the panel on the right
View
Clicking browse and then navigating to
docs/build/html/index.htmlwill let you view the built documentation! From here you can browse around to make sure it’s doing what you want it to.
Note that the unit-test-job will fail because the tests that are run will also fail.
Collaborative code development
So far all of the tools and skills that we have discussed have been motivated by making the individual software developers life easier. In practice, all of these tools and skills will make it easier for people to work in a group, even if only because everyone is working with the same mindset.
GitLab and GitHub provide a range of tools for project and team management. We’ll explore some of the GitLab tools.
Issue tracking
The first point of call is the issue tracker.
In my experience this is the most useful collaborative tool.
You can access the issue tracker from from the left pane of your GitLab repo:
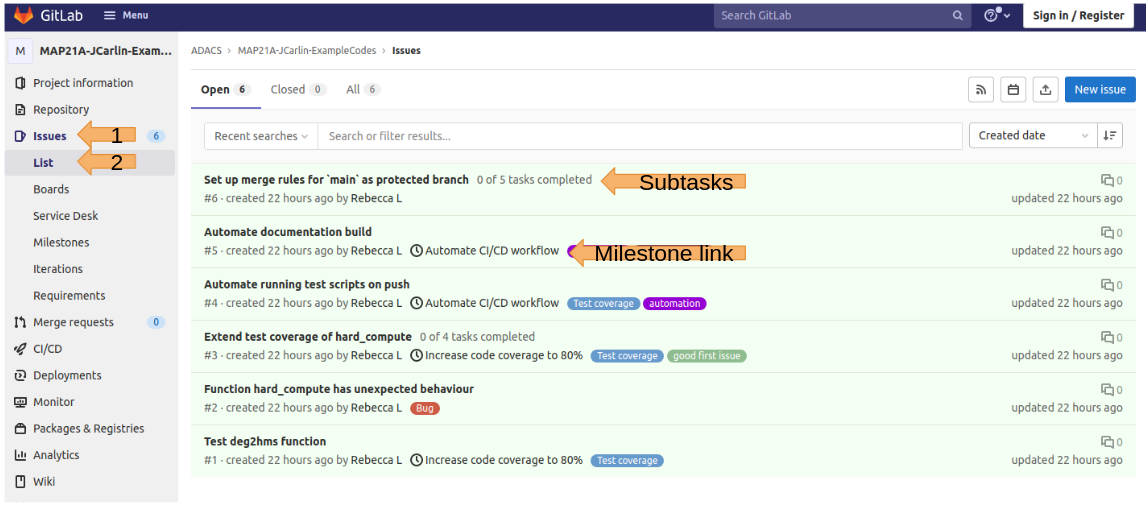 The issues are labeled (number and description), and can have tags to categorize them.
Issues can be linked to project milestones, and can have subtasks (todo lists) for completion.
The issues are labeled (number and description), and can have tags to categorize them.
Issues can be linked to project milestones, and can have subtasks (todo lists) for completion.
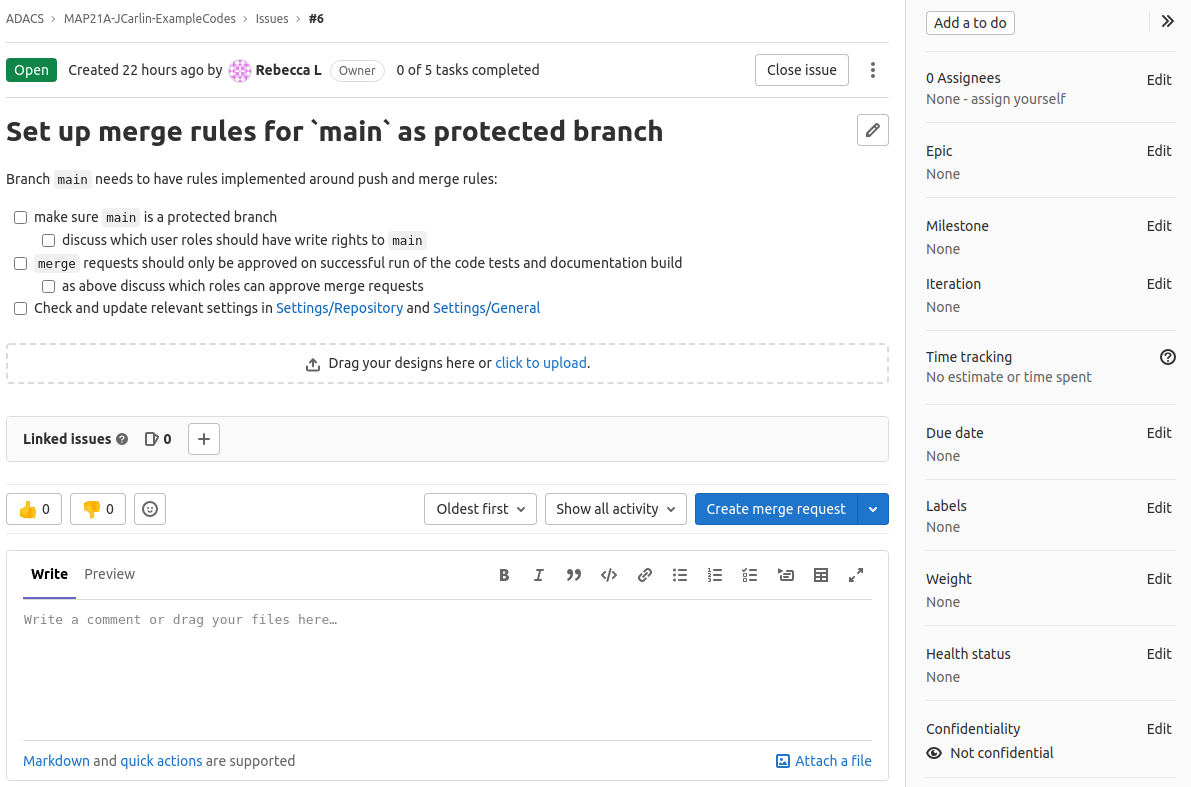 If we click on a link we can see a panel on the right that allows us to use a lot of project/team management tools including:
- assigning an issue to someone
- linking to epics/milestones
- setting a due date
- time tracking
- linking
A super useful capability to note is that each issue has a unique number (6 in the image above), and that you can make links to that issue in the git commits or other issues,simply by referring to it via #6.
The discussion thread of each issue will then be automatically populated with a link to that commit.
Similarly, milestones can be referenced by using the %"Milestone name" syntax.
Merge/Pull requests
It is good practice to set one of your branches as THE branch which will always work.
Typically this is the main branch.
In GitLab you can prevent people from committing changes directly to this branch by making it a protected branch.
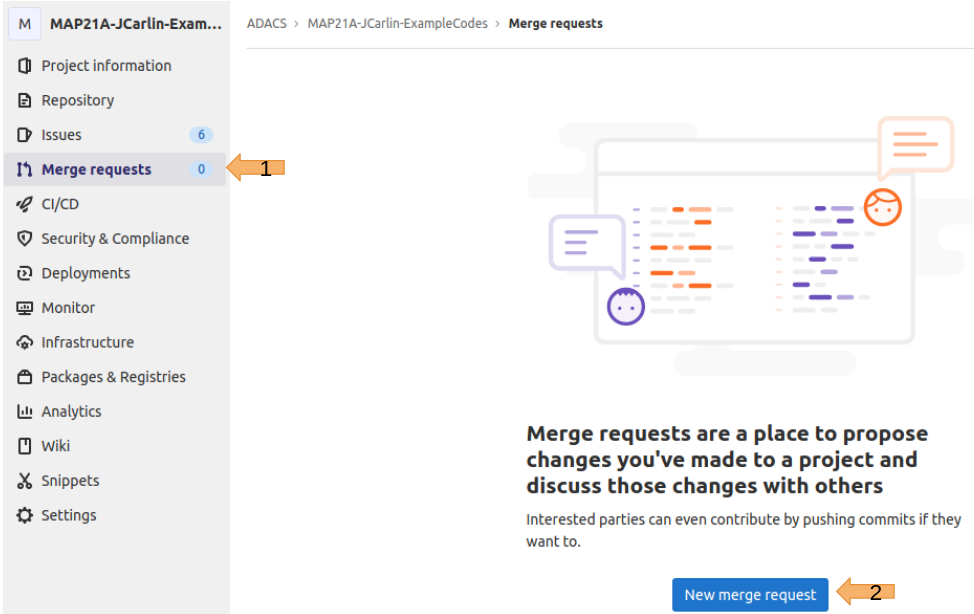
People will be unable to push changes to a protected branch, the only way to make changes is via a merge request.
To begin a merge request we click the blue button here:
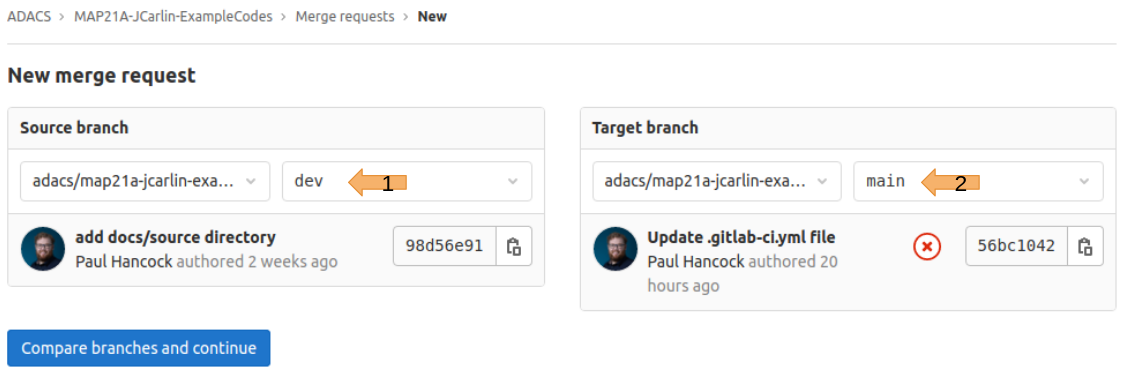
And then select the branch that has the changes we want to merge from (the source branch) and the branch we want to apply the changes onto (the target branch):
A merge request is essentially a special kind of issue so it’ll get a number just like an issue would.
You can link to this merge request in the same way you would with an issue.
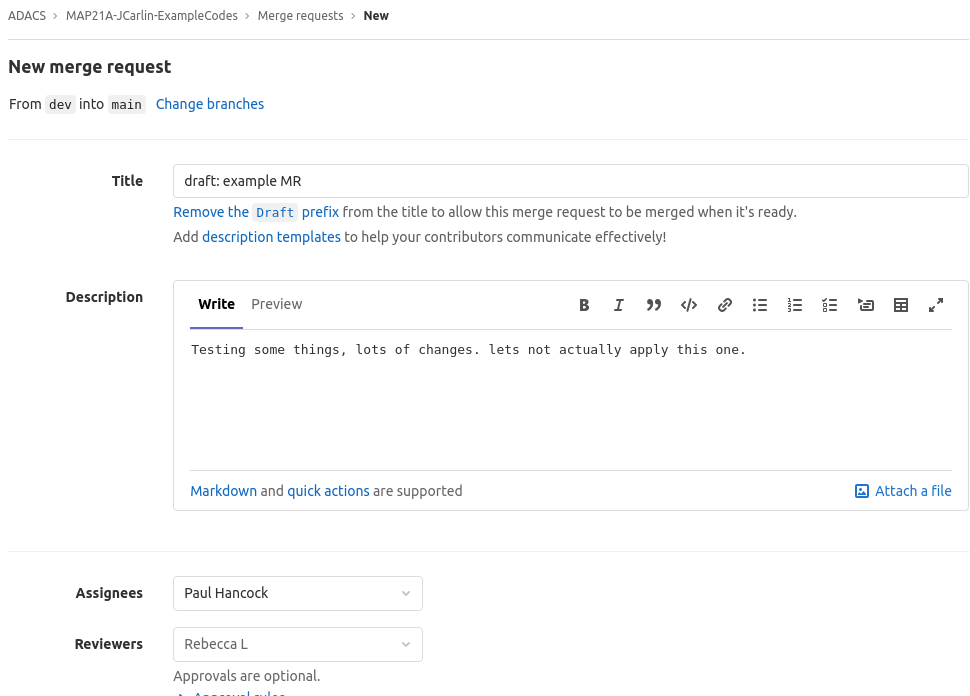
Additionally a merge request can set an assignee for the merge request - this is the person who will sort out any conflicts or issues.
You can also assign a reviewer - this is the person that will identify issues, and approve the merge request.
Once the merge request has been created GitLab will show you which commits will be included, which files will be changed, and if there are any conflicts.
If there are conflicts that cannot be automatically resolved, you will not be able to do the merge until the conflicts are resolve and the approver has signed off (if assigned).
Behind the scenes a merge request is just doing git merge (or git rebase depending on what you choose).
Code review
Code review is the process of consciously and systematically checking that new or updated code is up to spec according to a set of standards. Code review is an important phase of the development cycle for any code base, and whilst it will take time to complete, it will save you time and stress in the long term.
Before new code is accepted into the code-base a review takes place to ensure that the code meets the project standards. Standards can include:
- existing tests still pass
- new code has accompanying tests (which pass)
- test coverage for new/changed code is at least 80%
- documentation has been updated to align with adjustments to code
- code is formatted according to project guidelines (eg, PEP8)
It is generally a good idea to document the standards and procedures for accepting a pull request for your code base.
The CONTRIBUTING.md file in the root of your repo is a good place to outline these standards/procedures.
Not only is code review good for your project, but it is good for your developers. By frequently discussing how and why code is being written, and analyzing each other’s code, you will learn new software development skills. In general, academics are rather scared to share their “garbage code” with others, but, just like paper writing, it’s only through peer review and self-reflection that you can improve your skills.
Who performs code review?
GitHub and GitLab both provide an interface for performing code review at the pull/merge request stage. Additionally, CI features (above) can be set up such that they will compile documentation, run tests, and report coverage, for each merge/pull request and then comment with their results.
Even with the above automated features there is usually a final requirement that someone is responsible for signing off on a set of changes. Code review should not just be performed by one person, even if they are the senior developer. Code review is in everyone’s interest and the opportunity/responsibility should be shared.
Forms of code review
Discussion based - where the code is shared among the team and input is sought. Strengths and weaknesses are highlighted along with potential alternatives. This work well for a small group of dedicated people.
Pair programming - where the review is happening during the development phase. You and a buddy work on the same problem or same piece of code and continually share your solutions. This is an excellent way to up-skill new members and introduce them to the procedures and standards of your project.
Informal - where new/changed code is discussed with a colleague over a hot-beverage at your desk. This may break out into pair programming, or be elevated to a larger group discussion, and is thus a great place to start your code-review.
Tool assisted - where much of the review process is done by the computer. Checking that tests pass and coverage quotas are met is a simple task for a computer. Ensuring that code obeys a style guide such as PEP8 can be done by your IDE as you work. Templates for doc-strings and new files to align with project style can also be provided to your IDE.
Management Tools
The follow software tools can be extremely useful for the development and management of a software project.
- Software hosting: GitHub, GitLab
- (Public) Documentation: GitHub/GitLab wikis, readthedocs.org (api/auto-documentation)
- (Private) Documentation and document control: GoogleDrive, OneDrive, DropBox
- Communication and coordination: Slack, Teams
- Project planning: Jira, Trello
Share your tool tips
What tools are part of your software development ecosystem?
Key Points
Automate testing and documentation
Use a CI workflow to automatically check your code
Project management strategies and tools save time