Version Control for Collaborative and CI Workflows
Overview
Teaching: 120 min
Exercises: 60 minQuestions
How do I collaborate on GitLab?
How do I set up continuous integration?
Objectives
Set up projects and collaborators on Gitlab
Explore collaborative workflow including dealing with conflicts, branching and merging
Demonstrate a CI workflow.
Questions from previous modules
TBC
Recap
For this lesson we assume that you already know how to track files on your own computer and that you are comfortable with the basic git workflow:
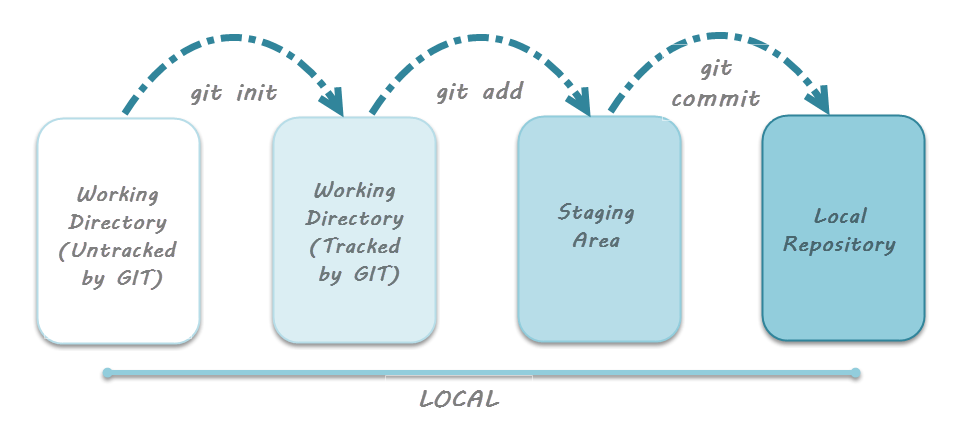
image credit: toolsqa
Working With Remote Repositories
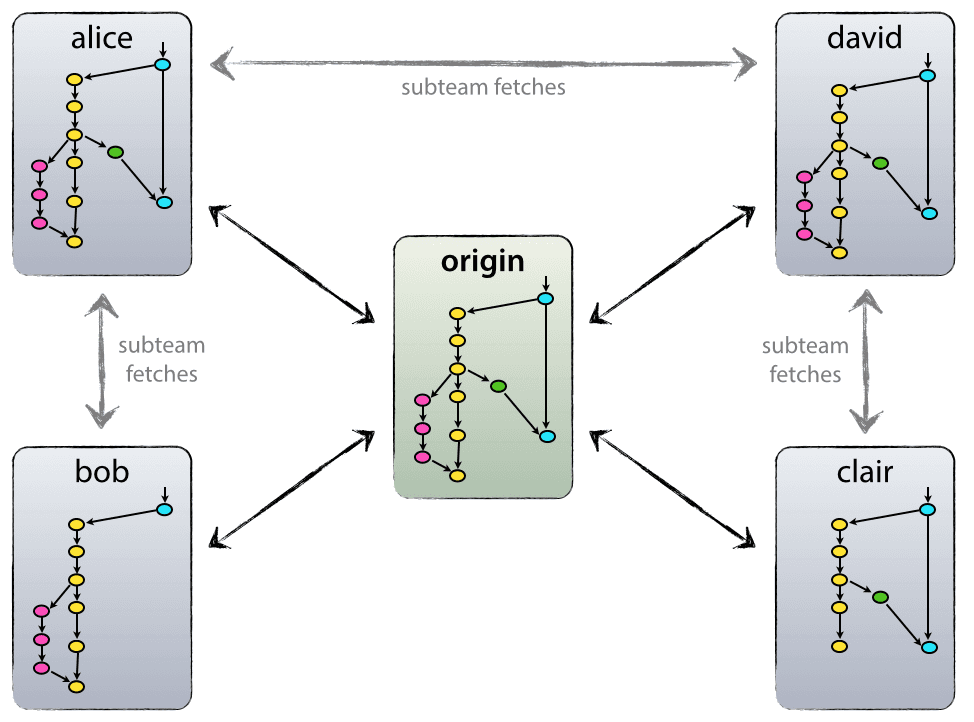
Version control really comes into its own when we begin to collaborate with other people. Git makes collaboration easy as each party has their own complete copy of a repository and can make the required changes independently from a connection to a central repository.
In practice, however, the simplest way to work collaboratively is to use a central copy of the repository(considered to be the “truth”) to which everyone adds their changes. Most programmers use hosting services like GitHub, Bitbucket or GitLab to hold this central copy which is called a remote repository.
To interact with a remote repository the above workflow gets extended by a push and pull step to send and retrieve changes from the remote repo, respectively:
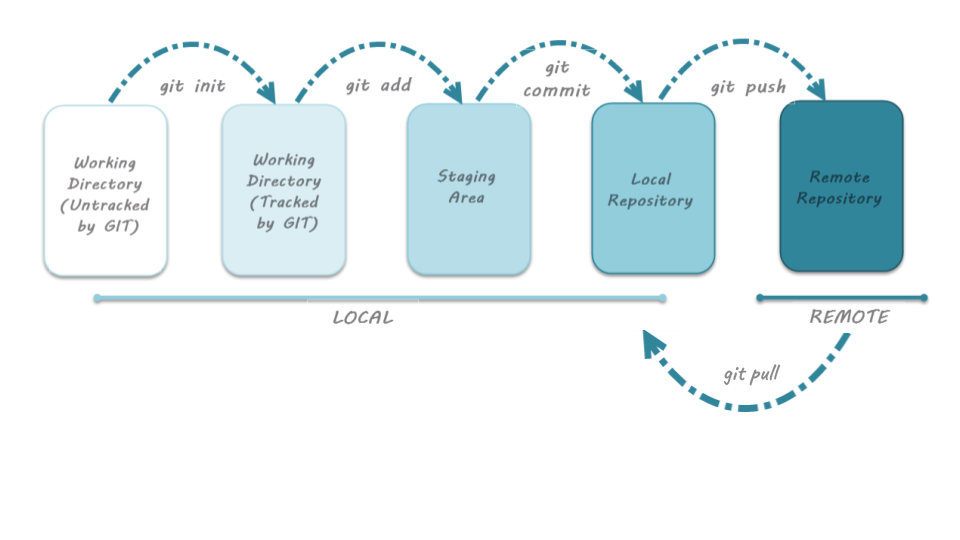 image credit: toolsqa
For this lesson we will be using GitLab examples where possible.
Why use a remote hosting service?
- Version Control remotely
- Visible code and reproducibility
- Open code and reuse
- Collaborative code development
- Open code development
Working collaboratively
As mentioned above, working remotely and collaboratively is supported by various hosting services.
Everyone has their own complete copy of the entire repository and can make changes as required.
From there changes are committed (pushed) to a central repository and all collaborators can implement these changes in their own local repositories by running the pull command.
To be able to integrate one’s changes in the remote repository the author will need to have write access, if they do not have these they can submit a pull request or merge request and a repository owner/maintainer can then approve and merge these changes.
git remote add origin [URL]    # link an (empty) remote repo to your local repo, nickname it origin
git push origin main           # push your local changes to the main branch of the remote repo called origin
git pull origin main           # pull changes from the main branch of the remote repo called origin
$ git remote -v                # show nickname(s) and url(s) of associated remote repo(s)

$ git clone [URL] [location]   # clone a remote repository from [URL] to your computer into the optionally  specified [location]
Let’s try it out
The Premise Wolfman and Dracula have been hired by Universal Missions (a space services spinoff from Euphoric State University) to investigate if it is possible to send their next planetary lander to Mars. During the exploration phase, Wolfman and Dracula want to be able to work on the plans at the same time, but they have run into problems doing this in the past. If they take turns, each one will spend a lot of time waiting for the other to finish, but if they work on their own copies and email changes back and forth things will be lost, overwritten, or duplicated. A colleague suggests using version control to manage their work. Their exploration notes are in the ADACS planets repo.
For the next step we will add you as collaborators to the ADACS planets repo. The goal is that you, as collaborator, add changes into this repo to get familiar with the commands and to learn about potential conflicts.
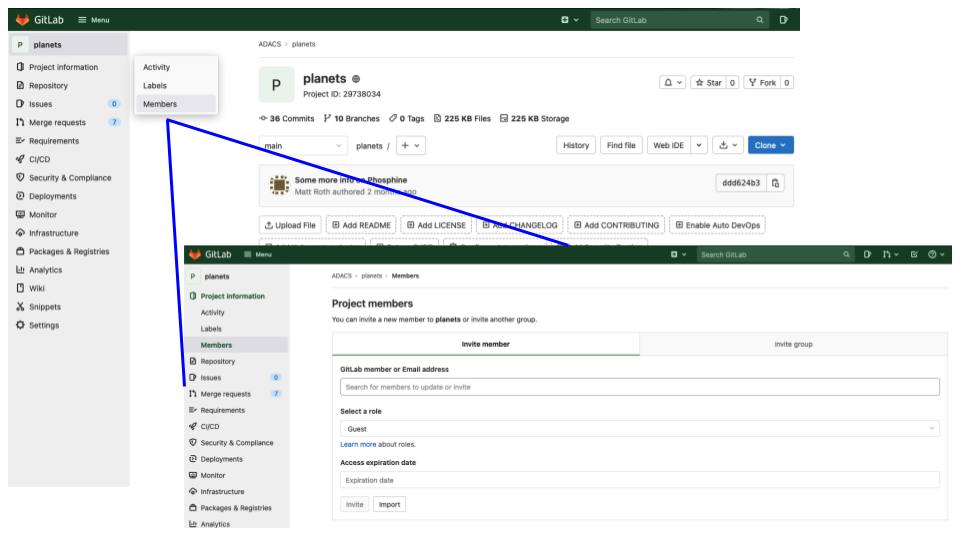
The Owner of a repository needs to give the Collaborator access. On GitLab this is done by clicking on Project information in the left hand menu and selecting Members. At the top of the Project members page is a form to invite new members (using their username or email), the form also allows for selection of the role (and associated privileges) as well as an expiration date for the membership.
Next, you will need to download a copy of the repository to your machine. This is called “cloning a repo”:
$ git clone https://gitlab.com/adacs/planets ~/Desktop/planets
If you choose to clone without the clone path
(~/Desktop/planets) specified at the end,
you will clone the repo into whichever folder you are currently in, so make sure you are not already in a git repository!
You, the Collaborator can now make a changes in your clone of the repository, exactly the same way as you would in a repository you set up yourself:
Try it out
Chose a file in the local version of the planets repo and go through the version control process, i.e., edit the file, add the changes and commit them. Now add the extra step of pushing your changes to the remote repository using
git push origin mainNote, that we didn’t have to create a remote called
origin: Git uses this name by default when we clone a repository. Take a look at the planets repository on GitLab again, and you should be able to see any new commit made by a collaborator. You may need to refresh your browser to see the new commit. To download and add changes made by other contributors rungit pull origin mainNow the repositories (Owner’s local, Collaboratorss local, and Owner’s on GitLab) are back in sync.
Some more about remotes
In this episode our local repository has had a single “remote”, called
origin. A remote is a copy of the repository that is hosted somewhere else, that we can push to and pull from, and there’s no reason that you have to work with only one. For example, on some large projects you might have your own copy in your own GitLab account (you’d probably call thisorigin) and also the main “upstream” project repository (let’s call thisupstreamfor the sake of examples). You would pull fromupstreamfrom time to time to get the latest updates that other people have committed.Remember that the name you give to a remote only exists locally. It’s an alias that you choose - whether
origin, orupstream, orfred- and not something intrinstic to the remote repository.The
git remotefamily of commands is used to set up and alter the remotes associated with a repository. Here are some of the most useful ones:
git remote -vlists all the remotes that are configured (we already used this in the last episode)git remote add [name] [url]is used to add a new remotegit remote remove [name]removes a remote. Note that it doesn’t affect the remote repository at all - it just removes the link to it from the local repo.git remote set-url [name] [newurl]changes the URL that is associated with the remote. This is useful if it has moved, e.g. to a different GitLab account, or from GitLab to a different hosting service. Or, if we made a typo when adding it!git remote rename [oldname] [newname]changes the local alias by which a remote is known - its name. For example, one could use this to changeupstreamtofred.
A Basic Collaborative Workflow
In practice, it is good to be sure that you have an updated version of the repository you are collaborating on, so you should
git pullbefore making changes. The basic collaborative workflow would be:
- update your local repo with
git pull origin main,- make your changes and stage them with
git add,- commit your changes with
git commit -m, and- upload the changes to GitLab with
git push origin mainIt is better to make many commits with smaller changes rather than of one commit with massive changes: small commits are easier to read and review.
Conflicts
As soon as people can work in parallel, they’ll likely step on each other’s toes. This will even happen with a single person: if we are working on a piece of software on both our laptop and a server in the lab, we could make different changes to each copy. Version control helps us manage these conflicts by giving us tools to resolve overlapping changes.
To see how we can resolve conflicts, we must first create one. At the beginning of the lesson,
the file mars.txt looked like this:
$ cat mars.txt
Cold and dry, but everything is my favourite colour.
The two moons may be a problem for Wolfman.
But the mummy will appreaciate the lack of humidity.
We will have to manufacture our own oxygen.

When we colonise, we really should make a chocolate factory a priority.

Phoebe and Deimos are taunting me.


Has the most massive storms.

First colonised by Matt Damon in the mid-2010s.

I hope one day to find some friends. It's been so lonely since my last friends left.

History:
First colonised by Matthew Damon in the mid-2010s.

MARS UNSUITABLE FOR WOLFMAN!!! ABORT
Let’s add a line to the owner’s copy only:
$ nano mars.txt
$ cat mars.txt
Cold and dry, but everything is my favourite colour.
The two moons may be a problem for Wolfman.
But the mummy will appreaciate the lack of humidity.
We will have to manufacture our own oxygen.

When we colonise, we really should make a chocolate factory a priority.

Phoebe and Deimos are taunting me.


Has the most massive storms.

First colonised by Matt Damon in the mid-2010s.

I hope one day to find some friends. It's been so lonely since my last friends left.

History:
First colonised by Matthew Damon in the mid-2010s.

MARS UNSUITABLE FOR WOLFMAN!!! ABORT

This line is added to Rebecca's copy
and then push the change to GitLab:
$ git add mars.txt
$ git commit -m "Add a line in to Rebecca's copy"
$ git push origin main
[main 7f4c257] Add a line in to Rebecca's copy
 1 file changed, 2 insertions(+)


 Enumerating objects: 5, done.
Counting objects: 100% (5/5), done.
Delta compression using up to 8 threads
Compressing objects: 100% (3/3), done.
Writing objects: 100% (3/3), 340 bytes | 340.00 KiB/s, done.
Total 3 (delta 2), reused 0 (delta 0), pack-reused 0
To gitlab.com:adacs/planets.git
   ccbeb02..7f4c257  main -> main
Now let’s have Paul make a different change to their copy without updating from GitLab:
$ nano mars.txt
$ cat mars.txt
Cold and dry, but everything is my favourite colour.
The two moons may be a problem for Wolfman.
But the mummy will appreaciate the lack of humidity.
We will have to manufacture our own oxygen.

When we colonise, we really should make a chocolate factory a priority.

Phoebe and Deimos are taunting me.


Has the most massive storms.

First colonised by Matt Damon in the mid-2010s.

I hope one day to find some friends. It's been so lonely since my last friends left.

History:
First colonised by Matthew Damon in the mid-2010s.

MARS UNSUITABLE FOR WOLFMAN!!! ABORT

We added a different line in the other copy
We can commit the change locally:
$ git add mars.txt
$ git commit -m "Add a line in Paul's copy"
but Git won’t let us push it to GitLab:
$ git push origin main
To gitlab.com:adacs/planets.git
 ! [rejected]        main -> main (fetch first)
error: failed to push some refs to 'git@gitlab.com:adacs/planets.git'
hint: Updates were rejected because the remote contains work that you do
hint: not have locally. This is usually caused by another repository pushing
hint: to the same ref. You may want to first integrate the remote changes
hint: (e.g., 'git pull ...') before pushing again.
hint: See the 'Note about fast-forwards' in 'git push --help' for details.

Git rejects the push because it detects that the remote repository has new updates that have not been incorporated into the local branch. What we have to do is pull the changes from GitLab, merge them into the copy we’re currently working in, and then push that. Let’s start by pulling:
$ git pull origin main
...
remote: Enumerating objects: 3, done.
remote: Counting objects: 100% (3/3), done.
remote: Compressing objects: 100% (3/3), done.
remote: Total 3 (delta 0), reused 0 (delta 0), pack-reused 0
Unpacking objects: 100% (3/3), 1.05 KiB | 1.05 MiB/s, done.
From gitlab.com:adacs/planets
 * branch            main       -> FETCH_HEAD
   ccbeb02..7f4c257  main       -> origin/main
Auto-merging mars.txt
CONFLICT (content): Merge conflict in mars.txt
Automatic merge failed; fix conflicts and then commit the result.
The git pull command updates the local repository to include those
changes already included in the remote repository.
After the changes from the remote branch have been fetched, Git detects that changes made to the local copy
overlap with those made to the remote repository, and therefore refuses to merge the two versions to
stop us from trampling on our previous work. The conflict is marked in
in the affected file:
$ cat mars.txt
Cold and dry, but everything is my favourite colour.
The two moons may be a problem for Wolfman.
But the mummy will appreaciate the lack of humidity.
We will have to manufacture our own oxygen.

When we colonise, we really should make a chocolate factory a priority.

Phoebe and Deimos are taunting me.


Has the most massive storms.

First colonised by Matt Damon in the mid-2010s.

I hope one day to find some friends. It's been so lonely since my last friends left.

History:
First colonised by Matthew Damon in the mid-2010s.

MARS UNSUITABLE FOR WOLFMAN!!! ABORT

<<<<<<< HEAD
We added a different line in the other copy
=======
This line is added to Rebecca's copy
>>>>>>> 7f4c25737460c1015c9045909c88aeeb190614e4
Our change is preceded by <<<<<<< HEAD.
Git has then inserted ======= as a separator between the conflicting changes
and marked the end of the content downloaded from GitLab with >>>>>>>.
(The string of letters and digits after that marker
identifies the commit we’ve just downloaded.)
It is now up to us to edit this file to remove these markers and reconcile the changes. We can do anything we want: keep the change made in the local repository, keep the change made in the remote repository, write something new to replace both, or get rid of the change entirely. Let’s replace both so that the file looks like this:
$ cat mars.txt
Cold and dry, but everything is my favourite colour.
The two moons may be a problem for Wolfman.
But the mummy will appreaciate the lack of humidity.
We will have to manufacture our own oxygen.

When we colonise, we really should make a chocolate factory a priority.

Phoebe and Deimos are taunting me.


Has the most massive storms.

First colonised by Matt Damon in the mid-2010s.

I hope one day to find some friends. It's been so lonely since my last friends left.

History:
First colonised by Matthew Damon in the mid-2010s.

MARS UNSUITABLE FOR WOLFMAN!!! ABORT

We removed the conflict on this line
To finish merging,
we add mars.txt to the changes being made by the merge and then commit:
$ git add mars.txt
$ git status
On branch main
All conflicts fixed but you are still merging.
  (use "git commit" to conclude merge)

Changes to be committed:

	modified:   mars.txt
$ git commit
[main 68f21e8] Merge branch 'main' of gitlab.com:adacs/planets into main
Now we can push our changes to GitLab:
$ git push origin main
Enumerating objects: 10, done.
Counting objects: 100% (10/10), done.
Delta compression using up to 8 threads
Compressing objects: 100% (6/6), done.
Writing objects: 100% (6/6), 683 bytes | 683.00 KiB/s, done.
Total 6 (delta 4), reused 0 (delta 0)
To gitlab.com:adacs/planets.git
   7f4c257..68f21e8  main -> main
Git keeps track of what we’ve merged with what, so we don’t have to fix things by hand again. When Rebecca, who made the first change, pulls again, she doesn’t need to merge again because Git knows Paul has already done that.
Git’s ability to resolve conflicts is very useful, but conflict resolution costs time and effort, and can introduce errors if conflicts are not resolved correctly.
Conflicts on Non-textual files
What does Git do when there is a conflict in an image or some other non-textual file that is stored in version control?
Solution
Let’s try it. Suppose Dracula takes a picture of Martian surface and calls it
mars.jpg.If you do not have an image file of Mars available, you can create a dummy binary file like this:
$ head -c 1024 /dev/urandom > mars.jpg
$ ls -lh mars.jpg
-rw-r--r-- 1 vlad 57095 1.0K Mar 8 20:24 mars.jpg
lsshows us that this created a 1-kilobyte file. It is full of random bytes read from the special file,/dev/urandom.Now, suppose Dracula adds
mars.jpgto his repository:$ git add mars.jpg $ git commit -m "Add picture of Martian surface"[main 8e4115c] Add picture of Martian surface 1 file changed, 0 insertions(+), 0 deletions(-) create mode 100644 mars.jpgSuppose that Wolfman has added a similar picture in the meantime. His is a picture of the Martian sky, but it is also called
mars.jpg. When Dracula tries to push, he gets a familiar message:$ git push origin mainTo https://github.com/vlad/planets.git ! [rejected] main -> main (fetch first) error: failed to push some refs to 'https://github.com/vlad/planets.git' hint: Updates were rejected because the remote contains work that you do hint: not have locally. This is usually caused by another repository pushing hint: to the same ref. You may want to first integrate the remote changes hint: (e.g., 'git pull ...') before pushing again. hint: See the 'Note about fast-forwards' in 'git push --help' for details.We’ve learned that we must pull first and resolve any conflicts:
$ git pull origin mainWhen there is a conflict on an image or other binary file, git prints a message like this:
$ git pull origin main
remote: Counting objects: 3, done.
remote: Compressing objects: 100% (3/3), done.
remote: Total 3 (delta 0), reused 0 (delta 0)
Unpacking objects: 100% (3/3), done.
From https://github.com/vlad/planets.git
 * branch            main     -> FETCH_HEAD
   6a67967..439dc8c  main     -> origin/main
warning: Cannot merge binary files: mars.jpg (HEAD vs. 439dc8c08869c342438f6dc4a2b615b05b93c76e)
Auto-merging mars.jpg
CONFLICT (add/add): Merge conflict in mars.jpg
Automatic merge failed; fix conflicts and then commit the result.
The conflict message here is mostly the same as it was for
mars.txt, but there is one key additional line:warning: Cannot merge binary files: mars.jpg (HEAD vs. 439dc8c08869c342438f6dc4a2b615b05b93c76e)Git cannot automatically insert conflict markers into an image as it does for text files. So, instead of editing the image file, we must check out the version we want to keep. Then we can add and commit this version.
On the key line above, Git has conveniently given us commit identifiers for the two versions of
mars.jpg. Our version isHEAD, and Wolfman’s version is439dc8c0.... If we want to use our version, we can usegit checkout:$ git checkout HEAD mars.jpg $ git add mars.jpg $ git commit -m "Use image of surface instead of sky"[main 21032c3] Use image of surface instead of skyIf instead we want to use Wolfman’s version, we can use
git checkoutwith Wolfman’s commit identifier,439dc8c0:$ git checkout 439dc8c0 mars.jpg $ git add mars.jpg $ git commit -m "Use image of sky instead of surface"[main da21b34] Use image of sky instead of surfaceWe can also keep both images. The catch is that we cannot keep them under the same name. But, we can check out each version in succession and rename it, then add the renamed versions. First, check out each image and rename it:
$ git checkout HEAD mars.jpg
$ git mv mars.jpg mars-surface.jpg
$ git checkout 439dc8c0 mars.jpg
$ mv mars.jpg mars-sky.jpg
Then, remove the old
mars.jpgand add the two new files:$ git rm mars.jpg $ git add mars-surface.jpg $ git add mars-sky.jpg $ git commit -m "Use two images: surface and sky"[main 94ae08c] Use two images: surface and sky 2 files changed, 0 insertions(+), 0 deletions(-) create mode 100644 mars-sky.jpg rename mars.jpg => mars-surface.jpg (100%)Now both images of Mars are checked into the repository, and
mars.jpgno longer exists.
Reducing Conflicts
If you find yourself resolving a lot of conflicts in a project, consider these technical approaches to reducing them:
- Pull from upstream more frequently, especially before starting new work
- Use topic branches to segregate work, merging to main when complete
- Make smaller more atomic commits
- Where logically appropriate, break large files into smaller ones so that it is less likely that two authors will alter the same file simultaneously
Conflicts can also be minimized with project management strategies:
- Clarify who is responsible for what areas with your collaborators
- Discuss what order tasks should be carried out in with your collaborators so that tasks expected to change the same lines won’t be worked on simultaneously
- If the conflicts are stylistic churn (e.g. tabs vs. spaces), establish a project convention that is governing and use code style tools (e.g.
htmltidy,perltidy,rubocop, etc.) to enforce, if necessary
Branching
Git can store multiple concurrent sets of the changes made to the files and directories in a git repo. Each of these parallel instances is called a branch and main (or master) is Git’s default working branch.
A new branch can be created from any commit and will have a divergent history starting from this commit. Branches can also be merged together.
Why are branches useful?
Developing software we want to try out some new ideas,
but we’re not sure yet whether they’ll work or if we’ll keep them.
While this development work is going on we want to make sure that our working version of the software is unaffected.
To do this we can create a branch, e.g. ‘feature1’, and keep our main branch clean.
When we’re done developing the feature and we are sure that we want to include it
in our program, we can merge the feature branch with the main branch.
This keeps all the work-in-progress separate from the main branch, which
contains tested, working code.
When we merge our feature branch with main, git creates a new commit which
contains merged files from main and feature1.
After the merge we can continue developing (and making commits) in feature1 as well.
The merged branch is not deleted.
Branching workflows
One popular model is the Gitflow model:

- A
mainbranch, representing a released version of the code - A release branch, representing the beginnings of the next release - a branch where the code is still undergoing testing
- Various feature and/or developer-specific branches representing work-in-progress, new features, bug fixes etc
There are different possible workflows when using Git for code development. If you want to learn more about different workflows with Git, have a look at this discussion on the Atlassian website.
Branching in practice
$ git branch [branch-name]         create a branch with name [branch-name]

$ git checkout [branch-name]       switch onto branch with name [branch-name]
$ git switch [branch name]

$ git checkout -b [branch-name]    create and switch onto a branch [branch-name] in one step

$ git push <remote> <branch-name>  push changes in [branch-name] to the remote [remote]
Continuing with our planets repo, we want to add information on Dune but we are not sure whether we can collate enough information to justify adding it as a possible base to explore for Wolfman, Dracula and their colleagues.
To start, Rebecca creates a new branch called dune:
$ git checkout -b dune
Switched to a new branch 'dune'
She then creates a sub-folder and adds an overview document (Readme file) to assign a planet to each participant to explore, before adding, committing and pushing the changes:
$ mkdir Dune
$ touch Dune/Readme.md
$ nano Dune/Readme.md
$ git add Dune/README.md
$ git commit -m "add Dune planet assignment readme"
 1 file changed, 7 insertions(+)
 create mode 100644 Dune/README.md
$ git push origin dune
Enumerating objects: 5, done.
Counting objects: 100% (5/5), done.
Delta compression using up to 8 threads
Compressing objects: 100% (3/3), done.
Writing objects: 100% (4/4), 485 bytes | 485.00 KiB/s, done.
Total 4 (delta 1), reused 0 (delta 0), pack-reused 0
remote:
remote: To create a merge request for dune, visit:
remote:   https://gitlab.com/adacs/planets/-/merge_requests/new?merge_request%5Bsource_branch%5D=dune
remote:
To gitlab.com:adacs/planets.git
 * [new branch]      dune -> dune
Your turn:
Pull the changes from the remote repository and switch onto the new branch. You can check all branches with
git branch -a.Check which planet you have been assigned and create a new branch diverging from
dunefollowing the naming convention dune_[yourname]Create a document for your planet (in the Dune folder) and add a few lines. Add, commit and push your changes.
Do not merge any changes yet!
GitLab - pushing a new branch
When you push your new branch to GitLab it will automatically show you an option to create a merge request on the repo page. We will dismiss this option for now.

Consolidating Changes
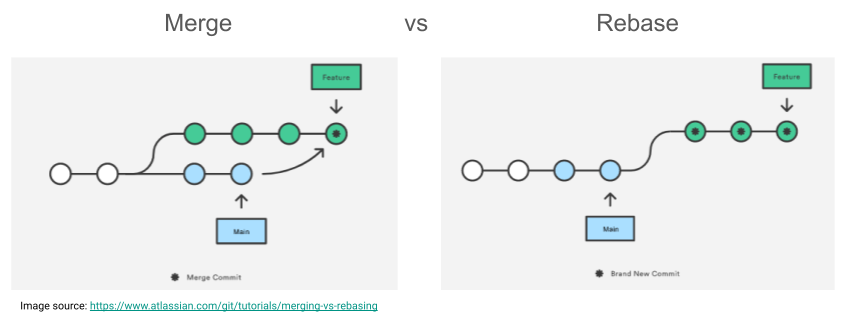
Merging vs Rebasing
In essence, both git merge and git rebase achieve the same thing, that is integrating changes from one branch into another branch.
However, how this is done differs:
-
git mergecreates a new commmit that integrates the changes from branch a (e.g.main) into branch b (e.g.feature). The existing branches are not changed in any way. -
git rebasemoves the entire branch b (iefeature) to the tip of branch a (iemain), effectively incorporating all changes from branch a and leaving you with a linear history. Rebasing rewrites your project history!
The image below visualises the difference between git merge and git rebase.
We will look at using both, but to read a good comparison visit the Atlassian Merging vs. Rebasing page.
Rebase
With GitLab you can:
- rebase from the command line, automatically or interactively, or
- rebase from the UI

Remember: Rebasing rewrites your history
You should not rebase a shared branch as this can lead to complex merge issues.
Worked Example
The example below shows a rebase of the dune branch that happened after Rebecca and Paul solved their merge conflicts on the main branch. Before continuing to edit files on branch dune Rebecca wanted to include the changes from main without creating a merge commit, to do this she followed these steps:
- Fetch the latest changes from
main - Checkout the feature branch
dune - Rebase against
main - Force push your changes. Be careful with this! Check the gitlab documentation.
Before you rebase it is a good idea to back up your branch so you don’t lose any changes.
git checkout -b dune-backup
Switched to a new branch 'dune-backup'
git checkout dune
Switched to branch 'dune'
git fetch origin main
remote: Enumerating objects: 10, done.
remote: Counting objects: 100% (10/10), done.
remote: Compressing objects: 100% (6/6), done.
remote: Total 6 (delta 4), reused 0 (delta 0), pack-reused 0
Unpacking objects: 100% (6/6), 663 bytes | 60.00 KiB/s, done.
From gitlab.com:adacs/planets
 * branch            main       -> FETCH_HEAD
   7f4c257..68f21e8  main       -> origin/main
git checkout dune
Switched to branch 'dune'
git rebase origin/main
Successfully rebased and updated refs/heads/dune.
git push --force-with-lease origin dune
Enumerating objects: 5, done.
Counting objects: 100% (5/5), done.
Delta compression using up to 8 threads
Compressing objects: 100% (3/3), done.
Writing objects: 100% (4/4), 492 bytes | 492.00 KiB/s, done.
Total 4 (delta 1), reused 0 (delta 0), pack-reused 0
remote:
remote: To create a merge request for dune, visit:
remote:   https://gitlab.com/adacs/planets/-/merge_requests/new?merge_request%5Bsource_branch%5D=dune
remote:
To gitlab.com:adacs/planets.git
 + 481e544...c1f0a83 dune -> dune (forced update)
After this rebase our branch graph has changed, instead of the dune branch diverging from the “Merge branch ‘tidy-files’ into ‘main’” it now diverges from the conflict resolution commit done by Paul.

Recover your changes
If you need to recover your changes you can reset
duneagainstdune-backup:git checkout dune git reset --hard dune-backupNote, if you have added changes to
dunesince creating the back-up branch those changes will be lost doing the hard reset.
Rebase from the GitLab UI
You can rebase your feature branch directly from the merge request through a quick action, if all of these conditions are met:
- No merge conflicts exist for your feature branch.
- You have the Developer role for the source project. This role grants you permission to push to the source branch for the source project.
- If the merge request is in a fork, the fork must allow commits from members of the upstream project.
To rebase from the UI:
- Go to your merge request.
- Type /rebase in a comment.
- Select Comment.
GitLab schedules a rebase of the feature branch against the default branch and executes it as soon as possible.
Interactive Rebase
git rebase -i will open an interactive rebasing session. This provides an opportunity to edit, delete, combine, and reorder individual commits as they are moved onto the new base commit. This can be useful for cleaning up the history before sharing it with others.
Worked Example
Rebecca rebased the dune branch onto origin/main after her and Paul’s merge conflict was resolved on the main branch (see worked example above).
She also realised that there was a typo in her original commit to the dune branch which she corrected with git comit --amend. However, as this commit had already been pushed to GitLab this led to a further merge conflict with origin/dune. After working on adding instructions to the README file and fixing some typos the recent history of the dune branch has become a little convoluted. Rebecca is now trying to rewrite this recent history using an interactive rebase.
git log --oneline
6c45347 (HEAD -> dune) fix another typo
27c6f7f fix typo
b94e389 add instructions to readme
54130ab (origin/dune) Merge branch 'dune' of gitlab.com:adacs/planets into dune
d636801 add Dune planet assignment readme
8996bc5 add Dune planet assignemtn readme
68f21e8 (origin/main, main) Merge branch 'main' of gitlab.com:adacs/planets into main
e6c7a83 Add a line in Paul's copy
7f4c257 Add a line in to Rebecca's copy
ccbeb02 Update .gitignore
2928bc6 Update README.md
48ba03b Merge branch 'tidy-files' into 'main'
To use git rebase to rewrite our recent history we use a specific commit ID (or number relative to HEAD) as our base:
git rebase -i HEAD~5
This will open the interactive rebase file in your default editor:
pick d636801 add Dune planet assignment readme
pick 8996bc5 add Dune planet assignemtn readme
pick b94e389 add instructions to readme
pick 27c6f7f fix typo
pick 6c45347 fix another typo

# Rebase 68f21e8..6c45347 onto 68f21e8 (5 commands)
#
# Commands:
# p, pick <commit> = use commit
# r, reword <commit> = use commit, but edit the commit message
# e, edit <commit> = use commit, but stop for amending
# s, squash <commit> = use commit, but meld into previous commit
# f, fixup <commit> = like "squash", but discard this commit's log message
# x, exec <command> = run command (the rest of the line) using shell
# b, break = stop here (continue rebase later with 'git rebase --continue')
# d, drop <commit> = remove commit
# l, label <label> = label current HEAD with a name
# t, reset <label> = reset HEAD to a label
# m, merge [-C <commit> | -c <commit>] <label> [# <oneline>]
# .       create a merge commit using the original merge commit's
# .       message (or the oneline, if no original merge commit was
# .       specified). Use -c <commit> to reword the commit message.
#
# These lines can be re-ordered; they are executed from top to bottom.
#
# If you remove a line here THAT COMMIT WILL BE LOST.
#
# However, if you remove everything, the rebase will be aborted.
#
Rebecca now changes this to the following before saving the file:
p d636801 add Dune planet assignment readme
d 8996bc5 add Dune planet assignemtn readme
p b94e389 add instructions to readme
s 27c6f7f fix typo
s 6c45347 fix another typo
As she is attempting to squash the last few commits she can now chose the commit message associated with this:
# This is a combination of 3 commits.
# This is the 1st commit message:

add instructions to readme

# This is the commit message #2:

fix typo

# This is the commit message #3:

fix another typo

# Please enter the commit message for your changes. Lines starting
# with '#' will be ignored, and an empty message aborts the commit.
#
# Date:      Wed Oct 6 15:08:55 2021 +0800
#
# interactive rebase in progress; onto 68f21e8
# Last commands done (5 commands done):
#    squash 27c6f7f fix typo
#    squash 6c45347 fix another typo
# No commands remaining.
# You are currently rebasing branch 'dune' on '68f21e8'.
#
# Changes to be committed:
#       modified:   Dune/README.md
#
She decides to keep only the first commit message:
add instructions to readme
The final step is to force push these changes to origin/dune:
git push --force-with-lease origin dune
The force push here is necessary as we had created a merge commit that has now been dropped from our local history but still exists in the remote branch.
The --force-with-lease flag is a saver option of the --force flag as it does not overwrite any commits made to the remote (by e.g. your collaborator) since you started working on it locally, see this stackoverflow post.
The new history now looks like this:
16947f5 (HEAD -> dune, origin/dune) add instructions to readme
d636801 add Dune planet assignment readme
68f21e8 (origin/main, main) Merge branch 'main' of gitlab.com:adacs/planets into main
e6c7a83 Add a line in Paul's copy
7f4c257 Add a line in to Rebecca's copy
ccbeb02 Update .gitignore
2928bc6 Update README.md
48ba03b Merge branch 'tidy-files' into 'main'
Merging
In GitLab, you typically use a merge request to merge your changes, instead of using the command line.
However, if you want to use the command line you can do so as well, however, this will not create a merge request and the associated functionalities like assigning a reviewer and the option to discuss changes before they get merged.
Worked Example
Rebecca has the dune-backup branch from when she wanted to rebase the dune branch.
More work has now been done on the dune branch and Rebecca wants to merge this changes into dune-backup. Checkout this Atlassian tutorial for more detail.
Confirm the receiving branch
Execute git status to ensure that HEAD is pointing to the correct merge-receiving branch. If needed, execute git checkout to switch to the receiving branch.
git checkout dune-backup
git status
On branch dune-backup
nothing to commit, working tree clean
Fetch latest remote commits
Make sure the receiving branch dune-backup and the merging branch dune are up-to-date with the latest remote changes. In Rebecca’s case dune-backup only exists locally, however, dune is connected to the remote, so she does a git pull on dune
git fetch origin dune
From gitlab.com:adacs/planets
 * branch            dune       -> FETCH_HEAD
Merging
A merge can be initiated by executing git merge [branch-to-merge] where [branch-to-merge] is the name of the branch that will be merged into the receiving branch.
git merge dune
CONFLICT (add/add): Merge conflict in Dune/README.md
Auto-merging Dune/README.md
Automatic merge failed; fix conflicts and then commit the result.
Rebecca now checks Dune/README.md and resolves the conflicts
git status
On branch dune-backup
You have unmerged paths.
  (fix conflicts and run "git commit")
  (use "git merge --abort" to abort the merge)

Changes to be committed:
	modified:   .gitignore
	modified:   README.md
	modified:   mars.txt

Unmerged paths:
  (use "git add <file>..." to mark resolution)
	both added:      Dune/README.md
<<<<<<< HEAD
=======
Please find your name in the list below, next to it is the
planet from the Dune universe assigned to you.

1. Create a new branch (branching of `dune`) called `dune_[yourname]`
(first name is enough)
  a. First make sure you are on branch `dune`: `git switch dune`
  b. You can check the branch you are on with `git branch` it will
     show your local branches and highlight the branch you are working on
  c. Then create yout branch and switch onto it:
     `git checkout -b dune_[yourname]`
  d. Feel free to double check the branch you are on as in step b.
2. Create a text file in the Dune folder for your planet and add
some info to it.
3. Track your changes using `git add`. `git commit` and
`git push origin [your-branch]`
4. Repeat a few times: change your file and track the changes to build
up a short git history on your branch.

>>>>>>> dune
Julian Carlin               - Arrakis
Kariuki Chege               - Caladan
Liam Dunn                   - Giedi Prime
Yi Shuen (Christine) Lee    - Kaitain
Hannah Middleton            - Ix
Lucy Strang                 - Poritrin
Andrés Vargas               - Salusa Secundus
Rebecca cleans up the README file and then runs git add and git commit to finalise the merge
git add Dune/README.md
git commit
[dune-backup c2a376f] Merge branch 'dune' into dune-backup
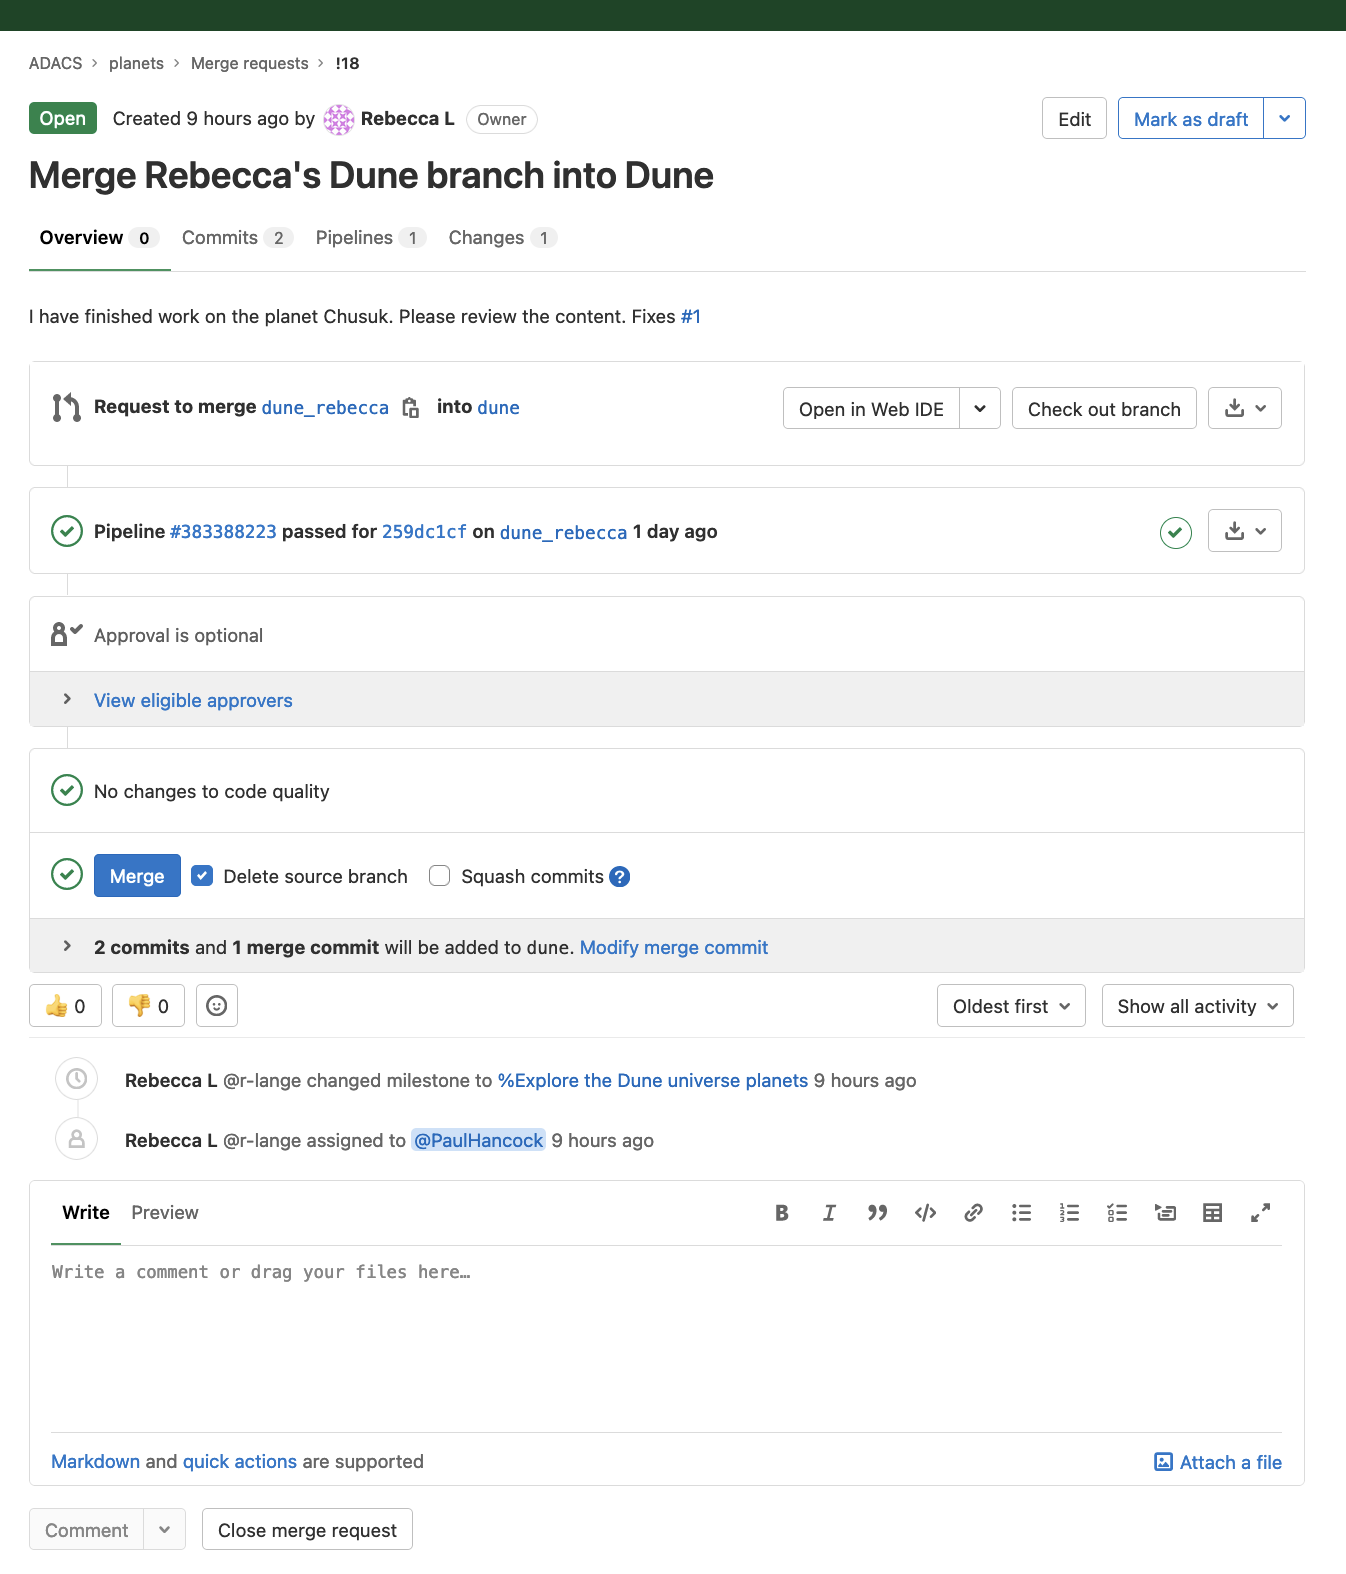
Merge Requests
There are several ways you can submit a merge request:
- Go to the Merge Request (MR) tab of you repo, e.g. planets repo merge request
- When you push changes of your branch to GitLab, the output message includes a link to create a MR, see below
- If you have an issue you are trying to fix you can create a MR from the issue (this will create a new branch for you)
- to reference an existing issues in an MR you can add a comment in the MR description
Fixes #[issue-number](GitLab should help with auto-completion)
Using Milestones, Issues and Epics can help you manage your project, more on that in the next lesson.
 ...
 remote: To create a merge request for docs-new-merge-request, visit:
 remote:   https://gitlab.example.com/my-group/my-project/merge_requests/new?merge_request%5Bsource_branch%5D=my-new-branch
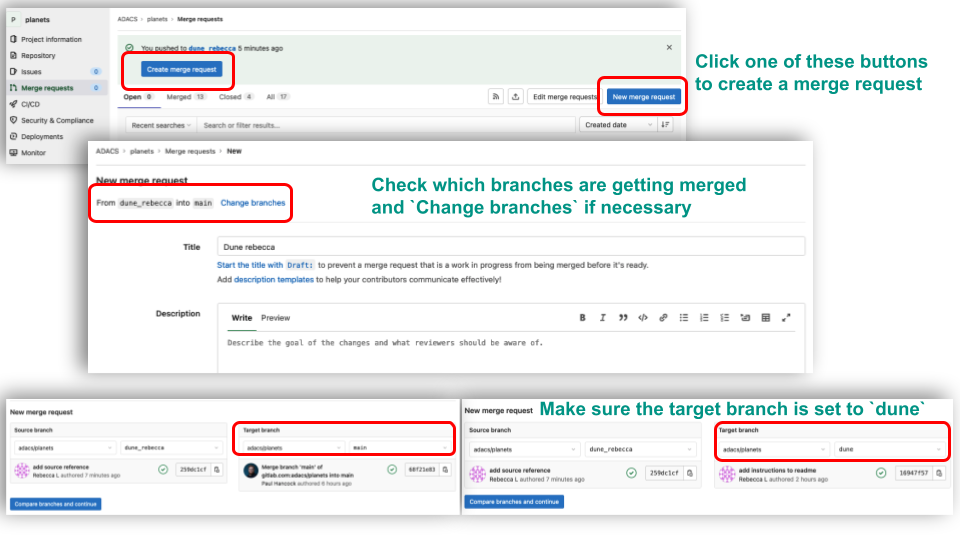
Let’s work through some rebasing and merging of your branches
- Use an interactive rebase to clean up the git history of your branch
dune_[yourname]- Create a merge request for your branch into
duneSolution
Use
git rebase -i HEAD~[n]to start your interactive rebase, where HEAD~[n] specifies the commit you want to use as your base, i.e. [n] commits into the past. Pick, squash, edit, … your commits, resolve any squash comment or other issues and then (force) push your branch to origin/dune_[yourname]a. When you pushed your above changes to the remote repository the output should have included a link to create a merge request:
...
remote: To create a merge request for docs-new-merge-request, visit:
remote:   https://gitlab.example.com/my-group/my-project/merge_requests/new?merge_request%5Bsource_branch%5D=my-new-branch
Copy the link and open it in your browser. Make sure you check which branch you are merging into! We want to merge
dune_[yourname]intodune, click the Change branches link if this is not the case.b. After you pushed your changes you can create a new merge request from the GitLab repository UI. As in a), make sure you set up the merge request to merge
dune_[yourname]intodune.
Summary
- A branch is a divergent history from the
mainbranch starting at a specific commit- You can think of them as pointers to a specific commit
- You should develop new code on a branch so that your
mainalways remains in working order- branch early, and branch often
- there is no storage / memory overhead with making many branches, it’s easier to logically divide up your work than have big beefy branches which are more likely to cause merge conflicts.
- Merging creates a new commit that integrates the changes and existing branches are not changed.
- Rebasing moves your changes to the tip of the existing branch and will re-write history to give you a linear workflow. You should not do it in shared branches!
CI/CD in GitLab
In this weeks lesson we will introduce what automations are possible for continuous integration/development/deployment/delivery within GitLab. In next week’s lesson we will look at a worked example based on the ‘example codes’ repo.
Continuous Integration is the practice of integrating code into a shared repository and building/testing each change automatically, as early as possible - usually several times a day.
- Detects errors as quickly as possible
- Fix while fresh in your mind
- Reduces integration problems
- Smaller problems are easier to digest
- Don’t compound problems
- Allows teams to develop faster, with more confidence
Continuous Delivery adds that the software can be released to production at any time, often by automatically pushing changes to a staging system.
- Ensures that every change to the system is releasable
- Lowers risk of each release - makes releases “boring”
- Delivers value more frequently
- Get fast feedback on what users care about
Continuous Deployment goes further and pushes changes to production automatically.
GitLab CI/CD features
Multi-platform: you can execute builds on Unix, Windows, OSX, and any other platform that supports Go.
Multi-language: build scripts are command line driven and work with Java, PHP, Ruby, C, and any other language.
Parallel builds: GitLab CI splits builds over multiple machines, for fast execution.
Autoscaling: you can automatically spin up and down VM’s or Kubernetes pods to make sure your builds get processed immediately while minimizing costs.
Realtime logging: a link in the merge request takes you to the current build log that updates dynamically.
Versioned tests: a .gitlab-ci.yml file that contains your tests, allowing developers to contribute changes and ensuring every branch gets the tests it needs.
Pipeline: define multiple jobs per stage and even trigger other pipelines.
Build artifacts: upload binaries and other build artifacts to GitLab and browse and download them.
Test locally: reproduce tests locally using gitlab-runner exec.
Docker support and container registry: use custom Docker images, run on Kubernetes, built-in container registry to store, share, and use container images.
GitLab for Education and GitLab for Open Source provide qualifying projects the top GitLab tier, plus 50,000 CI minutes per month.
The .gitlab-ci.yml file all tiers
To use GitLab CI/CD, you need:
- Application code hosted in a Git repository.
- A file called
.gitlab-ci.ymlin the root of your repository, which contains the CI/CD configuration.
In the .gitlab-ci.yml file, you can define:
- The scripts you want to run.
- Other configuration files and templates you want to include.
- Dependencies and caches.
- The commands you want to run in sequence and those you want to run in parallel.
- The location to deploy your application to.
- Whether you want to run the scripts automatically or trigger any of them manually.
GitLab detects the .gitlab-ci.yml in your repo and an application called GitLab Runner runs the scripts defined in the jobs every time changes are pushed to any branch in the project.
Organise your scripts and jobs into stages that follow a sequence appropriate for your repo. Imagine the scripts you add to jobs are the same as shell commands you run on your computer.
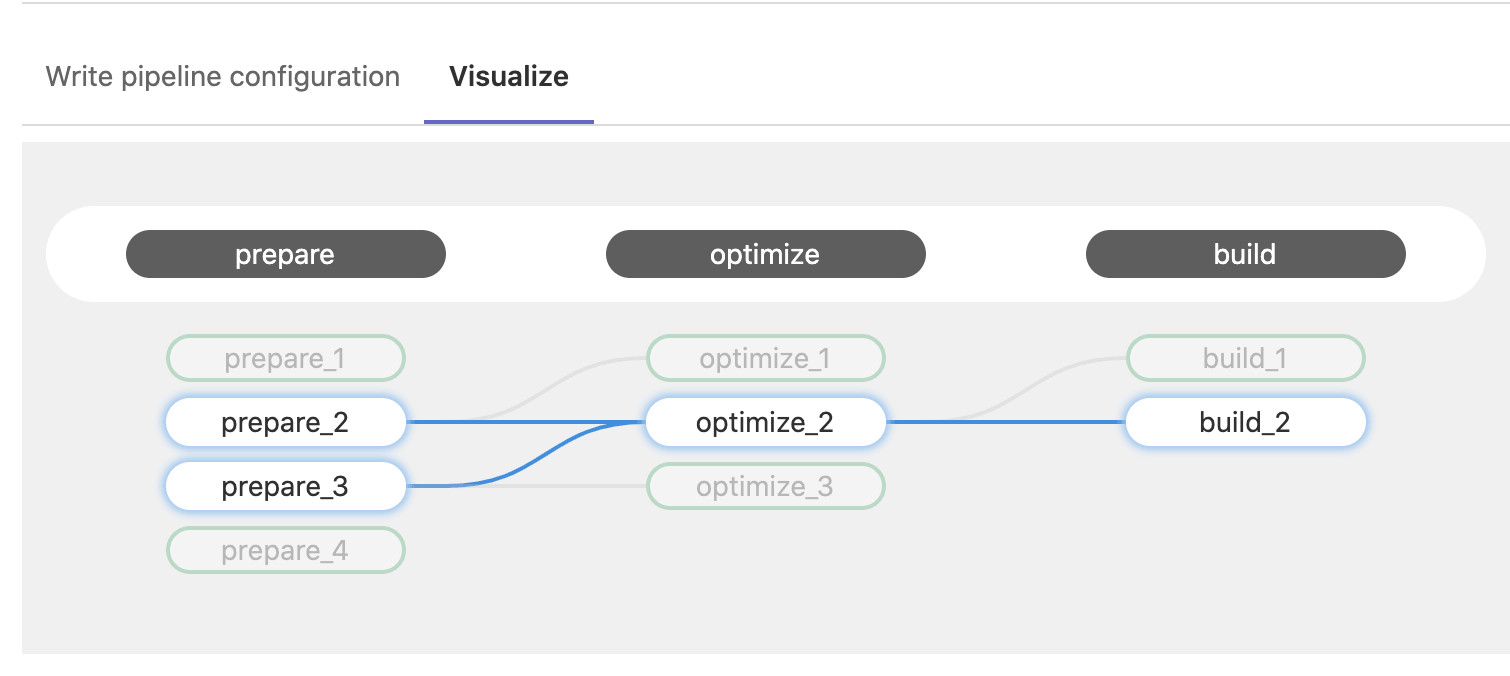
Use the pipeline editor to edit your .gitlab-ci.yml configuration file. The editor will validate your file against the schema, there is also a lint tool to test the validity of your changes before committing them.
The editor also lets you visualise your pipeline, which is useful to check workflows and dependencies for more complex configurations.
 GitLab also maintains a repository of CI/CD templates.
Example
stages:
  - build
  - test
  - deploy

build-job:
  stage: build
  script:
    - echo "Hello, $GITLAB_USER_LOGIN!"

test-job1:
  stage: test
  script:
    - echo "This job tests something"

test-job2:
  stage: test
  script:
    - echo "This job tests something, but takes more time than test-job1."
    - echo "After the echo commands complete, it runs the sleep command for 20 seconds"
    - echo "which simulates a test that runs 20 seconds longer than test-job1"
    - sleep 20

deploy-prod:
  stage: deploy
  script:
    - echo "This job deploys something from the $CI_COMMIT_BRANCH branch."
The example consists of various scripts run in four jobs which are grouped into three stages.
The build-job job in the build stage runs first, on successful completion the two test-jobs in the test stage are run in parallel, followed by the deploy-prod job in the deploy stage.
Let’s have a look at this script implemented in the Planets repo.
Acknowledgements
This lesson is based on and adapted from:
- The Software Carpentries lesson on Version Control, specifically episodes 8 and 9
- Gerard Capes SWC-style lessons on git, specifically the episode on branching
- The gitlab ci/cd page
- GitLab’s CI Community Day 2020 materials
- GitLab Why CI/CD presentation
Key Points
start a new branch for each new feature development
use a GitLab CI/CD template or create your own to keep track of development status/goals
submit pull request from a feature branch and run CI to test all is working.