Packaging, testing, and documentation
Overview
Teaching: 120 min
Exercises: 60 minQuestions
How to set up a module/package in Python?
How/why do I write tests?
How is documentation different from commenting?
How/why do I write documentation?
Objectives
Set up a directory/file structure for packaging code
Understand how to test code
Understand how/when/where to document code
In this module we will learn how and why we can document code, test code, and bundle code into a library/module that can be used by others. We will start with the packaging code section as this will lay out the framework of where we place our various files.
Packaging code
What is a python module?
A python module is a library of code that can be distributed and used by others.
Common modules that you would have used before include numpy, scipy, and astropy.
Modules primarily do one or both of the following:
- to provide functionality to other software (a library)
- to execute a task (a software package)
Because of the above dual purpose people tend to use the words package and module interchangeably.
Common python modules
What other python modules/packages have you used?
Examples
matplotlib
sklearn
pymc3
Why make a module?
A common mantra of software development is don’t repeat yourself (or others). This effectively means that you should write code once, and then use it multiple times. At the most basic level, it means that code that is used many times should be put into a function, which is then called often. This means that you have only one place for the bug to occur/fix, aiding your debug/development cycle.
If you find yourself copying functions between different code that you write, you should consider packaging those functions into a module and then just importing that module.
Packaging your software into a module will allow you to share your work more broadly via a software repository such as github, or even the python package index (pypi.org). Having your software shared online will increase the visibility of your work, which can lead to greater recognition of your work through software citation.
Developing or contributing to a software package that is widely used is another way that your effort can be recognized and can be used to strengthen a grant, scholarship, or job application.
How are python modules structured?
Python modules can contain a variety of elements including python code, C/Fortran or other language code, data, documentation, scripts, and many other things. The example that we will be dealing with today is the simplest example as it only contains python code.
Python modules mirror the underlying directory/file structure.
If you want to create a module called mymodule all you need to do is create a directory called mymodule and make sure that it has a special file in it called __init__.py.
This file can be empty and you’ll still have defined a module.
Let’s try that out now:
Challenge: make a module
Create a directory with a name of your choice and put an empty file in it called
__init__.py. Once this is done, open a python terminal and try toimportyour module.Example
mkdir mymodule
touch mymodule/__init__.py
python
Python 3.8.10 (default, Jun  2 2021, 10:49:15)
[GCC 9.4.0] on linux
Type "help", "copyright", "credits" or "license" for more information.
>>> import mymodule
>>> dir(mymodule)
['__builtins__', '__cached__', '__doc__', '__file__', '__loader__', '__name__', '__package__', '__path__', '__spec__']
Note that even with an empty file your module already has a bunch of attributes assigned to it.
The __path__ and __file__ attributes will be the path to the module directory and filename of the __init__.py file that you created.
Try the following to verify:
print(mymodule.__path__, mymodule.__file__)
Congratulations, you have just created a python module. It doesn’t do anything useful yet but we’ll get to that later on. Firstly we should discuss the contents and structure of a typical python package.
Package contents and structure.
Recommended content/structure is:
/docs
/mymodule
/mymodule/data
/scripts
/tests
LICENSE
README.md
requirements.txt
setup.py
The files and directories are as follows:
/docsis where you should store the stand-alone documentation for your package./mymoduleis both the name of your module, and the location that the module code should be kept/mymodule/datais where you should store data that are required by your module. Not always needed. Maybe you have some constants or templates that you use to make your life easier. They should be stored here./scriptsis where you put the scripts that a user will interact with from the command line. Typically without the.pyextension./testsis where you put all the code and data that are required for testing your packageLICENSEis for licencing your code. Be as permissive as possible, check with your institute as to what they recommend you use. (They may not care).README.mdis not documentation. This should contain a high level description of your package. It is what GitHub will display on the front page of your repository.requirements.txtis where you list all of your code dependencies (like numpy etc). This makes it easier for people to install your package.setup.pyis a script that will allow package managers likepipto auto-magically install your package. It can also be run directly.
We’ll come back to each of these things later in this course but for now let’s just focus on the mymodule and scripts directories.
An example code repository has been set up at MAP21A-JCarlin-ExampleCodes, which contains the above structure. For the remainder of this workshop we will be building on this template to make a fully documented and tested python package. So that we don’t all step on each other’s toes, everyone should fork the repo on github and then clone this new version.
Fork and clone the repo
- Navigate to https://gitlab.com/adacs/map21a-jcarlin-examplecodes
- Ensure that you are logged into gitlab
- Click the fork button (top right)
- On your forked version of the repo click the blue clone button
- copy the link that starts with
git@gitlab.com- In a terminal on your computer run
git clone <link-from-above>- If you don’t want to use git, then use the
download source codeoption and unzip to some place on your computer.
If you are familiar with git then feel free to commit changes to your repo as we progress through the following. (See next workshop for git instructions).
Making a not-empty python package
Now that we have our template python package we will add some super basic functionality to it.
Edit
__init__.pyEdit
mymodule/__init__.pyso that it does two things:
- Prints “Hello from module `mymodule`” when it is run.
- Defines a function called
funcwhich prints “You just ran the function called `func` from module `mymodule`”Expected behavior
python mymodule/__init__pyHello from `mymodule`Python 3.8.10 (default, Jun 2 2021, 10:49:15) [GCC 9.4.0] on linux Type "help", "copyright", "credits" or "license" for more information. >>> import mymodule Hello from `mymodule` >>> dir(mymodule) ['__builtins__', '__cached__', '__doc__', '__file__', '__loader__', '__name__', '__package__', '__path__', '__spec__', 'func'] >>> mymodule.func() You just ran the function called `func` from module `mymodule`
Submodules
Note that some packages like scipy like to use sub-modules to organize code based on functionality.
Sub-modules can be easily created in one of two ways:
- a file within the directory
mymodulecalledsubmod1.py - a directory within
mymodulecalledsubmod2with an__init__.pyfile within it.
Either way the sub-module can be imported as:
from mymodule import submod1, submod2
By default all of the sumbodules will be imported so you can also access functions within submod1 like this:
import mymodule

mymodule.submod1.func()
To control which sub-modules are imported we can define a variable within the __init__.py file which is __all__ and then define which sub-modules should automatically be imported.
Challenge: automatically import only some modules
- Create two sub-modules of
mymodulecalleddefaultandother.- Edit the
__init__.pyfile so that onlydefaultis imported when you importmymodule- Confirm that
othercan still be explicitly importedSolution
touch mymodule/{default,other}.py
echo "__all__ = ['default']" >> mymodule/__init__.py
python -c "import mymodule; print(dir(mymodule))"
Hello from `mymodule`
['__all__', '__builtins__', '__cached__', '__doc__', '__file__', '__loader__', '__name__', '__package__', '__path__', '__spec__', 'func']
python -c "from mymodule import default, other; print(dir())"
Hello from `mymodule`
['__annotations__', '__builtins__', '__doc__', '__loader__', '__name__', '__package__', '__spec__', 'default', 'other']
By importing only the modules that are going to be used, we can reduce the amount of time taken to load a module, as well as the total memory overhead of python.
What else is __init__.py good for?
You should consider defining the following in your __init__.py:
- A docstring appropriate for the module, see later
- “private” variables such as
__version__,__date__,__author__,__citation__ - “public” constants (IN_ALL_CAPS=True)
Package level scripts
If your package is providing a piece of software that does a thing then you will typically want a command line entry point for users rather than having them write their own code. Essentially a script is just a command line interface for the code in your module.
Challenge write a script
In the
scriptsfolder create a new file calledrunme. The script should importmymoduleand then runfuncand then exit. Bonus: accept user input and echo it back to them.Solution
touch scripts/runme
chmod ugo+x scripts/runme
In file
runme#! /usr/bin/env python from mymodule import func import sys func() print(sys.argv) sys.exit()Test by running
./scripts/runmeNote that you may need do the following to get the imports to work
export PYTHONPATH=.:$PYTHONPATHthis is because your package is not installed. See here for how to install packages.
Installing a package
We can make our software package installable by adding some content to the setup.py file.
Currently this file is empty so we shall fill it with some useful content.
Update setup.py so that it contains the following information
#! /usr/bin/env python
"""
Set up for mymodule
"""
from setuptools import setup

requirements = ['scipy>=1.0',
                # others
                ]

setup(
    name='mymodule',
    version=0.1,
    install_requires=requirements,
    python_requires='>=3.6',
    scripts=['scripts/runme']
)
You should now be able to install the package by running:
pip install -e .
Note the -e directive, which means that the module will be ‘editable’ after install.
Normally the code/data/scripts are all copied to some central location when they are installed, however the -e directive will instead link the files to that location.
This means that you don’t have to install your module every time you make a small change.
Now that the module has been installed you should be able to import this module from python regardless of which directory you are working in.
Similarly, because we provided scripts=['scripts/runme'], we should have access to this script from anywhere on our system.
Try it out!
Publishing a package on pypi
With some extensions to the setup.py file we can publish our package on the pypi.org registry.
For instructions on how to do this see the instructions on python.org.
Testing code
We now have a package that can be installed but it might be trash as it’s un-tested and un-documented.
In order to understand testing we should have some code that is doing something more than just printing to the screen.
In the default sub-module add the following silly function:
def hard_compute(number,
                word,
                option=None
                ):
    if not option:
        return number
    result = '.'.join([word,str(option)])
    return result
The desired behavior of the function can be summarized as:
hard_compute(1,'hello') == 1
hard_compute(1,'test',7) == "test.7"
hard_compute(None,'hello') == -1
Note: the function doesn’t actually work as intended.
We’ll learn how to write a test harness that will determine if the function hard_compute obeys the above expectations.
How to write and run tests
Depending on how you will run your test harness you will write tests in different ways.
For this workshop we’ll focus on pytest (docs) as it is both a great starting point for beginners, and also a very capable testing tool for advanced users.
pytest can be installed via pip:
pip install pytest
In order to use pytest we need to structure our test code in a particular way.
Firstly we need a directory called tests which contain test modules named as test_<item>.py which in turn have functions called test_<thing>.
The functions themselves need to do one of two things:
- return
Noneif the test was successful - raise an exception if the test failed
Here is an example test in the file `tests/test_module.py:
def test_module_import():
    try:
        import mymodule
    except Exception as e:
        raise AssertionError("Failed to import mymodule")
    return
With pytest installed we simply navigate to our package directory and run pytest:
============================ test session starts ============================
platform linux -- Python 3.8.10, pytest-6.2.4, py-1.10.0, pluggy-0.13.1
rootdir: /data/alpha/hancock/ADACS/MAP21A-JCarlin-ExampleCodes
collected 1 item

tests/test_module.py .                                                [100%]

============================= 1 passed in 0.01s =============================
pytest will automatically look for directories/files/functions of the required format and run them.
If you decide that a test is no longer needed (or not valid, or still in development), you can turn it off by changing the name so that it doesn’t start with test.
I like to change test_thing so that it becomes dont_test_thing.
This way you can keep the test code, but it just wont run.
Bonus note
Eventually the number of tests that you create will be large and take a while to run. In order that you can test individual sections of your code base the following python-fu may be useful:
if __name__ == "__main__":
    # introspect and run all the functions starting with 'test'
    for f in dir():
        if f.startswith('test'):
            print(f)
            globals()[f]()
with the above you can run all the tests within a file just by running that file.
Testing hard_compute
Let’s now return to our previous example and design a set of tests for the hard_compute function in the mymodule.default module.
Challenge write a test
- Create a file
tests/test_defaultand within it a functiontest_hard_compute.- Use the desired behavior listed above as the three test cases
test_hard_computeshould returnNoneif all cases passedtest_hard_computeshould raise anAssertionErrorwith a sensible note if a test failsIf you include the code from the bonus not above you can quickly run just this test.
When you have a test that you are happy with run it using
pytestSolution
def test_hard_compute():
    from mymodule.default import hard_compute

    answer = hard_compute(1, 'help')
    expected = 1
    if answer != expected:
        raise AssertionError(f"hard_compute(1,'help') should return {expected} but
                               returned {answer}")

    answer = hard_compute(1, 'test', 7)
    expected = "test.7"
    if answer != expected:
        raise AssertionError(f"hard_compute(1,'test', 7) should return {expected} but
                               returned {answer}")

    answer = hard_compute(None,'hello')
    expected = -1
    if answer != expected: # "is" instead of "==" since expected is None
        raise AssertionError(f"hard_compute(None,'hello') should return {expected}
                               but returned {answer}")

    return

if __name__ == "__main__":
    # introspect and run all the functions starting with 'test'
    for f in dir():
        if f.startswith('test'):
            print(f)
            globals()[f]()
If your test code works as intended you should get the following output from
pytest============================================================= short test summary info > ============================================================= FAILED tests/test_default.py::test_hard_compute - AssertionError: hard_compute(None,> 'hello') should return -1 but returned None =========================================================== 1 failed, 1 passed in 0.> 11s ===========================================================
The fact that the failed tests are reported individually, and the assertion errors are reported for each failure, should be an encouragement to write useful things as your error messages.
Note that in the above we ran all three tests in the same function. If the first test failed, then the second two are not run. If the subsequent tests are dependent on the success of the first then this is a good design technique. However, if the tests are independent then it might be a good idea to split the tests into individual functions.
Testing modes
Broadly speaking there are two classes of testing: functional and non-functional.
| Testing type | Goal | Automated? |
|---|---|---|
| Functional testing | ||
| - Unit testing | Ensure individual function/class works as intended | yes |
| - Integration testing | Ensure that functions/classes can work together | yes |
| - System testing | End-to-end test of a software package | partly |
| - Acceptance testing | Ensure that software meets business goals | no |
| Non-functional testing | ||
| - Performance testing | Test of speed/capacity/throughput of the software in a range of use cases | yes |
| - Security testing | Identify loopholes or security risks in the software | partly |
| - Usability testing | Ensure the user experience is to standard | no |
| - Compatibility testing | Ensure the software works on a range of platforms or with different version of dependent libraries | yes |
The different testing methods are conducted by different people and have different aims. Not all of the testing can be automated, and not all of it is relevant to all software packages. As someone who is developing code for personal use, use within a research group, or use within the astronomical community the following test modalities are relevant.
Unit testing
In this mode each function/class is tested independently with a set of known input/output/behavior. The goal here is to explore the desired behavior, capture edge cases, and ideally test every line of code within a function. Unit testing can be easily automated, and because the desired behaviors of a function are often known ahead of time, unit tests can be written before the code even exists.
Integration testing
Integration testing is a level above unit testing. Integration testing is where you test that functions/classes interact with each other as documented/desired. It is possible for code to pass unit testing but to fail integration testing. For example the individual functions may work properly, but the format or order in which data are passed/returned may be different. Integration tests can be automated. If the software development plan is detailed enough then integration tests can be written before the code exists.
System testing
System testing is Integration testing, but with integration over the full software stack. If software has a command line interface then system testing can be run as a sequence of bash commands.
Performance testing
Performance testing is an extension of benchmarking and profiling. During a performance test, the software is run and profiled and passing the test means meeting some predefined criteria. These criteria can be set in terms of:
- peak or average RAM use
- (temporary) I/O usage
- execution time
- cpu/gpu utilization
Performance testing can be automated, but the target architecture needs to be well specified in order to make useful comparisons. Whilst unit/integration/system testing typically aims to cover all aspects of a software package, performance testing may only be required for some subset of the software. For software that will have a long execution time on production/typical data, testing can be time-consuming and therefore it is often best to have a smaller data set which can be run in a shorter amount of time as a pre-amble to the longer running test case.
Compatibility testing
Compatibility testing is all about ensuring that the software will run in a number of target environments or on a set of target infrastructure. Examples could be that the software should run on:
- Python 3.6,3.7,3.8
- OSX, Windows, and Linux
- Pawsey, NCI, and OzStar
- Azure, AWS, and Google Cloud
- iPhone and Android
Compatibility testing requires testing environments that provide the given combination of software/hardware. Compatibility testing typically makes a lot of use of containers to test different environments or operating systems. Supporting a diverse range of systems can add a large overhead to the development/test cycle of a software project.
Developing tests
Ultimately tests are put in place to ensure that the actual and desired operation of your software are in agreement. The actual operation of the software is encoded in the software itself. The desired operation of the software should also be recorded for reference and the best place to do this is in the user/developer documenation (see below).
One strategy for developing test code is to write tests for each bug or failure mode that is identified. In this strategy, when a bug is identified, the first course of action is to develop a test case that will expose the bug. Once the test is in place, the code is altered until the test passes. This strategy can be very useful for preventing bugs from reoccurring, or at least identifying them when they do reoccur so that they don’t make their way into production.
Test metrics
As well has having all your tests pass when run, another consideration is the fraction of code which is actually tested. A basic measure of this is called the testing coverage, which is the fraction of lines of code being executed during the test run. Code that isn’t tested can’t be validated, so the coverage metric helps you to find parts of your code that are not being run during the test.
Example coverage
Run
python -m pytest --cov=mymodule --cov-report=term tests/test_module.pyto see the coverage report for this test/module.result
python -m pytest --cov=mymodule --cov-report=term tests/test_module.py
================================================================ test session starts =================================================================
platform linux -- Python 3.8.10, pytest-6.2.5, py-1.10.0, pluggy-1.0.0
rootdir: /data/alpha/hancock/ADACS/MAP21A-JCarlin-ExampleCodes
plugins: cov-2.12.1, anyio-3.3.0
collected 1 item

tests/test_module.py .                                                                                                                         [100%]

---------- coverage: platform linux, python 3.8.10-final-0 -----------
Name                   Stmts   Miss  Cover
------------------------------------------
mymodule/__init__.py       6      2    67%
mymodule/default.py       17     17     0%
mymodule/other.py          0      0   100%
------------------------------------------
TOTAL                     23     19    17%


================================================================= 1 passed in 0.05s ==================================================================
Note that default.py has 0% coverage because we didn’t use it in the test_module.py test.
We could have run the test_default.py test, but that would have failed and not generated a coverage report.
Also note that other.py has 100% coverage because there are no lines of code to be tested.
Finally, the __init__.py code has only 2/6 of the statements being executed.
We can have a better look at the coverage report by writing an html formatted report:
python -m pytest --cov=mymodule --cov-report html:coverage tests/test_module.py
This will give use a report for each file in the directory coverage.
Let’s open up the file mymodule___init___py.html (note the 3x underscores in the name), and see what statements were hit/missed during the testing.
An exercise for the keen student
Adjust the code/testing for mymodule such that all the functions are tested, all the tests pass, and you achieve 100% coverage on the coverage report.
Automated testing
We have already learned about the pytest package that will run all our tests and summarize the results.
This is one form of automation, but it relies on the user/developer remembering to run the tests after altering the code.
Another form of automation is to have a dedicated workflow that will detect code changes, run the tests, and then report the results.
GitHub (and GitLab) have continuous integration (CI) tools that you can make use of to run a suite of tests every time you push a new commit, or make a pull request.
We will explore these features in the day 3 content.
Documentation
To avoid simulating the entire python interpreter in our minds, it is often easier to document the (intended) behavior of our code in a human readable format.
Python offers the builtin function help() to display the documentation for a given function.
Let’s try that now.
Challenge: Get some help
Get some help on the python builtin function
enumeratehelp(enumerate)Solution
Help on class enumerate in module builtins:

class enumerate(object)
 |  enumerate(iterable, start=0)
 |
 |  Return an enumerate object.
 |
 |    iterable
 |      an object supporting iteration
 |
 |  The enumerate object yields pairs containing a count (from start, which
 |  defaults to zero) and a value yielded by the iterable argument.
 |
 |  enumerate is useful for obtaining an indexed list:
 |      (0, seq[0]), (1, seq[1]), (2, seq[2]), ...
Where does help() get all this information from?
In part, the information provided by help is part of the docstring for the enumerate function.
We can view the docstring by viewing the __doc__ attribute of the function as follows:
Example
print(enumerate.__doc__)Output
[2] 'Return an enumerate object.\n\n iterable\n an object supporting iteration\n\nThe enumerate object yields pairs containing a count (from start, which\ndefaults to zero) and a value yielded by the iterable argument.\n\nenumerate is useful for obtaining an indexed list:\n (0, seq[0]), (1, seq[1]), (2, seq[2]), ...'
Compare the help shown above to the official python documentation here.
Documentation vs commenting
There are two ways in which you can and should describe your code - documentation and commenting. These two ways of describing code have two audiences (which may overlap) - documentation is for the people who will use your code, whilst comments are for people who will develop your code. Both of these audiences include you, the original developer, some 6 months in the future when you have forgotten all the details about what you were doing. Quite simply:
Documentation is a love letter that you write to your future self.
– Damian Conway
Comments
Comments should include design decisions, or explanations of difficult to interpret code chunks.
Comments can include known/expected bugs or shortcomings in the code.
Things that are not yet implemented, or hacks that deal with bugs in other modules, should also be in comments.
Python comments come in two flavours: a single or part line comment which begins with a #, or a multiline comment which is any string literal.
'''
A comment that covers more than one line
because it is just so long
'''

def my_func(num):
  # assume that num is some numeric type, or at the very least
  # an object which supports division against an integer
  ans = num / 2 # A partial line comment
  return ans
The partial-line comment plus multi-line commands can be used to great effect when defining functions, dictionaries, or lists:
dict = {'key1': 0, # note about this item
        'key2': 1, # another note
        }

def my_func(num,
            ax,            # a matplotlib axes object
            verbose=True,  # TODO update to be logger.isEnabledFor(logging.DEBUG)
            **kwargs)
When python is interpreted (or compiled to byte-code), the interpreter will ignore the comments. The comments therefore only exist in the source code. Commenting your code has no effect on the behavior of your code, but it will (hopefully) increase your ability to understand what you did. Because the comments are ignored by the python interpreter only people with access to your source code will read them (developer usually), so this is a bad place to describe how your code should be used. For notes about code usage we instead use documentation.
Docstrings
Python provides a way for use to document the code inline, using docstrings. Docstrings can be attached to functions, classes, or modules, and are defined using a simple syntax as follows:
Example
def my_func():
  """
  This is the doc-string for the function my_func.
  I can type anything I like in here.
  The only constraint is that I start and end with tripe quotes (' or ")
  I can use multi-line strings like this, or just a single line string if I prefer.
  """
  return
Docstrings can be any valid string literal, meaning that they can be encased in either single or double quotes, but they need to be triple quoted. Raw and unicode strings are also fine.
Docstrings can be included anywhere in your code, however unless they immediately follow the beginning of a file (for modules) or the definition of a class or function, they will be ignored by the compiler.
The docstrings which are defined at the start of a module/class/function will be saved to the __doc__ attribute of that object, and can be accessed by normal python introspection.
Docstring formats
While it is possible to include any information in any format within a docstring it is clearly better to have some consistency in the formatting.
There are, unfortunately, many ‘standard’ formats for python documentation, though they are all similarly human readable so the difference between the formats is mostly about consistency and automated documentation (see day 3 lessons).
Scipy, Numpy, and astropy, all use the numpydoc format which is particularly easy to read. We will be working with the numpydoc format in this workshop.
Let’s have a look at an extensive example from the numpydoc website.
example.py
"""Docstring for the example.py module.

Modules names should have short, all-lowercase names.  The module name may
have underscores if this improves readability.

Every module should have a docstring at the very top of the file.  The
module's docstring may extend over multiple lines.  If your docstring does
extend over multiple lines, the closing three quotation marks must be on
a line by itself, preferably preceded by a blank line.

"""
from __future__ import division, absolute_import, print_function

import os  # standard library imports first

# Do NOT import using *, e.g. from numpy import *
#
# Import the module using
#
#   import numpy
#
# instead or import individual functions as needed, e.g
#
#  from numpy import array, zeros
#
# If you prefer the use of abbreviated module names, we suggest the
# convention used by NumPy itself::

import numpy as np
import matplotlib as mpl
import matplotlib.pyplot as plt

# These abbreviated names are not to be used in docstrings; users must
# be able to paste and execute docstrings after importing only the
# numpy module itself, unabbreviated.


def foo(var1, var2, *args, long_var_name='hi', **kwargs):
    r"""Summarize the function in one line.

    Several sentences providing an extended description. Refer to
    variables using back-ticks, e.g. `var`.

    Parameters
    ----------
    var1 : array_like
        Array_like means all those objects -- lists, nested lists, etc. --
        that can be converted to an array.  We can also refer to
        variables like `var1`.
    var2 : int
        The type above can either refer to an actual Python type
        (e.g. ``int``), or describe the type of the variable in more
        detail, e.g. ``(N,) ndarray`` or ``array_like``.
    *args : iterable
        Other arguments.
    long_var_name : {'hi', 'ho'}, optional
        Choices in brackets, default first when optional.
    **kwargs : dict
        Keyword arguments.

    Returns
    -------
    type
        Explanation of anonymous return value of type ``type``.
    describe : type
        Explanation of return value named `describe`.
    out : type
        Explanation of `out`.
    type_without_description

    Other Parameters
    ----------------
    only_seldom_used_keywords : type
        Explanation.
    common_parameters_listed_above : type
        Explanation.

    Raises
    ------
    BadException
        Because you shouldn't have done that.

    See Also
    --------
    numpy.array : Relationship (optional).
    numpy.ndarray : Relationship (optional), which could be fairly long, in
                    which case the line wraps here.
    numpy.dot, numpy.linalg.norm, numpy.eye

    Notes
    -----
    Notes about the implementation algorithm (if needed).

    This can have multiple paragraphs.

    You may include some math:

    .. math:: X(e^{j\omega } ) = x(n)e^{ - j\omega n}

    And even use a Greek symbol like :math:`\omega` inline.

    References
    ----------
    Cite the relevant literature, e.g. [1]_.  You may also cite these
    references in the notes section above.

    .. [1] O. McNoleg, "The integration of GIS, remote sensing,
       expert systems and adaptive co-kriging for environmental habitat
       modelling of the Highland Haggis using object-oriented, fuzzy-logic
       and neural-network techniques," Computers & Geosciences, vol. 22,
       pp. 585-588, 1996.

    Examples
    --------
    These are written in doctest format, and should illustrate how to
    use the function.

    >>> a = [1, 2, 3]
    >>> print([x + 3 for x in a])
    [4, 5, 6]
    >>> print("a\nb")
    a
    b
    """
    # After closing class docstring, there should be one blank line to
    # separate following codes (according to PEP257).
    # But for function, method and module, there should be no blank lines
    # after closing the docstring.
    pass
The example above is intentionally extensive, but you should be able to see what is going on. There are a few parts to the documentation format, some of which are considered essential, good practice, or optional.
Before we write any documentation, lets first create a function that is a little more interesting than our hard_compute example from before.
Create a non-silly example function
sed -i '1 a import numpy as np' mymodule/default.py
cat <<END >>mymodule/default.py


def deg2hms(x):
    if not np.isfinite(x):
        return 'XX:XX:XX.XX'
    # wrap negative RA's
    if x < 0:
        x += 360
    x /= 15.0
    h = int(x)
    x = (x - h) * 60
    m = int(x)
    s = (x - m) * 60
    return f"{h:02d}:{m:02d}:{s:05.2f}"
END
Essential documentation
The main goal of documentation is to describe the desired behavior or intended use of the code. As such every docstring should contain at least a one line statement that shows the intent of the code.
Document deg2hms v1
For our
deg2hmsexample above add a few lines of documentation to describe the intent of the function.Solution
def deg2hms(x):
    """
    Format decimal degrees into sexigessimal HH:MM:SS.SS
    """
    if not np.isfinite(x):
        return 'XX:XX:XX.XX'
    # wrap negative RA's
    if x < 0:
        x += 360
    x /= 15.0
    h = int(x)
    x = (x - h) * 60
    m = int(x)
    s = (x - m) * 60
    return f"{h:02d}:{m:02d}:{s:05.2f}"
Good practice documentation
It is good practice to describe the expected input and output (or behavior) of your functions.
In the numpydoc format we put these into two sections:
- Parameters: for the input
- Returns: for the output
There is no “Modifies” section for the documentation (though you could add one if you like). If the function modifies an input but does not return the modified version as an output then this should be included as part of the long form description.
Document deg2hms v2
Extend our documentation for
deg2hmsso that it includes a Parameters and Returns section.Solution
def deg2hms(x):
    """
    Format decimal degrees into sexigessimal HH:MM:SS.SS

    Parameters
    ----------
    x : float
        Angle in degrees. Assumed to be in [-360,360]

    Returns
    -------
    hms : string
        Sexigessimal representation of x, in the format HH:MM:SS.SS
        If x is np.nan, or np.inf then return "XX:XX:XX.XX" instead
    """
    if not np.isfinite(x):
        return 'XX:XX:XX.XX'
    # wrap negative RA's
    if x < 0:
        x += 360
    x /= 15.0
    h = int(x)
    x = (x - h) * 60
    m = int(x)
    s = (x - m) * 60
    return f"{h:02d}:{m:02d}:{s:05.2f}"
Optional documentation
The type of errors that are raised, and under what conditions, can be documented in the Raises section.
Notes, References, and Examples, are also useful sections but usually applicable to all functions or classes that you will be writing.
If I have used code snippets from stack-overflow or similar, then I find Notes/References section to be a good place to acknowledge and link to those resources.
The Examples section can be used to show intended use.
There is an automated testing suite called doctest which will scan your docstrings looking for segments starting with >>> and then running those segments in an interactive python interpreter.
A solid test suite will typically contain many tests for a single function, thus trying to embed all the tests into your docstrings just makes for very long docstrings.
It is preferable to keep your testing code in the tests module/directory of your python module, and to use the Examples section only for demonstrating functionality to the end user.
Making use of documentation
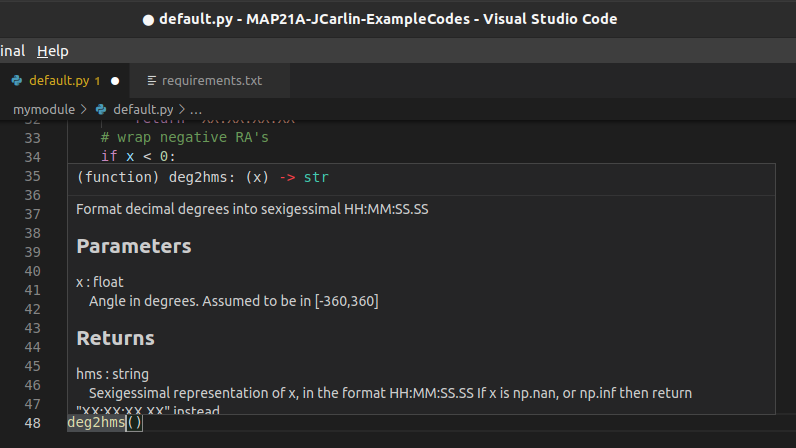
Some IDEs (the good ones) provide syntax highlighting, linting, and inline help as you write code. By providing docstrings for all your functions you can make use of the linting and inline help. Below is an example from VSCode in which the docstring for a function is being shown to me as I code.
You can use the help from the python console like this:
Python 3.8.10 (default, Jun  2 2021, 10:49:15)
[GCC 9.4.0] on linux
Type "help", "copyright", "credits" or "license" for more information.
>>> from mymodule import default
Hello from `mymodule`
>>> help(default.deg2hms)
Help on function deg2hms in module mymodule.default:

deg2hms(x)
    Format decimal degrees into sexigessimal HH:MM:SS.SS

    Parameters
    ----------
    x : float
        Angle in degrees. Assumed to be in [-360,360]

    Returns
    -------
    hms : string
        Sexigessimal representation of x, in the format HH:MM:SS.SS
        If x is np.nan, or np.inf then return "XX:XX:XX.XX" instead
>>>
Additionally you can compile all the documentation into a website or other document using an automated documentation tool as described in the next section.
Automated Documentation
If your docstrings are formatted in a regular way then you can make use of an automated documentation tool. There are many such tools available with a range of sophistication.
The simplest to use is the pdoc package which can be obtained from pypi.org.
Install and use pdoc
Install the pdoc module and then run it on our documented code using:
pip install pdoc
pdoc mymodule
By default pdoc will start a mini web sever with the documentation on it. This should be opened in your browser by default but if it isn’t you can navigate to
localhost:8080or127.0.0.1:8080. Use<ctrl>+Cwhen you want to stop the web server.Have an explore of the documentation so far and see how your docstrings map onto what is being shown on the web-pages.
To make documentation that is less ephemeral you can use the the -d docs option to cause all the documentation to be built and then placed into the docs folder.
pdoc only supports html output, however other auto-documentation packages such as sphinx can write latex (and thus pdf), ePub, man pages, or plain text.
Other forms of documentation
Compiling all your docstrings into an easy to find and navigate website is great, but this typically does not do a good job of documenting your software project as a whole. What is required here is something that deals with the intent of the software, a description of the problem that it is solving, and how users can install and begin to use the software. For this you have a few options:
- a
README.mdin your repository - a user guide document (html or PDF)
- a wiki or rtfd.io style website
Within any of the above you would want to include things such as:
- a guide for downloading/compiling/installing your software
- a ‘quick-start’ guide or set of examples for new users
- a Frequently Asked Questions (FAQ) section to address common problems
- tutorials to demonstrate some of the key features of your software (Jupyter notebooks are great here)
GitHub and GitLab both provide a wiki for each project. Additionally both platforms will allow you to set up Continuous Integration (CI) tools that will automatically build and publish your documentation to a third party website.
Bringing it all together
A typical development cycle will consist of writing code, testing code, and writing documentation. The order in which this is done depends on the software development strategies that you set out for your project, or simply personal preference. At the end of the day the process is cyclic - with the end goal of having code, tests, and documentation that are all in agreement. Once your code/tests/documentation are consistent then you can package your code into a module and publish it for others to use.
Key Points
Write a function doc-string
Write a function test
Write a function
Iterate until the three converge
Collect functions in a package/module
Compile documentation
Publish code and documentation