All in One View
Content from Introduction
Last updated on 2026-02-25 | Edit this page
Estimated time: 15 minutes
Background
Writing software is an integral component of the research activities of many astronomers. Increasingly, such software is written in collaborative efforts involving multiple researchers across multiple institutions. Despite this, training for astronomy students and early career researchers in best practices for collaborative software development is often informal and fails to make use of software industry knowledge. The goal of this course is to fill this training gap.
In this course you will be guided through the development of a software package, beginning at proof of concept, and finishing with a project that is findable, accessible, interoperable, reusable (FAIR), and citable by others. This course is presented in lessons which represent development cycles. Each cycle will be another step along the path of making code that you are proud of and can be recognised for.
You can engage with this course as a reading assignment but we recommend that you follow along at home by applying all the lessons learned to your own software project. This course is designed with collaborative software development in mind. Throughout the course there will be self paced ungraded activities to complete that will be marked as either SOLO or GROUP activities. If you are joining this course as part of a group wishing to improve your collaborative software development skills then you should aim to complete all the activities. If you are joining this course on your own then some of the group activities will not be relevant to you and you can skip them as appropriate.
At the beginning of this course you will be taken through a typical research driven development phase. In this phase we will create a proof of concept code which we then build on throughout the course. This project is extremely simple in scope as it intended to be a minimum working example that we can use to demonstrate various development techniques. Many of the examples in this course will refer to the example code. If you have an existing software project we recommend that you use that project when doing the various activities as you will encounter more issues, learn more techniques, and the solutions to the activities will be directly usable and beneficial to you.
Assumed knowledge and software requirements
This course assumes that you have basic proficiency in python. While python is the language that we’ll be working with primarily, most of the lessons are applicable to any language.
A large part of working in a group will involve keeping track of changes to a shared code base. For this we will be using the git version control system, and in particular we will be using GitHub as the remote repository.
Software requirements:
- Python 3.8 +
- A integrated development environment (IDE) or text editor of choice
- We recommend PyCharm or Visual Studio Code
- An operating system which gives you a proper command line
- For windows this means using something like gitbash, WSL, or the Anaconda prompt
- For OSX or Linux the regular terminal will be fine
- git, either from the command line, using a git desktop app, or as an add on to PyCharm or VSCode.
- An account on GitHub is required for some of the activities.
Content from Coding Up A Proof Of Concept
Last updated on 2026-02-24 | Edit this page
Estimated time: 110 minutes
Overview
Questions
- Where/How do I start a new project?
- How do I use a function?
- How do I document and test my code?
- Can I make a command line interface for my code?
Objectives
- Build a minimal working or “proof of concept” project that we can build on in this workshop
Beginning a new software project
Before we do anything to our project we should talk about:
Organisation
Organisation is key to a good project. Every time you start a new project or explore a new idea it is a good idea to create a new space for that project. This means creating a new directory for you to collect all the relevant data, software, and documentation. You will be involved in many projects through your career and often will have to manage multiple projects simultaneously. It is therefore not just a good idea to organise each project, but to have a consistent organisation structure between projects. In this section we will make some recommendations for organising a software project.
Put each project in its own directory, which is named after the project.
The location of this directory will depend on a higher level organisation scheme. For example you may separate your projects based on funding, based on collaboration, or based on research area.
Within you software project directory we recommend the following structure:
OUTPUT
 .
 ├── README.md          <- Description of this project
 ├── bin                <- Your compiled code can be stored here (not tracked by git)
 ├── config             <- Configuration files, e.g., for doxygen or for your model if needed
 ├── data
 │   ├── external       <- Data from third party sources.
 │   ├── interim        <- Intermediate data that has been transformed.
 │   ├── processed      <- The final data sets for analysis.
 │   └── raw            <- The original, immutable data dump.
 ├── docs               <- Documentation, e.g., doxygen or reference papers (not tracked by git)
 ├── notebooks          <- Jupyter or R notebooks
 ├── reports            <- For a manuscript source, e.g., LaTeX, Markdown, etc., or any project reports
 │   └── figures        <- Figures for the manuscript or reports
 └── src                <- Source code for this project
     ├── external       <- Any external source code, e.g., pull other git projects libraries
     └── tools          <- Any helper scripts go here
Setting up an empty structure such as the above can be done either by
making an template and then copying that every time you start a new
project. Additionally there are python packages such as
cookiecutter (pypi, rtfd, github)
that can automate this process for you, and offer a range of templates
to work with.
Name all files to reflect their content or function.
It is also convenient to use a consistent and descriptive naming
format for all your files and sub-folders. For example, use names such
as galaxy_count_table.csv, manuscript.md, or
light_curve_analysis.py. Do not using sequential numbers
(e.g., result1.csv, result2.csv) or a location
in a final manuscript (e.g., fig_3_a.png), since those
numbers will almost certainly change as the project evolves (and are
meaningless on their own).
Starting our project
Now we are ready to actually start doing something with our project.
Project evolution
In the typical project cycle for an astronomer or research software engineer (or RSE, a formal name for people who combine professional software expertise with an understanding of research), you will not sit down and have a detailed discussion about what the project is, where it needs to go, what the user stories and milestones are, and who will be involved. Usually research evolves organically through informal discussions with colleagues, or a sudden thought in the shower. Similarly our software projects evolve in an organic manner, often beginning with a small script of function to do just this one thing, which then over time gets used, reused, augmented, shared, and thus evolves into a software project. This evolution of ideas and code does not fit will with much of the more formal structures that professional software developers adhere to, and so we will not try to fit our projects to such a scheme. Instead we will create a path for our software that will be suited to our work style, but which draws on the knowledge and experience of professional software developers. Thus we will begin with a proof of concept code – a short bit of work that proves that something works using the minimal amount of effort.
Example project
The example project that we will work with will involve tasks that are familiar to many astronomers. The work that is being done is mostly for demonstration purposes – existing libraries will be able to do this task faster and easier that we will. The point of this example project is not the content, but the methodology that we use as we pass through various cycles of development.
Example project: an astronomy catalogue simulator
The example project that we will be developing will simulate a catalogue of foreground stars in the direction of the Andromeda galaxy. The initial requirements are as follows:
Stars should have randomised sky positions around the Andromeda galaxy Positions should fall within 1 degree of the central location Each star should have a unique ID The star ID and position should be saved in a csv file to be analysed by other programs This program is intended to be used by the developer and their research group which includes people who are not proficient python programmers.
It is intended that the software will grow in capability and complexity only as needed to support a current research project.
With this in mind we move to the first stage of our software project – the proof of concept.
SOLO Activity: Project structure
Consider the astronomy catalogue simulator project mentioned in the previous lesson.
Come up with a planned project structure that would be appropriate for this project. How much of the structure would change if you were to use a different language (e.g. Python vs C)? The scope of work is quite modest and could be achieved with a flat file structure or a single file. Which statements in the previous lesson suggest that a good project structure will be beneficial to future work?
Proof of concept code
The first iteration of our code is shown below. It was written in a stream-of-conscious mode with a focus on getting a minimum working example that proves that the work can be done.
PYTHON
#! /usr/bin/env python
# Demonstrate that we can simulate a catalogue of stars on the sky

# Determine Andromeda location in ra/dec degrees
import numpy as np
import math
# from wikipedia
ra = '00:42:44.3'
dec = '41:16:09'

d, m, s = dec.split(':')
dec = int(d)+int(m)/60+float(s)/3600

h, m, s = ra.split(':')
ra = 15*(int(h)+int(m)/60+float(s)/3600)
ra = ra/math.cos(dec*math.pi/180)

# make 1000 stars within 1 degree of Andromeda
ra_offsets = np.random.uniform(-1, 1, size=1000)
dec_offsets = np.random.uniform(-1, 1, size=1000)

ras = ra + ra_offsets
decs = dec + dec_offsets

# now write these to a csv file for use by my other program
with open('catalog.csv', 'w') as f:
    print("id,ra,dec", file=f)
    for i in range(1000):
        print("{0}, {1:7.4f}, {2:7.4f}".format(i, ras[i], decs[i]), file=f)
The above code was saved as sim.py. When run from the
command line it produces a file (catalog.csv) with a
header, one thousand rows, and columns showing the id/ra/dec of the
simulated points on the sky. Right now the code runs without error and
at first glance does what we need.
If we plot the ra/dec locations of the catalog we get the following output:
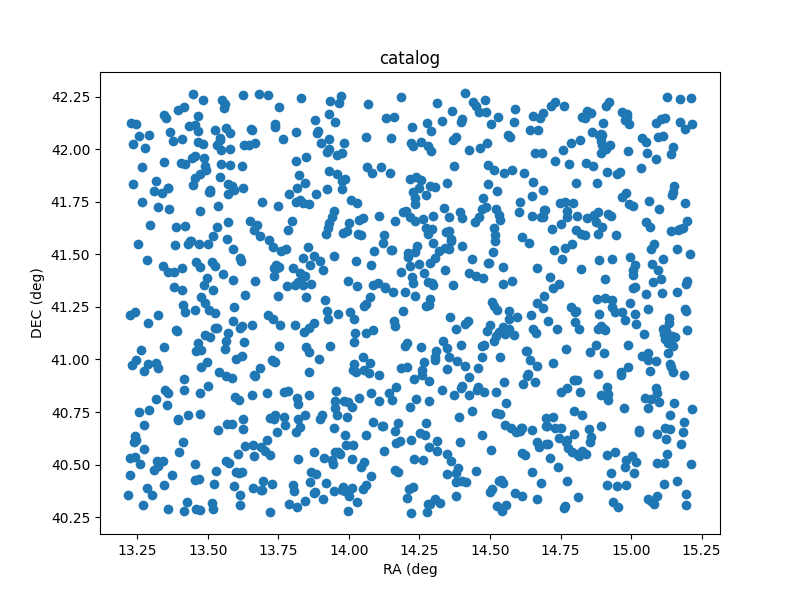
Sky plot of the catalog that comes from the sim.py program.
Making code reusable via functions
Now that we have proved to ourselves that it’s possible to generate a catalog, we want to tidy up the code a little so that it can be reused and adapted easily.
At the moment our intended audience is ourselves, so we are content
with keeping all the relevant information within the code itself. As a
first step we create new variables that record the target location
(ref_ra/ref_dec), the number of stars to generate
(nsources), and how far from the central location the new
positions should be generated (radius). This is done using
global variables at the top of our file like this:
PYTHON
#! /usr/bin/env python
# Demonstrate that we can simulate a catalogue of stars on the sky

# Determine Andromeda location in ra/dec degrees
import numpy as np
import math

# configuration using global variables
nsources = 1000
# from wikipedia
ref_ra = '00:42:44.3'
ref_dec = '41:16:09'
radius = 1
From here we need to make a few changes to our code so that these variables are now used in place of the previously hard-coded values.
We then take all the code that is part of the position generation
stage and bundle it all together into a function which we call
generate_positions. This allows us to keep that part of the
code separate from the file writing stage. In fact while we are at it we
should make a function for doing the file writing. Lets call it
write_file. While we are writing these functions we can use
python docstrings to
document the intent of each function.
PYTHON
def generate_positions():
    """
    Create `nsources` random locations within `radius` degrees of the reference `ref_ra`/`ref_dec`.

    Returns
    -------
    ra, dec : numpy.array
        Arrays of ra and dec coordinates in degrees.
    """

    # convert DMS -> degrees
    d, m, s = ref_dec.split(':')
    dec = int(d)+int(m)/60+float(s)/3600

    # convert HMS -> degrees
    h, m, s = ref_ra.split(':')
    ra = 15*(int(h)+int(m)/60+float(s)/3600)
    ra = ra/math.cos(dec*math.pi/180)  # don't forget projection effects

    ra_offsets = np.random.uniform(-1*radius, radius, size=nsources)
    dec_offsets = np.random.uniform(-1*radius, radius, size=nsources)

    ras = ra + ra_offsets
    decs = dec + dec_offsets
    return ras, decs


def write_file(ras, decs):
    """
    Write the ra/dec catalog to a file, and include a header and IDs.
    """
    with open('catalog.csv', 'w') as f:
        # creat a header row
        print("id,ra,dec", file=f)
        for i in range(nsources):
            # use a csv format
            print("{0}, {1:7.4f}, {2:7.4f}".format(i, ras[i], decs[i]), file=f)
    return
Note that the first function takes no parameters, while the second is designed to take two lists of positions as input. By breaking our code into functional blocks we have a number of advantages:
We can reuse a block of code by calling the function multiple times, and don’t have to bother with duplicated code. Duplicated code means duplicated bugs! The code within each function will not interfere with code in other functions, allowing us to reuse names of variables, and for unused variables and memory to be deleted upon exiting the function. We can document each function separately using a docstring to describe the intent of the code. This is in addition to the inline comments that we have used.
Our script can now be finished with a few more lines of code.
As a developer the code is now separated into functional parts, so if something goes wrong or needs changing, we know where to look to make those changes. As a user of the code we can open the file and read the first few lines to see what the default parameters are, and modify them if we choose. Additionally, as a user we can read the names and docstrings of the functions to understand what the code is doing rather than having to read the code itself.
Now we have a piece of code that is easier to use. However, this code is only really usable as is, and requires people to read/edit the source code to understand how it works and adapt it for their use. In the next section we’ll see how to further generalise our code by using more function parameters, and adding a command line interface.
Creating a command line interface
In the previous lesson we saw how we could use functions to separate different tasks, and docstrings to describe the behaviour of these functions. In this lesson we’ll generalise our code even further by removing the global variables, adding functions parameters, and adding a command line interface.
The first thing that we will do is remove the global variables, and have these values passed to the functions directly. This will mean that someone reading the code for a function doesn’t have to hunt through the rest of the code to figure out what the global variables are.
For the generate_positions function we can use
parameters with the same name as the previously existing global
variables, and we can set their default values to match. We have also
taken the opportunity to update the docstring so that we know what types
of parameters should be passed and what they are for.
PYTHON
def generate_positions(ref_ra='00:42:44.3',
                       ref_dec='41:16:09',
                       radius=1.,
                       nsources=1000):
    """
    Create nsources random locations within radius of the reference position.

    Parameters
    ----------
    ref_ra, ref_dec : str
        Reference position in "HH:MM:SS.S"/"DD:MM:SS.S" format.
        Default position is Andromeda galaxy.

    radius : float
        The radius within which to generate positions. Default = 1.

    nsources : int
        The number of positions to generate

    Returns
    -------
    ra, dec : numpy.array
        Arrays of ra and dec coordinates in degrees.
    """
    ...
    return
For the write_file function, we already had two
parameters that needed to be passed, but now we’ll add another which is
the output file name. This wasn’t part of the global variables, but it
was a hard coded file that we might want to change as we create multiple
catalogs. Note that this function used to use the nsources
global variable to know how many ra/dec values were passed. In this
revised version we just look at the length of the ras list
instead.
PYTHON
def write_file(ras, decs,
               outfile='catalog.csv'):
    """
    Write the ra/dec catalog to a file, and include a header and IDs.

    Parameters
    ----------
    ras, decs : list, numpy.array, or any iterable
        Iterable of ra and dec coordinates. The length of these need to match.

    outfile : str
        Path/filename for the output file. (Overwite=True)
    """
    with open(outfile, 'w') as f:
        # creat a header row
        print("id,ra,dec", file=f)
        for i in range(len(ras)):
            # use a csv format
            print("{0}, {1:7.4f}, {2:7.4f}".format(i, ras[i], decs[i]), file=f)
    return
By moving the global variables into the parameters of the functions, and making use of the default values we don’t need to make any further changes to our code. The following block is unchanged.
One advantage to our changes is that we could now generate a different catalog by adjusting these last two lines like this:
We will leverage this ability in order to make a command line
interface. The recommended way to do this is to use the
argparse module, and an if __name__ clause as
follows.
PYTHON
if __name__ == '__main__':
    # Set up the parser with all the options that you want
    parser = argparse.ArgumentParser(prog='sim')
    group1 = parser.add_argument_group()
    group1.add_argument('--ref_ra', dest='ref_ra', type=str, default='00:42:44.3',
                        help='Central/reference RA position HH:MM:SS.S format')
    group1.add_argument('--ref_dec', dest='ref_dec', type=str, default='41:16:09',
                        help='Central/reference Dec position DD:MM:SS.S format')
    group1.add_argument('--radius', dest='radius', type=float, default=1.,
                        help='radius within which the new positions are generated (deg)')
    group1.add_argument('--n', dest='nsources', type=int, default=1_000,
                        help='Number of positions to generate')
    group1.add_argument('--out', dest='outfile', type=str, default='catalog.csv',
                        help='Filename for saving output (csv format)')

    # parse the command line input
    options = parser.parse_args()
Here we have created a single group of arguments called
group1, and then we add five different arguments to that
group. Note that we provide both a call signature (--out)
for specifying a parameter, as well as the name/type/default value of
that parameter (dest/type/default). The help
is optional but highly recommended. If we were to run the code above
with the --help option then we would get the following
output:
OUTPUT
$> python sim.py --help
usage: sim [-h] [--ref_ra REF_RA] [--ref_dec REF_DEC] [--radius RADIUS] [--n NSOURCES] [--out OUTFILE]

optional arguments:
  -h, --help         show this help message and exit

  --ref_ra REF_RA    Central/reference RA position HH:MM:SS.S format
  --ref_dec REF_DEC  Central/reference Dec position DD:MM:SS.S format
  --radius RADIUS    radius within which the new positions are generated (deg)
  --n NSOURCES       Number of positions to generate
  --out OUTFILE      Filename for saving output (csv format)
Right away we have a way for people to understand how to use the program without having to open the source code. This will include you, two days from now, when you forgot some of the details of the code.
Finally, we can connect the user input to the program by using the
options object. Each of the parameters that were read in
with a dest=thing can be accessed using
options.thing. If we specified a type then argparse will
make sure that users don’t give input that can’t be converted to that
type. The final part of our code now looks like this:
PYTHON
    # parse the command line input
    options = parser.parse_args()

    ras, decs = generate_positions(ref_ra=options.ref_ra,
                                   ref_dec=options.ref_dec,
                                   radius=options.radius,
                                   nsources=options.nsources)
    write_file(ras, decs, outfile=options.outfile)
Since we specified default values for all of the inputs, we can run
python sim.py and it will run with the default values.
Creating a simple testing script
We now have a script with a command line interface that allows people to use the code without having to read the source. At this point we are feeling rather professional and are happy to share the code with others. One of the things that is often scary is the thought of others finding bugs in our code and then having to fix these bugs. A good way to alleviate these fears is to do some testing of the code ourselves to catch all the obvious errors before the script is sent to others. In a later lesson we’ll go through some more formal and rigorous testing, but for now we are going to start simple with some of the most basic tests.
In our file test_sim.sh we will make three tests. The
first two tests we are going to do will just ensure that the code will
not immediately crash when we run it:
BASH
#! /usr/bin/env bash

echo "Testing sim.py"
python sim.py || { echo "FAILED to run with default parameters"; exit 1 ;}
python sim.py --help || { echo "FAILED to print help"; exit 1 ;}
The next test we do will ensure that when we pass a filename to the
--out option, we will get a new file with that name. We use
the bash [ ] test and -f conditional to see
that the file exists.
BASH
python sim.py --out test.csv
if [ ! -f "test.csv" ]; then
    echo "FAILED to generate ouput test.csv"
    exit 1
fi

echo "all tests PASSED"
exit 0
The last two lines above then make sure that when the tests all pass we get a positive message and return an exit status of 0.
We now have a test script that will catch the most egregious issues with our script. Any time we make changes to our script we should run the test script just to make sure that we haven’t seriously broken anything.
More advanced testing with bash is not explored here as we will move to a python based test environment in a later lesson. The python based testing will make it easier to do things like make sure the right number of entries exist in the catalogue file and that the positions all lie within the specified region.
Summary
In this first development cycle we have:
- Demonstrated that we can simulate a catalogue of positions on the sky;
- Written a function to do the simulation, and another to write the results to a file;
- Created a command line interface to make the script easy to use and re-use; and
- Made a simple test script to alert us when our changes break the code.
If you would like to see the status of the project at the end of this cycle you can look at the cycle1 branch on GitHub (at this link).
Content from Developing Software In A Team
Last updated on 2026-02-27 | Edit this page
Estimated time: 180 minutes
Overview
Questions
- What are some pro/con of developing in a team?
- What are some common team roles?
- How can GitHub help managing tasks in a group project?
Objectives
- Gain experience developing software in a team environment
- Understand some common project management styles
- Create a new GitHub repo and push our project
- Experience a full development cycle with our test project
Benefits and pit-falls
Working on a software project as part of a team is a very different experience from working on a solo project. There are of course great advantages to having multiple people working on a problem, but there are also some pit-falls that need to be avoided, and overheads that cannot be avoided.
Benefits of working in a team
- Each person has different areas of expertise
- More person-hours available
- Group discussion leads to better decision making
- Group members can learn from each other faster than they can learn from a book/website
- Seeing how others work and solve problems can help you learn new skills that you didn’t know you needed
- Bug-fixing is easier when you have an informed buddy to talk to
- Work can be assigned to people with the most relevant skills increasing efficiency
- Dividing the development and testing of a work item between two people can make for better code and more complete tests
Pit-falls to avoid
- Siloing work:
- Separating work items can be a good idea but there needs to be frequent check-ins to ensure that the software being developed by two people is not diverging or conflicting
- Inconsistent standards:
- Even though people may have personal preferences or styles, documentation, commenting, and testing should be consistent across a code base.
- Non-constructive criticism:
- When things work they just work and no one talks about it
- When things break everyone talks about it
- Given that issues result from negative experiences, it is important for team moral to always try and keep feedback as constructive as possible
- Platform / dependency conflicts:
- There is no guarantee that all developers will be using the same operating system or development tools.
- Allowing people the freedom to choose is important but the differences need to be managed via an agreement on how/when/where testing takes place, what acceptance looks like, and the use of a style guide.
- Having some files with windows style end of line and others with linux style end of line can make it tedious to track changes
Overheads that cannot (should not) be avoided
Project management will take time, and may not be a skill that you have. Invest time in training. Communication and coordination take time but are vital to success Commit conflicts will arise even if everything is done right, these need to be discussed and handled properly rather than ignored The moral of the team is important to success and will take time and effort to maintain, but it is worth doing so that your project can see the benefits listed above.
Communication and project management
Communication
Team work requires effective communication between team members. This helps to keep everyone up to date on the status of the project, the current and future direction of the work, and avoids duplication of effort. Email, slack, messenger, GitHub issues, chats over a coffee, or a formal weekly meeting, are all valid ways of keeping the teem together. A formal meeting once a month complimented by a weekly email to status check, and real time slack messaging for immediate questions may be a good solution for a 5 person team working on a year long project. An informal weekly chat over lunch with intermittent emails may be good for a 2 person team working on a project that lasts a few months. The most important thing is that the chosen method is effective and that it includes all team members.
If an informal or ephemeral communication medium is involved when coming to an agreement or making a decision, it is good practice to have a follow up communication to reiterate the decision and reasoning using a medium that can be archived. For example, if the team meets over a coffee, discusses a current issue, and decides on a way forward, it is a good idea for someone to follow this up with an email so that the details of the decision are not lost.
Project management styles
The two main project management styles that are applied to software development are waterfall and agile. Neither of these are a project management methodology but are more like umbrella terms that group a set of methodologies that share a common mindset. In the waterfall mindset there is a very linear approach to the design and execution and delivery of the project with the main focus being on the process. In the agile mindset the main focus is on outcomes and deliverables, with the design and execution and delivery occurring in cycles.
Waterfall
In a waterfall project the whole life cycle of a project is mapped onto distinct, sequential work items, with each item relying on those that occur before, and blocking those that come after. Waterfall project management therefore represents a very rigid and linear approach. The waterfall system is a very traditional method for managing a project with participants being assigned clear roles and expectations.
 Image credit: https://startinfinity.com/project-management-methodologies/waterfall
The name waterfall comes from the fact that each work item will cascade onto the next. In a waterfall project there is a lot of attention paid to defining the entirety of the project up front, and then a close adherence to the project plan and timeline. It is therefore difficult to incorporate changes into the project plan, and therefore it is hard to respond to setbacks, opportunities, or changes in requirements.
The waterfall project management style was initially designed in the 1970’s for use in software development projects. It was taken on by many other industries to great success, but is now seen as an outdated methodology for software projects.
Agile
In 2001 the Manifesto for Agile Software Development was published. The agile manifesto can be summed up as:
We are uncovering better ways of developing software by doing it and helping others do it. Through this work we have come to value:
Individuals and interactions over processes and tools Working software over comprehensive documentation Customer collaboration over contract negotiation Responding to change over following a plan
That is, while there is value in the items on the right, we value the items on the left more.
The agile manifesto is based on the following principles:
- The highest priority is to satisfy the customer through early and continuous delivery of valuable software.
- Welcome changing requirements, even late in development. Agile processes harness change for the customer’s competitive advantage.
- Deliver working software frequently, from a couple of weeks to a couple of months, with a preference to the shorter timescale.
- Business people and developers must work together daily throughout the project.
- Build projects around motivated individuals. Give them the environment and support they need, and trust them to get the job done.
- The most efficient and effective method of conveying information to and within a development team is face-to-face conversation.
- Working software is the primary measure of progress.
- Agile processes promote sustainable development. The sponsors, developers, and users should be able to maintain a constant pace indefinitely.
- Continuous attention to technical excellence and good design enhances agility.
- Simplicity–the art of maximising the amount of work not done–is essential.
- The best architectures, requirements, and designs emerge from self-organising teams.
- At regular intervals, the team reflects on how to become more effective, then tunes and adjusts its behaviour accordingly.
- The agile mentality is designed to be able to be flexible, respond to change, deliver a working product early and have it improve incrementally over time.
Advantages of the agile mentality include:
- faster deployment of working solutions
- better quality of work
- increased client satisfaction
- reduced risk thanks to frequent testing and deployment
- increased team moral
- a project that finishes early is still able to deliver a working result
Some potential drawbacks include:
- potential for scope creep from continuous client feedback
- workload management can be difficult when duties and requirements are not known far in advance
- short development cycles can mean that skills gaps are not identified early leading to delays in delivery
You will likely see that the Agile development mentality fits much better with research project management including both traditional research work and software development projects. Additionally you may note that your organisation may employ a mix of different management methodologies for different projects, or at different levels of the organisation. Understanding the benefits and drawbacks of each will help you choose a project management style that works best for your project.
Popular Agile methodologies
Scrum
Scrum is mainly focused on the idea of sprints. Sprints are where the bulk of the “work” gets done, although there is a significant amount of effort put into the preparation and planning of each sprint, and then the post-sprint review and retrospective. Sprints are typically 1-2 weeks in duration and will focus on a particular set of goals. During a sprint there is usually a daily scrum at the start of the day in which people talk about what they did the day before, what their plans are for today, and what problems they might foresee. The sprint review is about reviewing the work that was completed, reporting related to said work, and identification of incomplete work. The retrospective is a more meta-level reflection on how the sprint went, meant to identify how the team worked together, what organisation or communication worked well or not, and what changes could be made to make the next sprint more productive.
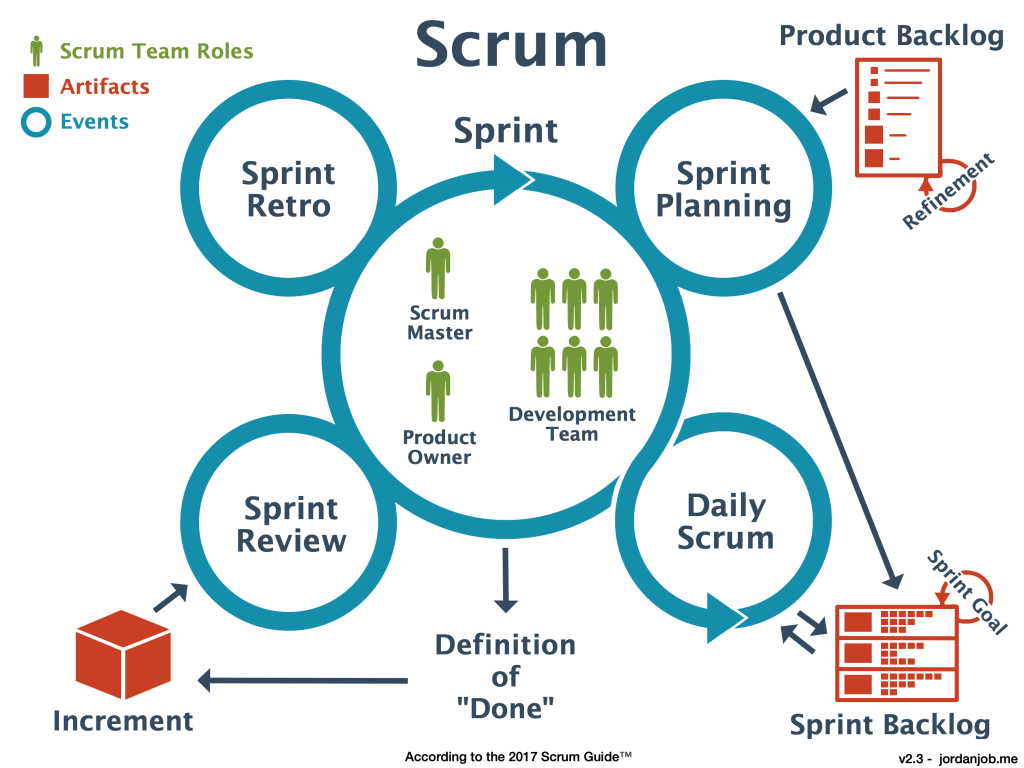 Image credit: https://jordanjob.me/blog/scrum-diagram/
The scrum methodology is based on team work and has well defined roles. The benefits of scrum include the ability to react to changes in requirements or resourcing, continuous testing/integration is effectively built in, prioritisation of tasks can be adjusted throughout the process. The disadvantages of scrum are that you need very good organisation before each sprint to maximise productivity. Additionally it requires that team members are able to block out a 1-2 week period in which they focus solely on the sprint and maintain a high focus. Clearly, scrum requires a medium to large team (5+) in order to be effective.
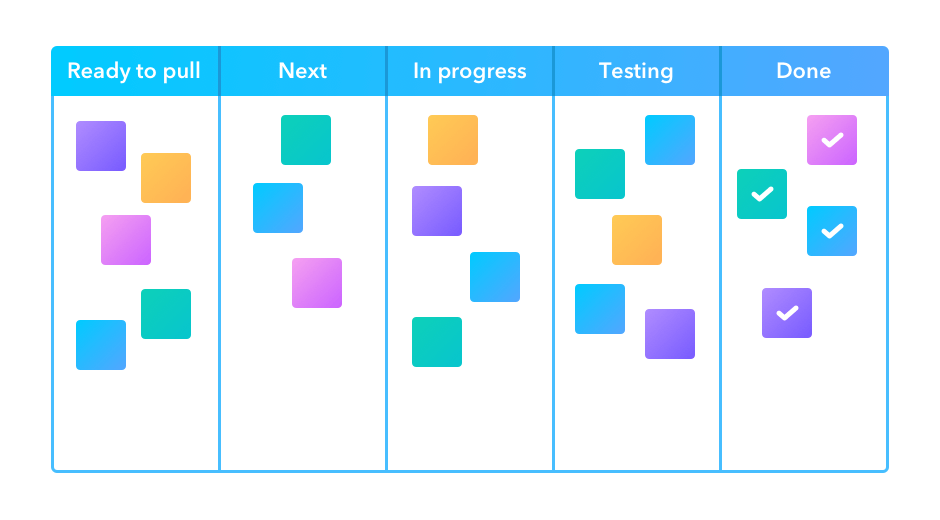
Kanban
In the Kanban methodology the main focus is on the visualisation that is used during the development process – the Kanban board. One goal of the board is to identify potential bottlenecks in the process. An example board is shown below with the following features:
Tasks that are represented as squares. Sticky notes or cards are often used on a physical wall, or their digital representation online.
Columns that represent the state of each task. A task is expected to migrate from the left most column (Ready/Backlog) through the central columns and into the final (Done/Complete) column, as the related work is being done.
Work in progress limits. In order to maintain focus and productivity, there are often limits on the number of cards that can be placed into some of the columns. In particular the “in progress” and “testing” columns are limited by the available people time allocated to the project.
Swim lanes (not shown), are rows that separate tasks based on categories of work such as documentation, testing, or reporting. Alternatively, colour coding of cards can be used to identify these categories.
 Image
credit: https://startinfinity.com/project-management-methodologies/kanban
Image
credit: https://startinfinity.com/project-management-methodologies/kanban
Even when the Kanban methodology is not being explicitly used, the visualisation process is so powerful that it often used in many other project management strategies. It’s not uncommon to see a Kanban board on the wall during a two week sprint.
The advantage of Kanban is that you have a single place to track the progress of all the tasks, and bottle necks can be quickly identified. One of the main disadvantages of Kanban come from people failing to update the Kanban board as a task is being worked on (poor communication), or updating too often (high overhead). Many project management software tools incorporate a Kanban board and tools like JIRA even have a way of migrating and updating tasks based on activity in a linked GitHub repository so that people can keep the Kanban up to date without having to visit the board itself.
Summary
Communication and effective project management are critical to the success of any collaborative project. There is no one-size-fits-all solution, and you will need to consider the project requirements, and the size and expertise of your team when deciding on a communication and management strategy. Thankfully there are many project management tools online that are free that will support whatever choice you make.
Member roles
Depending on the scope of your project, the size of the team, and the management strategy that is being used, you will have a number of roles that need to be filled within the team. Below is a list of some common roles that may be applicable to your project along with a short description. It should be noted that not all roles are required for all projects, and that the roles do not need to map to people on a 1:1 basis. It is normal to have multiple people per role and to have some people acting in multiple roles. The most important thing is that you consider the different roles and responsibilities, and have at least an implicit agreement on who is going to be filling each of the roles. This will help people to understand their responsibilities and who they should be handing work over to or working with during the project development.
Roles
- Software Developer
- Primarily focused on writing the software, fixing bugs, implementing new features.
- Should be responsive to issues, and provide implementation advice to the team.
- Documentation and Test Developer
- Primarily focused on the creation of documentation and developing tests.
- Test cases and docstrings should be consistent.
- Typically also will be responsible for automating the testing process and reporting issues.
- Documentation can be focused on docstrings but can also include online documentation, help files, tutorials, and examples.
- Product Owner
- The person who takes responsibility for setting the software project goals.
- This person is tasked with understanding the client/user needs and translating them into user stories, milestones, and tasks.
- Domain Expert
- Someone who has a good understanding of the context in which the software will be deployed or used.
- When developing software for astronomers, it is not essential for all the development team to have a good understanding of the general or specific field of application.
- A domain expert can be an internal point of contact for the development team when they have questions about the correctness or utility of an aspect of theproject.
- Project Manager
- Primarily focused on the organisation of the team, ensuring that team members have tasks matched to their skills, and that the required skills are available within the team.
- The project manager will be responsible for the timing and scheduling of work and deadlines.
- Reviewer
- Any piece of work that is completed should be assigned to a reviewer to ensure that the work is up to standard.
- The reviewer should have a good understanding of the goals of a piece of work and be able to give feedback on areas that need improvement.
- The reviewer should ideally not be involved in the development of the piece of work they are reviewing.
- Approver
- Similar to a reviewer, except that there is no requirement for an approver to understand the implementation of the work being done.
- An approver is focused on ensuring that the proper procedures have been followed.
- User Acceptance Tester
- Someone who is able to perform the necessary tests to ensure that each of the user stories have been met.
- Acceptance testing is typically not able to be automated and will require manual interaction to ensure that the end user can perform the tasks outline in the user stories.
The following workflow describes the interaction of the above roles within a generic software project:
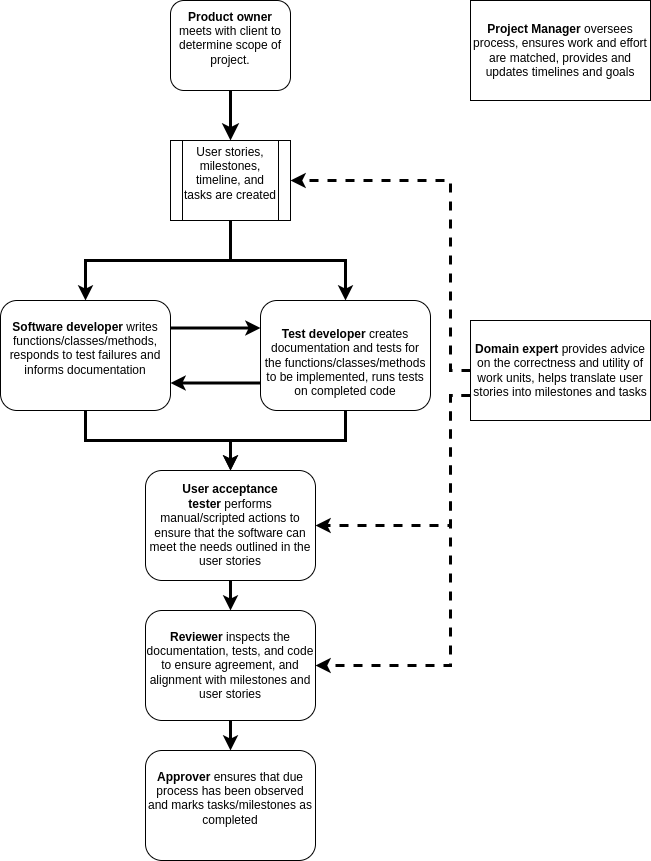
Solid lines indicate the flow of content for action, approval, or feedback. Dashed lines indicate input in the form of advice or oversight.
GROUP Activity: Who does what and when?
Within your software project group review the past three lessons and discuss the following:
- What software development roles are required for your project?
- What project management roles are required for your project?
- Are there any roles that would be beneficial to your project that are not listed?
- How are these roles distributed among the team?
- Are there people with multiple roles or roles shared among multiple people?
- Who determines the timeline and deliverables for this project?
- Is the timeline flexible?
- Can you classify the deliverables as one of required/desired/optional?
- How often and in what format should communication be managed?
If you have been involved in a previous software development project, please share the following with your teammates:
- What practices worked well and could be brought into this and future projects?
- What practices didn’t work well and should be avoided in the future?
- Was the previous project larger or smaller than the current one and how would that affect your choice of management/communication?
Create project standards and expectations
When a single person is working on a project there will typically be
a consistency imposed simply by the fact that the developer has ‘their
way’ of doing things (though this consistency may not exist through
time). When multiple developers are working on a project it is good
practice to have an agreed up on set of standards that will be followed
to ensure that the project has a consistent style and that common
practices are followed. These practices can include how/when to test,
the branch/develop/merge cycle, documentation formats, as well as code
style. A common place to note these standards and expectations is in the
CONTRIBUTING.md file in the root of your software project.
This file should be considered to be supplementary to the
README.md file, and for a slightly different audience.
Whilst the README.md file is aimed at users of the software, the
CONTRIBUTING.md file is aimed at people who might develop
the software, give feedback, or submit bug/feature requests.
Sections to consider for CONTRIBUTING.md
- Welcome and encourage people to contribute to the project
- Table of Contents (especially if the file is long)
- Style guide
- List standards for code style
- Consider using a linter and listing it here (with settings)
- Note the docstring format and guidelines
- Testing
- Where the tests are located
- How the test are run
- The machine/environment on which the tests are expected to pass
- How to submit changes
- Who can submit changes
- Expectations for what changes will be accepted
- The pull request approval process
- How to report a bug
- What is expected for a good bug report
- What tags/categories should be used when submitting a report
- How to request an “enhancement”
- What enhancements are likely to be support and which are not
- Templates
- Examples for enhancement / bug report / change requests.
- Code of Conduct
- Expectations for behaviour when contributing to the project
- Consequences for breaching the code of conduct
- Email/web address for reporting breaches
- Recognition model
- Let people know how their contributions will be recognised.
- The following may be appropriate:
- An acknowledgement section on the wiki
- Co-authorship or acknowledgements in a published paper
- Invitation to join as github contributor
- A shout out on social media
- A beverage of choice
The CONTRIBUTING.md file can become quite long if all of
the above are included. The key is to have a record of how people should
interact with others and with the project and that the project
maintainers adhere to these guide lines.
Creating a GitHub repository
At the moment we have a bunch of code, documentation, and associated files. We wish to make these available to others in the easiest way possible. We could just zip them all up and email to collaborators. However this means that collaborators no longer benefit from any future development that you do, and even worse, will start asking questions about code that may have diverged from the version you are working on. A solution to this problem is to keep all your code under version control, and to make use of one of the many free, online repositories to host a copy of the code. For this lesson we’ll focus on GitHub, but gitlab and bitbucket are also good alternatives.
Create an account on Github
Github accounts are free, you just need an email address to sign up. Since some academic institutions shut off your email address promptly when your contract ends, it may be a good idea to use a non-institutional or personal email to sign up to github or other services that will outlast your current contract.
Create a new repository on Github
Go to Github and sign in. You should be taken to a page which has a listing of your repositories and a green button to create a new one. Click the button and you should see a screen similar to the following.
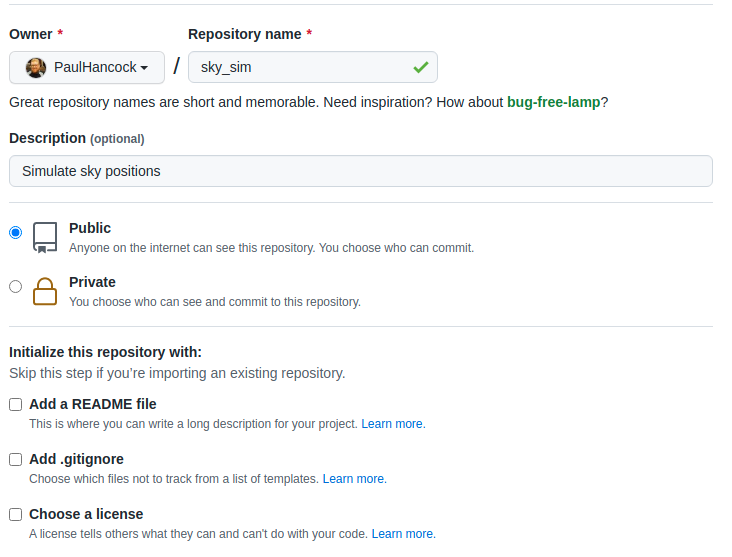
For now, lets create a truly empty repository so don’t select any of the last three boxes. Just give the repo a name (your project name is a good choice if available). You can change the description later or fill it in now.
Once you create the repository you’ll see a set of instructions about what to do next.
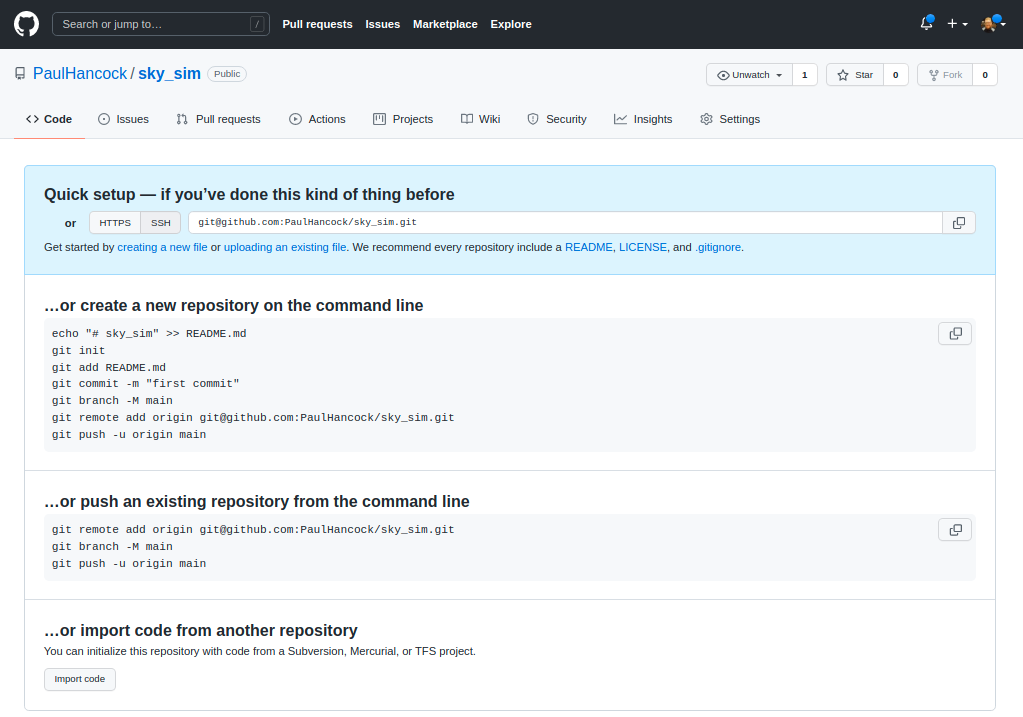
Now we are going to go with “create a new repository from the command line”.
The first part is to make a new local git repository using init / add / commit and to name the branch to be main (instead of master).
BASH
git init
git add README.md
git add requirements.txt encironment.yml
git add sim_catalog skysim/*.py
git commit -m "first commit"
git branch -M main
The next step is to link your local repository with the one that you
just created on Github. Replace PaulHancock/sky_sim.git
with your username and the name of the repo that you chose.
After you have done the git push you’ll have added all
your local changes to the remote repository and you can view the new
state of the project on Github. Note how your README.md
file gets rendered into a nice splash page.
When you push to origin main you’ll have to authenticate
with Github, see the github
documentation for instructions on how to set that up for ssh.
If you set your repository to be public then anyone on the internet
can see and download your code, they can make a fork (copy) of it to
work on themselves, and can even send feature requests or bug reports
via the issue tracker. We will get into those features later, but for
now all you need to do is let your collaborators know that your code is
available on Github, send them the link, and then they can
download/clone it as needed. An added bonus is that as you make changes
to your code, and then add/commit/push these changes, your
collaborators can then pull those changes and get the updates without
having to bug you about it.
Issue tracking on GitHub
Once your code is in the wild hopefully people will find it, use it, and give feedback. Positive feedback in person or by email is always nice, however there is also the issue of bugs, new feature requests, and people wanting clarification. Dealing with these last three points requires some organisation, and so we will learn how to use an issue tracker for this.
Github, gitlab, and bitbucket all offer an form of issue tracking that is attached to each of your software repositories. In this lesson we’ll focus on the Github issue tracker, but the lessons learned here are applicable to any issue tracker system.
The issue tracker is a way of engaging with your co-developers and
end-users to discuss any problems that people may be having when using
the software. The issue tracker is available for all Github
repositories, and enabled by default. However, publishing code on Github
does not mean that you are obligated to provide any support at all. If
you don’t intend on providing support for your software, it would be a
good idea to mention this in the README.md file that is
shown on the landing page so that people have clear expectations. If you
do intend to provide support and receive feedback then the issue tracker
is for you.
Overview
We will cover four of the most common issues that you are likely to see or use on the issue tracker, and give some guidance and advice about how to approach them. We’ll cover general questions, bug reports, feature requests, and pull requests.
Github issues has become a full featured work planning and project management system (see link), most of which is beyond the scope of this course. We will be focusing on the basic capabilities of the issue tracker to get you and your group started. Once you are up and running you should explore the other features.
To begin, let’s navigate to the github repository for our project of
choice. On the front page you should see a set of tabs. By default
you’ll be seeing the <> code tab, but we want to
select the ⊙ Issues tab.

Initially this will be blank for your project because there are no issues (yay).
Creating an issue
Navigate to the Issues tab of a repository on Github and
you’ll see a “New issue” button in green. Press this and we’ll explore
some of the options.
An issue has a title (or short description) and a comment (long description). When creating an issue you can add some labels to it so that others can easily understand what kind of issue you are reporting. Github has a range of built in labels, and the repository owner/admins can create more if needed.

Once an issue has been created, the author or repository owner/admins
can adjust the issue by assigning people to work on it, updating the
labels. This is a helpful piece of organisational work. Others can can
also comment on the issue so that there is a back and forth between the
developers, the person reporting the issue, and anyone else experiencing
the same/similar issues. When an issue is resolved it can be marked as
closed. Closed issues are not shown by default, but can be seen by
removing the is:open or add the is:closed
filter.
We will now go through some of the different types of issues that are typically reported and in the next lesson we’ll have a go at creating/resolving these issues.
Questions
This tag is usually used by people asking for clarification. There is not necessarily any issue with the code, it is just that the user doesn’t understand something. The threaded structure of the issue tracker makes this a useful place to have a discussion about the question. Questions usually lead to additional documentation being created – for example an FAQ section on the wiki for the repository. Questions can also be escalated into bugs or feature requests.
If someone sends you a question via email that does not involve personal/private information, then it is often a good idea to ask them to post the question on the issue tracker and then discuss it there. If the person isn’t that interested in using Github then I often just ask for their permission to replicate the email discussion on the issue tracker (with/without naming them depending on their preference). The mentality is the same with people asking questions in a classroom – if one person has a question, often there are others with the same question who are too shy to ask. By answering the question publicly you reduce the number of duplicate email chains that you have.
Bug reports
Bug reports are for when people find an error in your code. The
common errors are code crashing, or code giving unexpected or wrong
output. Best practice for reporting a bug is to give as much information
as is required to reproduce the error. This is the minimum working
example (MWE), or rather the minimum example that produces the error. It
is at this point where code versions and environments can be super
helpful. Asking people to run mycode --version and paste
the output in the bug report can help a lot. Sometimes people work with
old versions of code and simply updating to a new version can fix the
issue. For a program crash, a copy/paste of the output/error is
useful.
Github allows you to add files and images to the issue tracker so that people have the option of supplying a small amount of real data to reproduce the error. Similarly they can screenshot a problem (particularly useful for graphic interfaces or code that produces plots).
Keep in mind that when someone posts a bug report it is because they are having a problem. That problem is real. It may not be due to your code. It may be due to them misusing or misunderstanding your code. It may be due to issues with code that you are dependent on. It may be your fault. Just remember that people are not looking to place blame, but are looking to find a solution. Have a conversation with them in the issue tracker to figure out what is going on and how you could help solve the problem. If you don’t consider the bug to be a problem (it’s a feature not a bug) then note this in the issue tracker.
Feature requests
Sometimes a user will have an idea about how to improve or expand the capability of the software they are using. A feature request is a way for the user to suggest these improvements. Feature requests are not an indication that something is wrong, but that there is an opportunity to be better. Some example feature requests are:
- support additional input/output formats, or
- support additional operating systems, or
- provide some sanity checking before users made silly mistakes, or
- improve a users quality of life by combining multiple often used functions into one, or
- provide documentation in an alternative format (html, pdf, online wiki etc).
Feature requests are typically a user’s wish list, which if fulfilled, will save the user time or allow them to expand the scope of their work.
Pull requests
For a collaborative software development project you’ll typically
have multiple people contributing code to a range of branches. When the
development of the branch is complete the developer will submit a pull
request to have their changes/updates incorporated into a reference
branch (usually dev or main). A pull request is essentially a moderated
git merge (or git rebase) that allows you to
see any conflicts, see/discuss/approve changes, and make any final
changes required before the merge actually takes place.
People have the option of forking (copying) your public repository and making their own changes. If you are lucky, people will make useful changes to your code and then offer these changes back to you via a pull request. If these changes are aligned with the goals of your project and meet the various style and testing conditions that you set, then the pull request should be accepted.
A pull request is a request. There is no necessity for all pull requests to be accepted, however it is good practice (and polite) to give feedback on any pull requests that are not going to be accepted.
If you would like to capture the style, testing, and documentation
expectations for your project then a file called
CONTRIBUTING.md in the root of the repository is a common
place to define this. You can ask that people making pull requests obey
these expectations, and it is possible to create automated ways of
ensuring these standards are obeyed.
Summary
Whether your development group is just you, or three, or ten people, the issue tracker is a free and convenient workflow management platform.
GROUP Activity: Create, discuss, and resolve an issue on GitHub
Given the previous lessons, you should consider creating or updating
the CONTRIBUTING.md file for your project.
- Have one member of your team create a new issue in the GitHub issue tracker to create/update the file and assign the issue to at least one other member of the team.
- Tag the issue with a tag such as
documentation, or create a new tag that is more relevant. - Within your group, use the issue tracker to discuss what sections
are required for the
CONTRIBUTING.mdfile. - Once there is a consensus on the content, have someone make the required changes and push the file to GitHub (or edit directly online using the GitHub editor).
- Try using the
#<IssueNumber>format within the git commit to link the commit to the issue discussion. - When an acceptable file has been created/modified mark the issue as resolved (closed).
Branching and development
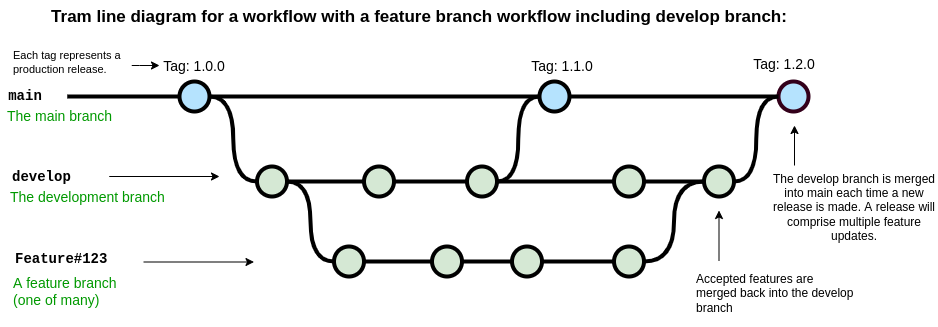
In this lesson we’ll focus on one of the most popular git workflows: Feature Branching. Many other workflows exist, but the most important feature of any workflow is that it provides benefit to the project. See the Atlassian tutorials on workflows for more information.
Feature branching
At the core of the feature branching workflow is the idea that all development should be done in a branch separate from the main branch. The rational for this is to ensure that the main branch of the project is always in a not-broken state. When people find your software repository and want to try it out, they will most likely check out the main branch and start their evaluation or usage journey from there. Having a broken main branch is a good way to turn people away from your software, and generate a lot of bug reports.
The diagram below shows the basic feature branch workflow.
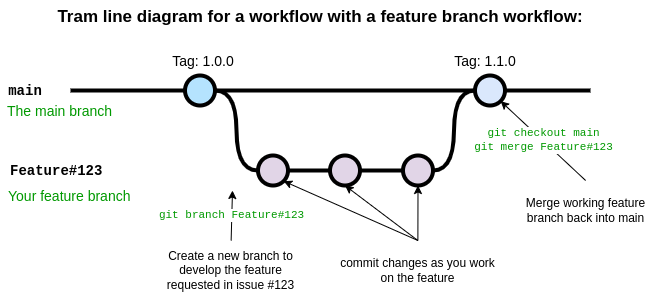
In the above case a feature has been requested in the issue with
ticket number 123. A developer is assigned the task of developing this
feature and begins by creating a new branch with git branch
using a branch name appropriate for the task. The development proceeds
on the feature branch, occasionally breaking the code, fixing the bugs,
updating tests and documentation, until finally a new version of the
code has been created which implements the new feature. At this point
the developer responsible for this branch ensures all their changes are
pushed to Github and the opens a pull request. During the pull request
other developers, and maybe the person who submitted the initial feature
request, will review and discuss the changes, ensure that the code meets
the repository standards for style and quality. Once everyone is happy
with the changes in the feature branch it is merged into main by
accepting the pull request on Github. Once the feature branch has been
merged into main it is deleted.
In this scheme many features branches can be created, developed, and then deleted over the life-cycle of the project.
A common variation on the feature branch workflow is to include a development branch as an intermediary between the main and feature branches. Feature branches are created off the develop branch and then merged back when complete. The develop branch therefore contains all of the latest features and if new features interact with each other in unexpected ways, this can be discovered on the develop branch rather than the main branch. The main branch is used for tagging and releasing new versions of the software, and these new versions can each include a number of developments.
Setting up branches
Git does not see any branch as being special. We assign “specialness”
to a branch based on the name, but we can rename branches or change our
idea of special as we like. Regardless of how a git repository has been
set up, you can move from one branching scheme to another at any time.
Creating a new develop branch and then making a habit of
branching features from that instead of main can be done at
any time. The key thing is to make sure that the branching/development
workflow that you decide on is serving a purpose for your project. Early
on in the development of some software you may have a single developer
who is hashing out a proof of concept. In this case you may do all your
development right on the main branch. As you start to share your code
with others you may decide to move development into the develop branch,
and merge back to main only when the code-base is in a working state.
Finally, as you bring more developers into the project you may decide
that a feature-develop-main workflow is a better way to keep the various
developments from interfering with each other.
The point is that you should make a choice, write it down some place
(CONTRIBUTING.md), stick to that choice for as long as it
is useful, and revise it when needed.
An example development cycle for fixing a bug
As I’m using my own code for various tasks I notice that
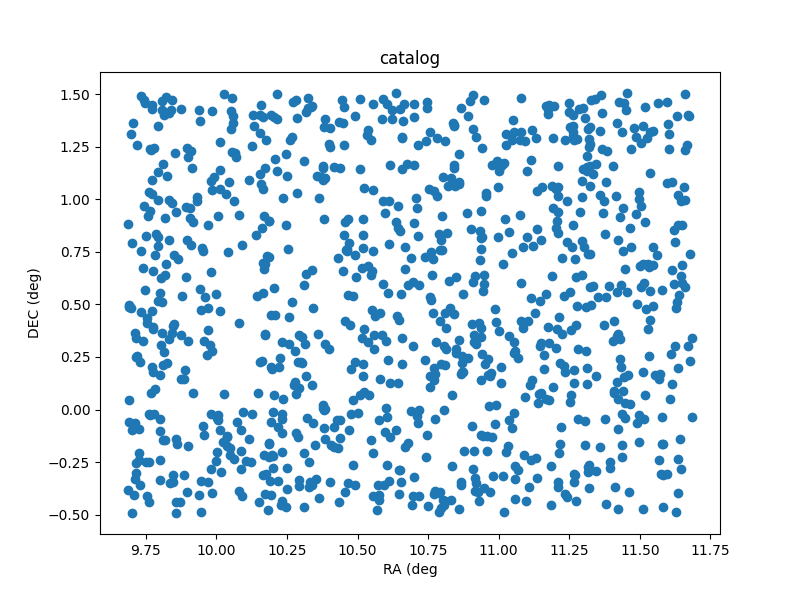
./scripts/sim_catalog --ref_ra=00:42:44.3 --ref_dec=-00:30:19 --radius 1 --n 1000
produces some unexpected output. A plot of the sky locations is shown
below. Note that the points have been generated around a central
declination of 00:30:19 instead of -00:30:19.
It seems that there is an issue with a negative reference
declination.
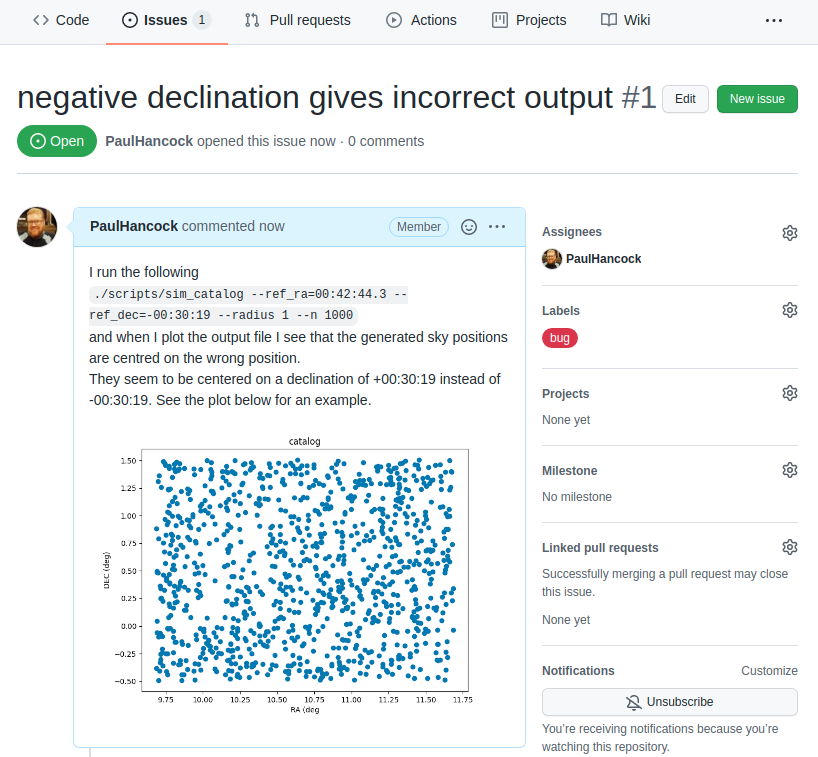
Reporting the issue
As a user, once I have identified an issue I should go to github and make a bug report on the issue tracker. In the example project I’m the only on the developer team so I’ll assign myself to the issue. I’ll also label it as being a bug.
Confirming the issue
Now that the issue has been submitted I’ll tackle this problem from the developer point of view.
The first thing to do is read and understand the issue. In this case I’ll just run the script exactly as shown in the issue tracker, and see that I get the same problem.
Create a feature branch for this issue
At this point I should create a new branch in my repository with some relevant name. Since the names of issues are not guaranteed to be unique I will instead use the issue number (#1 in this case) as part of the branch name. For a project with multiple developers it is also a good idea to identify who is the ‘owner’ of each branch. An example branch choice would be:
git branch Paulhancock/Issue#1
After some trial and error I find that the cause of the bug is in the following code:
PYTHON
def generate_positions(ref_ra='00:42:44.3',
                       ref_dec='41:16:09',
                       radius=1.,
                       nsources=1000):
...
    # convert DMS -> degrees
    d, m, s = ref_dec.split(':')
    dec = int(d)+int(m)/60+float(s)/3600
...
    return ras, decs
The first thing that I do is to make a new test that will expose this bug.
Writing a test
We will now write our first formal test for our code. We’ll use a
format that will make future automated testing easier. All the tests
that we wish to run are python scripts, and we’ll place them in the
tests/ directory. Each script will test a different
sub-module, and for the sim sub-module of our
skysim module, we’ll collect all the tests into
tests/test_sim.py.
The first thing that we need to do is import the module/code that
will be tested. In this case that will be the
generate_positions function within the
skysim.sim module.
PYTHON
#! /usr/bin/env python3
"""
Tests for the skysim.sim module
"""
import numpy as np
from skysim.sim import generate_positions
Each test that we write will be contained within a separate function
whose name begins with test_, and which returns
None when the test passes, and raises an
AssertionError if the test fails. While we could home-brew
our own set of standards for what pass/fail looks like, we will instead
use standards set out by one of the common python testing frameworks
called pytest.
We craft a piece of code that will detect the mistake in our original
function. In this case the mistake is that the negative sign at the
start of the declination is being ignored so we get the wrong positions.
To test for this we’ll run generate_positions with a
declination that is negative, and small radius, so that the expected
output should consist entirely of negative declinations if the function
works properly, and probably all positive declinations if it’s
broken.
Our test function looks like this:
PYTHON
def test_negative_dec():
    """
    Test for the negative dec bug noted in issue #1
    """
    _, decs = generate_positions(ref_ra='00:00:00',
                                 ref_dec='-00:30:19',
                                 radius=0.1, nsources=10)
    if not np.all(decs < 0):
        raise AssertionError("Declinations should be <0, but are >0")
    return
In order to run the tests we can add the following snippet to the end
of our script. The snippet essentially looks at all the global variables
(including function names), selects those that start with
test_, assumes that they are a function and calls that
function. When the function is called there is a try/except for an
AssertionError which reports failure if it’s caught, or
reports success if no error was raised.
PYTHON
if __name__ == "__main__":
    # introspect and run all the functions starting with 'test'
    for f in dir():
        if f.startswith('test'):
            try:
                globals()[f]()
            except AssertionError as e:
                print("{0} FAILED with error: {1}".format(f, e))
            else:
                print("{0} PASSED".format(f))
When we run our test code we get the following result:
BASH
$ python tests/test_sim.py
test_negative_dec FAILED with error Declinations should be <0, but are >0
This failure is not a bad thing, it means that we have successfully written a test function that will identify the bug. Now we can begin the process of fixing the bug.
Fixing the bug
Finally, once I have the test code in place, it’s time to fix the bug. I make some modifications to account for the leading minus sign on the declination as follows:
PYTHON
    # convert DMS -> degrees
    d, m, s = ref_dec.split(':')
    sign = 1
    if d[0] == '-':
        sign = -1
    dec = sign*(abs(int(d))+int(m)/60+float(s)/3600)
And I then re-run the code to make sure that the bug has been resolved, and then run my tests:
As I develop more and more tests the list of functions run will grow. Once the new bug has been solved I will re-run all my tests to ensure that fixing this bug has not caused a new bug some other place.
Checking in my work
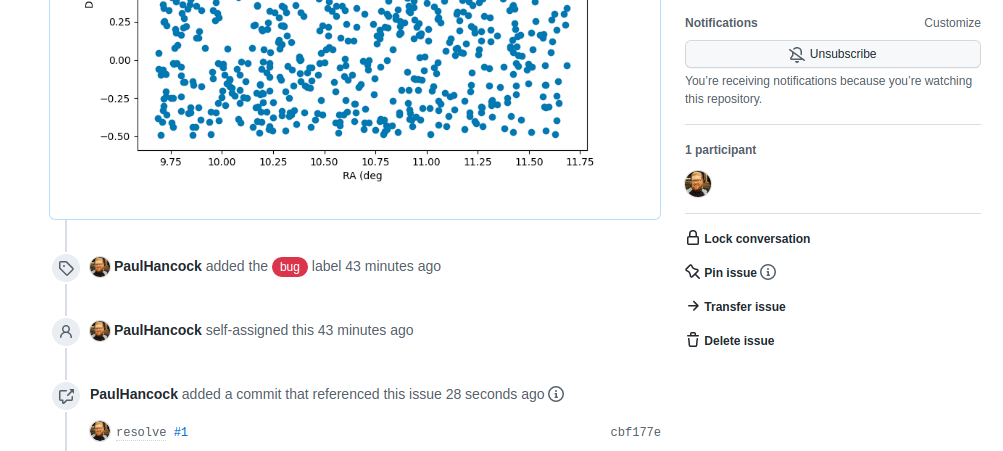
I now check in my new test code, and updated version of sim.py:
BASH
git add tests/test_sim.py
git commit -m 'expose bug from issue#1'
git commit -m 'resolve #1' skysim/sim.py
Note that I have used #1 to refer to the issue from
within my commit message. When viewed on Github these commit messages
will automatically generate a link to the issue, and when viewing the
issue I should be able to see the reverse link.
I now push the bug fix (and my new branch) to the Github repo.
If we look on the original issue page, we can see the link to the commit.
Creating a pull request
When we navigate to the landing page for our repository we will see a new yellow banner appear as below:
We can click the green “Compare & pull request” button to start a new pull request. Alternatively we can go to the “Pull requests” tab. Either way we enter a title and description for the pull request.
Note that the assign/label/project/milestone options that we see on
the pull request form are mostly the same as on the Issues form. This is
because pull requests are just special types of issues. They share a
numbering scheme. This is the first pull request for this repository but
it will be labelled #2 because there is an existing issue
#1. One difference between a pull request and an issue is
that a pull request can have a reviewer assigned to it. Here I have
selected myself as the assignee (the person looking after the pull
request), and SkyWa7ch3r as the reviewer (the person who
will review my code and sign off when they are happy).
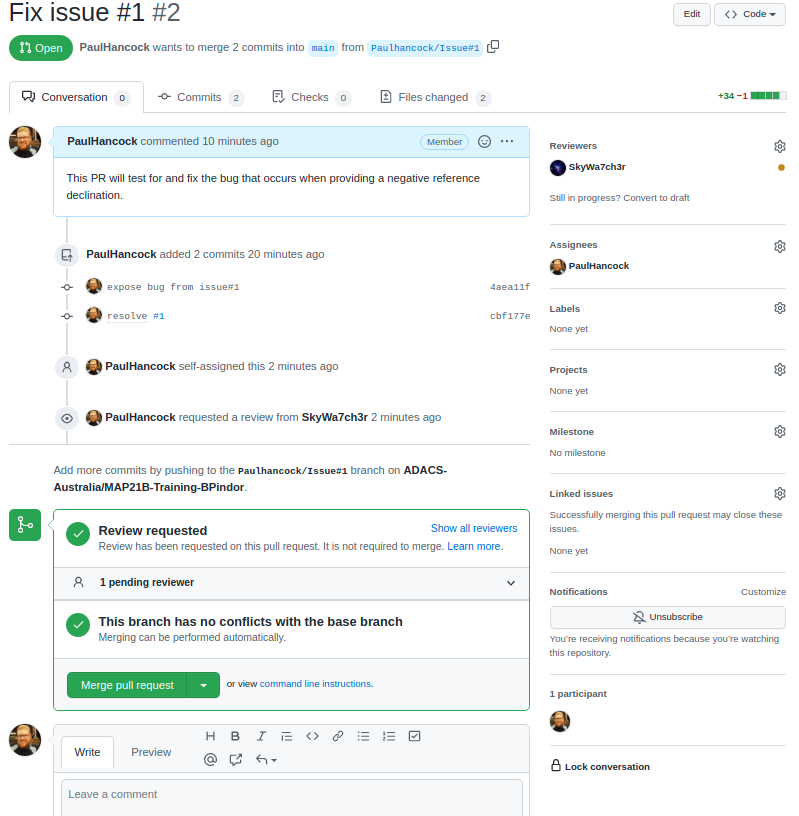
Github does some work in the background to let me know that there
will be no conflicts between this branch and the main branch, so that it
is ‘safe’ to do the merge. Currently there is no indication that the
code works or passes our tests. For now we let the reviwer do this work.
The reviewer would pull the Paulhancock/Issue#1 branch, run
the tests and see that they pass, then come back to github and make a
note of it in the discussion. (In a later lesson we’ll see how we can
make Github do most of this work for us using Github actions.)
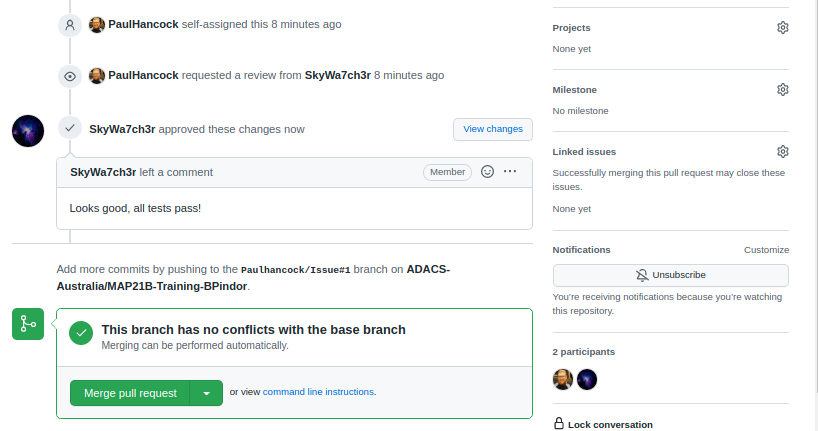
Once our reviewer(s) are happy with the changes we can merge our branch back into main by pressing the green button. This will create a new commit on the main branch in order to do the merge, so we’ll be asked for a title/description for the commit. It is pre-filled for us. Once the merge is complete Github will let us know that all is good, and suggest that we delete the branch. Since the feature is merged we no longer need this branch and will delete it.
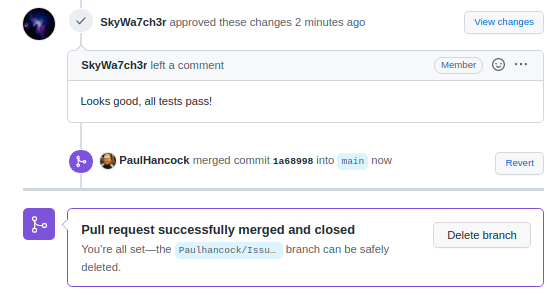
Closing the issue
If we navigate back to the issues tab, we’ll see that the issue
related to the pull request has also been closed for us. This is because
we wrote resolve #1 as a comment for our commit. When that
commit is merged into the main branch git will automatically resolve
(close) the linked issue. If we didn’t use this smart linking capability
we can still go back to the open issue and close it. Either way it would
be good to leave a note about the issue being fixed.
Summary
The development cycle for fixing a bug is as follows:
- identify bug
- report bug on the Gihub issue tracker
- confirm that the bug exists
- create a feature branch
- write a test to expose the bug/error
- fix the bug
- run all tests
- commit changes
- create a pull request
- merge the branch into main and delete the feature branch
In this example we had one person doing the reporting/fixing. Usually you’ll have an end user doing the finding/report part, and then one or more developers doing the remainder.
GROUP Activity: Working on the same problem
In this activity you will practice working in a team as you go through a simple development cycle.
- As a group, identify a minor issue with your current project. (Don’t feel bad, the only projects that don’t have issues are the ones that no one is using).
- Since the focus here is on the life-cycle of a bug, choose a small thing that is easy to identify and fix.
- A function without a docstring would be ideal (and probably easy to find).
- Have one team member create an issue that describes the problem and explains what a solution would look like.
- eg “myFunc(4) should return a filename”, or “myFunc should have a
docstring in
”. - Create a new branch for development work called
or Issue . - Assign at least two team members to work on this issue.
- Have one team member create a solution for the issue and then:
- Push the changes to the remote repository,
- Open a pull request to merge this branch into main,
- Set the assignees to be all the members working on the issue,
- Set the reviewer to be a team member who is not working on the code (if you have enough people, otherwise choose someone other than the pull request creator), and
- Add whatever labels look appropriate.
- Have the other team members:
- View the changes via the “files changed” tab of the pull request,
- Comment on what is good and what needs improving,
- Pull the active branch to their local machine,
- Make an improvement and commit the change, and
- Push the change back to the active branch.
- Everyone should have an opportunity to make comments and changes, but you’ll need to coordinate who is doing what and when to minimise the number of merge conflicts that occur.
- Once everyone has had a chance to view/comment/change, have the reviewer sign off on the pull request and merge the changes into the main branch.
Content from Making Code Reusable by You and Your Group
Last updated on 2026-02-25 | Edit this page
Estimated time: 180 minutes
Overview
Questions
- How do I easily share or re-use my code?
- When sharing, what information should I provide?
- Where and how can I easily share code?
Objectives
- Package your code into a module.
- Create a command line interface for your code.
- Identify and include meta-data in your module.
Separating the UI from the functionality
A programming principle called model-view-controller
(MVC) is recommended when designing code. Under MVC, programs are
separated into one of three components, the model (library) which
provides the core functionality, a viewer which provides a visualisation
of the results, and a controller which links the user to the model. In
our test code the model would be the two functions
generate_positions and write_file, whilst the
controller would be the command line interface. [In this example we
could consider the file output to be the viewer.]
At the end of cycle1 we had a single file, sim.py, which
contained both the model and the controller. Our first task will be to
separate this into two parts. The first part will be a python module
which provides the functionality, and the second will be a script which
receives user input and calls the library functions.
Creating a python module
Python modules, like the numpy module that we have
already used, can be easily created by obeying a simple directory/file
structure. If we want to create a module called skysim then
all we need to do is create a directory with the same name, and add an
empty file called __init__.py. Let’s do that now:
To access the module we simply use import skysim.
BASH
$ python
>>> import skysim
>>> dir(skysim)
['__builtins__', '__cached__', '__doc__', '__file__', '__loader__', '__name__', '__package__', '__path__', '__spec__']
>>>
We can see that the skysim module already has some
attributes defined, and they all start with a double underscore (
__ or ‘dunder’ ). The file attribute is a
string containing the full path to the file __init__.py.
The __name__ attribute will contain the string
skysim because this is the name of the module. If we had
renamed the module on import (using import skysim as other)
then the __name__ attribute would still be the same. Feel
free to explore the other attributes.
In order to add some functions or attributes to our module we can
simply add our sim.py file to the skysim
directory. If we do this and then restart our python interpreter we can
import all the functions/modules/variables provided by
sim.py by doing from skysim import sim. For
example:
BASH
$ python
>>> from skysim import sim
>>> dir(sim)
['__builtins__', '__cached__', '__doc__', '__file__', '__loader__', '__name__', '__package__', '__spec__', 'argparse', 'generate_positions', 'math', 'np', 'write_file']
>>>
Above we can see the two functions that we defined, as well as the
modules that we imported (argparse, math, and
np). We now have a library that we can import. When we
import a module, all the code within that file is executed. In the case
of our sim.py file this means that we import some other
modules and then define some functions.
If a python file is run via python myfile.py then the
__name__ attribute will be set to the string
__main__. However if a python file is imported via import
myfile or import myfile as mf, then the
__name__ attribute is set to be the filename (without the
.py extension). Therefore when we import
sim.py as part of our module the CLI that we created with
argparse does not get executed because we hid it within an
if __name__ == "__main__" clause.
Creating a stand alone script
To create a script that calls this library we create a new file
called sim_catalog. We then move all the content of the
if __name__ == "__main__" clause out of sim.py
and into our new file. Finally, we the import the functions that we need
from our newly created module.
Our new script looks like this:
PYTHON
#! /usr/bin/env python

import argparse
from skysim.sim import generate_positions, write_file

if __name__ == '__main__':
    # Set up the parser with all the options that you want
    parser = argparse.ArgumentParser(prog='sim')
    group1 = parser.add_argument_group()
    group1.add_argument('--ref_ra', dest='ref_ra', type=str, default='00:42:44.3',
                        help='Central/reference RA position HH:MM:SS.S format')
    group1.add_argument('--ref_dec', dest='ref_dec', type=str, default='41:16:09',
                        help='Central/reference Dec position DD:MM:SS.S format')
    group1.add_argument('--radius', dest='radius', type=float, default=1.,
                        help='radius within which the new positions are generated (deg)')
    group1.add_argument('--n', dest='nsources', type=int, default=1_000,
                        help='Number of positions to generate')
    group1.add_argument('--out', dest='outfile', type=str, default='catalog.csv',
                        help='Filename for saving output (csv format)')

    # parse the command line input
    options = parser.parse_args()

    ras, decs = generate_positions(ref_ra=options.ref_ra,
                                   ref_dec=options.ref_dec,
                                   radius=options.radius,
                                   nsources=options.nsources)
    write_file(ras, decs, outfile=options.outfile)
Note that we have a shebang line
(#!) to indicate that we want to use the python interpreter. This means
that we can make the file executable and then execute it like any other
program without the user having to explicitly type python.
It is not shown here, but I have made the file executable so that I can
just type ./sim_catalog to run the above code.
We have now separated our interface (sim_catalog) from
the model (skysim.sim). Currently the user will not notice
any difference because the functionality hasn’t changed. However, we are
now able to import the model into other python scripts. Our code is
becoming easier to re-use by ourselves (and other developers).
Updating our test script
Finally, we just need to update our test script so that it will use
the new sim_catalog script to do the testing.
SOLO Activity: Command line interface
A command line interface (CLI) is a good way to allow non-developers to use your software. In the previous lesson we saw how we can separate the functionality of your software from the user interface by creating a module with the core functionality and a script to provide the user interface.
Using the example project we developed earlier:
- Update the
scripts/sim_catalogfile so that it now has two argument groups,- The current
group1should have atitleof “Program settings” - The second group (
group2) should have atitleof “Metadata”
- The current
- Add the following parameters to
group2:-
--version, which will print the version -
--date, to show the last modified date -
--author, to list the authors
-
- All the parameters in
group2should have adefaultvalue ofFalse, and then useaction='store_true'to set the parameter toTruewhen this option is supplied by the user. - [Optional] Provide shortened versions of the parameters in
group2of the format-cetc.. - Write the necessary code so that when any of the options in
group2are set, all the required information is printed and the program exits without performing the simulation.
For now you’ll have to define some variables within the script to hold these values, but later on we’ll demonstrate a better place to store them.
Setting up a python environment
You python environment is the ecosystem of modules that you have
installed. If you have used pip to install modules then
pip freeze will give you a list of all the currently
installed modules and their versions. If you used conda
(anaconda) to install modules then conda list will do the
same. If you use a combination of the two then you are likely heading
toward the following problem:
If you have ever sent a python script to a collaborator only for them to say that it doesn’t work on their machine, it’s likely that they have a different set of modules installed, or that they have a different version of the modules installed. It may feel like installing all the modules at once would help out. But different software may depend on different versions of the same modules which would require you to uninstall/reinstall different versions of modules depending on what you are working on.
A better solution is to install multiple different python environments – one for each piece of software that you wish to run. To do this we will work with virtual environments.
Creating a new virtual environment
With the introduction of python 3, there is now a new module called
venv which handles the creation of new virtual
environments. See the python
documentation for a full breakdown. The short version is that we can
create a new virtual environment simply via:
where PROMPT is the name of the virtual environment, and ENV_DIR is the location in which all the files for this environment will be stored. A nice place to store your ENV_DIR is in your home directory.
Once you have created a virtual environment you can activate it via:
I find it nice to have a descriptive ENV_DIR such as
.env-jupyter or .env-py3-myproject (where the
‘.’ indicates a hidden directory in linux) but a short PROMPT such as
jpy, or py3-myproj. The reason for this is
that once your project is activated, your terminal will have PROMPT
added to the start of your command line. Since my PROMPT and ENV_DIR are
different I then add an alias in my ~/.bash_aliases file to
link them:
Creating a new virtual environment is easy, and if you get it wrong, you can just delete the ENV_DIR. The other nice thing is that if you are on a Linux or OSX machine your system version of python (which is used by the OS) can remain untouched, and won’t cause your system to become flaky when you totally mess up your python installs.
If you use Anaconda to install/manage your python modules, then you can simply navigate to the ‘environments’ tab, and create a new environment with the click of a button.
Now that we have created a new python environment we need to install some things into it.
Preserving environments with requirements.txt or environment.yml
Once you and your collaborators are comfortable managing different python virtual environments you are all set to start exporting and importing those environments for sharing.
The simplest way to share a python environment is to use a file which lists all the modules that are installed, and even their versions. Pip and conda have different ways of capturing dependencies.
pip – requirements.txt
For our example project we have used only one non-builtin python
module: numpy. To specify that this is module is required
we can create a file called requirements.txt and add the
following:
where the >=1.19 indicates that version 1.19 or
greater will be fine. See the pip
documentation for examples on how you can specify different version
numbers, ranges, and exclusions. By default each module listed will be
installed from the python package index (pypi), but you can also
indicate other locations including local files/folders or github
repositories.
If you don’t know what versions or dependencies you need for your
particular project then you can get a hint by inspecting your current
environment using pip freeze. This will list all the
installed modules and versions for the current environment. The list
will be much longer than you anticipate! To get a minimal list, start
with an empty environment and then keep installing modules until your
software will run, then run
pip freeze >> requirements.txt.
To install all the modules within a requirements.txt
file you run pip:
You now have a way of preserving and sharing your python environment
with others. It is good practice to keep a requirements.txt
file in your project directory, and to have this as part of your version
control repository.
conda – environment.yml
Anaconda uses a slightly different file format to capture essentially the same information. For the above example our file would look like:
Anaconda is able to reproduce not just the python modules, but the
entire virtual environment including the versions of python and anaconda
and also other non-python based codes. You can generate a good starting
point using conda list --export.
In order to 1) not dictate your users’ virtual environment management
choices, and 2) not duplicate information, the following method will
link your environment.yml and requirements.txt
files:
Conda understands pip formatted requirements, but pip doesn’t understand conda environment files, so there is no inverse version of the above linking.
Summary
In combination with a python virtual environment (previous lesson), we now have a greater expectation that our software will run the same on other people’s machines as is does on our own (test) machine. There will be some localisation (win/linux/osx) or language (en, ch, fr, etc) difference that might cause some problems down the line, but we have solved one of the most common sources of error.
Useful project metadata
Previously we used an empty __init__.py file in a
directory to cause python to interpret that directory as a module. There
is meta data that we wish to store about our project, and the
__init__.py file is an excellent place to do this.
Versioning
One of the most common items to store is the version of your
software. For most modules the module.__version__ is used
to store this information. There are many conventions for software
versioning and no one single correct answer. Versioning is the practice
of using unique numbers of names to refer to the different states of a
software project or code. A common choice is to use major/minor/patch
versions for the code such as 4.2.1, which is used by most
python modules. See semver.org for a
description on the how and why of semantic versioning.
A major version change will usually mean that the code has changed in
some fundamental way, and that people should not expect compatibility
between the two versions. For example: there were many changes between
the last version of python 2 (2.7) and python 3 that meant not all code
would work on both versions. If you have been using python for a while,
or have seen python code from ~10 years ago (or ~2 years ago if it’s
astronomers’ code!), then you’ll have seen some of these changes. Most
notable is the change from print "hello" to
print("hello").
A minor version change will usually indicate changes have been made that do not break compatibility within the major version. This would usually include the addition of new functionality that is compatible with (but not available in) previous versions of the software.
A patch version is used to distinguish states of development that do not change the intended functionality of the code base. These include bug fixes, security patches, or documentation updates.
Typically version 1.0 is used to represent the first stable/complete version of the software, and so versions such as 0.9 are used to indicate development versions.
Modification date
In addition to a semantic versioning noted above, some developers
find it useful to record the date of last change for each version of
their software (and indeed each file/module within). For this purpose we
would make use of the module.__date__ attribute. Date
formats are a perpetual problem for people and computers alike so it is
recommended that a single format be chosen and used consistently
throughout a project. The format YYYY-MM-DD is recommended as it has the
advantage of being time sorted when sorted alphanumerically.
Authors / developers
One method tracking attribution (or blame) in a project is to use the
module.__author__ attribute to store the author name as
either a string or list. For a project with few developers this can be
handled easily. For larger groups or projects git blame
would be a better method for tracking contributions on a line by line
basis.
Citation
For any researcher writing software there is an eternal battle
between writing good code and “doing science”. Acknowledging the use of
software is common but not yet standard or required when publishing
papers. To make it easier for people to cite your work you can use an
attribute such as module.__citation__ to employer people to
cite your work, link to papers or code repositories that should be cited
or referenced. When combined with a --cite command line
option, this is a great way for people to properly credit your work. If
your target audience are researchers then it can be very useful to store
a bibtex entry in the citation string so that people can just copy/paste
into their LaTeX document.
Meta data for our example project
The __init__ file in our example project can be updated
to include the above recommendations. Note the format of the
__citation__ string being multi line, and including LaTeX
formatting.
PYTHON
# /usr/bin/env python

__author__ = ['Dev One', 'Contrib Two']
__version__ = '0.9'
__date__ = '2021-12-02'
__citation__ = """
% If this work is used to support a publication please
% cite the following publication:
% Description of This code
@ARTICLE{ExcellentCode_2022,
   author = {{One}, D. and {Two}, C. and {People}, O},
    title = "{Awesome sauce code for astronomy projects}",
  journal = {Nature},
 keywords = {techniques: image processing, catalogues, surveys},
     year = 2021,
    month = may,
   volume = 1337,
    pages = {11-15},
      doi = {some.doi/link.in.here}
}

% It is also appropriate to link to the following repository:
https://github.com/devone/AwesomeSauce
"""GROUP Activity: metadata
In the past few lessons we learned about virtual environments, and project metadata. We will now put some of these lessons in to practice.
As a group:
- Decide upon a versioning scheme that will be used for the project, and if none currently exists, agree on what the current version number should be.
- Discuss how people should give recognition for using this project as part of their research (or other) work.
- Create issues on github that request the following changes. Share
the creation and assignee responsibilities between group members.
- The creation of a
requirements.txtandenvironment.ymlfile that include the dependencies for your project. For each dependency specify the minimum version requirement to be the smallest version that is used by one of the group members. - Record the agreed upon current version number of the project in the
<project>/__init__.pyfile. - Record the authors in an agreed upon order in the
__init__.pyfile - Record the last modification date in the
__init__.pyfile
- The creation of a
- Describe the method by which people should cite or give recognition for using this project
- For each of the issues above, have a group member follow the branch-develop-pull request workflow that was described earlier. When creating pull requests set the reviewer to include the person who created the initial issue.
- [Optional] Once all the pull requests have been resolved, repeat the
previous SOLO activity for your project (creating a command line
interface that will give users access to the
--cite,--date,--version,--authorinformation.
Licensing your work
By default any creative work is under an exclusive copyright which
means that the author(s) of that work have a say in what others can do
with it. In general this means that no one can build upon, use, reuse,
or distribute your work without your permission. To use or build upon
software that has no licence requires the new developer/user to contact
the original author(s) and get permission. This is time consuming,
annoying, and often not done. If you want your work to be used by others
your best bet is to provide an explicit software license as part of your
project so that people know up front what is allowed and not allowed. A
common way of licensing software is to provide a LICENSE
(or LICENCE) file in the root of the project.
(Alternatively you can provide the license as part of the header for
each file, but that’s a lot of repetition, and goes against our good
practice of don’t repeat yourself).
Choosing a software licence for your project
Your home institute may have opinions/guidelines for appropriate licensing software. Ask around and follow the advice of you local experts.
If you don’t have any local constraints on licensing your software
you can use one of the many license templates available on Github. To
use a template you need to log into your Github account, navigate to
your repository and then click the “add file”->”create new file”
button. You will be presented with a blank text editor and be asked for
a file name. If you use LICENSE.md (or any similar
spelling/extension) then you’ll see a new button appear on the right of
the screen saying “Choose a licence template”. Click that.

You’ll then see a list of common software licences that you can choose from. If you are brave you can read each of them in full. Alternatively you can simply read the Github provided summary at the top of what the permissions/limitations are. Choose one that feels right to you and then press “Review and submit”. This will create a new licence file.
Once you have a license file GitHub will add a badge to the “About” section of your project like this:
As you can see, for the example project I chose the GNU General public licence.
Basic documentation in README.md
Upon downloading new software, the first point of call for many
people is to look for some help on how to install and use the software.
This is where a file such as INSTRUCTIONS,
INSTALL or README can come in handy. The name
of the file says what it is and will attract the attention of the user.
While these files can be in any format, and have any name, a common
choice is README.md. If you have navigated to a GitHub
software repository, and seen the nice documentation available on the
front page, then this has been generated from the README.md
file.
The markdown format (guide here) is a simple to use, future proof, platform independent, document format that can be rendered into a range of other formats. As a bonus, the raw files are easily read and written by humans.
Things to consider for your README.md file
- The name of the project
- A description of the purpose of the software
- Maybe a one liner for each script
- Install instructions
- List some high level dependencies
- Usage instructions
- If you have a CLI then the output of
mycode --helpis appropriate to include verbatim - A link to documentation
- Author information and contact details (email, or just a link to github issues)
- A note on how people should credit this work
README.md for our example project
BASH
# SkySim
This project was built in order to simulate source (star/galaxy/other) positions over an area of sky.

## Installing
This project relies only on python built-ins and the numpy library.
Use `pip install -r requirements.txt` if you don't yet meet these requirements.

## Usage
The main entry point for this project is `sim_catalog`:

./sim_catalog --help
usage: sim [-h] [--ref_ra REF_RA] [--ref_dec REF_DEC] [--radius RADIUS] [--n NSOURCES] [--out OUTFILE]

optional arguments:
  -h, --help         show this help message and exit

  --ref_ra REF_RA    Central/reference RA position HH:MM:SS.S format
  --ref_dec REF_DEC  Central/reference Dec position DD:MM:SS.S format
  --radius RADIUS    radius within which the new positions are generated (deg)
  --n NSOURCES       Number of positions to generate
  --out OUTFILE      Filename for saving output (csv format)


## Documentation
Documentation is currently just this file, and associated python docstrings.

## Author / Contribution
This project is developed by Dev One.
If you want to contribute to this project please create a fork and issue pull requests for new features or bug fixes.

## Credit
If you find this project to be useful in your academic work please cite the following paper:
> [One, D. et al. Nature, 2021](https://nature.com)
The above README.md file will render on github
as below.
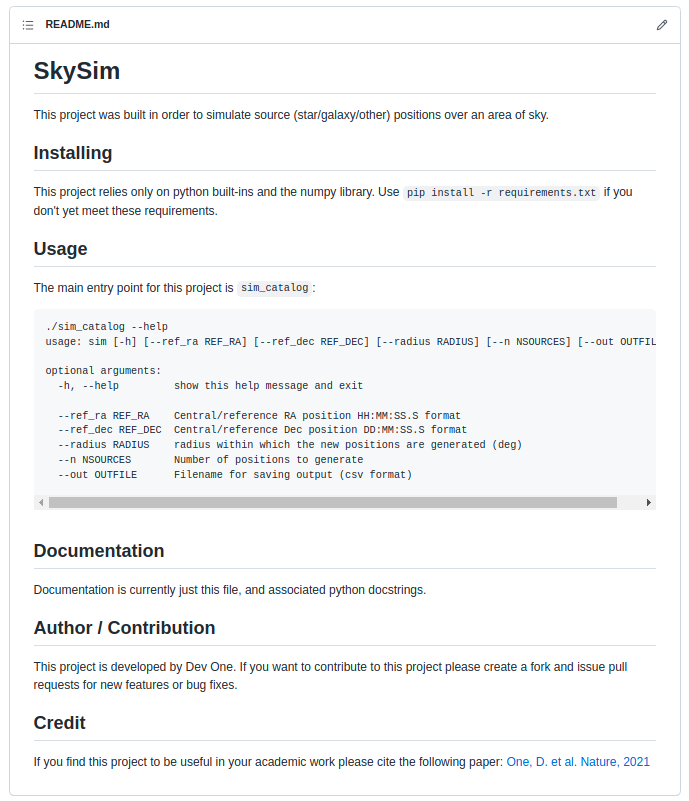
Summary
In this section we have made no changes to the core functionality of our software project. Instead we have made changes that make the software:
- easier to use for both developers and users
- by separating the command line interface from the core functionality;
-
more portable
- by listing dependencies in
requirements.txtandenvironment.yml;
- by listing dependencies in
-
easier to acknowledge and get help,
- by adding version, date, authorship, and citation information; and
-
more accessible,
- by providing a
README.mdfile.
- by providing a
The state of our project at the end of the second development cycle can be seen on the cycle2 branch of our github repository: here.
SOLO Activity: A GitHub landing page
When people visit the GitHub page for your project they would like to see more than just a directory listing of the files. People are typically looking for some description of what the project is, and how they can install and use it. In this activity we will ensure that our project has a landing page that is attractive to potential users.
- Use the GitHub online editor to create a new
LICENSEfile and choose an appropriate license from the template. - Create or update your project’s
README.mdfile so that it contains at least:- A short description of the software
- Some basic install instructions,
- Some basic usage instructions,
- A note about what documentation is available,
- A section that lists the authors/contributors to the project (and a link to CONTRIBUTING.md if you have one).
- A section that lets people know how you would like to receive credit if they should use your work.
- Edit the “about” section of the GitHub page to include a short description of the project and at least one topic.
Content from Testing and Documenting Code
Last updated on 2026-02-25 | Edit this page
Estimated time: 180 minutes
Overview
Questions
- How can I easily document my code?
- Why is documentation and testing even needed?
- How do I write and run test on my code?
Objectives
- Understand why testing and documentation is important.
- Add documentation to your project.
- Document your work.
Documenting via docstrings
To avoid simulating the entire python interpreter in our minds, it is
often easier to document the (intended) behavior of our code in a human
readable format. Python offers the builtin function help()
to display the documentation for a given function. For example, if we
want to know what the numpy.sum function does we can just
ask:
BASH
>>> import numpy as np
>>> help(np.sum)
Help on function sum in module numpy:

sum(a, axis=None, dtype=None, out=None, keepdims=<no value>, initial=<no value>, where=<no value>)
    Sum of array elements over a given axis.

    Parameters
    ----------
    a : array_like
        Elements to sum.
    axis : None or int or tuple of ints, optional
        Axis or axes along which a sum is performed.  The default,
        axis=None, will sum all of the elements of the input array.  If
        axis is negative it counts from the last to the first axis.

        .. versionadded:: 1.7.0

        If axis is a tuple of ints, a sum is performed on all of the axes
        specified in the tuple instead of a single axis or all the axes as
        before.
    dtype : dtype, optional
        The type of the returned array and of the accumulator in which the
        elements are summed.  The dtype of `a` is used by default unless `a`
        has an integer dtype of less precision than the default platform
...
Where does help() get all this information from? In
part, the information provided by help is part of the docstring for the
enumerate function. We can view the docstring by viewing the
__doc__ attribute of the function as follows:
BASH
>>> print(np.sum.__doc__)

    Sum of array elements over a given axis.

    Parameters
    ----------
    a : array_like
        Elements to sum.
    axis : None or int or tuple of ints, optional
        Axis or axes along which a sum is performed.  The default,
        axis=None, will sum all of the elements of the input array.  If
        axis is negative it counts from the last to the first axis.

        .. versionadded:: 1.7.0

        If axis is a tuple of ints, a sum is performed on all of the axes
        specified in the tuple instead of a single axis or all the axes as
        before.
...
Documentation vs commenting
There are two ways in which you can and should describe your code – documentation and commenting. These two ways of describing code have two audiences (which may overlap) – documentation is for the people who will use your code, whilst comments are for people who will develop your code. Both of these audiences include you, the original developer, some 6 months in the future when you have forgotten all the details about what you were doing. Quite simply:
Documentation is a love letter that you write to your future self.
- Damian Conway
Comments
Comments should include design decisions, or explanations of difficult to interpret code chunks. Comments can include known/expected bugs or shortcomings in the code. Things that are not yet implemented, or hacks that deal with bugs in other modules, should also be in comments. Python comments come in two flavours: a single or part line comment which begins with a #, or a multiline comment which is any string literal.
PYTHON
'''
A comment that covers more than one line
because it is just so long
'''

def my_func(num):
    # assume that num is some numeric type, or at the very least
    # an object which supports division against an integer
    ans = num / 2 # A partial line comment
    return ans
The partial-line comment plus multi-line commands can be used to great effect when defining functions, dictionaries, or lists:
PYTHON
dict = {'key1': 0, # note about this item
        'key2': 1, # another note
       }

def my_func(num,
            ax, # a matplotlib axes object
            verbose=True, # TODO update to be logger.isEnabledFor(logging.DEBUG)
            **kwargs)
When python is interpreted (or compiled to byte-code), the interpreter will ignore the comments. The comments therefore only exist in the source code. Commenting your code has no effect on the behavior of your code, but it will (hopefully) increase your ability to understand what you did. Because the comments are ignored by the python interpreter only people with access to your source code will read them (developer usually), so this is a bad place to describe how your code should be used. For notes about code usage we instead use documentation.
Docstrings
Python provides a way for use to document the code inline, using docstrings. Docstrings can be attached to functions, classes, or modules, and are defined using a simple syntax as follows:
PYTHON
def my_func():
  """
  This is the doc-string for the function my_func.
  I can type anything I like in here.
  The only constraint is that I start and end with tripe quotes (' or ")
  I can use multi-line strings like this, or just a single line string if I prefer.
  """
  return
Docstrings can be any valid string literal, meaning that they can be encased in either single or double quotes, but they need to be triple quoted. Raw and Unicode strings are also fine.
Docstrings can be included anywhere in your code, however unless they
immediately follow the beginning of a file (for modules) or the
definition of a class or function, they will be ignored by the compiler.
The docstrings which are defined at the start of a module/class/function
will be saved to the __doc__ attribute of that object, and
can be accessed by normal python introspection.
Docstring formats
While it is possible to include any information in any format within a docstring it is clearly better to have some consistency in the formatting.
There are, unfortunately, many ‘standard’ formats for python documentation, though they are all similarly human readable so the difference between the formats is mostly about consistency and automated documentation.
Scipy, Numpy, and astropy, all use the numpydoc format which is particularly easy to read. We will be working with the numpydoc format in this workshop.
Let’s have a look at an extensive example from the numpydoc website.
“““Docstring for the example.py module.
Modules names should have short, all-lowercase names. The module name may have underscores if this improves readability.
Every module should have a docstring at the very top of the file. The module’s docstring may extend over multiple lines. If your docstring does extend over multiple lines, the closing three quotation marks must be on a line by itself, preferably preceded by a blank line.
PYTHON
"""
from __future__ import division, absolute_import, print_function

import os  # standard library imports first

# Do NOT import using *, e.g. from numpy import *
#
# Import the module using
#
#   import numpy
#
# instead or import individual functions as needed, e.g
#
#  from numpy import array, zeros
#
# If you prefer the use of abbreviated module names, we suggest the
# convention used by NumPy itself::

import numpy as np
import matplotlib as mpl
import matplotlib.pyplot as plt

# These abbreviated names are not to be used in docstrings; users must
# be able to paste and execute docstrings after importing only the
# numpy module itself, unabbreviated.


def foo(var1, var2, *args, long_var_name='hi', **kwargs):
    r"""Summarize the function in one line.

    Several sentences providing an extended description. Refer to
    variables using back-ticks, e.g. `var`.

    Parameters
    ----------
    var1 : array_like
        Array_like means all those objects -- lists, nested lists, etc. --
        that can be converted to an array.  We can also refer to
        variables like `var1`.
    var2 : int
        The type above can either refer to an actual Python type
        (e.g. ``int``), or describe the type of the variable in more
        detail, e.g. ``(N,) ndarray`` or ``array_like``.
    *args : iterable
        Other arguments.
    long_var_name : {'hi', 'ho'}, optional
        Choices in brackets, default first when optional.
    **kwargs : dict
        Keyword arguments.

    Returns
    -------
    type
        Explanation of anonymous return value of type ``type``.
    describe : type
        Explanation of return value named `describe`.
    out : type
        Explanation of `out`.
    type_without_description

    Other Parameters
    ----------------
    only_seldom_used_keywords : type
        Explanation.
    common_parameters_listed_above : type
        Explanation.

    Raises
    ------
    BadException
        Because you shouldn't have done that.

    See Also
    --------
    numpy.array : Relationship (optional).
    numpy.ndarray : Relationship (optional), which could be fairly long, in
                    which case the line wraps here.
    numpy.dot, numpy.linalg.norm, numpy.eye

    Notes
    -----
    Notes about the implementation algorithm (if needed).

    This can have multiple paragraphs.

    You may include some math:

    .. math:: X(e^{j\omega } ) = x(n)e^{ - j\omega n}

    And even use a Greek symbol like :math:`\omega` inline.

    References
    ----------
    Cite the relevant literature, e.g. [1]_.  You may also cite these
    references in the notes section above.

    .. [1] O. McNoleg, "The integration of GIS, remote sensing,
       expert systems and adaptive co-kriging for environmental habitat
       modelling of the Highland Haggis using object-oriented, fuzzy-logic
       and neural-network techniques," Computers & Geosciences, vol. 22,
       pp. 585-588, 1996.

    Examples
    --------
    These are written in doctest format, and should illustrate how to
    use the function.

    >>> a = [1, 2, 3]
    >>> print([x + 3 for x in a])
    [4, 5, 6]
    >>> print("a\nb")
    a
    b
    """
    # After closing class docstring, there should be one blank line to
    # separate following codes (according to PEP257).
    # But for function, method and module, there should be no blank lines
    # after closing the docstring.
    pass
The example above is intentionally extensive, but you should be able to see what is going on. There are a few parts to the documentation format, some of which are considered essential, good practice, or optional. See the numpy doc guide for a more gentle yet more complete discussion on the numpydoc standard.
Good practice documentation
The main goal of documentation is to describe the desired behavior or intended use of the code. As such every docstring should contain at least a one line statement that shows the intent of the code.
It is good practice to describe the expected input and output (or behavior) of your functions.
In the numpydoc format we put these into two sections:
Parameters: for the input Returns: for the output
There is no “Modifies” section for the documentation (though you could add one if you like). If the function modifies an input but does not return the modified version as an output then this should be included as part of the long form description.
The generate_positions function from the example
skysim module has the following docstring:
PYTHON
def generate_positions(ref_ra='00:42:44.3',
                       ref_dec='41:16:09',
                       radius=1.,
                       nsources=1000):
    """
    Create nsources random locations within radius of the reference position.

    Parameters
    ----------
    ref_ra, ref_dec : str
        Reference position in "HH:MM:SS.S"/"DD:MM:SS.S" format.
        Default position is Andromeda galaxy.

    radius : float
        The radius within which to generate positions. Default = 1.

    nsources : int
        The number of positions to generate

    Returns
    -------
    ra, dec : numpy.array
        Arrays of ra and dec coordinates in degrees.
    """
Optional documentation
The type of errors that are raised, and under what conditions, can be
documented in the Raises section.
Notes, References, and
Examples, are also useful sections but not usually
applicable to all functions or classes that you will be writing. If I
have used code snippets from stack-overflow or similar, then I find
Notes/References section to be a good place to acknowledge and link to
those resources.
The Examples section can be used to show intended use. There is an
automated testing suite called doctest which will scan your docstrings
looking for segments starting with >>> and then run those
segments in an interactive python interpreter. A solid test suite will
typically contain many tests for a single function, thus trying to embed
all the tests into your docstrings just makes for very long docstrings.
It is preferable to keep your testing code in the tests
module/directory of your python module, and to use the
Examples section only for demonstrating functionality to
the end user.
Making use of documentation
Some IDEs (the good ones) provide syntax highlighting, linting, and inline help as you write code. By providing docstrings for all your functions you can make use of the linting and inline help. Below is an example from VSCode in which the docstring for a function is being shown:
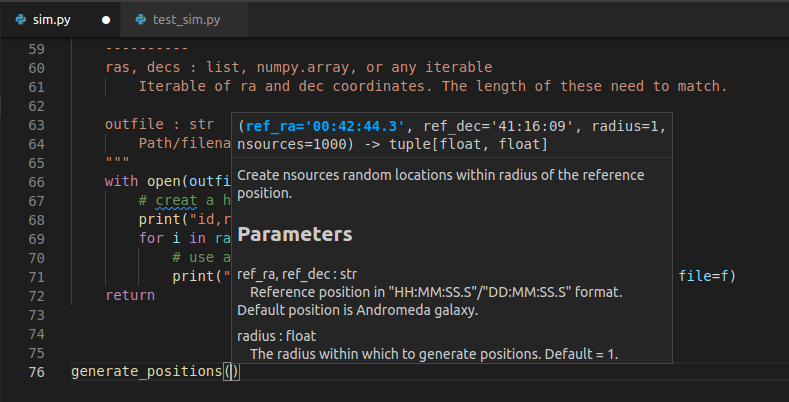
You can use the help from the python console like this:
BASH
>>> from skysim import sim
>>> help(sim.generate_positions)

Help on function generate_positions in module skysim.sim:

generate_positions(ref_ra='00:42:44.3', ref_dec='41:16:09', radius=1.0, nsources=1000)
    Create nsources random locations within radius of the reference position.

    Parameters
    ----------
    ref_ra, ref_dec : str
        Reference position in "HH:MM:SS.S"/"DD:MM:SS.S" format.
        Default position is Andromeda galaxy.

    radius : float
        The radius within which to generate positions. Default = 1.

    nsources : int
        The number of positions to generate

    Returns
    -------
    ra, dec : numpy.array
        Arrays of ra and dec coordinates in degrees.
...
Additionally you can compile all the documentation into a website or other document using an automated documentation tool as described in the next section.
Automated Documentation
If your docstrings are formatted in a regular way then you can make use of an automated documentation tool. There are many such tools available with a range of sophistication.
The simplest to use is the pdoc package which can be
obtained from pypi.org. The packaged can be installed via
pip install pdoc, and then run on our test module using
pdoc skysim.
By default pdoc will start a mini web sever with the
documentation on it. This should be opened in your browser by default
but if it isn’t you can navigate to localhost:8080 or
127.0.0.1:8080. Use <ctrl>+C when you
want to stop the web server. For the example project this is the website
that is generated:
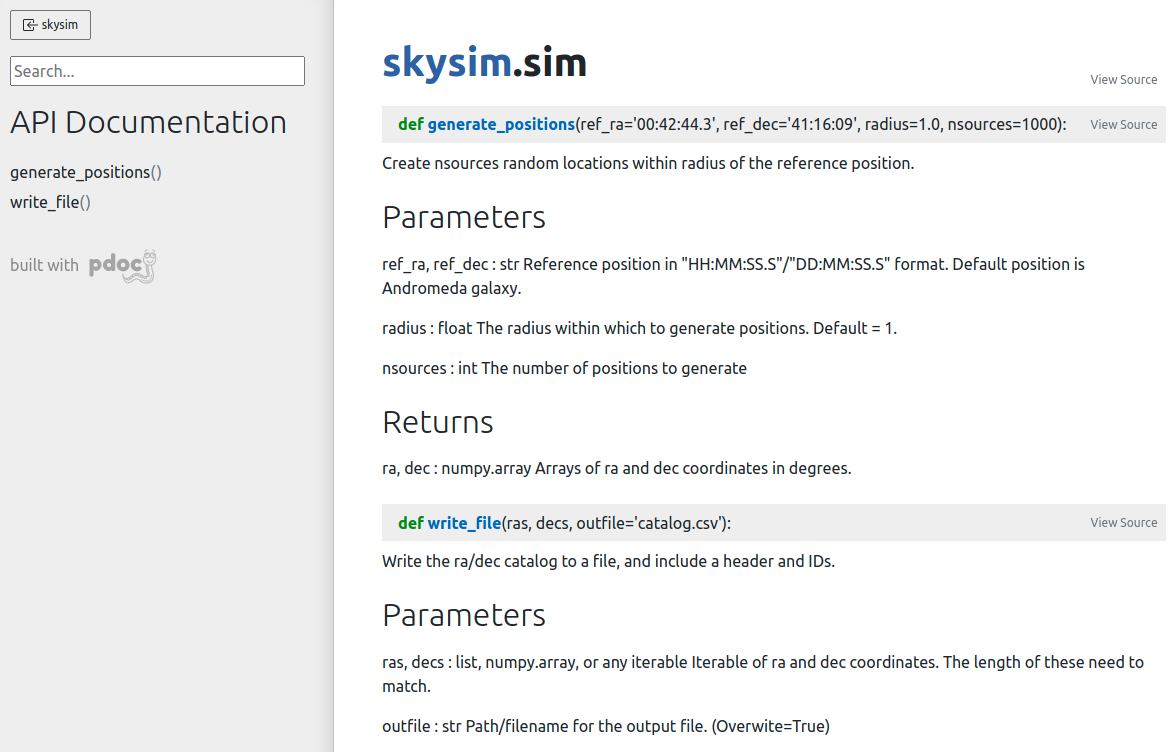
To make documentation that is less ephemeral you can use the the
-d docs option to cause all the documentation to be built
and then placed into the docs folder. pdoc
only supports html output, however other auto-documentation packages
such as sphinx can
write latex (and thus pdf), ePub, man pages, or plain text.
Other forms of documentation
Compiling all your docstrings into an easy to find and navigate website is great, but this typically does not do a good job of documenting your software project as a whole. What is required here is something that deals with the intent of the software, a description of the problem that it is solving, and how users can install and begin to use the software. For this you have a few options:
- a
README.mdin your repository - a user guide document (html or PDF)
- a wiki or rtfd.io style website
Within any of the above you would want to include things such as:
- a guide for downloading/compiling/installing your software
- a ‘quick-start’ guide or set of examples for new users
- a Frequently Asked Questions (FAQ) section to address common problems
- tutorials to demonstrate some of the key features of your software (Jupyter notebooks are great here)
GitHub and GitLab both provide a wiki for each project. Additionally both platforms will allow you to set up Continuous Integration (CI) tools that will automatically build and publish your documentation to a third party website.
Documentation as part of your development cycle
A typical development cycle will consist of writing code, testing code, and writing documentation. The order in which this is done depends on the software development strategies that you set out for your project, or simply personal preference. At the end of the day the process is cyclic – with the end goal of having code, tests, and documentation that are all in agreement. Once your code/tests/documentation are consistent then you can package your code into a module and publish it for others to use.
Generating documentation with sphinx
The pdoc module that we used in the last lesson was
nice, but more sophisticated options are available. Many of the
documentation pages that you may have viewed (such as scipy, numpy, or astropy), use the Sphinx python
documentation generator. Not only will Sphinx generate documentation
from your docstrings, but it will also allow you to write documentation
in reStructuredText
which can then be rendered into HTML, PDF, ePub, and other document
formats. For publishing code to a website such as readthedocs, Sphinx is an essential
choice.
Creating documentation from our docstrings
The documentation work that we have done on the test module will not be wasted. Sphinx understands a range of documentation styles and can fairly reliably auto-detect which one you are using (even if you change throughout your project!).
To begin using Sphinx we need to install it via pip. It is
recommended that we use a dedicated directory for our documentation
(docs/). Once Sphinx is installed we initialise our
documetaion using the sphinx-quickstart command.
We’ll be taken through a sort of install wizard with a few questions as follows. (bold are the answers that have been used for the example project).
OUTPUT
Welcome to the Sphinx 4.3.1 quickstart utility.

Please enter values for the following settings (just press Enter to
accept a default value, if one is given in brackets).

Selected root path: .

You have two options for placing the build directory for Sphinx output.
Either, you use a directory "_build" within the root path, or you separate
"source" and "build" directories within the root path.
> Separate source and build directories (y/n) [n]: y

The project name will occur in several places in the built documentation.
> Project name: SkySim
> Author name(s): Dev One
> Project release []: v3.0

If the documents are to be written in a language other than English,
you can select a language here by its language code. Sphinx will then
translate text that it generates into that language.

For a list of supported codes, see
https://www.sphinx-doc.org/en/master/usage/configuration.html#confval-language.
> Project language [en]:

Creating file /data/alpha/hancock/ADACS/MAP21B-Training-BPindor/docs/source/conf.py.
Creating file /data/alpha/hancock/ADACS/MAP21B-Training-BPindor/docs/source/index.rst.
Creating file /data/alpha/hancock/ADACS/MAP21B-Training-BPindor/docs/Makefile.
Creating file /data/alpha/hancock/ADACS/MAP21B-Training-BPindor/docs/make.bat.

Finished: An initial directory structure has been created.

You should now populate your master file /data/alpha/hancock/ADACS/MAP21B-Training-BPindor/docs/source/index.rst and create other documentation
source files. Use the Makefile to build the docs, like so:
   make builder
where "builder" is one of the supported builders, e.g. html, latex or linkcheck.
For most of these questions you can choose whatever answers you like, however separating the build/source directories for your documentation is recommended. Separate build/source directories make it easier to keep the documentation source under version control.
The setup will create the following file structure:
OUTPUT
docs/
├── build
├── make.bat
├── Makefile
└── source
    ├── conf.py
    ├── index.rst
    ├── _static
    └── _templates
If we move into the docs/ directory and type
make html Sphinx will generate some documentation for us.
The documentation will be a set of static .html files in
the build/ directory. Open
docs/build/index.html in your web browser to view them. At
the moment there is no content, just a few links to empty or broken
pages.
The reason that the website is empty is because we have a very spare
docs/source/ directory. What we are seeing is simply the
result of the index.rst page being rendered. In order to
extract the docstrings from our module, and build the html documentation
we have to edit some of the sphinx settings.
In the file socs/source/conf.py there are a lot of
options that are set to default values. The answers that you chose in
the initialisation stage are also in this file in case you need to
change them (for example the release number).
PYTHON
# Add any Sphinx extension module names here, as strings. They can be
# extensions coming with Sphinx (named 'sphinx.ext.*') or your custom
# ones.
extensions = ['sphinx.ext.autodoc',
              'sphinx.ext.mathjax',
              'sphinx.ext.viewcode',
              'sphinx.ext.napoleon',
             ]

...

html_theme = 'sphinx_rtd_theme'
The extensions setting enables different sphinx extensions. See the
sphinx
extensions page for a list of what modules are available and what
they do. The html_theme sets the theme for the website.
Here we have chosen the sphinx_rtd_theme which renders the
page using the default read the docs theme. If you want to explore more
themes then you should visit the sphinx-themes gallery.
Some of the sphinx extensions (including the theme chosen here)
require additional modules to be installed. Normally we would put these
required modules in the requirements.txt file for our
project. However, the documentation is typically only going to be built
by developers (and automation scripts) and not end users, so instead we
create a new file docs/requirements.txt that will list all
the dependencies for building the documentation. Note that the theme
sphinx_rtd_theme is provided by the
sphinx-rtd-theme module (replacing _ with
-).
Now that we have the autodoc extension enabeled, we just
need to update the website to include this feature. In the
docs/source/index.rst file we can add the following:
OUTPUT
Modules
=======

.. automodule:: skysim.sim
   :members:
With the extra extensions installed and the index updated we can now
run make html again and see the updated documentation web
pages.
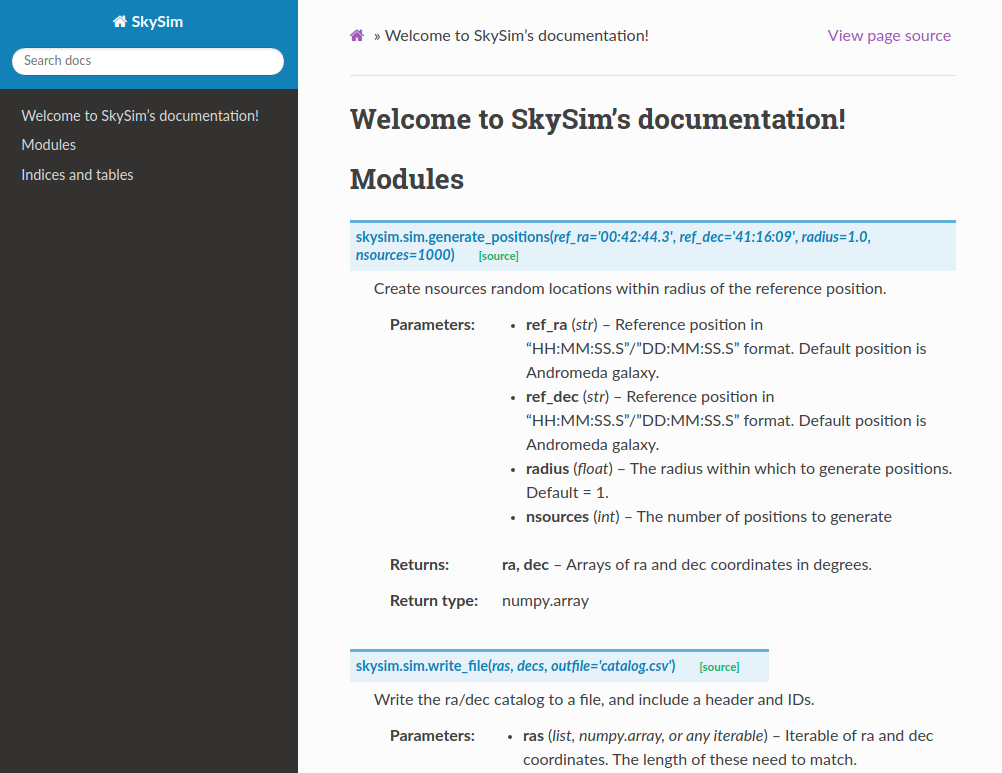
We now have a way of turning all our module/class/function docstrings into documentation.
At this point we have generated documentation that would be useful to people who are either developing this module, or who are importing it for use in their own software. Essentially we are just documenting the API for this software.
Cross-linking your docstrings
Sphinx provides a mechanism that will allow you to make links between different parts of your documentation. Two main uses for this are for your “see also” section, where you would link to similar functions/modules, or in your parameter descriptions where you want to say that a parameter is some custom object type.
To make these links you simply use back-tics around the
module/function/class you want to reference. Note that in our
documentation for skysim.sim.generate_positions we indicate
that the ra/dec return variables are of type numpy.array.
At the moment this is treated as just a string, however we can link it
to the numpy documentation by using the extension called
intersphinx.
To enable intersphinx we update the extensions part of
the conf.py file, and then add a new parameter called
intersphinx_mapping as shown below.
PYTHON
# Add any Sphinx extension module names here, as strings. They can be
# extensions coming with Sphinx (named 'sphinx.ext.*') or your custom
# ones.
extensions = ['sphinx.ext.autodoc',
              'sphinx.ext.mathjax',
              'sphinx.ext.viewcode',
              'sphinx.ext.napoleon',
              'sphinx.ext.intersphinx',
              ]

# Add mappings
intersphinx_mapping = {
   'numpy': ('https://numpy.org/doc/stable', None),
   'python': ('http://docs.python.org/3', None),
}
To make links we use back-tics around the module/function/class you want to reference:
PYTHON
def generate_positions(ref_ra='00:42:44.3',
                       ref_dec='41:16:09',
                       radius=1.,
                       nsources=1000):
    """
...

    Returns
    -------
    ra, dec : :obj:`numpy.array`
        Arrays of ra and dec coordinates in degrees.
    """
We can also link to other functions/classes within our module using
:func:`skysim.sim.generate_positions`.
Creating additional documentation
By default Sphinx can render any document that is in reStructuredText
format. In the docs/source directory you’ll see a file
index.rst which has been auto-generated by Sphinx. This
file will contain some content and directives for generating
content.
Initially the table of contents is empty and not shown on the main page, and the left pane just shows the section headers for the current page. The content on the main page has been generated from all the docstrings in your module(s). In order to include additional documentation you can add your own content pages and link to them from here.
Create a new file called docs/source/example.rst, and
then add some content. Save the file. Now edit the
docs/source/index.rst to link to this page by making the
following change (last line):
OUTPUT
Welcome to MyProject's documentation!
=====================================

.. toctree::
   :maxdepth: 2
   :caption: Contents:

   example
You can now build an entire website using this strategy. You can link
to pages using :ref:`page_name`, where
page_name is the name of the file/page.
Using markdown
If you don’t like rst, and would prefer markdown you can write markdown for your custom pages. This is particularly useful if you already have pages in markdown format (e.g. from an existing wiki).
The extension to use is a third party extension called
myst_parser. We can install it with
pip install myst-parser, and then enable it in the
conf.py as follows:
PYTHON
# Add any Sphinx extension module names here, as strings. They can be
# extensions coming with Sphinx (named 'sphinx.ext.*') or your custom
# ones.
extensions = ['sphinx.ext.autodoc',
              'sphinx.ext.mathjax',
              'sphinx.ext.viewcode',
              'sphinx.ext.napoleon',
              'sphinx.ext.intersphinx',
              'myst_parser',
              ]

# mappings for parsing files
source_suffix = {'.rst':'restructuredtext',
                 '.md':'markdown'}
The source_suffix provides sphinx with a way to determine what format to use when parsing the different file types.
Summary
You should now be able to create documentation from the docstrings of
your module, and from additional .rst or .md
files that provide more of a user guide style.
Once you have a set of documentation that you are happy with, you can host them at readthedocs.org. See the tutorial for instructions on how to do this.
Content from Automation and Continuous Integration (on GitHub)
Last updated on 2026-02-26 | Edit this page
Estimated time: 180 minutes
Overview
Questions
- What is CI?
- How can I use GitHub to test my code?
- How do automatically build documentation?
Objectives
- Become familiar with GitHub actions
- Use a github action to test your code
- Use a github action to build documentation
Using GitHub to run your tests
In this lesson we’ll learn how to have all our tests run every time we push changes to GitHub. This is an example of a continuous integration (CI) workflow. CI workflows are available via third party services such as Travis-CI, which you can link to your GitHub, GitLab, or Bitbucket repositories to build, test, and report on your projects. For this lesson we’ll use GitHub actions to perform the testing.
GitHub actions
GitHub Actions makes it easy to automate all your software workflows, now with world-class CI/CD. Build, test, and deploy your code right from GitHub. Make code reviews, branch management, and issue triaging work the way you want. GitHub.com
GitHub actions can perform a large variety of automation of tasks, but for this lesson we will focus only on the ability to install our module and run the tests. All of the actions that are associated with your project are stored in text files within your project. This means that you can edit the actions locally and then push them like any other file.
The actions are stored in a special directory called
./github/workflows/, and the files are stored in the
.yml format.
Creating a new action
To create a new action the easiest way is to use the Actions tab of
your GitHub repo, and select the New Workflow button.
The New workflow button will take you to a page to
choose a template from a long list. This list is semi-smart in that it
will look at the files that you have in your repository and suggest a
templates based on the language(s) that you are using. The first
template that shows up for our example repository is “Python
Package using Anaconda” which sounds like what we want so we’ll
start with that. Note that you can “set up a workflow yourself” using
the small link (this will begin with a blank workflow). Also note that
the templates are hosted in GitHub repositories so that you can browse
them and copy ideas from one to another. For the “Python Package
using Anaconda” the template is in the
actions/starter-workflows repository.

After selecting a template we’ll go to the online editor for
committing a new file on GitHub. The file
(./github/workflows/python-package-conda.yml) is currently
as follows:
YML
name: Python Package using Conda

on: [push]

jobs:
  build-linux:
    runs-on: ubuntu-latest
    strategy:
      max-parallel: 5

    steps:
    - uses: actions/checkout@v2
    - name: Set up Python 3.10
      uses: actions/setup-python@v2
      with:
        python-version: 3.10
    - name: Add conda to system path
      run: |
        # $CONDA is an environment variable pointing to the root of the miniconda directory
        echo $CONDA/bin >> $GITHUB_PATH
    - name: Install dependencies
      run: |
        conda env update --file environment.yml --name base
    - name: Lint with flake8
      run: |
        conda install flake8
        # stop the build if there are Python syntax errors or undefined names
        flake8 . --count --select=E9,F63,F7,F82 --show-source --statistics
        # exit-zero treats all errors as warnings. The GitHub editor is 127 chars wide
        flake8 . --count --exit-zero --max-complexity=10 --max-line-length=127 --statistics
    - name: Test with pytest
      run: |
        conda install pytest
        pytest
The first two lines give the name of the action which is
just for your own reference, and an on directive. The
on directive will trigger this action when
[push] happens. This is what we want.
The main part of the action is the jobs: section, which
can specify multiple jobs. Currently there is just one job with the name
build-linux. Within this job there are multiple
steps that are run.
The template is mostly good however:
- since this is the Anaconda template it uses conda for all the build/test. However Anaconda is slow to create new environments and install software;
- there is a bug in this template: the
python-versionshould be a string, not a float; - we don’t want to run the lint step.
We will replace conda with pip and can fix the other issues by updating the script to be as follows:
YML
name: Build and Test Python package using pip

on: [push]

jobs:
  build-linux:
    runs-on: ubuntu-latest
    strategy:
      max-parallel: 5

    steps:
    - uses: actions/checkout@v2
    - name: Set up Python "3.6"
      uses: actions/setup-python@v2
      with:
        python-version: "3.6"
    - name: Install dependencies
      run: |
        # upgrade pip
        python -m pip install --upgrade pip
        # install the testing requirements
        python -m pip install pytest pytest-cov
        # install the dependencies for this
        pip install -r requirements.txt
    - name: Install module
      run: |
        python -m pip install -e .
    - name: Test with pytest
      run: |
        pytest --cov=skysim --cov-report=term
Since we are now not using conda we should also change the name of
the script to be
./github/workflows/python-build-test-pip.yml before we save
it. Once we have made these changes and are happy we can press the green
“Start commit” button where we’ll be asked for a commit message, and
whether we want to commit to the main branch or to a new
branch. Lets commit directly to the main branch.
Once we make the commit the action will run. This is because
adding/changing a file via the GitHub webpage is considered the same as
a push action, which will trigger our workflow.
Viewing the progress/result of an action
To see what actions have been run and why, we navigate to the “Actions” tab. Here you’ll see all the actions that have ever been triggered for your repository, how they were triggered, what the status is, how long it took to run, and what artifacts (if any) were produced. Below is an example showing the completed action that we just created above.
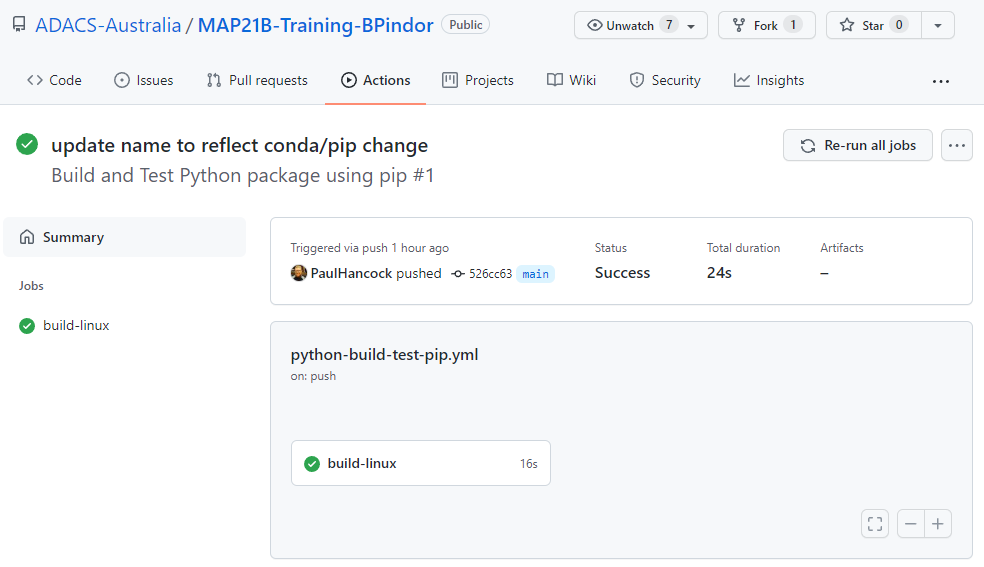
On the left, we see all the jobs that were part of this action, and on the right we have a summary for each. We want to see green ticks as this means that everything is ok. A red X will mean there was a problem somewhere. Either way we can click on one of the jobs to see the different steps of the job, and clicking the “>” next to a step will show all the details of that step. Below we can see the output of the “test with pytest” step.

If an action fails then the repository owner, and anyone watching the repository, will get a notification of the failure. When the action succeeds for the first time after a failure a notification will be sent, but if the action is a success following a success no further notifications will be sent. This means that you can push changes to your repo and you wont be bothered unless there is a problem.
Summary
We have seen how to setup a basic install-test workflow for a python project using a GitHub action. Once you have a working action you can extend it, create additional actions, or change how it triggers. See the documentation for more details and some examples.
Using GitHub to compile your documentation
In the previous lesson we learned how to use GitHub actions to build and test our python module. In this lesson we’ll learn how to compile our documentation with another GitHub action.
Creating a new workflow
To create a new action the easiest way is to use the
Actions tab of your GitHub repo, and select the
New Workflow button.
 The New workflow button will take you to a page to choose
a template from a long list. Last time we started with a pre-made
template for building and testing python code. This time we are going to
start with a generic template so we should click on the “set up a
workflow yourself ->” link.
We should see the following template appear under the file name of
.github/workflows/main.yml:
YML
# This is a basic workflow to help you get started with Actions

name: CI

# Controls when the workflow will run
on:
  # Triggers the workflow on push or pull request events but only for the main branch
  push:
    branches: [ main ]
  pull_request:
    branches: [ main ]

  # Allows you to run this workflow manually from the Actions tab
  workflow_dispatch:

# A workflow run is made up of one or more jobs that can run sequentially or in parallel
jobs:
  # This workflow contains a single job called "build"
  build:
    # The type of runner that the job will run on
    runs-on: ubuntu-latest

    # Steps represent a sequence of tasks that will be executed as part of the job
    steps:
      # Checks-out your repository under $GITHUB_WORKSPACE, so your job can access it
      - uses: actions/checkout@v2

      # Runs a single command using the runners shell
      - name: Run a one-line script
        run: echo Hello, world!

      # Runs a set of commands using the runners shell
      - name: Run a multi-line script
        run: |
          echo Add other actions to build,
          echo test, and deploy your project.
First up we should change the filename to something other than
main.yml and the name field to something other than
CI. The section that controls when the workflow is run is
maybe a little over-zealous but we can leave it for now. Finally, the
first step which uses actions/checkout@v2 is always useful
as it will check out our repository into the build environment. The
named steps after this are not currently useful so we should delete
them. We’ll replace these with a new step which does the documentation
build for us.
Using a template from the market place
Since we want to build our documentation using Sphinx, we can find a ready made solution in the GitHub marketplace. On the right panel we select the marketplace and search for Sphinx. The first result “Sphinx Build” looks like it does what we want so we’ll select that.
  When
we click the “Sphinx Build” result we get the following snippet of code.
Which we can include in our workflow file.
 When
we click the “Sphinx Build” result we get the following snippet of code.
Which we can include in our workflow file.
YML
- name: Sphinx Build
  # You may pin to the exact commit or the version.
  # uses: ammaraskar/sphinx-action@8b4f60114d7fd1faeba1a712269168508d4750d2
  uses: ammaraskar/sphinx-action@0.4
  with:
    # The folder containing your sphinx docs.
    docs-folder: # default is docs/
    # The command used to build your documentation.
    build-command: # optional, default is make html
    # Run before the build command, you can use this to install system level dependencies, for example with "apt-get update -y && apt-get install -y perl"
    pre-build-command: # optional
To use the above template we make a new step called “Sphinx Build”
and copy the template into that step. As we do this we need to fill in
values for docs-folder and build-command. The
pre-build-command is optional and we wont use it so we can
either delete it or comment it out. Our step section now looks like
this:
YML
    # Steps represent a sequence of tasks that will be executed as part of the job
    steps:
      # Checks-out your repository under $GITHUB_WORKSPACE, so your job can access it
      - uses: actions/checkout@v2

      - name: Sphinx Build
        # You may pin to the exact commit or the version.
        uses: ammaraskar/sphinx-action@0.4
        with:
          # The folder containing your sphinx docs.
          docs-folder: docs/
          # The command used to build your documentation.
          build-command: make html
If we commit this file it will trigger all our on:push
workflows to trigger – both the build/test workflow that we created
earlier, and this documentation workflow. For my example I used the name
“Documentation with Sphinx” for the workflow, and when it completes I
see the following output.
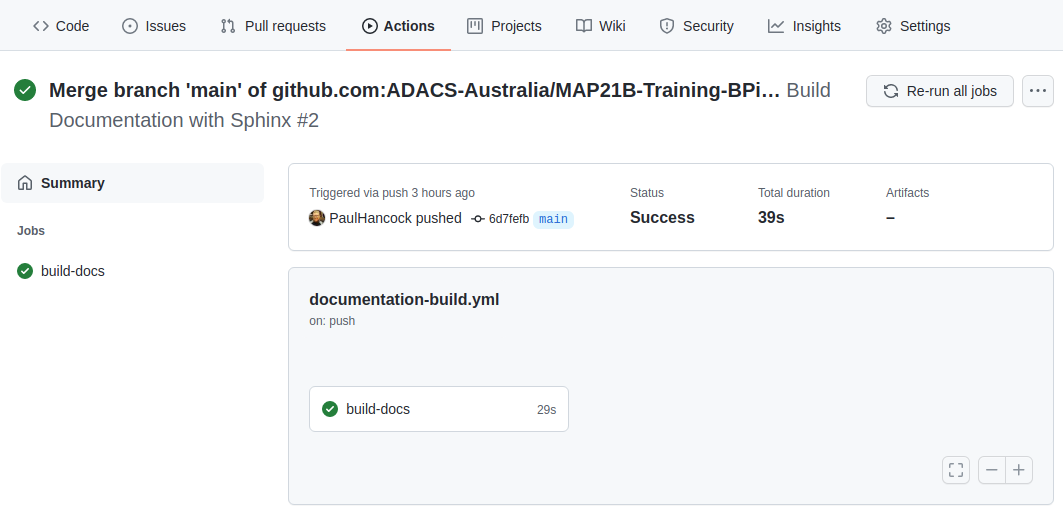  The good news is that
the documentation built without error. The bad news is that I can’t see
the documentation to ensure that it’s actually useful. Note in the above
image that there are three notes following our job: Status, Total
duration, and Artifacts. Artifacts are files that are retained after a
job completes. By default there are no artifacts, but we could modify
our workflow so that the documentation is part of the artifacts.
 The good news is that
the documentation built without error. The bad news is that I can’t see
the documentation to ensure that it’s actually useful. Note in the above
image that there are three notes following our job: Status, Total
duration, and Artifacts. Artifacts are files that are retained after a
job completes. By default there are no artifacts, but we could modify
our workflow so that the documentation is part of the artifacts.
Saving the documentation
To save the documentation that was built we need to let the GitHub workflow know that the documentation should be considered an artefact of the build. The advanced guide for GitHub actions demonstrates how to do this using another pre-made recipe which is as follows:
YML
  - name: 'Upload Artifact'
    uses: actions/upload-artifact@v2
    with:
      name: my-artifact
      path: my_file.txt
For us we want the artifact to be a directory docs/build/ and we’ll give it a name of documentation-html.
Our full workflow for this lesson now looks like this:
YML
# This is a basic workflow to help you get started with Actions

name: Build Documentation with Sphinx

# Controls when the workflow will run
on:
  # Triggers the workflow on push or pull request events but only for the main branch
  push:
    branches: [ main ]
  pull_request:
    branches: [ main ]

  # Allows you to run this workflow manually from the Actions tab
  workflow_dispatch:

# A workflow run is made up of one or more jobs that can run sequentially or in parallel
jobs:
  # This workflow contains a single job called "build"
  build-docs:
    # The type of runner that the job will run on
    runs-on: ubuntu-latest

    # Steps represent a sequence of tasks that will be executed as part of the job
    steps:
      # Checks-out your repository under $GITHUB_WORKSPACE, so your job can access it
      - uses: actions/checkout@v2

      - name: Sphinx Build
        # You may pin to the exact commit or the version.
        uses: ammaraskar/sphinx-action@0.4
        with:
          # The folder containing your sphinx docs.
          docs-folder: docs/
          # The command used to build your documentation.
          build-command: make html

      - name: Archive documentation
        uses: actions/upload-artifact@v2
        with:
          name: documentation-html
          path: docs/build/
If we save and wait for the triggered workflow to complete we should see that the artifacts field is now 1, and that there is a new section on our page which shows all the artifacts that were produced.
  We can
click on the
 We can
click on the documentation-html link to get a zip of the
docs/build/ directory which contains all our
documentation.
Summary
Building documentation requires a similar workflow to building and testing code.
The GitHub marketplace offers a variety of pre-made ‘steps’ to include in your workflow. There are many that will let you build documentation with Sphinx.
When building documentation we need to ensure that the documentation that was built is considered part of the workflow ‘artifact’ so that we can download and view it after the workflow completes.
SOLO Activity: GitHub actions
In this activity you will apply the previous lessons to automate the documentation and testing using GitHub actions. This activity can be completed on your own solo project, or as part of a group project. The requirements are that the project has a python module that can be installed, has at least one function with a docstring, and at least one test function.
- For your software project create a GitHub action that will build and
test your python module.
- “Build” in this case means install the required dependencies and then install your module using pip install -e .
- The test phase can be carried out using either a test suite such as pytest, or by running your test script directly. If you are using a personal test script then you should ensure that it will exit with status != 0 when the tests fail, so that the build/test workflow will also report a failure.
- Use the GitHub online editor to create/modify the relevant .yml files and set on status to be push so that the workflow will run each time that you make changes to the .yml file.
- Once you have a working build/test workflow, create a documentation workflow.
- Use the build/test workflow as a template and remove the test phase and replace it with a documentation build.
- Modify the documentation step such that it will produce an artefact which is the contents of the documentation directory.
- Verify that your documentation has completed properly by downloading and viewing the workflow artefact.
Content from Sharing Code To The Wider Community
Last updated on 2026-02-27 | Edit this page
Estimated time: 180 minutes
Overview
Questions
- Why should I share my code?
- Where and how can I share my code?
- How can I make my python code easy to obtain/install?
Objectives
- Have confidence to share your code
- Make your code findable and accessible
‘Publishing’ code
Once you have code that you are happy to share among collaborators you should consider publishing this code.
What do we mean by publishing? From least to greatest effort, any of the following could be considered as a definition for publishing code:
- Copying a version of your code to a public website for others to find and use,
- Making your version control repository (github, gitlab, bitbucket) public so that others can use and reuse your code,
- Uploading your code to a repository such a pypi.org so that others can easily download/install your software,
- Archiving a version of your code to a doi minting / storage service such as zenodo.org,
- Registering your code on a site such as ascl.net so that others can find your code,
- Writing a paper describing an application of your code and submitting for peer review in a science focused journal such as PASA or MNRAS,
- Writing a companion paper that describes your code and submitting the paper and code for peer review in a software focused journal such as A&C or JOSS. From the descriptions above you can see that the different options have slightly different intentions and audiences. We can take an lead from FAIR principles for data, and apply these principles to code.
Findable
Make code findable by creating a persistent identifier (eg doi) and including metadata. On pypi/zenodo/github you can use tags or topics to identify the software language but also the area of research or methodology that is being used. This makes it easier for people to find code that will suit their needs.
Accessible
Make code accessible by providing source code, install instructions, and documentation. Testing code on a range of platforms will also increase the accessibility of the code.
Interoperable
Use standard project templates, coding styles and idioms, and a modular design to allow your code to be used as part of a larger workflow or as a component of another product. This interoperability is useful for others, but will also make it easier for you to build on your own existing solutions.
Reasons not to publish
The following are often given as reasons not to publish code:
| Reason | Counter argument |
|---|---|
| I don’t want to have to “support” my code. | Publishing code does not commit you to providing endless support. If you do not intend to reply to emails, fix bugs, or make updates to the code, simply say so in the README.md file. If this is the case you could invite keen users to fork the repo and provide their own fixes. |
| I don’t want people to steal my good work. | With an appropriate license and attribution request, you can let others use your work while you benefit from their reuse. If there is a paper that describes or uses the code, you can ask for it to be cited by others, and this will increase the impact of that paper (and your h-index!). |
| My code is a bit hacky and I don’t want others to see it. | Being embarrassed about less-than-perfect code is normal. However, a quick scan of GitHub will show you that hacked-together code is very common even among professional developers. If your code serves it’s intended purpose then it’s good enough to share. Consider writing a short blurb in the README.md file that clearly state the intended aim of the code, so that you can manage the expectations of your users. |
| I don’t know how to share my code. | It’s not difficult to share code, and it’s easy to learn. This course is one of many (MANY) that take you through the steps of sharing or publishing code. The small investment to learn how to share code will pay off quickly when you start to discover and use code written by others, get feedback and recognition for your code, or when your computer dies and you need to recover your work. |
| My code contains sensitive IP that I’m not allowed to share. | Good argument! Keep it secure some place. Many of the steps that you would take to prepare your data for publication are still worth doing to make your code usable within your trusted network. |
Obtaining a doi from Zenodo.org
You have a piece of code on github, but it is changing over time, and you would like to provide a link to a particular version of the code. This is important for reproducibility of your research work, both for yourself and others.
The Zenodo repository provides a safe, trusted, and citable place to host your code. Zenodo is primarily focused on the storage of data, but this includes: documentation, papers, posters, raw or processed data, source code, and compiled binaries. Zenodo will allow you to version your data but does not provide a version control system such as git. However, Zenodo and Github are friends so you can link them together to get the best of both worlds.
Sign up to Zenodo
You can create a new Zenodo account using an email address and password, or you can use your Github or ORCID accounts to login. Whatever you choose, you can still link your github/ORCID later and use them to sign in.
Create a new repository
Once signed in click on the upload button at the top of the page, and then on the next page click “New Upload”

The following page will have a lot of details, some of which are mandatory, but most of which are either recommended or optional. Begin by downloading a .zip of your files from Github, and then uploading it to Zenodo. Press the green “start upload” button and then start filling out the rest of the form.
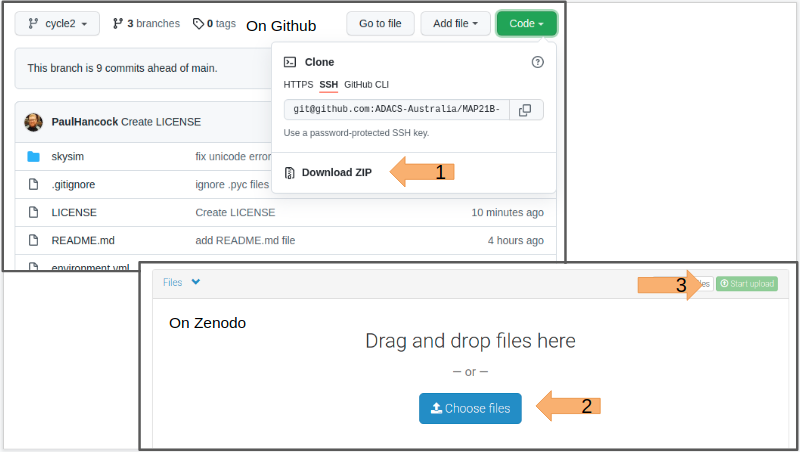
As the upload is progressing you can fill in the upload type (Software) and basic information.
Leave the DOI blank, but click the “reserve DOI” button so that you can know what the final DOI will be.
Fill in the remainder of the form and then press “save” at the top of the page, this will make a draft of your repository that you can come back to later and update. When you are finally happy with all the details you can press ‘publish’.
Once your upload has been published you should navigate to the published repository in your uploads list, and select it.
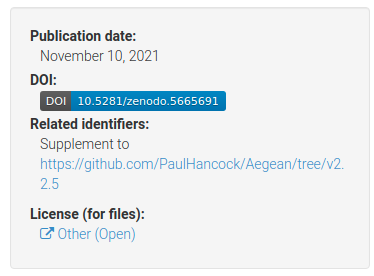
The above example is for the Aegean source finding software that I developed. You can see the DOI badge with the full DOI, a link to supplementary material, and the licence. If you click the DOI badge you’ll get a new pane that shows you how to embed this information into a markdown file such as your README.md that you have on your github page!
Below this panel you can also see a box that allows people to cite your code. There is even a box that allows people to get the citation in any format that they need it.
You now have a version of your code which is archived on zenodo and will not change. If you want to update the archive with new versions of the code, Zenodo has the capacity to do this, and will mint a new doi for each version. It is recommended that you don’t make a new doi for every small change you make to your code. A new version for each major or minor version change would be appropriate, or when you have published work that used a particular major/minor/patch version of the code.
Sadly Zenodo is not indexed by ADS so you can’t track citations very well from here.
Registering your code on ascl.net
In the last lesson we saw how to obtain a DOI by uploading a software project to Zenodo. In this lesson we’ll make an entry in the Astrophysics Source Code Library (ASCL.net), which is indexed by ADS, and can help you gain an audience, and track citations.
Submit a code to ASCL
Go to the “submit a code” page here.
The page asks for a title, credit (authors/contributors), abstract, and a site list for the code.
The site list should be a list of links to places where people can obtain the code. I highly recommend that you put a link to both your Github and Zenodo repositories. If the code was described in a paper you can put that in the “Preferred Citation Method” section.
ASCL.net does not store your code. No one will vet the quality of your code. ASCL.net is simply a place to register that some code exists and that you’d like to be acknowledged for creating/contributing. ASCL.net is indexed by ADS so it will get a bibcode in ADS, which can then be used to generate a bibtex entry for people to use when citing your code. Another goal of ASCL.net is to make it easier for people to find your code in the first place. If you haven’t explored the code available here I recommend that you do so now – there are some gems.
You can also get a nice little badge from ASCL to add to your
README.md file!
Installing your module via setup.py
In our code directory we specified a requirements.txt
file that allowed users to easily installed the dependencies for our
code. However, if someone wants to run our main script
(sim_catalog) then they have to be in the code directory.
If we want to run the code from some other location on our system then
it won’t work. The reason is that we haven’t installed our code as a
python module.
Installing a python module will do the following:
- Copy the module directory and files (eg
skysim/*) to a central location so that python can access them no matter where it’s run from,- something like
/home/${USER}/.py3/lib/python3.8/site-packages/;
- something like
- Copy and scripts (eg
sim_sky) to a similar location so that they can be invoked from anywhere,- something like
/home/${USER}/.py3/bin/;
- something like
- Make a note that the module is installed,
- so that
pip freezewill report the name/version of the software.
- so that
In order to install a python module you need a special file called
setup.py.
Template for setup.py
The python
documentation covers all the gory details of the how and why of
using a setup.py file. However, a great place to start is
to use a template so we’ll provide one here to get started.
PYTHON
import setuptools
import skysim

with open("README.md", "r", encoding="utf-8") as fh:
    long_description = fh.read()

with open('requirements.txt', 'r') as fh:
    reqs = [line for line in fh.readlines() if not line.startswith('#')]

setuptools.setup(
    name="SkySim",
    version=skysim.__version__,
    author=skysim.__author__,
    author_email="author@example.com",
    description="Simulate sky locations",
    long_description=long_description,
    long_description_content_type="text/markdown",
    url="https://github.com/DevOne/sky_sim",
    scripts=['scripts/sim_catalog'],
    python_requires=">=3.6",
)
Note the following:
- we import the
skysimmodule so that we can read the__version__and__author__information directly, - we populate the
long_descriptionby reading theREADME.mdfile, - we read the requirements from the
requirements.txtfile, - we have set a minimum python version for this program, something
that we can’t do with a
requirements.txtfile, - we have moved the script sim_catalog from the root directory into
the
scripts/directory.
The above notes are in keeping with the good coding practice of not repeating ourselves. All the information is stored in a single location and duplication is minimised.
Installing the module
For someone to install our software they should do one of the following:
or just download a .zip file from github, unzip it, and
then run pip install . in the same directory.
The final ‘.’ indicates that pip should install the
module defined in this directory. Pip will search for a
setup.py file for the required information.
Developer mode
As a developer it is annoying to have to uninstall/install your module every time you make a change and want to check that things are working. Pip has a nice solution to this which is a developer mode install. Unlike a regular install, the developer mode will not copy files to some python directory, but make symlinks instead. This means that your changes to the files will be immediately used in the installed version of the code. If you move or add files however, you’ll need to uninstall/install the code again.
A developer mode install can be done using the -e flag
for pip:
Upgrading
If users want to upgrade the module they have to download or pull the
new version, uninstall the old one, and then install the new one. It can
be a little tedious and easy to forget. Luckily there is a python
package index pypi.org which pip can look
to in order to find different versions of your software. It is thanks to
pypi.org that pip knows how to install all the modules that we listed in
our requirements.txt file. We’ll explore the python package
index in the next lesson.
Hosting your code on pypi.org
The python package index at pypi.org
is the first place that pip will look when asked to install a package.
If your package is avaialble via pypi.org then your users can install
your software simply by typing pip install <package>.
Installing from other locations is still possible and sometimes easy. In
this lesson we’ll go through the process of preparing your code and
uploading it to pypi.org. This content is based on the instructions at
Packaging
Python Projects (PyPA), which you should also refer to.
Name check
Unlike GitHub where the project name is disambiguated based on the project owner, pypi requires that each package have it’s own unique name. So before you think about uploading your package to pypi.org you should do a search to see if your package name is already in use, and choose a new one if this is the case.
Once you have a name you like you should google it. This is what many people will do when looking for your code and if the results that come back are for a different software project (e.g. same name different language), or are NSFW then people will be less likely to keep looking.
You can choose nearly anything you like as the package name, however PEP423 has some advice about how you might choose and structure your package name.
Project structure
If you use the structure outline in Beginning a
new software project, and have created a setup.py file
as described in Installing your module via
setup.py, then you are good to go. The project structure recommended
in these lessons differs from that which is given on the PyPA site but
will still work.
Project metadata
In addition to the meta data that we have already included in the
setup.py file we can include information that has special
meaning on the pypi site. This information is used to populate many of
the links on the landing page for a package. An example for the
numpy package is shown below:
The information in the project description is
rendered from the long_description metadata using the
long_description_content_type to inform how the rendering
should be done. Many projects choose to copy their
README.md file into this field (as we did in a previous
lesson), however you can of course create a custom description for a
pypi audience.
The information in the project links section is
drawn from the project_urls dictionary. You can have any
description/links you like here. Some of the obvious ones get
appropriate icons but these cannot be customised.
Another sectionson the pypi landing page that you may want to populate is “Classifiers”. For numpy they are shown below.
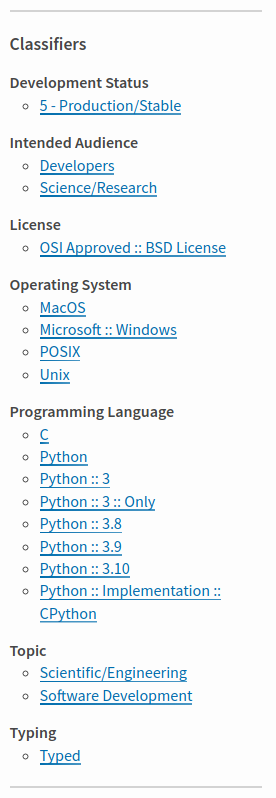
The classifiers section helps people see additional metadata in a
regular format, and also allows people to search for other projects with
similar classifiers. Classifiers are specified as a list of strings in
the classifiers parameter within setup.py.
These classifiers can be changed for each release of a project. A list
of classifiers can be found at pypi.org/classifiers/. It is a
long list, so maybe the first point of call would be to look at a
package like numpy or astropy that you think would have similar
classifiers and copy the relevant ones into your package.
Building a distribution package
PyPA provides a package simply called build that will
create a package from your project. Install it using
python3 -m pip install --upgrade build, and then run it
using python3 -m build. It will create a directory called
dist/ which contains a .tar.gz file (your
source archive) and a .whl file which is the build
distribution. Congratulations, you now have a package that can be served
by pypi – you just need a way to upload it.
Uploading to pypi
The first thing that you need is to create an account on pypi.org. Accounts are free and easy to make so go sign up here.
The second thing you’ll need is an API token. As noted on PyPA:
To securely upload your project, you’ll need a PyPI API token. Create one at https://test.pypi.org/manage/account/#api-tokens, setting the “Scope” to “Entire account”. Don’t close the page until you have copied and saved the token — you won’t see that token again.
https://packaging.python.org/en/latest/tutorials/packaging-projects/
Uploading to pypi is handled by the twine module which
can be installed using
python3 -m pip install --upgrade twine.
To upload your package use:
When prompted for a username you should use __token__
and for your password you should use
pypi-<API_Token_Value>.
If you want to test that your upload will work and see what the page
would look like without placing it on the main package index you can use
the test repository. To do this just add
--repository testpypi after twine in the above
command. When you upload to the test repository you can see the results
at
https://test.pypi.org/project/example-pkg-YOUR-USERNAME-HERE.
This test site is good to use for the first time you are uploading as
you’ll invariably want to make some small changes once you’ve seen how
the landing page renders.
Congratulations, you now have a package published in the python package index. For more details and some alternatives to the method given above you are referred to the PyPA tutorial.