Coding Up A Proof Of Concept
Last updated on 2026-02-24 | Edit this page
Estimated time: 110 minutes
Overview
Questions
- Where/How do I start a new project?
- How do I use a function?
- How do I document and test my code?
- Can I make a command line interface for my code?
Objectives
- Build a minimal working or “proof of concept” project that we can build on in this workshop
Beginning a new software project
Before we do anything to our project we should talk about:
Organisation
Organisation is key to a good project. Every time you start a new project or explore a new idea it is a good idea to create a new space for that project. This means creating a new directory for you to collect all the relevant data, software, and documentation. You will be involved in many projects through your career and often will have to manage multiple projects simultaneously. It is therefore not just a good idea to organise each project, but to have a consistent organisation structure between projects. In this section we will make some recommendations for organising a software project.
Put each project in its own directory, which is named after the project.
The location of this directory will depend on a higher level organisation scheme. For example you may separate your projects based on funding, based on collaboration, or based on research area.
Within you software project directory we recommend the following structure:
OUTPUT
 .
 ├── README.md          <- Description of this project
 ├── bin                <- Your compiled code can be stored here (not tracked by git)
 ├── config             <- Configuration files, e.g., for doxygen or for your model if needed
 ├── data
 │   ├── external       <- Data from third party sources.
 │   ├── interim        <- Intermediate data that has been transformed.
 │   ├── processed      <- The final data sets for analysis.
 │   └── raw            <- The original, immutable data dump.
 ├── docs               <- Documentation, e.g., doxygen or reference papers (not tracked by git)
 ├── notebooks          <- Jupyter or R notebooks
 ├── reports            <- For a manuscript source, e.g., LaTeX, Markdown, etc., or any project reports
 │   └── figures        <- Figures for the manuscript or reports
 └── src                <- Source code for this project
     ├── external       <- Any external source code, e.g., pull other git projects libraries
     └── tools          <- Any helper scripts go here
Setting up an empty structure such as the above can be done either by
making an template and then copying that every time you start a new
project. Additionally there are python packages such as
cookiecutter (pypi, rtfd, github)
that can automate this process for you, and offer a range of templates
to work with.
Name all files to reflect their content or function.
It is also convenient to use a consistent and descriptive naming
format for all your files and sub-folders. For example, use names such
as galaxy_count_table.csv, manuscript.md, or
light_curve_analysis.py. Do not using sequential numbers
(e.g., result1.csv, result2.csv) or a location
in a final manuscript (e.g., fig_3_a.png), since those
numbers will almost certainly change as the project evolves (and are
meaningless on their own).
Starting our project
Now we are ready to actually start doing something with our project.
Project evolution
In the typical project cycle for an astronomer or research software engineer (or RSE, a formal name for people who combine professional software expertise with an understanding of research), you will not sit down and have a detailed discussion about what the project is, where it needs to go, what the user stories and milestones are, and who will be involved. Usually research evolves organically through informal discussions with colleagues, or a sudden thought in the shower. Similarly our software projects evolve in an organic manner, often beginning with a small script of function to do just this one thing, which then over time gets used, reused, augmented, shared, and thus evolves into a software project. This evolution of ideas and code does not fit will with much of the more formal structures that professional software developers adhere to, and so we will not try to fit our projects to such a scheme. Instead we will create a path for our software that will be suited to our work style, but which draws on the knowledge and experience of professional software developers. Thus we will begin with a proof of concept code – a short bit of work that proves that something works using the minimal amount of effort.
Example project
The example project that we will work with will involve tasks that are familiar to many astronomers. The work that is being done is mostly for demonstration purposes – existing libraries will be able to do this task faster and easier that we will. The point of this example project is not the content, but the methodology that we use as we pass through various cycles of development.
Example project: an astronomy catalogue simulator
The example project that we will be developing will simulate a catalogue of foreground stars in the direction of the Andromeda galaxy. The initial requirements are as follows:
Stars should have randomised sky positions around the Andromeda galaxy Positions should fall within 1 degree of the central location Each star should have a unique ID The star ID and position should be saved in a csv file to be analysed by other programs This program is intended to be used by the developer and their research group which includes people who are not proficient python programmers.
It is intended that the software will grow in capability and complexity only as needed to support a current research project.
With this in mind we move to the first stage of our software project – the proof of concept.
SOLO Activity: Project structure
Consider the astronomy catalogue simulator project mentioned in the previous lesson.
Come up with a planned project structure that would be appropriate for this project. How much of the structure would change if you were to use a different language (e.g. Python vs C)? The scope of work is quite modest and could be achieved with a flat file structure or a single file. Which statements in the previous lesson suggest that a good project structure will be beneficial to future work?
Proof of concept code
The first iteration of our code is shown below. It was written in a stream-of-conscious mode with a focus on getting a minimum working example that proves that the work can be done.
PYTHON
#! /usr/bin/env python
# Demonstrate that we can simulate a catalogue of stars on the sky

# Determine Andromeda location in ra/dec degrees
import numpy as np
import math
# from wikipedia
ra = '00:42:44.3'
dec = '41:16:09'

d, m, s = dec.split(':')
dec = int(d)+int(m)/60+float(s)/3600

h, m, s = ra.split(':')
ra = 15*(int(h)+int(m)/60+float(s)/3600)
ra = ra/math.cos(dec*math.pi/180)

# make 1000 stars within 1 degree of Andromeda
ra_offsets = np.random.uniform(-1, 1, size=1000)
dec_offsets = np.random.uniform(-1, 1, size=1000)

ras = ra + ra_offsets
decs = dec + dec_offsets

# now write these to a csv file for use by my other program
with open('catalog.csv', 'w') as f:
    print("id,ra,dec", file=f)
    for i in range(1000):
        print("{0}, {1:7.4f}, {2:7.4f}".format(i, ras[i], decs[i]), file=f)
The above code was saved as sim.py. When run from the
command line it produces a file (catalog.csv) with a
header, one thousand rows, and columns showing the id/ra/dec of the
simulated points on the sky. Right now the code runs without error and
at first glance does what we need.
If we plot the ra/dec locations of the catalog we get the following output:
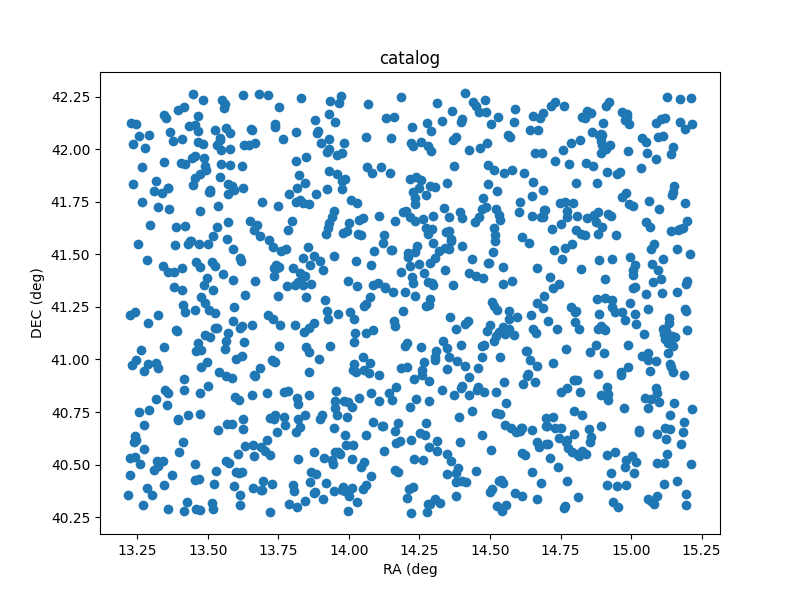
Sky plot of the catalog that comes from the sim.py program.
Making code reusable via functions
Now that we have proved to ourselves that it’s possible to generate a catalog, we want to tidy up the code a little so that it can be reused and adapted easily.
At the moment our intended audience is ourselves, so we are content
with keeping all the relevant information within the code itself. As a
first step we create new variables that record the target location
(ref_ra/ref_dec), the number of stars to generate
(nsources), and how far from the central location the new
positions should be generated (radius). This is done using
global variables at the top of our file like this:
PYTHON
#! /usr/bin/env python
# Demonstrate that we can simulate a catalogue of stars on the sky

# Determine Andromeda location in ra/dec degrees
import numpy as np
import math

# configuration using global variables
nsources = 1000
# from wikipedia
ref_ra = '00:42:44.3'
ref_dec = '41:16:09'
radius = 1
From here we need to make a few changes to our code so that these variables are now used in place of the previously hard-coded values.
We then take all the code that is part of the position generation
stage and bundle it all together into a function which we call
generate_positions. This allows us to keep that part of the
code separate from the file writing stage. In fact while we are at it we
should make a function for doing the file writing. Lets call it
write_file. While we are writing these functions we can use
python docstrings to
document the intent of each function.
PYTHON
def generate_positions():
    """
    Create `nsources` random locations within `radius` degrees of the reference `ref_ra`/`ref_dec`.

    Returns
    -------
    ra, dec : numpy.array
        Arrays of ra and dec coordinates in degrees.
    """

    # convert DMS -> degrees
    d, m, s = ref_dec.split(':')
    dec = int(d)+int(m)/60+float(s)/3600

    # convert HMS -> degrees
    h, m, s = ref_ra.split(':')
    ra = 15*(int(h)+int(m)/60+float(s)/3600)
    ra = ra/math.cos(dec*math.pi/180)  # don't forget projection effects

    ra_offsets = np.random.uniform(-1*radius, radius, size=nsources)
    dec_offsets = np.random.uniform(-1*radius, radius, size=nsources)

    ras = ra + ra_offsets
    decs = dec + dec_offsets
    return ras, decs


def write_file(ras, decs):
    """
    Write the ra/dec catalog to a file, and include a header and IDs.
    """
    with open('catalog.csv', 'w') as f:
        # creat a header row
        print("id,ra,dec", file=f)
        for i in range(nsources):
            # use a csv format
            print("{0}, {1:7.4f}, {2:7.4f}".format(i, ras[i], decs[i]), file=f)
    return
Note that the first function takes no parameters, while the second is designed to take two lists of positions as input. By breaking our code into functional blocks we have a number of advantages:
We can reuse a block of code by calling the function multiple times, and don’t have to bother with duplicated code. Duplicated code means duplicated bugs! The code within each function will not interfere with code in other functions, allowing us to reuse names of variables, and for unused variables and memory to be deleted upon exiting the function. We can document each function separately using a docstring to describe the intent of the code. This is in addition to the inline comments that we have used.
Our script can now be finished with a few more lines of code.
As a developer the code is now separated into functional parts, so if something goes wrong or needs changing, we know where to look to make those changes. As a user of the code we can open the file and read the first few lines to see what the default parameters are, and modify them if we choose. Additionally, as a user we can read the names and docstrings of the functions to understand what the code is doing rather than having to read the code itself.
Now we have a piece of code that is easier to use. However, this code is only really usable as is, and requires people to read/edit the source code to understand how it works and adapt it for their use. In the next section we’ll see how to further generalise our code by using more function parameters, and adding a command line interface.
Creating a command line interface
In the previous lesson we saw how we could use functions to separate different tasks, and docstrings to describe the behaviour of these functions. In this lesson we’ll generalise our code even further by removing the global variables, adding functions parameters, and adding a command line interface.
The first thing that we will do is remove the global variables, and have these values passed to the functions directly. This will mean that someone reading the code for a function doesn’t have to hunt through the rest of the code to figure out what the global variables are.
For the generate_positions function we can use
parameters with the same name as the previously existing global
variables, and we can set their default values to match. We have also
taken the opportunity to update the docstring so that we know what types
of parameters should be passed and what they are for.
PYTHON
def generate_positions(ref_ra='00:42:44.3',
                       ref_dec='41:16:09',
                       radius=1.,
                       nsources=1000):
    """
    Create nsources random locations within radius of the reference position.

    Parameters
    ----------
    ref_ra, ref_dec : str
        Reference position in "HH:MM:SS.S"/"DD:MM:SS.S" format.
        Default position is Andromeda galaxy.

    radius : float
        The radius within which to generate positions. Default = 1.

    nsources : int
        The number of positions to generate

    Returns
    -------
    ra, dec : numpy.array
        Arrays of ra and dec coordinates in degrees.
    """
    ...
    return
For the write_file function, we already had two
parameters that needed to be passed, but now we’ll add another which is
the output file name. This wasn’t part of the global variables, but it
was a hard coded file that we might want to change as we create multiple
catalogs. Note that this function used to use the nsources
global variable to know how many ra/dec values were passed. In this
revised version we just look at the length of the ras list
instead.
PYTHON
def write_file(ras, decs,
               outfile='catalog.csv'):
    """
    Write the ra/dec catalog to a file, and include a header and IDs.

    Parameters
    ----------
    ras, decs : list, numpy.array, or any iterable
        Iterable of ra and dec coordinates. The length of these need to match.

    outfile : str
        Path/filename for the output file. (Overwite=True)
    """
    with open(outfile, 'w') as f:
        # creat a header row
        print("id,ra,dec", file=f)
        for i in range(len(ras)):
            # use a csv format
            print("{0}, {1:7.4f}, {2:7.4f}".format(i, ras[i], decs[i]), file=f)
    return
By moving the global variables into the parameters of the functions, and making use of the default values we don’t need to make any further changes to our code. The following block is unchanged.
One advantage to our changes is that we could now generate a different catalog by adjusting these last two lines like this:
We will leverage this ability in order to make a command line
interface. The recommended way to do this is to use the
argparse module, and an if __name__ clause as
follows.
PYTHON
if __name__ == '__main__':
    # Set up the parser with all the options that you want
    parser = argparse.ArgumentParser(prog='sim')
    group1 = parser.add_argument_group()
    group1.add_argument('--ref_ra', dest='ref_ra', type=str, default='00:42:44.3',
                        help='Central/reference RA position HH:MM:SS.S format')
    group1.add_argument('--ref_dec', dest='ref_dec', type=str, default='41:16:09',
                        help='Central/reference Dec position DD:MM:SS.S format')
    group1.add_argument('--radius', dest='radius', type=float, default=1.,
                        help='radius within which the new positions are generated (deg)')
    group1.add_argument('--n', dest='nsources', type=int, default=1_000,
                        help='Number of positions to generate')
    group1.add_argument('--out', dest='outfile', type=str, default='catalog.csv',
                        help='Filename for saving output (csv format)')

    # parse the command line input
    options = parser.parse_args()
Here we have created a single group of arguments called
group1, and then we add five different arguments to that
group. Note that we provide both a call signature (--out)
for specifying a parameter, as well as the name/type/default value of
that parameter (dest/type/default). The help
is optional but highly recommended. If we were to run the code above
with the --help option then we would get the following
output:
OUTPUT
$> python sim.py --help
usage: sim [-h] [--ref_ra REF_RA] [--ref_dec REF_DEC] [--radius RADIUS] [--n NSOURCES] [--out OUTFILE]

optional arguments:
  -h, --help         show this help message and exit

  --ref_ra REF_RA    Central/reference RA position HH:MM:SS.S format
  --ref_dec REF_DEC  Central/reference Dec position DD:MM:SS.S format
  --radius RADIUS    radius within which the new positions are generated (deg)
  --n NSOURCES       Number of positions to generate
  --out OUTFILE      Filename for saving output (csv format)
Right away we have a way for people to understand how to use the program without having to open the source code. This will include you, two days from now, when you forgot some of the details of the code.
Finally, we can connect the user input to the program by using the
options object. Each of the parameters that were read in
with a dest=thing can be accessed using
options.thing. If we specified a type then argparse will
make sure that users don’t give input that can’t be converted to that
type. The final part of our code now looks like this:
PYTHON
    # parse the command line input
    options = parser.parse_args()

    ras, decs = generate_positions(ref_ra=options.ref_ra,
                                   ref_dec=options.ref_dec,
                                   radius=options.radius,
                                   nsources=options.nsources)
    write_file(ras, decs, outfile=options.outfile)
Since we specified default values for all of the inputs, we can run
python sim.py and it will run with the default values.
Creating a simple testing script
We now have a script with a command line interface that allows people to use the code without having to read the source. At this point we are feeling rather professional and are happy to share the code with others. One of the things that is often scary is the thought of others finding bugs in our code and then having to fix these bugs. A good way to alleviate these fears is to do some testing of the code ourselves to catch all the obvious errors before the script is sent to others. In a later lesson we’ll go through some more formal and rigorous testing, but for now we are going to start simple with some of the most basic tests.
In our file test_sim.sh we will make three tests. The
first two tests we are going to do will just ensure that the code will
not immediately crash when we run it:
BASH
#! /usr/bin/env bash

echo "Testing sim.py"
python sim.py || { echo "FAILED to run with default parameters"; exit 1 ;}
python sim.py --help || { echo "FAILED to print help"; exit 1 ;}
The next test we do will ensure that when we pass a filename to the
--out option, we will get a new file with that name. We use
the bash [ ] test and -f conditional to see
that the file exists.
BASH
python sim.py --out test.csv
if [ ! -f "test.csv" ]; then
    echo "FAILED to generate ouput test.csv"
    exit 1
fi

echo "all tests PASSED"
exit 0
The last two lines above then make sure that when the tests all pass we get a positive message and return an exit status of 0.
We now have a test script that will catch the most egregious issues with our script. Any time we make changes to our script we should run the test script just to make sure that we haven’t seriously broken anything.
More advanced testing with bash is not explored here as we will move to a python based test environment in a later lesson. The python based testing will make it easier to do things like make sure the right number of entries exist in the catalogue file and that the positions all lie within the specified region.
Summary
In this first development cycle we have:
- Demonstrated that we can simulate a catalogue of positions on the sky;
- Written a function to do the simulation, and another to write the results to a file;
- Created a command line interface to make the script easy to use and re-use; and
- Made a simple test script to alert us when our changes break the code.
If you would like to see the status of the project at the end of this cycle you can look at the cycle1 branch on GitHub (at this link).