Sharing Code To The Wider Community
Last updated on 2026-02-27 | Edit this page
Overview
Questions
- Why should I share my code?
- Where and how can I share my code?
- How can I make my python code easy to obtain/install?
Objectives
- Have confidence to share your code
- Make your code findable and accessible
‘Publishing’ code
Once you have code that you are happy to share among collaborators you should consider publishing this code.
What do we mean by publishing? From least to greatest effort, any of the following could be considered as a definition for publishing code:
- Copying a version of your code to a public website for others to find and use,
- Making your version control repository (github, gitlab, bitbucket) public so that others can use and reuse your code,
- Uploading your code to a repository such a pypi.org so that others can easily download/install your software,
- Archiving a version of your code to a doi minting / storage service such as zenodo.org,
- Registering your code on a site such as ascl.net so that others can find your code,
- Writing a paper describing an application of your code and submitting for peer review in a science focused journal such as PASA or MNRAS,
- Writing a companion paper that describes your code and submitting the paper and code for peer review in a software focused journal such as A&C or JOSS. From the descriptions above you can see that the different options have slightly different intentions and audiences. We can take an lead from FAIR principles for data, and apply these principles to code.
Findable
Make code findable by creating a persistent identifier (eg doi) and including metadata. On pypi/zenodo/github you can use tags or topics to identify the software language but also the area of research or methodology that is being used. This makes it easier for people to find code that will suit their needs.
Accessible
Make code accessible by providing source code, install instructions, and documentation. Testing code on a range of platforms will also increase the accessibility of the code.
Interoperable
Use standard project templates, coding styles and idioms, and a modular design to allow your code to be used as part of a larger workflow or as a component of another product. This interoperability is useful for others, but will also make it easier for you to build on your own existing solutions.
Reasons not to publish
The following are often given as reasons not to publish code:
| Reason | Counter argument |
|---|---|
| I don’t want to have to “support” my code. | Publishing code does not commit you to providing endless support. If you do not intend to reply to emails, fix bugs, or make updates to the code, simply say so in the README.md file. If this is the case you could invite keen users to fork the repo and provide their own fixes. |
| I don’t want people to steal my good work. | With an appropriate license and attribution request, you can let others use your work while you benefit from their reuse. If there is a paper that describes or uses the code, you can ask for it to be cited by others, and this will increase the impact of that paper (and your h-index!). |
| My code is a bit hacky and I don’t want others to see it. | Being embarrassed about less-than-perfect code is normal. However, a quick scan of GitHub will show you that hacked-together code is very common even among professional developers. If your code serves it’s intended purpose then it’s good enough to share. Consider writing a short blurb in the README.md file that clearly state the intended aim of the code, so that you can manage the expectations of your users. |
| I don’t know how to share my code. | It’s not difficult to share code, and it’s easy to learn. This course is one of many (MANY) that take you through the steps of sharing or publishing code. The small investment to learn how to share code will pay off quickly when you start to discover and use code written by others, get feedback and recognition for your code, or when your computer dies and you need to recover your work. |
| My code contains sensitive IP that I’m not allowed to share. | Good argument! Keep it secure some place. Many of the steps that you would take to prepare your data for publication are still worth doing to make your code usable within your trusted network. |
Obtaining a doi from Zenodo.org
You have a piece of code on github, but it is changing over time, and you would like to provide a link to a particular version of the code. This is important for reproducibility of your research work, both for yourself and others.
The Zenodo repository provides a safe, trusted, and citable place to host your code. Zenodo is primarily focused on the storage of data, but this includes: documentation, papers, posters, raw or processed data, source code, and compiled binaries. Zenodo will allow you to version your data but does not provide a version control system such as git. However, Zenodo and Github are friends so you can link them together to get the best of both worlds.
Sign up to Zenodo
You can create a new Zenodo account using an email address and password, or you can use your Github or ORCID accounts to login. Whatever you choose, you can still link your github/ORCID later and use them to sign in.
Create a new repository
Once signed in click on the upload button at the top of the page, and then on the next page click “New Upload”

The following page will have a lot of details, some of which are mandatory, but most of which are either recommended or optional. Begin by downloading a .zip of your files from Github, and then uploading it to Zenodo. Press the green “start upload” button and then start filling out the rest of the form.
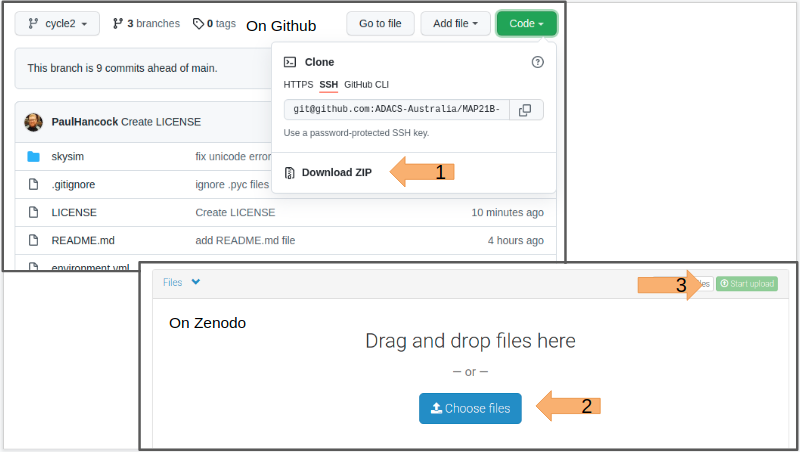
As the upload is progressing you can fill in the upload type (Software) and basic information.
Leave the DOI blank, but click the “reserve DOI” button so that you can know what the final DOI will be.
Fill in the remainder of the form and then press “save” at the top of the page, this will make a draft of your repository that you can come back to later and update. When you are finally happy with all the details you can press ‘publish’.
Once your upload has been published you should navigate to the published repository in your uploads list, and select it.
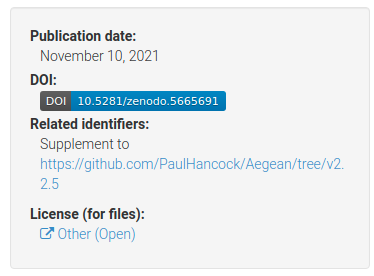
The above example is for the Aegean source finding software that I developed. You can see the DOI badge with the full DOI, a link to supplementary material, and the licence. If you click the DOI badge you’ll get a new pane that shows you how to embed this information into a markdown file such as your README.md that you have on your github page!
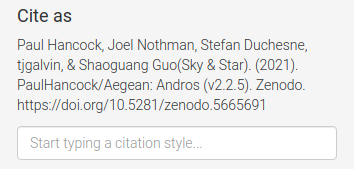
Below this panel you can also see a box that allows people to cite your code. There is even a box that allows people to get the citation in any format that they need it.
You now have a version of your code which is archived on zenodo and will not change. If you want to update the archive with new versions of the code, Zenodo has the capacity to do this, and will mint a new doi for each version. It is recommended that you don’t make a new doi for every small change you make to your code. A new version for each major or minor version change would be appropriate, or when you have published work that used a particular major/minor/patch version of the code.
Sadly Zenodo is not indexed by ADS so you can’t track citations very well from here.
Registering your code on ascl.net
In the last lesson we saw how to obtain a DOI by uploading a software project to Zenodo. In this lesson we’ll make an entry in the Astrophysics Source Code Library (ASCL.net), which is indexed by ADS, and can help you gain an audience, and track citations.
Submit a code to ASCL
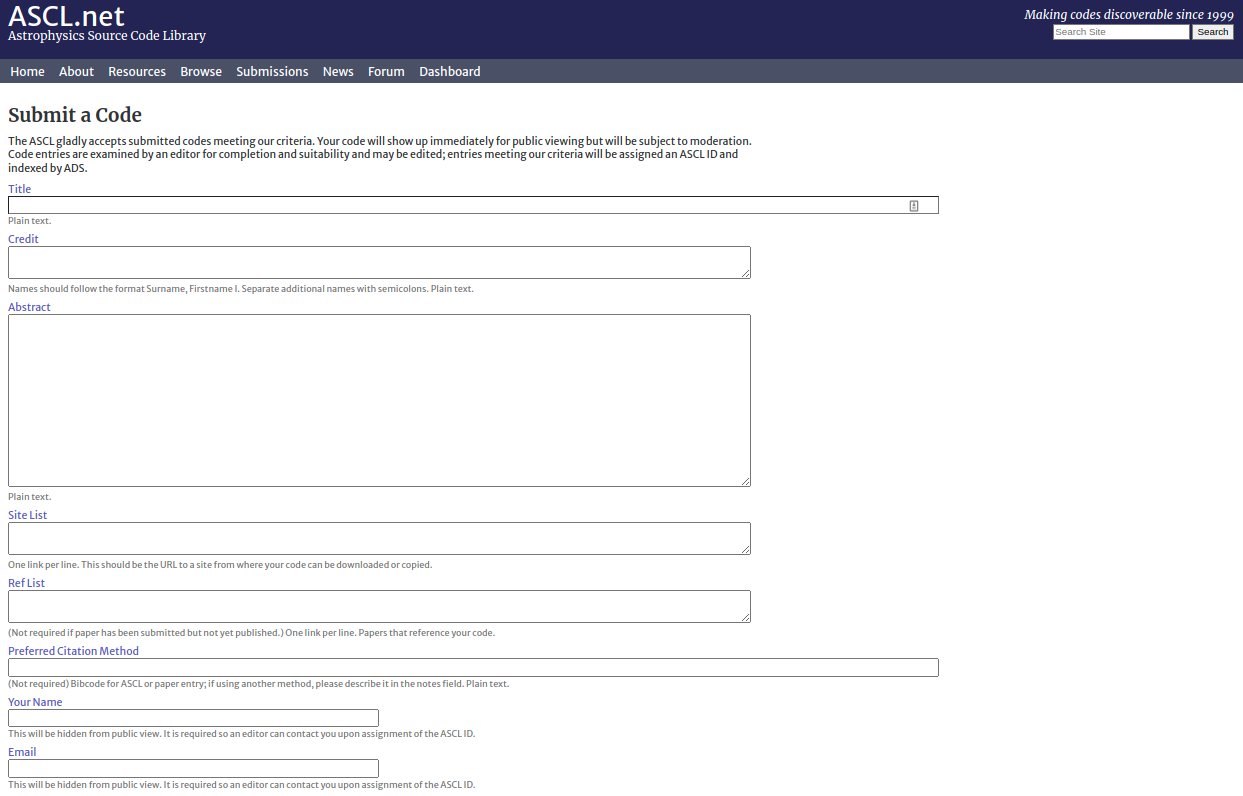
Go to the “submit a code” page here.
The page asks for a title, credit (authors/contributors), abstract, and a site list for the code.
The site list should be a list of links to places where people can obtain the code. I highly recommend that you put a link to both your Github and Zenodo repositories. If the code was described in a paper you can put that in the “Preferred Citation Method” section.
ASCL.net does not store your code. No one will vet the quality of your code. ASCL.net is simply a place to register that some code exists and that you’d like to be acknowledged for creating/contributing. ASCL.net is indexed by ADS so it will get a bibcode in ADS, which can then be used to generate a bibtex entry for people to use when citing your code. Another goal of ASCL.net is to make it easier for people to find your code in the first place. If you haven’t explored the code available here I recommend that you do so now – there are some gems.
You can also get a nice little badge from ASCL to add to your
README.md file!
Installing your module via setup.py
In our code directory we specified a requirements.txt
file that allowed users to easily installed the dependencies for our
code. However, if someone wants to run our main script
(sim_catalog) then they have to be in the code directory.
If we want to run the code from some other location on our system then
it won’t work. The reason is that we haven’t installed our code as a
python module.
Installing a python module will do the following:
- Copy the module directory and files (eg
skysim/*) to a central location so that python can access them no matter where it’s run from,- something like
/home/${USER}/.py3/lib/python3.8/site-packages/;
- something like
- Copy and scripts (eg
sim_sky) to a similar location so that they can be invoked from anywhere,- something like
/home/${USER}/.py3/bin/;
- something like
- Make a note that the module is installed,
- so that
pip freezewill report the name/version of the software.
- so that
In order to install a python module you need a special file called
setup.py.
Template for setup.py
The python
documentation covers all the gory details of the how and why of
using a setup.py file. However, a great place to start is
to use a template so we’ll provide one here to get started.
PYTHON
import setuptools
import skysim

with open("README.md", "r", encoding="utf-8") as fh:
    long_description = fh.read()

with open('requirements.txt', 'r') as fh:
    reqs = [line for line in fh.readlines() if not line.startswith('#')]

setuptools.setup(
    name="SkySim",
    version=skysim.__version__,
    author=skysim.__author__,
    author_email="author@example.com",
    description="Simulate sky locations",
    long_description=long_description,
    long_description_content_type="text/markdown",
    url="https://github.com/DevOne/sky_sim",
    scripts=['scripts/sim_catalog'],
    python_requires=">=3.6",
)
Note the following:
- we import the
skysimmodule so that we can read the__version__and__author__information directly, - we populate the
long_descriptionby reading theREADME.mdfile, - we read the requirements from the
requirements.txtfile, - we have set a minimum python version for this program, something
that we can’t do with a
requirements.txtfile, - we have moved the script sim_catalog from the root directory into
the
scripts/directory.
The above notes are in keeping with the good coding practice of not repeating ourselves. All the information is stored in a single location and duplication is minimised.
Installing the module
For someone to install our software they should do one of the following:
or just download a .zip file from github, unzip it, and
then run pip install . in the same directory.
The final ‘.’ indicates that pip should install the
module defined in this directory. Pip will search for a
setup.py file for the required information.
Developer mode
As a developer it is annoying to have to uninstall/install your module every time you make a change and want to check that things are working. Pip has a nice solution to this which is a developer mode install. Unlike a regular install, the developer mode will not copy files to some python directory, but make symlinks instead. This means that your changes to the files will be immediately used in the installed version of the code. If you move or add files however, you’ll need to uninstall/install the code again.
A developer mode install can be done using the -e flag
for pip:
Upgrading
If users want to upgrade the module they have to download or pull the
new version, uninstall the old one, and then install the new one. It can
be a little tedious and easy to forget. Luckily there is a python
package index pypi.org which pip can look
to in order to find different versions of your software. It is thanks to
pypi.org that pip knows how to install all the modules that we listed in
our requirements.txt file. We’ll explore the python package
index in the next lesson.
Hosting your code on pypi.org
The python package index at pypi.org
is the first place that pip will look when asked to install a package.
If your package is avaialble via pypi.org then your users can install
your software simply by typing pip install <package>.
Installing from other locations is still possible and sometimes easy. In
this lesson we’ll go through the process of preparing your code and
uploading it to pypi.org. This content is based on the instructions at
Packaging
Python Projects (PyPA), which you should also refer to.
Name check
Unlike GitHub where the project name is disambiguated based on the project owner, pypi requires that each package have it’s own unique name. So before you think about uploading your package to pypi.org you should do a search to see if your package name is already in use, and choose a new one if this is the case.
Once you have a name you like you should google it. This is what many people will do when looking for your code and if the results that come back are for a different software project (e.g. same name different language), or are NSFW then people will be less likely to keep looking.
You can choose nearly anything you like as the package name, however PEP423 has some advice about how you might choose and structure your package name.
Project structure
If you use the structure outline in Beginning a
new software project, and have created a setup.py file
as described in Installing your module via
setup.py, then you are good to go. The project structure recommended
in these lessons differs from that which is given on the PyPA site but
will still work.
Project metadata
In addition to the meta data that we have already included in the
setup.py file we can include information that has special
meaning on the pypi site. This information is used to populate many of
the links on the landing page for a package. An example for the
numpy package is shown below:
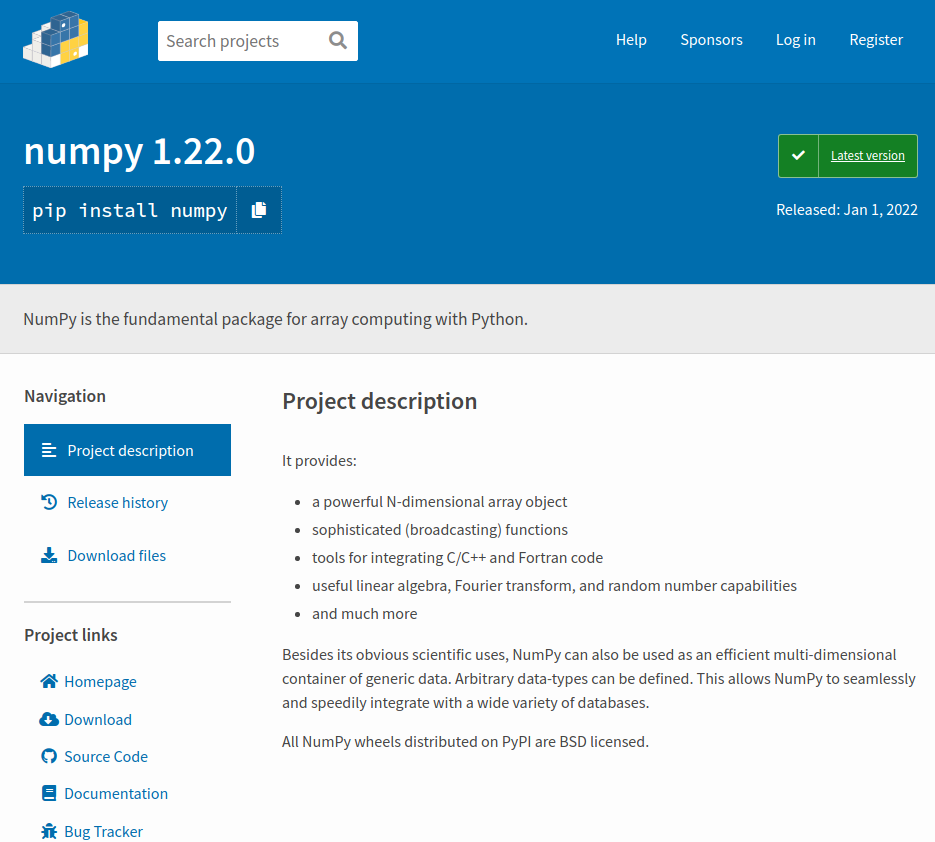
The information in the project description is
rendered from the long_description metadata using the
long_description_content_type to inform how the rendering
should be done. Many projects choose to copy their
README.md file into this field (as we did in a previous
lesson), however you can of course create a custom description for a
pypi audience.
The information in the project links section is
drawn from the project_urls dictionary. You can have any
description/links you like here. Some of the obvious ones get
appropriate icons but these cannot be customised.
Another sectionson the pypi landing page that you may want to populate is “Classifiers”. For numpy they are shown below.
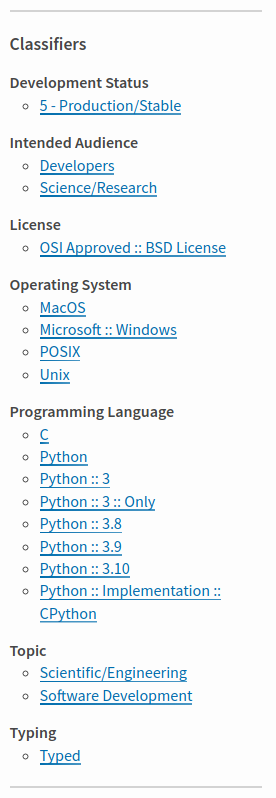
The classifiers section helps people see additional metadata in a
regular format, and also allows people to search for other projects with
similar classifiers. Classifiers are specified as a list of strings in
the classifiers parameter within setup.py.
These classifiers can be changed for each release of a project. A list
of classifiers can be found at pypi.org/classifiers/. It is a
long list, so maybe the first point of call would be to look at a
package like numpy or astropy that you think would have similar
classifiers and copy the relevant ones into your package.
Building a distribution package
PyPA provides a package simply called build that will
create a package from your project. Install it using
python3 -m pip install --upgrade build, and then run it
using python3 -m build. It will create a directory called
dist/ which contains a .tar.gz file (your
source archive) and a .whl file which is the build
distribution. Congratulations, you now have a package that can be served
by pypi – you just need a way to upload it.
Uploading to pypi
The first thing that you need is to create an account on pypi.org. Accounts are free and easy to make so go sign up here.
The second thing you’ll need is an API token. As noted on PyPA:
To securely upload your project, you’ll need a PyPI API token. Create one at https://test.pypi.org/manage/account/#api-tokens, setting the “Scope” to “Entire account”. Don’t close the page until you have copied and saved the token — you won’t see that token again.
https://packaging.python.org/en/latest/tutorials/packaging-projects/
Uploading to pypi is handled by the twine module which
can be installed using
python3 -m pip install --upgrade twine.
To upload your package use:
When prompted for a username you should use __token__
and for your password you should use
pypi-<API_Token_Value>.
If you want to test that your upload will work and see what the page
would look like without placing it on the main package index you can use
the test repository. To do this just add
--repository testpypi after twine in the above
command. When you upload to the test repository you can see the results
at
https://test.pypi.org/project/example-pkg-YOUR-USERNAME-HERE.
This test site is good to use for the first time you are uploading as
you’ll invariably want to make some small changes once you’ve seen how
the landing page renders.
Congratulations, you now have a package published in the python package index. For more details and some alternatives to the method given above you are referred to the PyPA tutorial.