Making Code Reusable by You and Your Group
Last updated on 2026-02-25 | Edit this page
Overview
Questions
- How do I easily share or re-use my code?
- When sharing, what information should I provide?
- Where and how can I easily share code?
Objectives
- Package your code into a module.
- Create a command line interface for your code.
- Identify and include meta-data in your module.
Separating the UI from the functionality
A programming principle called model-view-controller
(MVC) is recommended when designing code. Under MVC, programs are
separated into one of three components, the model (library) which
provides the core functionality, a viewer which provides a visualisation
of the results, and a controller which links the user to the model. In
our test code the model would be the two functions
generate_positions and write_file, whilst the
controller would be the command line interface. [In this example we
could consider the file output to be the viewer.]
At the end of cycle1 we had a single file, sim.py, which
contained both the model and the controller. Our first task will be to
separate this into two parts. The first part will be a python module
which provides the functionality, and the second will be a script which
receives user input and calls the library functions.
Creating a python module
Python modules, like the numpy module that we have
already used, can be easily created by obeying a simple directory/file
structure. If we want to create a module called skysim then
all we need to do is create a directory with the same name, and add an
empty file called __init__.py. Let’s do that now:
To access the module we simply use import skysim.
BASH
$ python
>>> import skysim
>>> dir(skysim)
['__builtins__', '__cached__', '__doc__', '__file__', '__loader__', '__name__', '__package__', '__path__', '__spec__']
>>>
We can see that the skysim module already has some
attributes defined, and they all start with a double underscore (
__ or ‘dunder’ ). The file attribute is a
string containing the full path to the file __init__.py.
The __name__ attribute will contain the string
skysim because this is the name of the module. If we had
renamed the module on import (using import skysim as other)
then the __name__ attribute would still be the same. Feel
free to explore the other attributes.
In order to add some functions or attributes to our module we can
simply add our sim.py file to the skysim
directory. If we do this and then restart our python interpreter we can
import all the functions/modules/variables provided by
sim.py by doing from skysim import sim. For
example:
BASH
$ python
>>> from skysim import sim
>>> dir(sim)
['__builtins__', '__cached__', '__doc__', '__file__', '__loader__', '__name__', '__package__', '__spec__', 'argparse', 'generate_positions', 'math', 'np', 'write_file']
>>>
Above we can see the two functions that we defined, as well as the
modules that we imported (argparse, math, and
np). We now have a library that we can import. When we
import a module, all the code within that file is executed. In the case
of our sim.py file this means that we import some other
modules and then define some functions.
If a python file is run via python myfile.py then the
__name__ attribute will be set to the string
__main__. However if a python file is imported via import
myfile or import myfile as mf, then the
__name__ attribute is set to be the filename (without the
.py extension). Therefore when we import
sim.py as part of our module the CLI that we created with
argparse does not get executed because we hid it within an
if __name__ == "__main__" clause.
Creating a stand alone script
To create a script that calls this library we create a new file
called sim_catalog. We then move all the content of the
if __name__ == "__main__" clause out of sim.py
and into our new file. Finally, we the import the functions that we need
from our newly created module.
Our new script looks like this:
PYTHON
#! /usr/bin/env python

import argparse
from skysim.sim import generate_positions, write_file

if __name__ == '__main__':
    # Set up the parser with all the options that you want
    parser = argparse.ArgumentParser(prog='sim')
    group1 = parser.add_argument_group()
    group1.add_argument('--ref_ra', dest='ref_ra', type=str, default='00:42:44.3',
                        help='Central/reference RA position HH:MM:SS.S format')
    group1.add_argument('--ref_dec', dest='ref_dec', type=str, default='41:16:09',
                        help='Central/reference Dec position DD:MM:SS.S format')
    group1.add_argument('--radius', dest='radius', type=float, default=1.,
                        help='radius within which the new positions are generated (deg)')
    group1.add_argument('--n', dest='nsources', type=int, default=1_000,
                        help='Number of positions to generate')
    group1.add_argument('--out', dest='outfile', type=str, default='catalog.csv',
                        help='Filename for saving output (csv format)')

    # parse the command line input
    options = parser.parse_args()

    ras, decs = generate_positions(ref_ra=options.ref_ra,
                                   ref_dec=options.ref_dec,
                                   radius=options.radius,
                                   nsources=options.nsources)
    write_file(ras, decs, outfile=options.outfile)
Note that we have a shebang line
(#!) to indicate that we want to use the python interpreter. This means
that we can make the file executable and then execute it like any other
program without the user having to explicitly type python.
It is not shown here, but I have made the file executable so that I can
just type ./sim_catalog to run the above code.
We have now separated our interface (sim_catalog) from
the model (skysim.sim). Currently the user will not notice
any difference because the functionality hasn’t changed. However, we are
now able to import the model into other python scripts. Our code is
becoming easier to re-use by ourselves (and other developers).
Updating our test script
Finally, we just need to update our test script so that it will use
the new sim_catalog script to do the testing.
SOLO Activity: Command line interface
A command line interface (CLI) is a good way to allow non-developers to use your software. In the previous lesson we saw how we can separate the functionality of your software from the user interface by creating a module with the core functionality and a script to provide the user interface.
Using the example project we developed earlier:
- Update the
scripts/sim_catalogfile so that it now has two argument groups,- The current
group1should have atitleof “Program settings” - The second group (
group2) should have atitleof “Metadata”
- The current
- Add the following parameters to
group2:-
--version, which will print the version -
--date, to show the last modified date -
--author, to list the authors
-
- All the parameters in
group2should have adefaultvalue ofFalse, and then useaction='store_true'to set the parameter toTruewhen this option is supplied by the user. - [Optional] Provide shortened versions of the parameters in
group2of the format-cetc.. - Write the necessary code so that when any of the options in
group2are set, all the required information is printed and the program exits without performing the simulation.
For now you’ll have to define some variables within the script to hold these values, but later on we’ll demonstrate a better place to store them.
Setting up a python environment
You python environment is the ecosystem of modules that you have
installed. If you have used pip to install modules then
pip freeze will give you a list of all the currently
installed modules and their versions. If you used conda
(anaconda) to install modules then conda list will do the
same. If you use a combination of the two then you are likely heading
toward the following problem:
If you have ever sent a python script to a collaborator only for them to say that it doesn’t work on their machine, it’s likely that they have a different set of modules installed, or that they have a different version of the modules installed. It may feel like installing all the modules at once would help out. But different software may depend on different versions of the same modules which would require you to uninstall/reinstall different versions of modules depending on what you are working on.
A better solution is to install multiple different python environments – one for each piece of software that you wish to run. To do this we will work with virtual environments.
Creating a new virtual environment
With the introduction of python 3, there is now a new module called
venv which handles the creation of new virtual
environments. See the python
documentation for a full breakdown. The short version is that we can
create a new virtual environment simply via:
where PROMPT is the name of the virtual environment, and ENV_DIR is the location in which all the files for this environment will be stored. A nice place to store your ENV_DIR is in your home directory.
Once you have created a virtual environment you can activate it via:
I find it nice to have a descriptive ENV_DIR such as
.env-jupyter or .env-py3-myproject (where the
‘.’ indicates a hidden directory in linux) but a short PROMPT such as
jpy, or py3-myproj. The reason for this is
that once your project is activated, your terminal will have PROMPT
added to the start of your command line. Since my PROMPT and ENV_DIR are
different I then add an alias in my ~/.bash_aliases file to
link them:
Creating a new virtual environment is easy, and if you get it wrong, you can just delete the ENV_DIR. The other nice thing is that if you are on a Linux or OSX machine your system version of python (which is used by the OS) can remain untouched, and won’t cause your system to become flaky when you totally mess up your python installs.
If you use Anaconda to install/manage your python modules, then you can simply navigate to the ‘environments’ tab, and create a new environment with the click of a button.
Now that we have created a new python environment we need to install some things into it.
Preserving environments with requirements.txt or environment.yml
Once you and your collaborators are comfortable managing different python virtual environments you are all set to start exporting and importing those environments for sharing.
The simplest way to share a python environment is to use a file which lists all the modules that are installed, and even their versions. Pip and conda have different ways of capturing dependencies.
pip – requirements.txt
For our example project we have used only one non-builtin python
module: numpy. To specify that this is module is required
we can create a file called requirements.txt and add the
following:
where the >=1.19 indicates that version 1.19 or
greater will be fine. See the pip
documentation for examples on how you can specify different version
numbers, ranges, and exclusions. By default each module listed will be
installed from the python package index (pypi), but you can also
indicate other locations including local files/folders or github
repositories.
If you don’t know what versions or dependencies you need for your
particular project then you can get a hint by inspecting your current
environment using pip freeze. This will list all the
installed modules and versions for the current environment. The list
will be much longer than you anticipate! To get a minimal list, start
with an empty environment and then keep installing modules until your
software will run, then run
pip freeze >> requirements.txt.
To install all the modules within a requirements.txt
file you run pip:
You now have a way of preserving and sharing your python environment
with others. It is good practice to keep a requirements.txt
file in your project directory, and to have this as part of your version
control repository.
conda – environment.yml
Anaconda uses a slightly different file format to capture essentially the same information. For the above example our file would look like:
Anaconda is able to reproduce not just the python modules, but the
entire virtual environment including the versions of python and anaconda
and also other non-python based codes. You can generate a good starting
point using conda list --export.
In order to 1) not dictate your users’ virtual environment management
choices, and 2) not duplicate information, the following method will
link your environment.yml and requirements.txt
files:
Conda understands pip formatted requirements, but pip doesn’t understand conda environment files, so there is no inverse version of the above linking.
Summary
In combination with a python virtual environment (previous lesson), we now have a greater expectation that our software will run the same on other people’s machines as is does on our own (test) machine. There will be some localisation (win/linux/osx) or language (en, ch, fr, etc) difference that might cause some problems down the line, but we have solved one of the most common sources of error.
Useful project metadata
Previously we used an empty __init__.py file in a
directory to cause python to interpret that directory as a module. There
is meta data that we wish to store about our project, and the
__init__.py file is an excellent place to do this.
Versioning
One of the most common items to store is the version of your
software. For most modules the module.__version__ is used
to store this information. There are many conventions for software
versioning and no one single correct answer. Versioning is the practice
of using unique numbers of names to refer to the different states of a
software project or code. A common choice is to use major/minor/patch
versions for the code such as 4.2.1, which is used by most
python modules. See semver.org for a
description on the how and why of semantic versioning.
A major version change will usually mean that the code has changed in
some fundamental way, and that people should not expect compatibility
between the two versions. For example: there were many changes between
the last version of python 2 (2.7) and python 3 that meant not all code
would work on both versions. If you have been using python for a while,
or have seen python code from ~10 years ago (or ~2 years ago if it’s
astronomers’ code!), then you’ll have seen some of these changes. Most
notable is the change from print "hello" to
print("hello").
A minor version change will usually indicate changes have been made that do not break compatibility within the major version. This would usually include the addition of new functionality that is compatible with (but not available in) previous versions of the software.
A patch version is used to distinguish states of development that do not change the intended functionality of the code base. These include bug fixes, security patches, or documentation updates.
Typically version 1.0 is used to represent the first stable/complete version of the software, and so versions such as 0.9 are used to indicate development versions.
Modification date
In addition to a semantic versioning noted above, some developers
find it useful to record the date of last change for each version of
their software (and indeed each file/module within). For this purpose we
would make use of the module.__date__ attribute. Date
formats are a perpetual problem for people and computers alike so it is
recommended that a single format be chosen and used consistently
throughout a project. The format YYYY-MM-DD is recommended as it has the
advantage of being time sorted when sorted alphanumerically.
Authors / developers
One method tracking attribution (or blame) in a project is to use the
module.__author__ attribute to store the author name as
either a string or list. For a project with few developers this can be
handled easily. For larger groups or projects git blame
would be a better method for tracking contributions on a line by line
basis.
Citation
For any researcher writing software there is an eternal battle
between writing good code and “doing science”. Acknowledging the use of
software is common but not yet standard or required when publishing
papers. To make it easier for people to cite your work you can use an
attribute such as module.__citation__ to employer people to
cite your work, link to papers or code repositories that should be cited
or referenced. When combined with a --cite command line
option, this is a great way for people to properly credit your work. If
your target audience are researchers then it can be very useful to store
a bibtex entry in the citation string so that people can just copy/paste
into their LaTeX document.
Meta data for our example project
The __init__ file in our example project can be updated
to include the above recommendations. Note the format of the
__citation__ string being multi line, and including LaTeX
formatting.
PYTHON
# /usr/bin/env python

__author__ = ['Dev One', 'Contrib Two']
__version__ = '0.9'
__date__ = '2021-12-02'
__citation__ = """
% If this work is used to support a publication please
% cite the following publication:
% Description of This code
@ARTICLE{ExcellentCode_2022,
   author = {{One}, D. and {Two}, C. and {People}, O},
    title = "{Awesome sauce code for astronomy projects}",
  journal = {Nature},
 keywords = {techniques: image processing, catalogues, surveys},
     year = 2021,
    month = may,
   volume = 1337,
    pages = {11-15},
      doi = {some.doi/link.in.here}
}

% It is also appropriate to link to the following repository:
https://github.com/devone/AwesomeSauce
"""GROUP Activity: metadata
In the past few lessons we learned about virtual environments, and project metadata. We will now put some of these lessons in to practice.
As a group:
- Decide upon a versioning scheme that will be used for the project, and if none currently exists, agree on what the current version number should be.
- Discuss how people should give recognition for using this project as part of their research (or other) work.
- Create issues on github that request the following changes. Share
the creation and assignee responsibilities between group members.
- The creation of a
requirements.txtandenvironment.ymlfile that include the dependencies for your project. For each dependency specify the minimum version requirement to be the smallest version that is used by one of the group members. - Record the agreed upon current version number of the project in the
<project>/__init__.pyfile. - Record the authors in an agreed upon order in the
__init__.pyfile - Record the last modification date in the
__init__.pyfile
- The creation of a
- Describe the method by which people should cite or give recognition for using this project
- For each of the issues above, have a group member follow the branch-develop-pull request workflow that was described earlier. When creating pull requests set the reviewer to include the person who created the initial issue.
- [Optional] Once all the pull requests have been resolved, repeat the
previous SOLO activity for your project (creating a command line
interface that will give users access to the
--cite,--date,--version,--authorinformation.
Licensing your work
By default any creative work is under an exclusive copyright which
means that the author(s) of that work have a say in what others can do
with it. In general this means that no one can build upon, use, reuse,
or distribute your work without your permission. To use or build upon
software that has no licence requires the new developer/user to contact
the original author(s) and get permission. This is time consuming,
annoying, and often not done. If you want your work to be used by others
your best bet is to provide an explicit software license as part of your
project so that people know up front what is allowed and not allowed. A
common way of licensing software is to provide a LICENSE
(or LICENCE) file in the root of the project.
(Alternatively you can provide the license as part of the header for
each file, but that’s a lot of repetition, and goes against our good
practice of don’t repeat yourself).
Choosing a software licence for your project
Your home institute may have opinions/guidelines for appropriate licensing software. Ask around and follow the advice of you local experts.
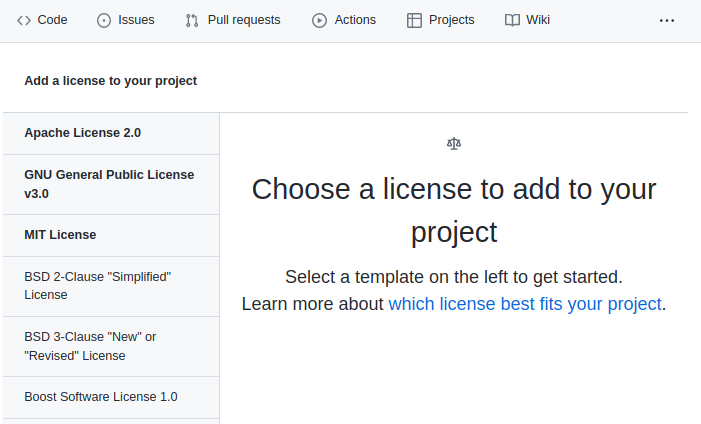
If you don’t have any local constraints on licensing your software
you can use one of the many license templates available on Github. To
use a template you need to log into your Github account, navigate to
your repository and then click the “add file”->”create new file”
button. You will be presented with a blank text editor and be asked for
a file name. If you use LICENSE.md (or any similar
spelling/extension) then you’ll see a new button appear on the right of
the screen saying “Choose a licence template”. Click that.

You’ll then see a list of common software licences that you can choose from. If you are brave you can read each of them in full. Alternatively you can simply read the Github provided summary at the top of what the permissions/limitations are. Choose one that feels right to you and then press “Review and submit”. This will create a new licence file.
Once you have a license file GitHub will add a badge to the “About” section of your project like this:
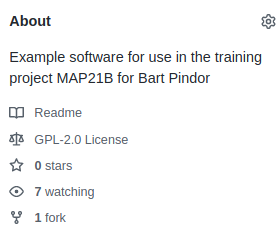
As you can see, for the example project I chose the GNU General public licence.
Basic documentation in README.md
Upon downloading new software, the first point of call for many
people is to look for some help on how to install and use the software.
This is where a file such as INSTRUCTIONS,
INSTALL or README can come in handy. The name
of the file says what it is and will attract the attention of the user.
While these files can be in any format, and have any name, a common
choice is README.md. If you have navigated to a GitHub
software repository, and seen the nice documentation available on the
front page, then this has been generated from the README.md
file.
The markdown format (guide here) is a simple to use, future proof, platform independent, document format that can be rendered into a range of other formats. As a bonus, the raw files are easily read and written by humans.
Things to consider for your README.md file
- The name of the project
- A description of the purpose of the software
- Maybe a one liner for each script
- Install instructions
- List some high level dependencies
- Usage instructions
- If you have a CLI then the output of
mycode --helpis appropriate to include verbatim - A link to documentation
- Author information and contact details (email, or just a link to github issues)
- A note on how people should credit this work
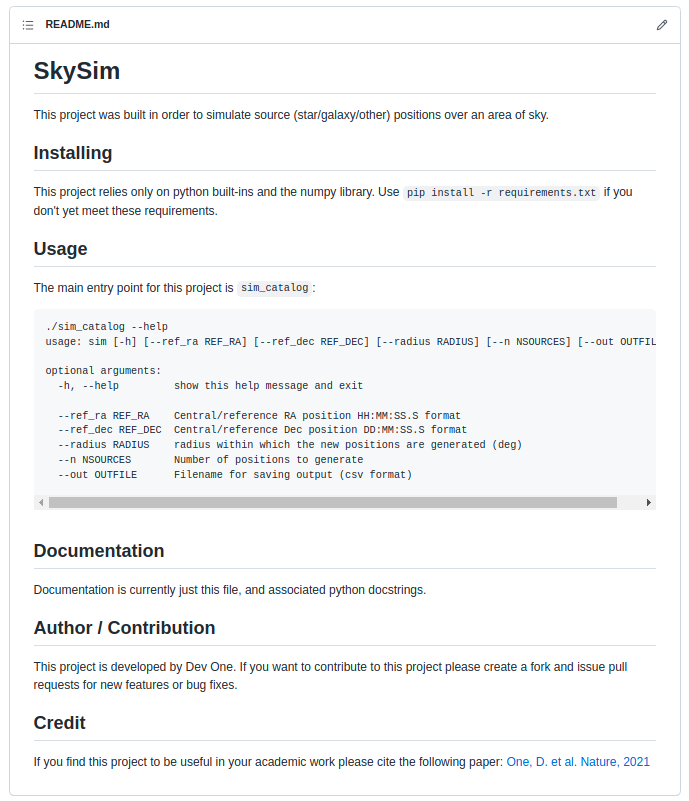
README.md for our example project
BASH
# SkySim
This project was built in order to simulate source (star/galaxy/other) positions over an area of sky.

## Installing
This project relies only on python built-ins and the numpy library.
Use `pip install -r requirements.txt` if you don't yet meet these requirements.

## Usage
The main entry point for this project is `sim_catalog`:

./sim_catalog --help
usage: sim [-h] [--ref_ra REF_RA] [--ref_dec REF_DEC] [--radius RADIUS] [--n NSOURCES] [--out OUTFILE]

optional arguments:
  -h, --help         show this help message and exit

  --ref_ra REF_RA    Central/reference RA position HH:MM:SS.S format
  --ref_dec REF_DEC  Central/reference Dec position DD:MM:SS.S format
  --radius RADIUS    radius within which the new positions are generated (deg)
  --n NSOURCES       Number of positions to generate
  --out OUTFILE      Filename for saving output (csv format)


## Documentation
Documentation is currently just this file, and associated python docstrings.

## Author / Contribution
This project is developed by Dev One.
If you want to contribute to this project please create a fork and issue pull requests for new features or bug fixes.

## Credit
If you find this project to be useful in your academic work please cite the following paper:
> [One, D. et al. Nature, 2021](https://nature.com)
The above README.md file will render on github
as below.
Summary
In this section we have made no changes to the core functionality of our software project. Instead we have made changes that make the software:
- easier to use for both developers and users
- by separating the command line interface from the core functionality;
-
more portable
- by listing dependencies in
requirements.txtandenvironment.yml;
- by listing dependencies in
-
easier to acknowledge and get help,
- by adding version, date, authorship, and citation information; and
-
more accessible,
- by providing a
README.mdfile.
- by providing a
The state of our project at the end of the second development cycle can be seen on the cycle2 branch of our github repository: here.
SOLO Activity: A GitHub landing page
When people visit the GitHub page for your project they would like to see more than just a directory listing of the files. People are typically looking for some description of what the project is, and how they can install and use it. In this activity we will ensure that our project has a landing page that is attractive to potential users.
- Use the GitHub online editor to create a new
LICENSEfile and choose an appropriate license from the template. - Create or update your project’s
README.mdfile so that it contains at least:- A short description of the software
- Some basic install instructions,
- Some basic usage instructions,
- A note about what documentation is available,
- A section that lists the authors/contributors to the project (and a link to CONTRIBUTING.md if you have one).
- A section that lets people know how you would like to receive credit if they should use your work.
- Edit the “about” section of the GitHub page to include a short description of the project and at least one topic.