Developing Software In A Team
Last updated on 2026-02-27 | Edit this page
Overview
Questions
- What are some pro/con of developing in a team?
- What are some common team roles?
- How can GitHub help managing tasks in a group project?
Objectives
- Gain experience developing software in a team environment
- Understand some common project management styles
- Create a new GitHub repo and push our project
- Experience a full development cycle with our test project
Benefits and pit-falls
Working on a software project as part of a team is a very different experience from working on a solo project. There are of course great advantages to having multiple people working on a problem, but there are also some pit-falls that need to be avoided, and overheads that cannot be avoided.
Benefits of working in a team
- Each person has different areas of expertise
- More person-hours available
- Group discussion leads to better decision making
- Group members can learn from each other faster than they can learn from a book/website
- Seeing how others work and solve problems can help you learn new skills that you didn’t know you needed
- Bug-fixing is easier when you have an informed buddy to talk to
- Work can be assigned to people with the most relevant skills increasing efficiency
- Dividing the development and testing of a work item between two people can make for better code and more complete tests
Pit-falls to avoid
- Siloing work:
- Separating work items can be a good idea but there needs to be frequent check-ins to ensure that the software being developed by two people is not diverging or conflicting
- Inconsistent standards:
- Even though people may have personal preferences or styles, documentation, commenting, and testing should be consistent across a code base.
- Non-constructive criticism:
- When things work they just work and no one talks about it
- When things break everyone talks about it
- Given that issues result from negative experiences, it is important for team moral to always try and keep feedback as constructive as possible
- Platform / dependency conflicts:
- There is no guarantee that all developers will be using the same operating system or development tools.
- Allowing people the freedom to choose is important but the differences need to be managed via an agreement on how/when/where testing takes place, what acceptance looks like, and the use of a style guide.
- Having some files with windows style end of line and others with linux style end of line can make it tedious to track changes
Overheads that cannot (should not) be avoided
Project management will take time, and may not be a skill that you have. Invest time in training. Communication and coordination take time but are vital to success Commit conflicts will arise even if everything is done right, these need to be discussed and handled properly rather than ignored The moral of the team is important to success and will take time and effort to maintain, but it is worth doing so that your project can see the benefits listed above.
Communication and project management
Communication
Team work requires effective communication between team members. This helps to keep everyone up to date on the status of the project, the current and future direction of the work, and avoids duplication of effort. Email, slack, messenger, GitHub issues, chats over a coffee, or a formal weekly meeting, are all valid ways of keeping the teem together. A formal meeting once a month complimented by a weekly email to status check, and real time slack messaging for immediate questions may be a good solution for a 5 person team working on a year long project. An informal weekly chat over lunch with intermittent emails may be good for a 2 person team working on a project that lasts a few months. The most important thing is that the chosen method is effective and that it includes all team members.
If an informal or ephemeral communication medium is involved when coming to an agreement or making a decision, it is good practice to have a follow up communication to reiterate the decision and reasoning using a medium that can be archived. For example, if the team meets over a coffee, discusses a current issue, and decides on a way forward, it is a good idea for someone to follow this up with an email so that the details of the decision are not lost.
Project management styles
The two main project management styles that are applied to software development are waterfall and agile. Neither of these are a project management methodology but are more like umbrella terms that group a set of methodologies that share a common mindset. In the waterfall mindset there is a very linear approach to the design and execution and delivery of the project with the main focus being on the process. In the agile mindset the main focus is on outcomes and deliverables, with the design and execution and delivery occurring in cycles.
Waterfall
In a waterfall project the whole life cycle of a project is mapped onto distinct, sequential work items, with each item relying on those that occur before, and blocking those that come after. Waterfall project management therefore represents a very rigid and linear approach. The waterfall system is a very traditional method for managing a project with participants being assigned clear roles and expectations.
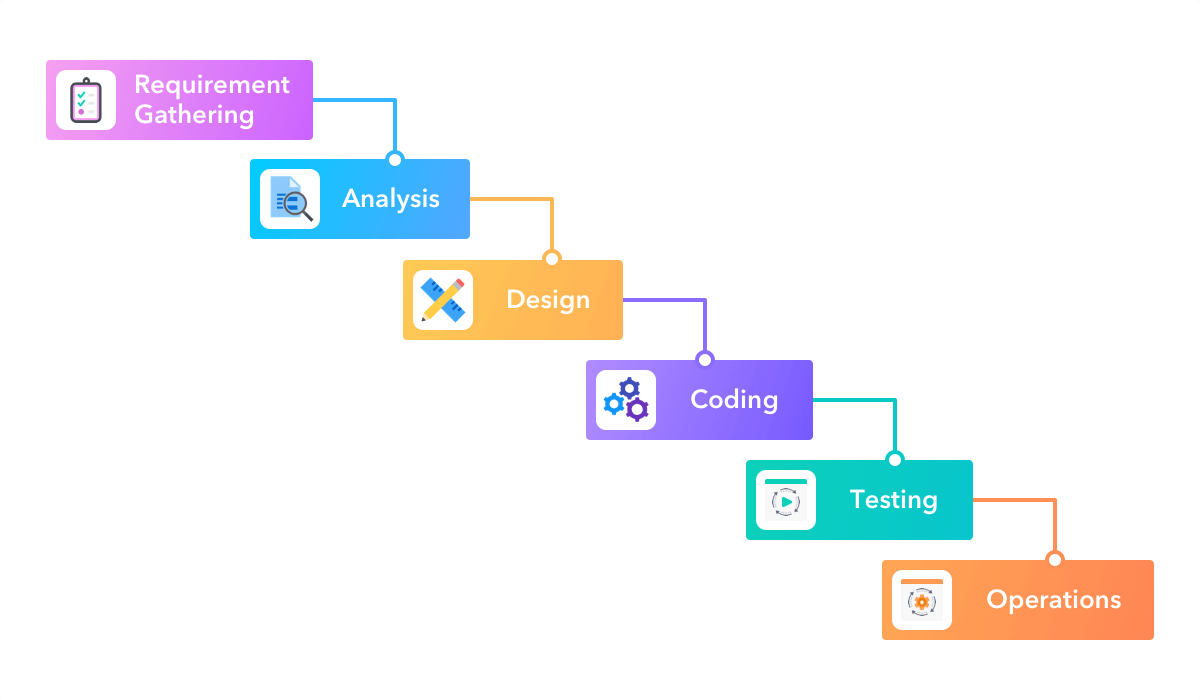 Image credit: https://startinfinity.com/project-management-methodologies/waterfall
The name waterfall comes from the fact that each work item will cascade onto the next. In a waterfall project there is a lot of attention paid to defining the entirety of the project up front, and then a close adherence to the project plan and timeline. It is therefore difficult to incorporate changes into the project plan, and therefore it is hard to respond to setbacks, opportunities, or changes in requirements.
The waterfall project management style was initially designed in the 1970’s for use in software development projects. It was taken on by many other industries to great success, but is now seen as an outdated methodology for software projects.
Agile
In 2001 the Manifesto for Agile Software Development was published. The agile manifesto can be summed up as:
We are uncovering better ways of developing software by doing it and helping others do it. Through this work we have come to value:
Individuals and interactions over processes and tools Working software over comprehensive documentation Customer collaboration over contract negotiation Responding to change over following a plan
That is, while there is value in the items on the right, we value the items on the left more.
The agile manifesto is based on the following principles:
- The highest priority is to satisfy the customer through early and continuous delivery of valuable software.
- Welcome changing requirements, even late in development. Agile processes harness change for the customer’s competitive advantage.
- Deliver working software frequently, from a couple of weeks to a couple of months, with a preference to the shorter timescale.
- Business people and developers must work together daily throughout the project.
- Build projects around motivated individuals. Give them the environment and support they need, and trust them to get the job done.
- The most efficient and effective method of conveying information to and within a development team is face-to-face conversation.
- Working software is the primary measure of progress.
- Agile processes promote sustainable development. The sponsors, developers, and users should be able to maintain a constant pace indefinitely.
- Continuous attention to technical excellence and good design enhances agility.
- Simplicity–the art of maximising the amount of work not done–is essential.
- The best architectures, requirements, and designs emerge from self-organising teams.
- At regular intervals, the team reflects on how to become more effective, then tunes and adjusts its behaviour accordingly.
- The agile mentality is designed to be able to be flexible, respond to change, deliver a working product early and have it improve incrementally over time.
Advantages of the agile mentality include:
- faster deployment of working solutions
- better quality of work
- increased client satisfaction
- reduced risk thanks to frequent testing and deployment
- increased team moral
- a project that finishes early is still able to deliver a working result
Some potential drawbacks include:
- potential for scope creep from continuous client feedback
- workload management can be difficult when duties and requirements are not known far in advance
- short development cycles can mean that skills gaps are not identified early leading to delays in delivery
You will likely see that the Agile development mentality fits much better with research project management including both traditional research work and software development projects. Additionally you may note that your organisation may employ a mix of different management methodologies for different projects, or at different levels of the organisation. Understanding the benefits and drawbacks of each will help you choose a project management style that works best for your project.
Popular Agile methodologies
Scrum
Scrum is mainly focused on the idea of sprints. Sprints are where the bulk of the “work” gets done, although there is a significant amount of effort put into the preparation and planning of each sprint, and then the post-sprint review and retrospective. Sprints are typically 1-2 weeks in duration and will focus on a particular set of goals. During a sprint there is usually a daily scrum at the start of the day in which people talk about what they did the day before, what their plans are for today, and what problems they might foresee. The sprint review is about reviewing the work that was completed, reporting related to said work, and identification of incomplete work. The retrospective is a more meta-level reflection on how the sprint went, meant to identify how the team worked together, what organisation or communication worked well or not, and what changes could be made to make the next sprint more productive.
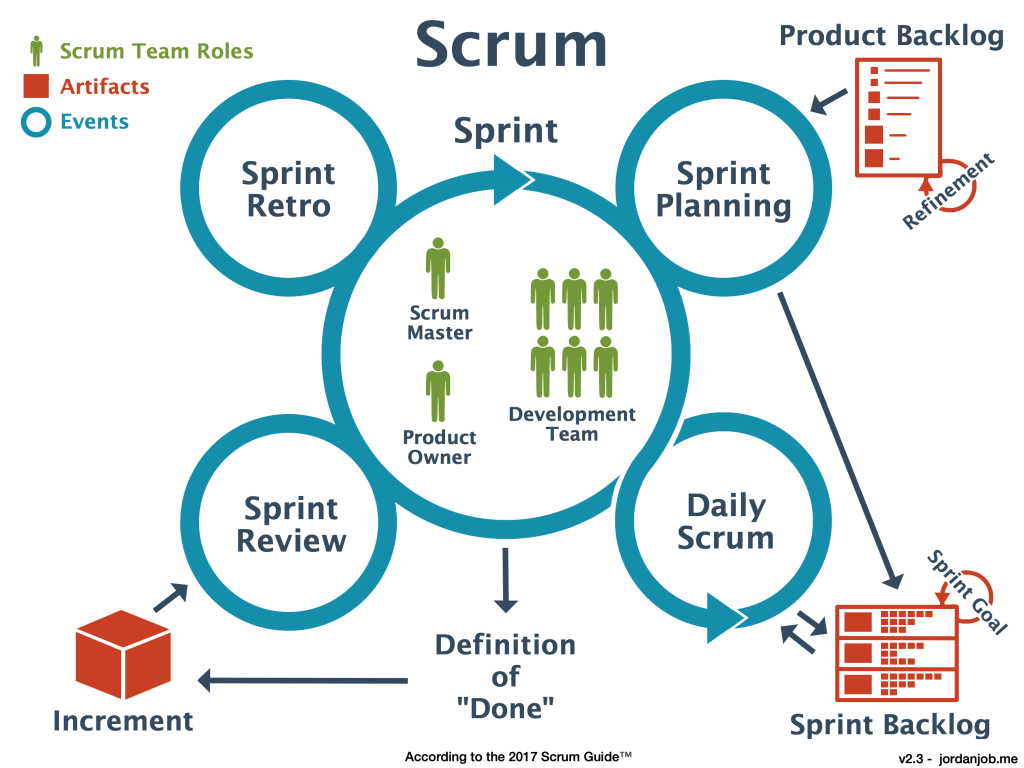 Image credit: https://jordanjob.me/blog/scrum-diagram/
The scrum methodology is based on team work and has well defined roles. The benefits of scrum include the ability to react to changes in requirements or resourcing, continuous testing/integration is effectively built in, prioritisation of tasks can be adjusted throughout the process. The disadvantages of scrum are that you need very good organisation before each sprint to maximise productivity. Additionally it requires that team members are able to block out a 1-2 week period in which they focus solely on the sprint and maintain a high focus. Clearly, scrum requires a medium to large team (5+) in order to be effective.
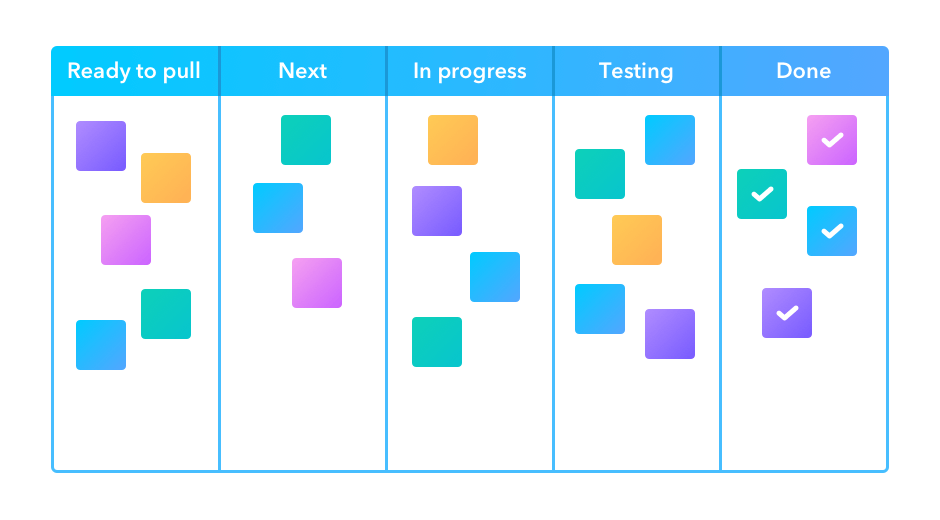
Kanban
In the Kanban methodology the main focus is on the visualisation that is used during the development process – the Kanban board. One goal of the board is to identify potential bottlenecks in the process. An example board is shown below with the following features:
Tasks that are represented as squares. Sticky notes or cards are often used on a physical wall, or their digital representation online.
Columns that represent the state of each task. A task is expected to migrate from the left most column (Ready/Backlog) through the central columns and into the final (Done/Complete) column, as the related work is being done.
Work in progress limits. In order to maintain focus and productivity, there are often limits on the number of cards that can be placed into some of the columns. In particular the “in progress” and “testing” columns are limited by the available people time allocated to the project.
Swim lanes (not shown), are rows that separate tasks based on categories of work such as documentation, testing, or reporting. Alternatively, colour coding of cards can be used to identify these categories.
 Image
credit: https://startinfinity.com/project-management-methodologies/kanban
Image
credit: https://startinfinity.com/project-management-methodologies/kanban
Even when the Kanban methodology is not being explicitly used, the visualisation process is so powerful that it often used in many other project management strategies. It’s not uncommon to see a Kanban board on the wall during a two week sprint.
The advantage of Kanban is that you have a single place to track the progress of all the tasks, and bottle necks can be quickly identified. One of the main disadvantages of Kanban come from people failing to update the Kanban board as a task is being worked on (poor communication), or updating too often (high overhead). Many project management software tools incorporate a Kanban board and tools like JIRA even have a way of migrating and updating tasks based on activity in a linked GitHub repository so that people can keep the Kanban up to date without having to visit the board itself.
Summary
Communication and effective project management are critical to the success of any collaborative project. There is no one-size-fits-all solution, and you will need to consider the project requirements, and the size and expertise of your team when deciding on a communication and management strategy. Thankfully there are many project management tools online that are free that will support whatever choice you make.
Member roles
Depending on the scope of your project, the size of the team, and the management strategy that is being used, you will have a number of roles that need to be filled within the team. Below is a list of some common roles that may be applicable to your project along with a short description. It should be noted that not all roles are required for all projects, and that the roles do not need to map to people on a 1:1 basis. It is normal to have multiple people per role and to have some people acting in multiple roles. The most important thing is that you consider the different roles and responsibilities, and have at least an implicit agreement on who is going to be filling each of the roles. This will help people to understand their responsibilities and who they should be handing work over to or working with during the project development.
Roles
- Software Developer
- Primarily focused on writing the software, fixing bugs, implementing new features.
- Should be responsive to issues, and provide implementation advice to the team.
- Documentation and Test Developer
- Primarily focused on the creation of documentation and developing tests.
- Test cases and docstrings should be consistent.
- Typically also will be responsible for automating the testing process and reporting issues.
- Documentation can be focused on docstrings but can also include online documentation, help files, tutorials, and examples.
- Product Owner
- The person who takes responsibility for setting the software project goals.
- This person is tasked with understanding the client/user needs and translating them into user stories, milestones, and tasks.
- Domain Expert
- Someone who has a good understanding of the context in which the software will be deployed or used.
- When developing software for astronomers, it is not essential for all the development team to have a good understanding of the general or specific field of application.
- A domain expert can be an internal point of contact for the development team when they have questions about the correctness or utility of an aspect of theproject.
- Project Manager
- Primarily focused on the organisation of the team, ensuring that team members have tasks matched to their skills, and that the required skills are available within the team.
- The project manager will be responsible for the timing and scheduling of work and deadlines.
- Reviewer
- Any piece of work that is completed should be assigned to a reviewer to ensure that the work is up to standard.
- The reviewer should have a good understanding of the goals of a piece of work and be able to give feedback on areas that need improvement.
- The reviewer should ideally not be involved in the development of the piece of work they are reviewing.
- Approver
- Similar to a reviewer, except that there is no requirement for an approver to understand the implementation of the work being done.
- An approver is focused on ensuring that the proper procedures have been followed.
- User Acceptance Tester
- Someone who is able to perform the necessary tests to ensure that each of the user stories have been met.
- Acceptance testing is typically not able to be automated and will require manual interaction to ensure that the end user can perform the tasks outline in the user stories.
The following workflow describes the interaction of the above roles within a generic software project:
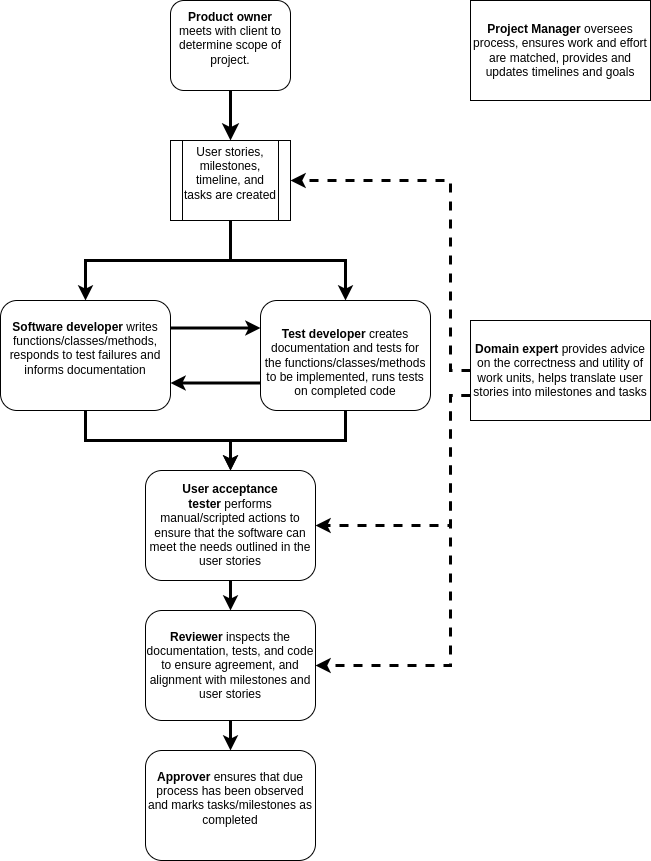
Solid lines indicate the flow of content for action, approval, or feedback. Dashed lines indicate input in the form of advice or oversight.
GROUP Activity: Who does what and when?
Within your software project group review the past three lessons and discuss the following:
- What software development roles are required for your project?
- What project management roles are required for your project?
- Are there any roles that would be beneficial to your project that are not listed?
- How are these roles distributed among the team?
- Are there people with multiple roles or roles shared among multiple people?
- Who determines the timeline and deliverables for this project?
- Is the timeline flexible?
- Can you classify the deliverables as one of required/desired/optional?
- How often and in what format should communication be managed?
If you have been involved in a previous software development project, please share the following with your teammates:
- What practices worked well and could be brought into this and future projects?
- What practices didn’t work well and should be avoided in the future?
- Was the previous project larger or smaller than the current one and how would that affect your choice of management/communication?
Create project standards and expectations
When a single person is working on a project there will typically be
a consistency imposed simply by the fact that the developer has ‘their
way’ of doing things (though this consistency may not exist through
time). When multiple developers are working on a project it is good
practice to have an agreed up on set of standards that will be followed
to ensure that the project has a consistent style and that common
practices are followed. These practices can include how/when to test,
the branch/develop/merge cycle, documentation formats, as well as code
style. A common place to note these standards and expectations is in the
CONTRIBUTING.md file in the root of your software project.
This file should be considered to be supplementary to the
README.md file, and for a slightly different audience.
Whilst the README.md file is aimed at users of the software, the
CONTRIBUTING.md file is aimed at people who might develop
the software, give feedback, or submit bug/feature requests.
Sections to consider for CONTRIBUTING.md
- Welcome and encourage people to contribute to the project
- Table of Contents (especially if the file is long)
- Style guide
- List standards for code style
- Consider using a linter and listing it here (with settings)
- Note the docstring format and guidelines
- Testing
- Where the tests are located
- How the test are run
- The machine/environment on which the tests are expected to pass
- How to submit changes
- Who can submit changes
- Expectations for what changes will be accepted
- The pull request approval process
- How to report a bug
- What is expected for a good bug report
- What tags/categories should be used when submitting a report
- How to request an “enhancement”
- What enhancements are likely to be support and which are not
- Templates
- Examples for enhancement / bug report / change requests.
- Code of Conduct
- Expectations for behaviour when contributing to the project
- Consequences for breaching the code of conduct
- Email/web address for reporting breaches
- Recognition model
- Let people know how their contributions will be recognised.
- The following may be appropriate:
- An acknowledgement section on the wiki
- Co-authorship or acknowledgements in a published paper
- Invitation to join as github contributor
- A shout out on social media
- A beverage of choice
The CONTRIBUTING.md file can become quite long if all of
the above are included. The key is to have a record of how people should
interact with others and with the project and that the project
maintainers adhere to these guide lines.
Creating a GitHub repository
At the moment we have a bunch of code, documentation, and associated files. We wish to make these available to others in the easiest way possible. We could just zip them all up and email to collaborators. However this means that collaborators no longer benefit from any future development that you do, and even worse, will start asking questions about code that may have diverged from the version you are working on. A solution to this problem is to keep all your code under version control, and to make use of one of the many free, online repositories to host a copy of the code. For this lesson we’ll focus on GitHub, but gitlab and bitbucket are also good alternatives.
Create an account on Github
Github accounts are free, you just need an email address to sign up. Since some academic institutions shut off your email address promptly when your contract ends, it may be a good idea to use a non-institutional or personal email to sign up to github or other services that will outlast your current contract.
Create a new repository on Github
Go to Github and sign in. You should be taken to a page which has a listing of your repositories and a green button to create a new one. Click the button and you should see a screen similar to the following.
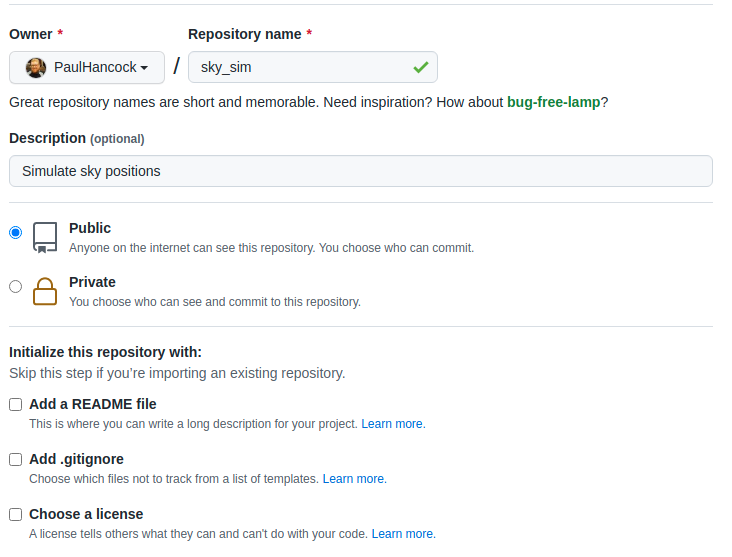
For now, lets create a truly empty repository so don’t select any of the last three boxes. Just give the repo a name (your project name is a good choice if available). You can change the description later or fill it in now.
Once you create the repository you’ll see a set of instructions about what to do next.
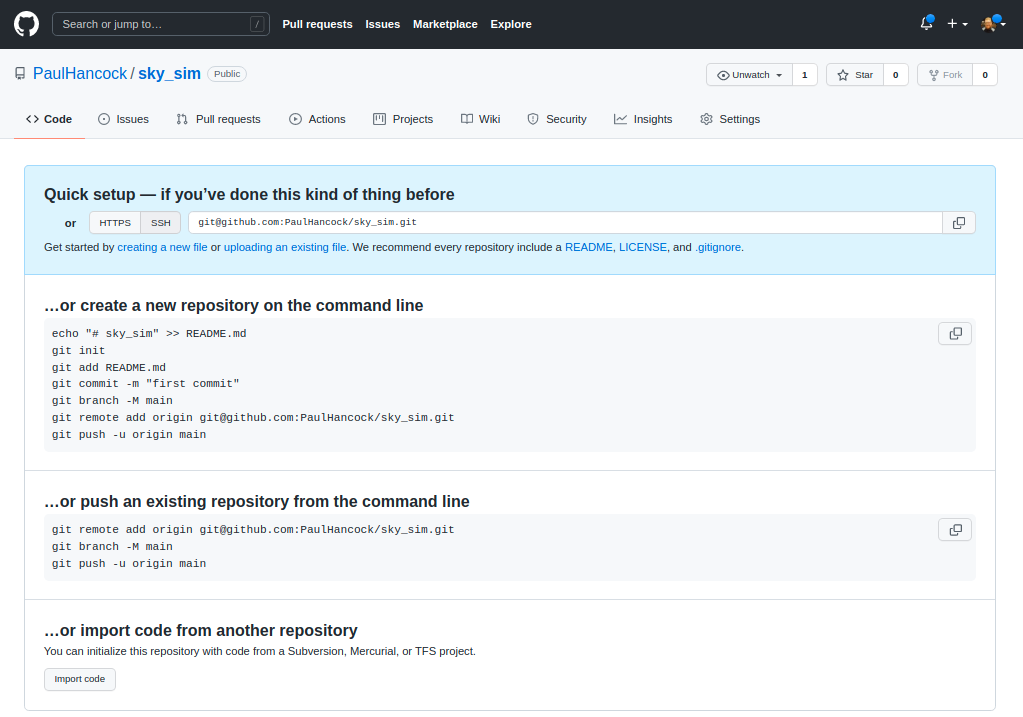
Now we are going to go with “create a new repository from the command line”.
The first part is to make a new local git repository using init / add / commit and to name the branch to be main (instead of master).
BASH
git init
git add README.md
git add requirements.txt encironment.yml
git add sim_catalog skysim/*.py
git commit -m "first commit"
git branch -M main
The next step is to link your local repository with the one that you
just created on Github. Replace PaulHancock/sky_sim.git
with your username and the name of the repo that you chose.
After you have done the git push you’ll have added all
your local changes to the remote repository and you can view the new
state of the project on Github. Note how your README.md
file gets rendered into a nice splash page.
When you push to origin main you’ll have to authenticate
with Github, see the github
documentation for instructions on how to set that up for ssh.
If you set your repository to be public then anyone on the internet
can see and download your code, they can make a fork (copy) of it to
work on themselves, and can even send feature requests or bug reports
via the issue tracker. We will get into those features later, but for
now all you need to do is let your collaborators know that your code is
available on Github, send them the link, and then they can
download/clone it as needed. An added bonus is that as you make changes
to your code, and then add/commit/push these changes, your
collaborators can then pull those changes and get the updates without
having to bug you about it.
Issue tracking on GitHub
Once your code is in the wild hopefully people will find it, use it, and give feedback. Positive feedback in person or by email is always nice, however there is also the issue of bugs, new feature requests, and people wanting clarification. Dealing with these last three points requires some organisation, and so we will learn how to use an issue tracker for this.
Github, gitlab, and bitbucket all offer an form of issue tracking that is attached to each of your software repositories. In this lesson we’ll focus on the Github issue tracker, but the lessons learned here are applicable to any issue tracker system.
The issue tracker is a way of engaging with your co-developers and
end-users to discuss any problems that people may be having when using
the software. The issue tracker is available for all Github
repositories, and enabled by default. However, publishing code on Github
does not mean that you are obligated to provide any support at all. If
you don’t intend on providing support for your software, it would be a
good idea to mention this in the README.md file that is
shown on the landing page so that people have clear expectations. If you
do intend to provide support and receive feedback then the issue tracker
is for you.
Overview
We will cover four of the most common issues that you are likely to see or use on the issue tracker, and give some guidance and advice about how to approach them. We’ll cover general questions, bug reports, feature requests, and pull requests.
Github issues has become a full featured work planning and project management system (see link), most of which is beyond the scope of this course. We will be focusing on the basic capabilities of the issue tracker to get you and your group started. Once you are up and running you should explore the other features.
To begin, let’s navigate to the github repository for our project of
choice. On the front page you should see a set of tabs. By default
you’ll be seeing the <> code tab, but we want to
select the ⊙ Issues tab.

Initially this will be blank for your project because there are no issues (yay).
Creating an issue
Navigate to the Issues tab of a repository on Github and
you’ll see a “New issue” button in green. Press this and we’ll explore
some of the options.
An issue has a title (or short description) and a comment (long description). When creating an issue you can add some labels to it so that others can easily understand what kind of issue you are reporting. Github has a range of built in labels, and the repository owner/admins can create more if needed.

Once an issue has been created, the author or repository owner/admins
can adjust the issue by assigning people to work on it, updating the
labels. This is a helpful piece of organisational work. Others can can
also comment on the issue so that there is a back and forth between the
developers, the person reporting the issue, and anyone else experiencing
the same/similar issues. When an issue is resolved it can be marked as
closed. Closed issues are not shown by default, but can be seen by
removing the is:open or add the is:closed
filter.
We will now go through some of the different types of issues that are typically reported and in the next lesson we’ll have a go at creating/resolving these issues.
Questions
This tag is usually used by people asking for clarification. There is not necessarily any issue with the code, it is just that the user doesn’t understand something. The threaded structure of the issue tracker makes this a useful place to have a discussion about the question. Questions usually lead to additional documentation being created – for example an FAQ section on the wiki for the repository. Questions can also be escalated into bugs or feature requests.
If someone sends you a question via email that does not involve personal/private information, then it is often a good idea to ask them to post the question on the issue tracker and then discuss it there. If the person isn’t that interested in using Github then I often just ask for their permission to replicate the email discussion on the issue tracker (with/without naming them depending on their preference). The mentality is the same with people asking questions in a classroom – if one person has a question, often there are others with the same question who are too shy to ask. By answering the question publicly you reduce the number of duplicate email chains that you have.
Bug reports
Bug reports are for when people find an error in your code. The
common errors are code crashing, or code giving unexpected or wrong
output. Best practice for reporting a bug is to give as much information
as is required to reproduce the error. This is the minimum working
example (MWE), or rather the minimum example that produces the error. It
is at this point where code versions and environments can be super
helpful. Asking people to run mycode --version and paste
the output in the bug report can help a lot. Sometimes people work with
old versions of code and simply updating to a new version can fix the
issue. For a program crash, a copy/paste of the output/error is
useful.
Github allows you to add files and images to the issue tracker so that people have the option of supplying a small amount of real data to reproduce the error. Similarly they can screenshot a problem (particularly useful for graphic interfaces or code that produces plots).
Keep in mind that when someone posts a bug report it is because they are having a problem. That problem is real. It may not be due to your code. It may be due to them misusing or misunderstanding your code. It may be due to issues with code that you are dependent on. It may be your fault. Just remember that people are not looking to place blame, but are looking to find a solution. Have a conversation with them in the issue tracker to figure out what is going on and how you could help solve the problem. If you don’t consider the bug to be a problem (it’s a feature not a bug) then note this in the issue tracker.
Feature requests
Sometimes a user will have an idea about how to improve or expand the capability of the software they are using. A feature request is a way for the user to suggest these improvements. Feature requests are not an indication that something is wrong, but that there is an opportunity to be better. Some example feature requests are:
- support additional input/output formats, or
- support additional operating systems, or
- provide some sanity checking before users made silly mistakes, or
- improve a users quality of life by combining multiple often used functions into one, or
- provide documentation in an alternative format (html, pdf, online wiki etc).
Feature requests are typically a user’s wish list, which if fulfilled, will save the user time or allow them to expand the scope of their work.
Pull requests
For a collaborative software development project you’ll typically
have multiple people contributing code to a range of branches. When the
development of the branch is complete the developer will submit a pull
request to have their changes/updates incorporated into a reference
branch (usually dev or main). A pull request is essentially a moderated
git merge (or git rebase) that allows you to
see any conflicts, see/discuss/approve changes, and make any final
changes required before the merge actually takes place.
People have the option of forking (copying) your public repository and making their own changes. If you are lucky, people will make useful changes to your code and then offer these changes back to you via a pull request. If these changes are aligned with the goals of your project and meet the various style and testing conditions that you set, then the pull request should be accepted.
A pull request is a request. There is no necessity for all pull requests to be accepted, however it is good practice (and polite) to give feedback on any pull requests that are not going to be accepted.
If you would like to capture the style, testing, and documentation
expectations for your project then a file called
CONTRIBUTING.md in the root of the repository is a common
place to define this. You can ask that people making pull requests obey
these expectations, and it is possible to create automated ways of
ensuring these standards are obeyed.
Summary
Whether your development group is just you, or three, or ten people, the issue tracker is a free and convenient workflow management platform.
GROUP Activity: Create, discuss, and resolve an issue on GitHub
Given the previous lessons, you should consider creating or updating
the CONTRIBUTING.md file for your project.
- Have one member of your team create a new issue in the GitHub issue tracker to create/update the file and assign the issue to at least one other member of the team.
- Tag the issue with a tag such as
documentation, or create a new tag that is more relevant. - Within your group, use the issue tracker to discuss what sections
are required for the
CONTRIBUTING.mdfile. - Once there is a consensus on the content, have someone make the required changes and push the file to GitHub (or edit directly online using the GitHub editor).
- Try using the
#<IssueNumber>format within the git commit to link the commit to the issue discussion. - When an acceptable file has been created/modified mark the issue as resolved (closed).
Branching and development
In this lesson we’ll focus on one of the most popular git workflows: Feature Branching. Many other workflows exist, but the most important feature of any workflow is that it provides benefit to the project. See the Atlassian tutorials on workflows for more information.
Feature branching
At the core of the feature branching workflow is the idea that all development should be done in a branch separate from the main branch. The rational for this is to ensure that the main branch of the project is always in a not-broken state. When people find your software repository and want to try it out, they will most likely check out the main branch and start their evaluation or usage journey from there. Having a broken main branch is a good way to turn people away from your software, and generate a lot of bug reports.
The diagram below shows the basic feature branch workflow.
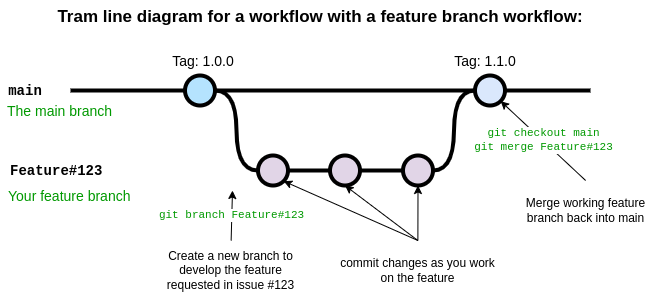
In the above case a feature has been requested in the issue with
ticket number 123. A developer is assigned the task of developing this
feature and begins by creating a new branch with git branch
using a branch name appropriate for the task. The development proceeds
on the feature branch, occasionally breaking the code, fixing the bugs,
updating tests and documentation, until finally a new version of the
code has been created which implements the new feature. At this point
the developer responsible for this branch ensures all their changes are
pushed to Github and the opens a pull request. During the pull request
other developers, and maybe the person who submitted the initial feature
request, will review and discuss the changes, ensure that the code meets
the repository standards for style and quality. Once everyone is happy
with the changes in the feature branch it is merged into main by
accepting the pull request on Github. Once the feature branch has been
merged into main it is deleted.
In this scheme many features branches can be created, developed, and then deleted over the life-cycle of the project.
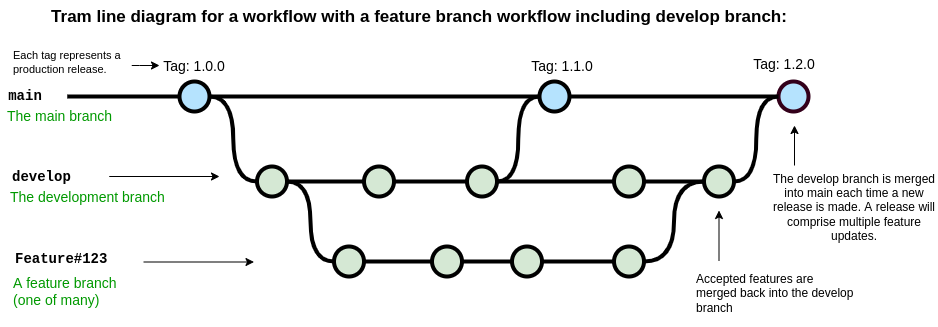
A common variation on the feature branch workflow is to include a development branch as an intermediary between the main and feature branches. Feature branches are created off the develop branch and then merged back when complete. The develop branch therefore contains all of the latest features and if new features interact with each other in unexpected ways, this can be discovered on the develop branch rather than the main branch. The main branch is used for tagging and releasing new versions of the software, and these new versions can each include a number of developments.
Setting up branches
Git does not see any branch as being special. We assign “specialness”
to a branch based on the name, but we can rename branches or change our
idea of special as we like. Regardless of how a git repository has been
set up, you can move from one branching scheme to another at any time.
Creating a new develop branch and then making a habit of
branching features from that instead of main can be done at
any time. The key thing is to make sure that the branching/development
workflow that you decide on is serving a purpose for your project. Early
on in the development of some software you may have a single developer
who is hashing out a proof of concept. In this case you may do all your
development right on the main branch. As you start to share your code
with others you may decide to move development into the develop branch,
and merge back to main only when the code-base is in a working state.
Finally, as you bring more developers into the project you may decide
that a feature-develop-main workflow is a better way to keep the various
developments from interfering with each other.
The point is that you should make a choice, write it down some place
(CONTRIBUTING.md), stick to that choice for as long as it
is useful, and revise it when needed.
An example development cycle for fixing a bug
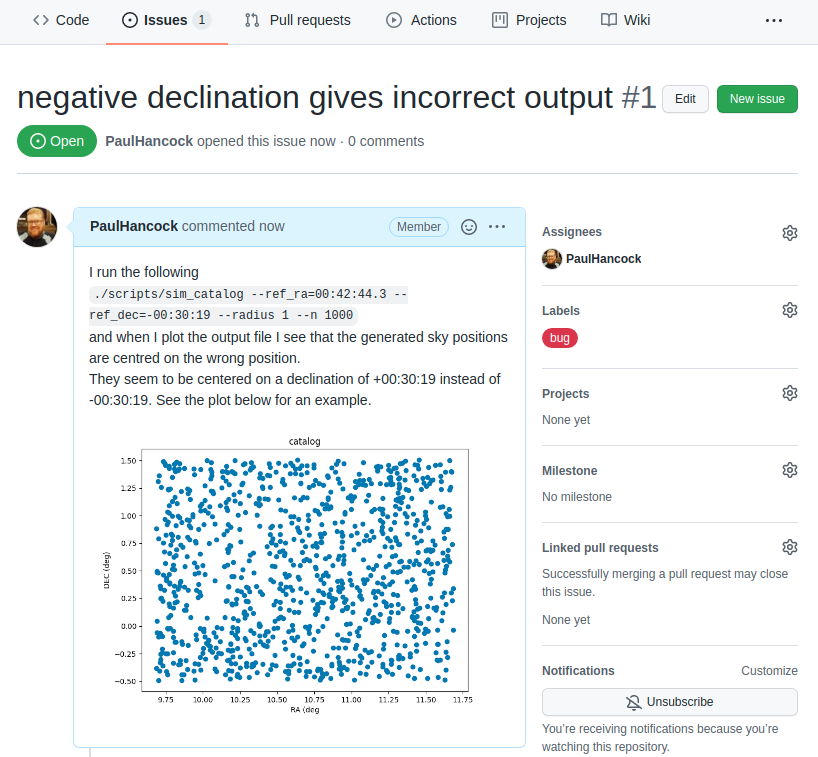
As I’m using my own code for various tasks I notice that
./scripts/sim_catalog --ref_ra=00:42:44.3 --ref_dec=-00:30:19 --radius 1 --n 1000
produces some unexpected output. A plot of the sky locations is shown
below. Note that the points have been generated around a central
declination of 00:30:19 instead of -00:30:19.
It seems that there is an issue with a negative reference
declination.

Reporting the issue
As a user, once I have identified an issue I should go to github and make a bug report on the issue tracker. In the example project I’m the only on the developer team so I’ll assign myself to the issue. I’ll also label it as being a bug.
Confirming the issue
Now that the issue has been submitted I’ll tackle this problem from the developer point of view.
The first thing to do is read and understand the issue. In this case I’ll just run the script exactly as shown in the issue tracker, and see that I get the same problem.
Create a feature branch for this issue
At this point I should create a new branch in my repository with some relevant name. Since the names of issues are not guaranteed to be unique I will instead use the issue number (#1 in this case) as part of the branch name. For a project with multiple developers it is also a good idea to identify who is the ‘owner’ of each branch. An example branch choice would be:
git branch Paulhancock/Issue#1
After some trial and error I find that the cause of the bug is in the following code:
PYTHON
def generate_positions(ref_ra='00:42:44.3',
                       ref_dec='41:16:09',
                       radius=1.,
                       nsources=1000):
...
    # convert DMS -> degrees
    d, m, s = ref_dec.split(':')
    dec = int(d)+int(m)/60+float(s)/3600
...
    return ras, decs
The first thing that I do is to make a new test that will expose this bug.
Writing a test
We will now write our first formal test for our code. We’ll use a
format that will make future automated testing easier. All the tests
that we wish to run are python scripts, and we’ll place them in the
tests/ directory. Each script will test a different
sub-module, and for the sim sub-module of our
skysim module, we’ll collect all the tests into
tests/test_sim.py.
The first thing that we need to do is import the module/code that
will be tested. In this case that will be the
generate_positions function within the
skysim.sim module.
PYTHON
#! /usr/bin/env python3
"""
Tests for the skysim.sim module
"""
import numpy as np
from skysim.sim import generate_positions
Each test that we write will be contained within a separate function
whose name begins with test_, and which returns
None when the test passes, and raises an
AssertionError if the test fails. While we could home-brew
our own set of standards for what pass/fail looks like, we will instead
use standards set out by one of the common python testing frameworks
called pytest.
We craft a piece of code that will detect the mistake in our original
function. In this case the mistake is that the negative sign at the
start of the declination is being ignored so we get the wrong positions.
To test for this we’ll run generate_positions with a
declination that is negative, and small radius, so that the expected
output should consist entirely of negative declinations if the function
works properly, and probably all positive declinations if it’s
broken.
Our test function looks like this:
PYTHON
def test_negative_dec():
    """
    Test for the negative dec bug noted in issue #1
    """
    _, decs = generate_positions(ref_ra='00:00:00',
                                 ref_dec='-00:30:19',
                                 radius=0.1, nsources=10)
    if not np.all(decs < 0):
        raise AssertionError("Declinations should be <0, but are >0")
    return
In order to run the tests we can add the following snippet to the end
of our script. The snippet essentially looks at all the global variables
(including function names), selects those that start with
test_, assumes that they are a function and calls that
function. When the function is called there is a try/except for an
AssertionError which reports failure if it’s caught, or
reports success if no error was raised.
PYTHON
if __name__ == "__main__":
    # introspect and run all the functions starting with 'test'
    for f in dir():
        if f.startswith('test'):
            try:
                globals()[f]()
            except AssertionError as e:
                print("{0} FAILED with error: {1}".format(f, e))
            else:
                print("{0} PASSED".format(f))
When we run our test code we get the following result:
BASH
$ python tests/test_sim.py
test_negative_dec FAILED with error Declinations should be <0, but are >0
This failure is not a bad thing, it means that we have successfully written a test function that will identify the bug. Now we can begin the process of fixing the bug.
Fixing the bug
Finally, once I have the test code in place, it’s time to fix the bug. I make some modifications to account for the leading minus sign on the declination as follows:
PYTHON
    # convert DMS -> degrees
    d, m, s = ref_dec.split(':')
    sign = 1
    if d[0] == '-':
        sign = -1
    dec = sign*(abs(int(d))+int(m)/60+float(s)/3600)
And I then re-run the code to make sure that the bug has been resolved, and then run my tests:
As I develop more and more tests the list of functions run will grow. Once the new bug has been solved I will re-run all my tests to ensure that fixing this bug has not caused a new bug some other place.
Checking in my work
I now check in my new test code, and updated version of sim.py:
BASH
git add tests/test_sim.py
git commit -m 'expose bug from issue#1'
git commit -m 'resolve #1' skysim/sim.py
Note that I have used #1 to refer to the issue from
within my commit message. When viewed on Github these commit messages
will automatically generate a link to the issue, and when viewing the
issue I should be able to see the reverse link.
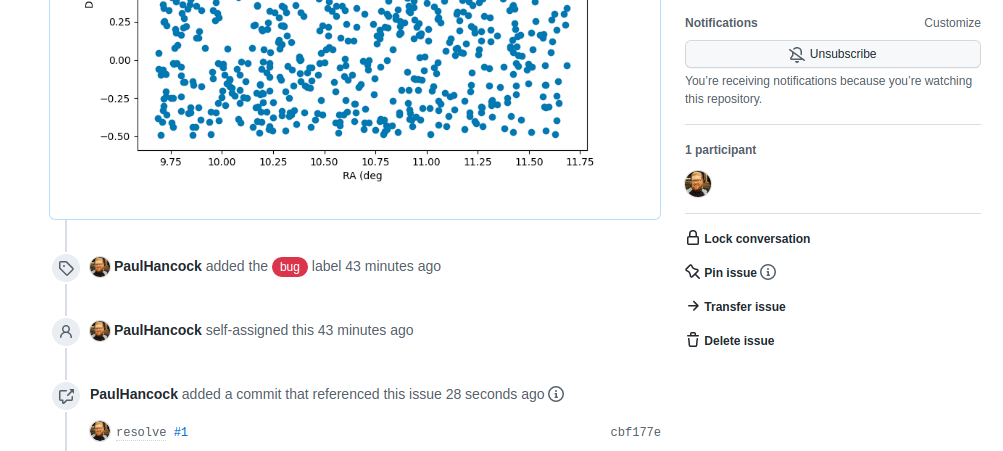
I now push the bug fix (and my new branch) to the Github repo.
If we look on the original issue page, we can see the link to the commit.
Creating a pull request
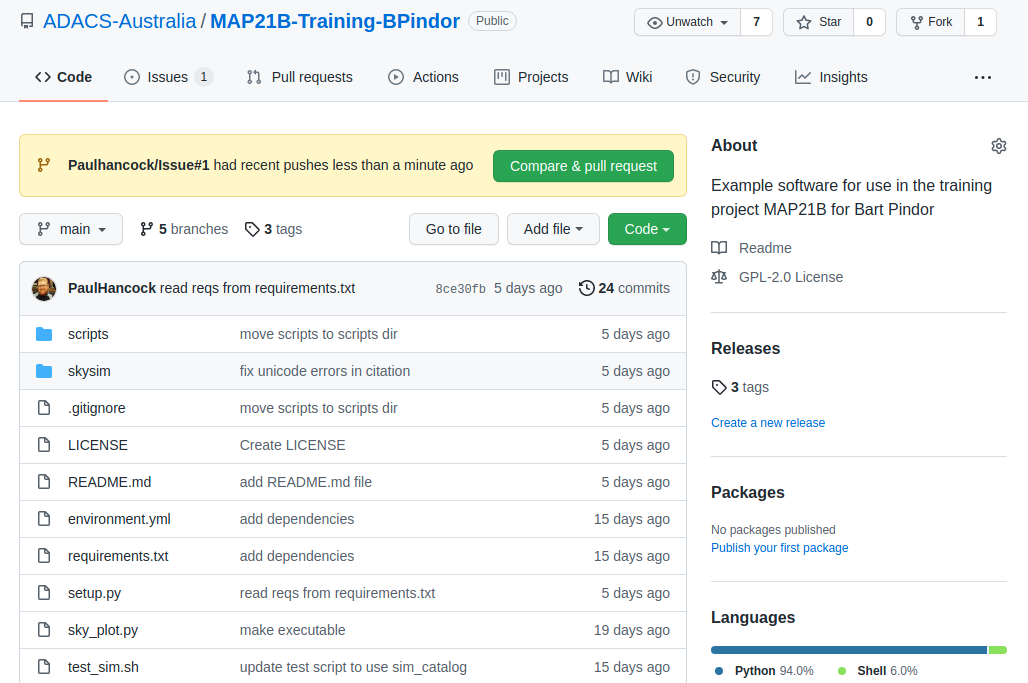
When we navigate to the landing page for our repository we will see a new yellow banner appear as below:
We can click the green “Compare & pull request” button to start a new pull request. Alternatively we can go to the “Pull requests” tab. Either way we enter a title and description for the pull request.
Note that the assign/label/project/milestone options that we see on
the pull request form are mostly the same as on the Issues form. This is
because pull requests are just special types of issues. They share a
numbering scheme. This is the first pull request for this repository but
it will be labelled #2 because there is an existing issue
#1. One difference between a pull request and an issue is
that a pull request can have a reviewer assigned to it. Here I have
selected myself as the assignee (the person looking after the pull
request), and SkyWa7ch3r as the reviewer (the person who
will review my code and sign off when they are happy).
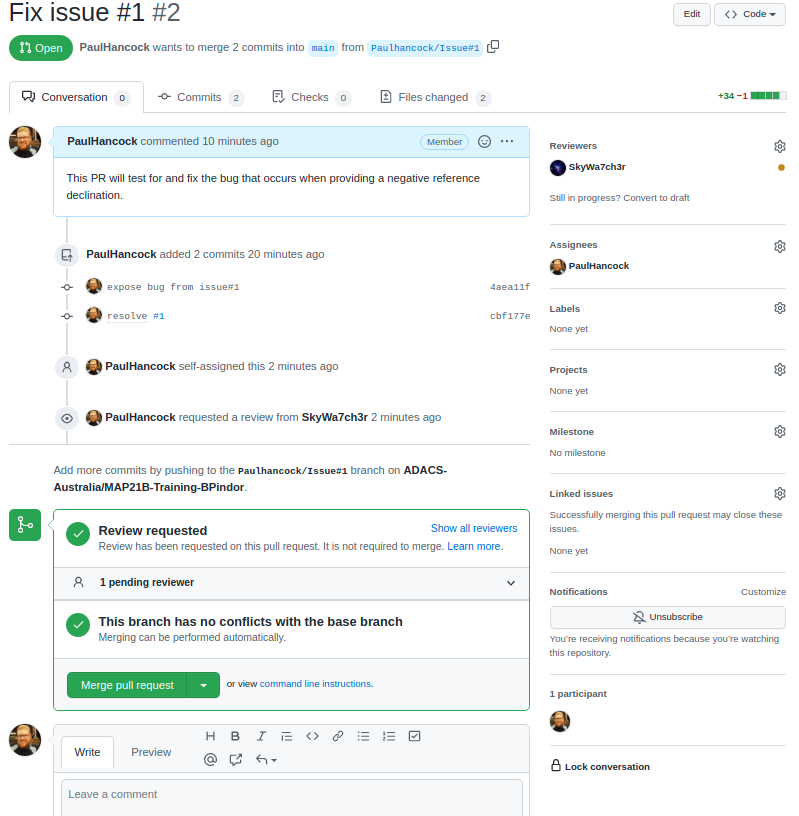
Github does some work in the background to let me know that there
will be no conflicts between this branch and the main branch, so that it
is ‘safe’ to do the merge. Currently there is no indication that the
code works or passes our tests. For now we let the reviwer do this work.
The reviewer would pull the Paulhancock/Issue#1 branch, run
the tests and see that they pass, then come back to github and make a
note of it in the discussion. (In a later lesson we’ll see how we can
make Github do most of this work for us using Github actions.)
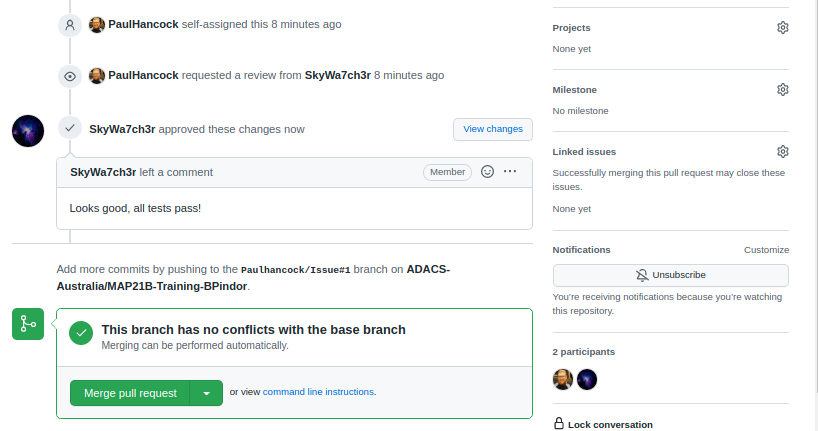
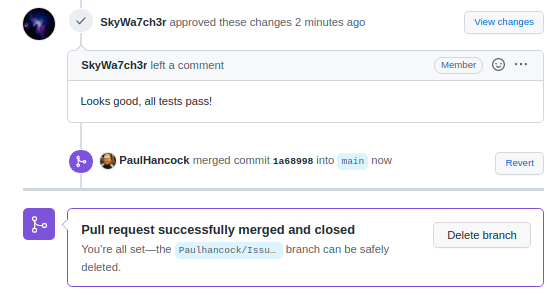
Once our reviewer(s) are happy with the changes we can merge our branch back into main by pressing the green button. This will create a new commit on the main branch in order to do the merge, so we’ll be asked for a title/description for the commit. It is pre-filled for us. Once the merge is complete Github will let us know that all is good, and suggest that we delete the branch. Since the feature is merged we no longer need this branch and will delete it.
Closing the issue
If we navigate back to the issues tab, we’ll see that the issue
related to the pull request has also been closed for us. This is because
we wrote resolve #1 as a comment for our commit. When that
commit is merged into the main branch git will automatically resolve
(close) the linked issue. If we didn’t use this smart linking capability
we can still go back to the open issue and close it. Either way it would
be good to leave a note about the issue being fixed.
Summary
The development cycle for fixing a bug is as follows:
- identify bug
- report bug on the Gihub issue tracker
- confirm that the bug exists
- create a feature branch
- write a test to expose the bug/error
- fix the bug
- run all tests
- commit changes
- create a pull request
- merge the branch into main and delete the feature branch
In this example we had one person doing the reporting/fixing. Usually you’ll have an end user doing the finding/report part, and then one or more developers doing the remainder.
GROUP Activity: Working on the same problem
In this activity you will practice working in a team as you go through a simple development cycle.
- As a group, identify a minor issue with your current project. (Don’t feel bad, the only projects that don’t have issues are the ones that no one is using).
- Since the focus here is on the life-cycle of a bug, choose a small thing that is easy to identify and fix.
- A function without a docstring would be ideal (and probably easy to find).
- Have one team member create an issue that describes the problem and explains what a solution would look like.
- eg “myFunc(4) should return a filename”, or “myFunc should have a
docstring in
”. - Create a new branch for development work called
or Issue . - Assign at least two team members to work on this issue.
- Have one team member create a solution for the issue and then:
- Push the changes to the remote repository,
- Open a pull request to merge this branch into main,
- Set the assignees to be all the members working on the issue,
- Set the reviewer to be a team member who is not working on the code (if you have enough people, otherwise choose someone other than the pull request creator), and
- Add whatever labels look appropriate.
- Have the other team members:
- View the changes via the “files changed” tab of the pull request,
- Comment on what is good and what needs improving,
- Pull the active branch to their local machine,
- Make an improvement and commit the change, and
- Push the change back to the active branch.
- Everyone should have an opportunity to make comments and changes, but you’ll need to coordinate who is doing what and when to minimise the number of merge conflicts that occur.
- Once everyone has had a chance to view/comment/change, have the reviewer sign off on the pull request and merge the changes into the main branch.