Working on an HPC
Overview
Teaching: 15 min
Exercises: 15 minQuestions
How do I access an HPC facility?
How do I run tasks on an HPC?
How do I request resources for my jobs?
How do I access already installed software?
How can I install other software?
Objectives
Understand how to login and submit jobs
Know how to create a workflow with job dependencies and array jobs
Know how to access/install/use software
 HPC resources for this workshop are provided by The National Computational Infrastructure NCI.
In this lesson we’ll be taking an accelerated path through the Gadi User Guide which is very thorough and recommended when you use NCI for your own work.
HPC resources for this workshop are provided by The National Computational Infrastructure NCI.
In this lesson we’ll be taking an accelerated path through the Gadi User Guide which is very thorough and recommended when you use NCI for your own work.
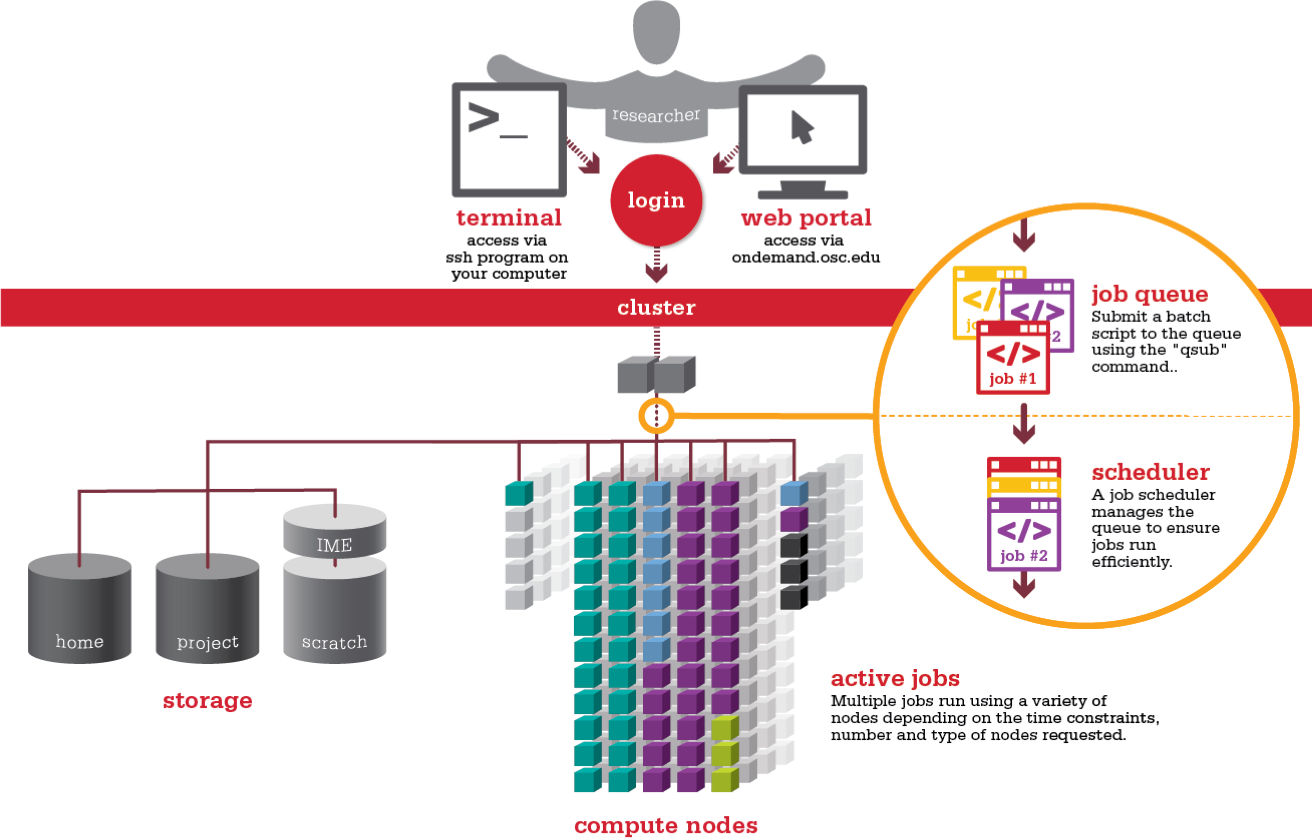
Logging in
We will be working with the NCI HPC cluster called Gadi, you should have an account, and be a member of the group vp91.
See the setup page if you need more information.
To connect to a login node you should use ssh:
ssh <user>@gadi.nci.org.au
You will be asked for a password each time you connect. If you would prefer to work with ssh keys for password-less login, this tutorial is quite helpful.
Upon login you’ll be greeted with a message of the day:
###############################################################################
#                  Welcome to the NCI National Facility!                      #
#      This service is for authorised clients only. It is a criminal          #
#      offence to:                                                            #
#                - Obtain access to data without permission                   #
#                - Damage, delete, alter or insert data without permission    #
#      Use of this system requires acceptance of the Conditions of Use        #
#      published at http://nci.org.au/users/nci-terms-and-conditions-access   #
###############################################################################
|         gadi.nci.org.au - 185,032 processor InfiniBand x86_64 cluster       |
===============================================================================

Jul 5 2022 /scratch File Expiry
   The file expiry system is now active on /scratch: files that have not been
   accessed in more than 100 days will be automatically quarantined for 14 days
   and then permanently deleted. For more details, please see
   https://opus.nci.org.au/x/BABTCQ.

Oct 4 2022 Account Status Information on Login
   Whenever logging in from outside of Gadi, all users will now be presented
   with a brief summary about file expiry and projects near compute and/or
   storage quotas. This can be configured using the "login-info-conf" utility.
   For more information, please see https://opus.nci.org.au/x/HoABCw.

===============================================================================
and you’ll either be working on the gadi-login-01 or gadi-login-02 log-in node.
It doesn’t matter which node you join.
You can check the groups that you are a member of using the groups command:
[pjh562@gadi-login-01 ~]$ groups
vp91 S.U
You ou should be a member of the vp91 group, as that is the one that we’ll be using for this course.
You have access to two file systems: home and scratch.
The home file system holds your home or ~/ directory and files, and is limited to 10GB.
It is backed up but should not be used for frequent file access (don’t do work here).
The scratch file system is a large scratch storage for general use.
It is not backed up, files older than 10days are marked for deletion.
Create a personal work folder
Navigate to
/scratch/vp91. Create a directory in here with your username (if it doesn’t already exist)Solution
cd /scratch/vp91
ls
mkdir ${USER}
Please use your username and not some other personal nickname.
How do I run tasks on an HPC
Currently you will have only a very minimal set of software loaded. To see what software modules you have loaded:
module list
Currently Loaded Modulefiles:
 1) pbs
Effectively we start of with just enough tools to submit and monitor jobs.
Remember from last lesson, we need to use a scheduler in order for our jobs to be run on the compute nodes:
Querying the queue system
Before we run any jobs we need to see what resources are available.
One way to do this is using the qstat -Q command which will report information similar to:
[pjh562@gadi-login-01 ~]$ qstat -Q
Queue              Max   Tot Ena Str   Que   Run   Hld   Wat   Trn   Ext Type
---------------- ----- ----- --- --- ----- ----- ----- ----- ----- ----- ----
normal               0   812 yes yes   779     0    20    13     0     0 Rou*
normal-exec          0  4265 yes yes  2322  1593   339     0     0    11 Exe*
express              0     0 yes yes     0     0     0     0     0     0 Rou*
express-exec         0   138 yes yes    28    92    18     0     0     0 Exe*
copyq                0    20 yes yes     0     0     0    20     0     0 Rou*
copyq-exec           0    61 yes yes     3    52     6     0     0     0 Exe*
gpuvolta             0     0 yes yes     0     0     0     0     0     0 Rou*
gpuvolta-exec        0   480 yes yes   152   258    63     0     0     0 Exe*
hugemem-exec         0    79 yes yes     7    66     6     0     0     0 Exe*
hugemem              0     0 yes yes     0     0     0     0     0     0 Rou*
biodev               0     0 yes yes     0     0     0     0     0     0 Rou*
biodev-exec          0    21 yes yes     0    21     0     0     0     0 Exe*
megamembw-exec       0     6 yes yes     4     2     0     0     0     0 Exe*
megamembw            0     0 yes yes     0     0     0     0     0     0 Rou*
normalbw-exec        0  2301 yes yes   301  1902    95     0     0     3 Exe*
normalbw             0     1 yes yes     0     0     0     1     0     0 Rou*
expressbw-exec       0     7 yes yes     0     7     0     0     0     0 Exe*
expressbw            0     0 yes yes     0     0     0     0     0     0 Rou*
normalsl-exec        0    10 yes yes     0    10     0     0     0     0 Exe*
normalsl             0     0 yes yes     0     0     0     0     0     0 Rou*
hugemembw-exec       0    12 yes yes     0     9     3     0     0     0 Exe*
hugemembw            0     0 yes yes     0     0     0     0     0     0 Rou*
megamem              0     0 yes yes     0     0     0     0     0     0 Rou*
megamem-exec         0     1 yes yes     0     1     0     0     0     0 Exe*
gpursaa              0     0 yes yes     0     0     0     0     0     0 Rou*
gpursaa-exec         0     1 yes yes     0     1     0     0     0     0 Exe*
analysis             0     0 yes yes     0     0     0     0     0     0 Rou*
analysis-exec        0     2 yes yes     0     2     0     0     0     0 Exe*
dgxa100              0     0 yes yes     0     0     0     0     0     0 Rou*
dgxa100-exec         0    75 yes yes    68     6     1     0     0     0 Exe*
normalsr             0     0 yes yes     0     0     0     0     0     0 Rou*
normalsr-exec        0     0 yes yes     0     0     0     0     0     0 Exe*
expresssr            0     0 yes yes     0     0     0     0     0     0 Rou*
expresssr-exec       0     0 yes yes     0     0     0     0     0     0 Exe*
A description of the columns is:
       Description of columns:

       Queue          Queue name

       Max            Maximum number of jobs allowed to run concurrently in this queue

       Tot            Total number of jobs in the queue

       Ena            Whether the queue is enabled or disabled

       Str            Whether the queue is started or stopped

       Que            Number of queued jobs

       Run            Number of running jobs

       Hld            Number of held jobs

       Wat            Number of waiting jobs

       Trn            Number of jobs being moved (transiting)

       Ext            Number of exiting jobs

       Type           Type of queue: execution or routing
The queue column lists the name of the job queue. See Queue Structure for a list of what all the queues are for and the hardware available for each, and Queue Limits for a break down of the limits for each of the available queues.
The run column shows how many jobs are currently running in that queue and the que column shows how many jobs are queued (waiting to run) for that queue. Together we can use these get a feel for which queues are busy/free.
How do I install software on an HPC
As noted in a previous lesson, the HPC facility administrators manage a lot of software.
For software that is provided by the HPC facility we can use the module system to load the required software/version.
In the previous exercises you saw this happen when we called module load python3/3.8.5.
We will explore the module system in more detail and then learn how to build and install our own software.
The LMOD module system
The LMOD software is designed to allow users of an HPC facility to manage which software they are using at a given time. When a user loads a module, the LMOD system will set a bunch of different environment variables that are needed to run the particular software. Additionally, additional modules (dependencies) will be loaded (or unloaded) to minimize version conflicts.
When we first log into gadi we have a fairly limited set of modules already loaded:
module[pjh562@gadi-login-02 ~]$ module list
Currently Loaded Modulefiles:
 1) pbs
If we want to have access to a python interpreter we can try the following:
[pjh562@gadi-login-02 ~]$ module load python
ERROR: Unable to locate a modulefile for 'python'
Seems like there is no python module!
Well actually, there are a lot installed, and LMOD needs more info to know which one we want.
We can show all the available modules using module avail (warning it’s a LOT).
If we want to look for python modules we can do the following:
[pjh562@gadi-login-02 ~]$ module avail python
-------------------------------------------- /apps/Modules/modulefiles --------------------------------------------
python2-as-python  python2/2.7.17     python3/3.7.4  python3/3.9.2   python3/3.10.4
python2/2.7.16     python3-as-python  python3/3.8.5  python3/3.10.0  python3/3.11.0
We’ll choose v3.8 of python which we load via module load python3/3.8.5.
Let’s do that now.
[pjh562@gadi-login-02 ~]$ module load python3/3.8.5
Loading python3/3.8.5
  Loading requirement: intel-mkl/2020.2.254
[pjh562@gadi-login-02 ~]$ module list
Currently Loaded Modulefiles:
 1) pbs   2) intel-mkl/2020.2.254   3) python3/3.8.5
Note that LMOD also loaded the intel-mkl library as well.
Why
intel-mkl?Because the LMOD
python3/3.8.5includes a bunch of python libraries such asnumpy.numpyhas been installed using the intel math kernel library, which make math fast!
Find some modules
Use
module availto figure out what versions of theopenmpilibrary are available.answer
[pjh562@gadi-login-02 ~]$ module avail openmpi
-------------------------------------------- /apps/Modules/modulefiles --------------------------------------------
openmpi/2.1.6           openmpi/3.1.4-debug  openmpi/4.0.4        openmpi/4.0.7-debug  openmpi/4.1.3
openmpi/2.1.6-debug     openmpi/4.0.1        openmpi/4.0.4-debug  openmpi/4.1.0        openmpi/4.1.3-debug
openmpi/2.1.6-mt        openmpi/4.0.1-debug  openmpi/4.0.5        openmpi/4.1.0-debug  openmpi/4.1.4(default)
openmpi/2.1.6-mt-debug  openmpi/4.0.2        openmpi/4.0.5-debug  openmpi/4.1.1        openmpi/4.1.4-debug
openmpi/3.0.4           openmpi/4.0.2-debug  openmpi/4.0.6        openmpi/4.1.1-debug
openmpi/3.0.4-debug     openmpi/4.0.3        openmpi/4.0.6-debug  openmpi/4.1.2
openmpi/3.1.4           openmpi/4.0.3-debug  openmpi/4.0.7        openmpi/4.1.2-debug
The module avail command will match partial strings such as module avail *debug*.
Once you locate the module you want to use you’ll need to include module load program/version in all of your job scripts before that program can be used.
If you end up in the not so nice situation where you need to run different versions of a program at different parts of your job you can use module unload pogram/version or module swap old_program/version new_program/version to change versions.
This is occasionally needed when the software you rely on was not written/built/installed by you.
Containers are a good way to get around messing about with program versions.
Running Jobs
There are two types of jobs that can be run: either a batch job where PBSPro executes a script on your behalf, or an interactive job whereby you are given direct access to a compute node and you can do things interactively.
Interactive jobs
We will start with a simple interactive job.
Use qsub -I to start an interactive job.
You should see a sequence of output as follows:
[pjh562@gadi-login-01 ~]$ qsub -I -qnormal -lwalltime=00:05:00,storage=scratch/vp91
qsub: waiting for job 76970825.gadi-pbs to start
qsub: job 76970825.gadi-pbs ready

[pjh562@gadi-cpu-clx-1891 ~]$
Note that the prompt has changed to be gadi-cpu-clx-1891 which tell us the name of the node we are working.
You will most likely get a different node name.
When you finish with an interactive session you can exit it using exit or <ctrl>+d to end the ssh session, and then again to exit the job allocation.
Before we exit the interactive session, let’s have a look at what the job queue looks like.
[pjh562@gadi-cpu-clx-1891 ~]$ qstat -u ${USER}

gadi-pbs:
                                                                 Req'd  Req'd   Elap
Job ID               Username Queue    Jobname    SessID NDS TSK Memory Time  S Time
-------------------- -------- -------- ---------- ------ --- --- ------ ----- - -----
76970825.gadi-pbs    pjh562   normal-* STDIN      20925*   1   1  500mb 10:00 R 00:02
[pjh562@gadi-cpu-clx-1891 ~]$ exit
logout

qsub: job 76970825.gadi-pbs completed
[pjh562@gadi-login-01 ~]$
You can see that each job has an ID (above it is 76970825), and we can see which queue the job is in, how many nodes (NDS) and tasks (TSK) have been assigned, and what the requested memory/time is, as well as how long the job has been running (Elap Time). We didn’t request a specific amount of nodes/tasks/memory so we get the default.
If we have no jobs in the queue then qstat will just return nothing.
Interactive jobs are good for debugging your code, but usually leave the compute node idle whilst you read/think/code. Interactive jobs should be used sparingly, in preference of batch jobs.
Batch jobs
The most common type of job that you will run on an HPC is a batch job. A batch job requires that you have a script that describes all the processing that you will need to do, as well as an estimate of the resources that you’ll need. With these bits of information the SLURM scheduler can then appropriately assign you resources and execute the work.
Lets run a basic hello world script, watch it run, and then pick apart what happened.
The python script
/scratch/vp91/pjh562/scripts/hello.py#! /usr/bin/env python import os host = os.environ["HOSTNAME"] print(f"Hello from the world of {host}")
The bash script
/scratch/vp91/pjh562/scripts/first_script.sh#! /usr/bin/env bash # #PBS -N hello #PBS -o output.txt #PBS -e error.txt # #PBS -l walltime=00:05:00 #PBS -l mem=200MB # load the python module module load python3/3.8.5 # move to the work directory cd /scratch/vp91/${USER} # do the work python3 ../pjh562/scripts/hello.py | tee hello.txt sleep 120
We then submit the batch script to SLURM using the qsub command from our own directory, and view our job list:
[pjh562@gadi-login-04 pjh562]$ qsub scripts/first_script.sh
77477612.gadi-pbs
[pjh562@gadi-login-04 pjh562]$ qstat -u ${USER}

gadi-pbs:
                                                                 Req'd  Req'd   Elap
Job ID               Username Queue    Jobname    SessID NDS TSK Memory Time  S Time
-------------------- -------- -------- ---------- ------ --- --- ------ ----- - -----
77477612.gadi-pbs    pjh562   normal-* hello         --    1   1  200mb 00:05 Q   --
Initially our jobs is not running (S column shows Q), but after a minute or so we see:
[pjh562@gadi-login-04 pjh562]$ qstat  -u ${USER}

gadi-pbs:
                                                                 Req'd  Req'd   Elap
Job ID               Username Queue    Jobname    SessID NDS TSK Memory Time  S Time
-------------------- -------- -------- ---------- ------ --- --- ------ ----- - -----
77477612.gadi-pbs    pjh562   normal-* hello      34700*   1   1  200mb 00:05 R 00:00
The script will take a few seconds to run the python script, and then sleep for 2 minutes so that we have a chance to catch it in the queue.
We’ll get the out put ina file called res.txt, which sits in the directory from which we submitted the qsub job.
[pjh562@gadi-login-04 pjh562]$ more hello.txt
Hello from the world of gadi-cpu-clx-1891.gadi.nci.org.au

[pjh562@gadi-login-04 pjh562]$ more output.txt
Hello from the world of gadi-cpu-clx-1891.gadi.nci.org.au

======================================================================================
                  Resource Usage on 2023-03-20 22:53:37:
   Job Id:             77478053.gadi-pbs
   Project:            vp91
   Exit Status:        0
   Service Units:      0.07
   NCPUs Requested:    1                      NCPUs Used: 1
                                           CPU Time Used: 00:00:00
   Memory Requested:   200.0MB               Memory Used: 6.42MB
   Walltime requested: 00:05:00            Walltime Used: 00:02:01
   JobFS requested:    100.0MB                JobFS used: 0B
======================================================================================

[pjh562@gadi-login-04 pjh562]$ more error.txt
Now let’s review what we did:
- Created a python script which did all the “hard” work.
- Created a bash script which told PBSPro about the resources that we needed, and how to invoke our program.
- The
#PBScomments at the top of the bash script are ignored by bash, but are picked up by PBSPro.-Nis what shows up in theqsublisting. It defaults to your script name, but can be renamed here.-ois the location of the file that will contain all of theSTDOUTfrom the running of your program, plus a summary of resource usage at the end.-eis the location of the file that will have theSTDERRfrom your program-l walltime=[H:M:S]is the (wall) time that this job requires. If your job does not complete in this time it will be killed.-l mem=will tell PBSpro how much ram is required per node default is in B, but you can use MB/GB
- Load the software that we’ll need using the
modulesystem - Move to the directory which contains the code we are running
- Run the python code and copy the stdout to a file
- Sleep for 120 to simulate a job that takes more than a few seconds to run
- The
- Submitted the job to the scheduler using
qsub - Watched the progress of the job by running
qstat -u ${USER}(a few times) - Inspected the outputs once the job completed by viewing
hello.txt,output.txt, anderror.txt(empty).
Building a workflow
Once we know how to submit jobs we start thinking about all the jobs that we could run, and quickly we get into a state where we spend all our time writing jobs, submitting them to the queue, monitoring them, and then deciding which jobs need to be done next and submitting them. This is time consuming and it’s something we should get the computers to do for us. If we think about the work that we need to do as discrete jobs, and then join multiple jobs together to form a workflow, then we can implement this workflow on an HPC using the scheduler system.
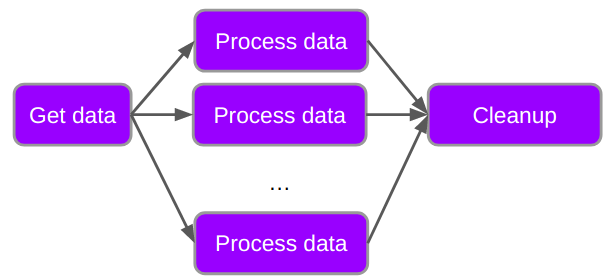
Below is a generic workflow with just three parts.

The purple boxes represent work that needs to be done, and the arrows represent dependency of tasks. You cannot process the data until you have retrieved the data, and you have to process the data before you do the cleanup.
In the above diagram we would say that there is a dependency between the tasks, as indicated by the arrows.
Slurm allows us to create these dependency links when we schedule jobs so that we don’t have to sit around waiting for something to complete before submitting the next job.
When we schedule a job with qsub we can use the -W depend flag to indicate these links between our jobs.
Dependency example
Try the following in your directory. Remember to replace the
123456with the actual job id that is returned to you[pjh562@gadi-login-04 pjh562]$ qsub scripts/first_script.sh 77479068.gadi-pbs [pjh562@gadi-login-04 pjh562]$ qsub -W depend=afterok:77479068 scripts/second_script.sh 77479087.gadi-pbs [pjh562@gadi-login-04 pjh562]$ qstat -u ${USER}Example output
[pjh562@gadi-login-04 pjh562]$ qsub scripts/first_script.sh 77479068.gadi-pbs [pjh562@gadi-login-04 pjh562]$ qsub -W depend=afterok:77479068 scripts/second_script.sh 77479087.gadi-pbs [pjh562@gadi-login-04 pjh562]$ qstat -u ${USER} Job ID Username Queue Jobname SessID NDS TSK Memory Time S Time -------------------- -------- -------- ---------- ------ --- --- ------ ----- - ----- 77479068.gadi-pbs pjh562 normal-* hello -- 1 1 200mb 00:05 Q -- 77479087.gadi-pbs pjh562 normal-* no_hello -- 1 1 200mb 00:05 H --
In the above example you’ll see that the first job submitted was not running due to Q.
This means that the job in in the queue but that it is waiting for other jobs to complete before it can be run.
The second job, however, is not running due to H, and this is because it’s on hold waiting for the first job to complete.
Again in the above example, we used the dependency criteria of afterok, but many more options are available:
after: This job starts after the other job has begun or been canceled.afterany: This jobs starts after the other job has finished, regulardless of status.afterok: This job statrts after the other job has finished successfully.afternotok: This job starts after the other job has finished un-successfully (returned error, or was killed by the scheduler).
It is possible to list multiple dependencies by appending multiple job ids.
For example afterok:123:124:125:153
In the case of afterok if the named job fails, then this job will not be run - it will be deleted from the schedule.
Similarly with the afternotok - if the named job succeeded then this job will not be run.
By using the afterok and afternotok dependencies it is possible to set up a fork in your workflow, such that when a job fails, a cleanup job will run, but when the job succeeds the next part of your workflow will run.
Plan a job
Use the dependencies listed above to create the following workflow in SLURM:
- Hold a meeting of criminals to plan a heist (3 criminals)
- After the meeting and before the heist, all criminals go home and plan ways to back stab their colleagues
- Heist is enacted
- If the heist is successful book flights to the cayman islands and retire
- If the heist fails enact back-stabbing plans
Possible solution
> qsub meeting.sh
100.gadi-pbs
> qsub -W depend=afterany:100 plan1.sh
101.gadi-pbs
> qsub -W depend=afterany:100 plan2.sh
102.gadi-pbs
> qsub -W depend=afterany:100 plan3.sh
103.gadi-pbs
> qsub -W depend=afterany:101,102,103 heist.sh
104.gadi-pbs
> qsub -W depend=afterok:104 retire.sh
105.gadi-pbs
> qsub -W depend=afternotok:104 back-stab.sh
106.gadi-pbs
Parallel workflows
We will be discussing parallel computing in another lesson in more depth. As a prelude to that lesson lets consider a workflow which has a structure more like the following:
In this workflow we have a single job which fetches all the data that we need to process, and then multiple processing jobs which are independent of each other, followed by a cleanup job. The dependency indicated by the arrows shows that the different processing jobs need to happen after the data retrieval and before the cleanup, but have no reliance on each other. In this case we can set up the dependencies as follows:
- queue start job
- queue processing job1, depends on start job
- queue processing job2, depends on start job
- queue processing job3, depends on start job
- …
- queue processing jobN, depends on start job
- queue cleanup job, depends on all of the processing jobs
In the above case it is highly likely that the processing jobs (1..N) will be copies of each other, with only a small change in the way that the processing is done. For example: the start job can download a lot of data, and the individual processing jobs are processing the same data, but testing different models each time. In this case the parameters of the models are all that is changing in the job files. We could either set up a template system to make a copy of the template job, and then alter the parameters within, and submit them according to the above scheme, or we could get SLURM to do this work for us.
This brings us to the concept of array jobs. In an array job we write a single script that is submitted to SLURM, but we tell it that we want multiple copies of this job to run. Within the job we then identify the ID or job number, and use that to set up the parameters for the job.
Rather than get into a lot of details about how to create extended workflows using PBS dependencies, we recommend that you use a higher level workflow manager such as NextFlow. Workflow managers like NextFlow (and others listed here), allow you to describe a workflow using a meta-language that is independent of the platform that you are working on. This means that your workflow can be portable between laptop, desktop, HPC, and cloud with only small changes to a configuration file. Additionally, NextFlow will handle the use of containers, tracking of resource usage, and has options for how to manage failed tasks.
If you are interested, we highly recommend that you check out the ADACS NextFlow training.
Key Points
Plan your work and map it onto a workflow for SLURM to execute
Find software with LMOD or Singularity / Docker hub