Introduction
Overview
Teaching: 5 min
Exercises: 0 minQuestions
How is the lesson structured?
Objectives
Acknowledgement of country
We wish to acknowledge the custodians of the land we reside on, for the developers of these lessons, these are the Wadjuk (Perth region) people of the Nyoongar nation. We would like to pay our respect to their Elders past, present and emerging and we acknowledge and respect their continuing culture and the contribution they make to the life of this city and this region.
Lesson Layout
This training was designed to be taught by a presenter but should be sufficient to be self-taught. If you would like to request a presenter, you can do so through the ADACS contact page.
-
The Benefits of Project Management
We will go through some common examples of inefficient management practices and how we can improve them with project management.
-
Trello
We will go through how to use a collaboration tool called Trello. We will go through common examples of how Trello can be used to manage both personal and collaborative projects efficiently.
-
Personal Project Management
We will cover how to manage and prioritise your tasks and manage your time more effectively.
-
Group Project Management
We will show you how to manage your group’s projects, data, software and documentation. This will improve your organisation and make introducing new researchers to your group easier.
-
Software collaboration with GitHub
We will cover the best practices for collaborating on software projects and the software used to create plots and tables in publications.
-
Project Collaboration
We will show you effective methods to collaborate on large projects, whether it involves software, data analysis, or paper writing. We will also cover creating reproducible data and version control for your Overleaf papers.
Key Points
The Benefits of Project Management
Overview
Teaching: 15 min
Exercises: 0 minQuestions
What is project management?
What is a Kanban board?
How is this better then emails?
Objectives
Understand key concepts of project management
Be familiar with the idea of a Kanban board
Project Management
The goal of project management is to make it easier to understand the work that needs to be done, track the progress of individual work items, to reduce the communications overhead, and to increase productivity of all involved. By applying project management strategies to your work you can expect to get more work done with your limited resources, have a clearer view of the current state of your projects, and be able to collaborate with others more effectively.
Has this happened to you before?
-
You attend a meeting to discuss a result that a colleague has been working on. They have emailed the figure to the group so they ask if everyone is looking at it. One person can’t find the email so they share the screen so everyone can see the email attachment. They then realise that this is not the most up to date version of the figure so they spend a minute finding the latest figure on their laptop.
-
You attend a meeting to discuss a project your group is collaborating on. This involves updating the group on the progress of the tasks which takes most of the meeting. Only one of the tasks requires discussion so it feels like an inefficient meeting.
-
You complete a task and want to move to a new task but you’re not sure what tasks still need doing or if anyone is already working on them.
The above examples are quite common in academic life, and are a sign that a project is not engaging in effective project management strategies.
Common problems and how to solve them through project and data management
The following are some problems you may have experienced in your research that make your work inefficient, along with some potential solutions:
- Struggling to find the email with the attached plot you are looking for
- Have a central place where all plots are kept
- Not being sure if this is the most up to date version of a plot
- Every time an update to a plot is made, you upload the latest version to a shared location and comment on the differences
- Struggling to keep track of your task
- Track all of your tasks and sub-tasks using a visualisation tool such as a Kanban board
- Forgetting deadlines
- Add deadlines to all your tasks, and use a task tracking tool that will show reminders for upcoming deadlines
- Not budgeting your time (spreading yourself too thin) so you can’t work on your project
- For each project you work on, budget a fraction of your time you plan to spend on it, and once you commit all your time, do not take on new projects
- Struggling to keep track of who was assigned to a task
- Use a work tracking app like Trello, to assign people to tasks and track their progress
- Unsure who is assigned to the task that is blocking you
- You can see on Trello who is blocking your task and send them a note to ask when they expect to complete the task
- Having meetings that involve updates on tasks rather than helpful discussions
- Use a work tracking app with a Kanban board so that you can see the status of all tasks at a glance. You do not need to talk about the progress of all tasks, just those that are causing problems or are being delayed. Your meetings can be focused on solving problems.
Your life after discovering project management
-
You attend a meeting to discuss a result that a colleague has been working on. Everyone has access to where you stored the plot and can see every version of it and your comments on the changes. You can discuss the most recent change and even discuss reverting to a previous version if you made the plot more difficult to understand.
-
You attend a meeting to discuss a project your group is collaborating on. Since the status of all tasks are displayed on your project management app there is no need to spend the meeting updating the group on the progress of the tasks. The meeting only involves discussion of difficult problems. The meeting feels very productive even though it took much less than the alloted 1 hour.
-
You want to start on a new task so you select a task on the project management app, assign yourself and mark it as in progress so the group knows you have started the task.
Project management frameworks
There are several project management strategies, such as waterfall and agile, which have a particular mentality for approaching a project and their own areas of strength.
The agile project management strategy is a well defined project management framework that is different from the fairly ad-hoc or free style approach that is typically used in academia. The agile approach aims to deliver a minimum viable product as soon as possible, and then gradually expand the scope of the project to include additional features as time and resources allow. Requirements, plans, and results are continuously reviewed, so that agile is able to quickly and easily respond to change.
The waterfall project management methodology divides a project into distinct phases, and each phase into a series of tasks. The tasks and phases are scoped, resourced, and ordered to produce a Gantt chart, with each task having a set of precedents that must be complete before the task can be begun. A waterfall project typically does not produce any usable results until the entire project is complete. Since the requirements, plans, and resources are all agreed upon at the start of the project, it is difficult for the waterfall process to respond to change (think of that institution-wide project that took years to complete an was obsolete as soon as it was finished). Whilst the waterfall methodology is poorly suited to a research environment, projects which require a high degree of compliance are well served by a waterfall project management strategy.
Visual task tracking with a Kanban board
A common tool that many project management strategies use is a Kanban board. Kanban boards are one of the most common ways to keep track of your tasks and can simply track tasks as “To Do”, “In Progress”, and “Done”. Tasks will be created in the “To Do” category, then migrate into “In Progress” when someone picks them up to begin work, and then move into the “Done” category when completed.
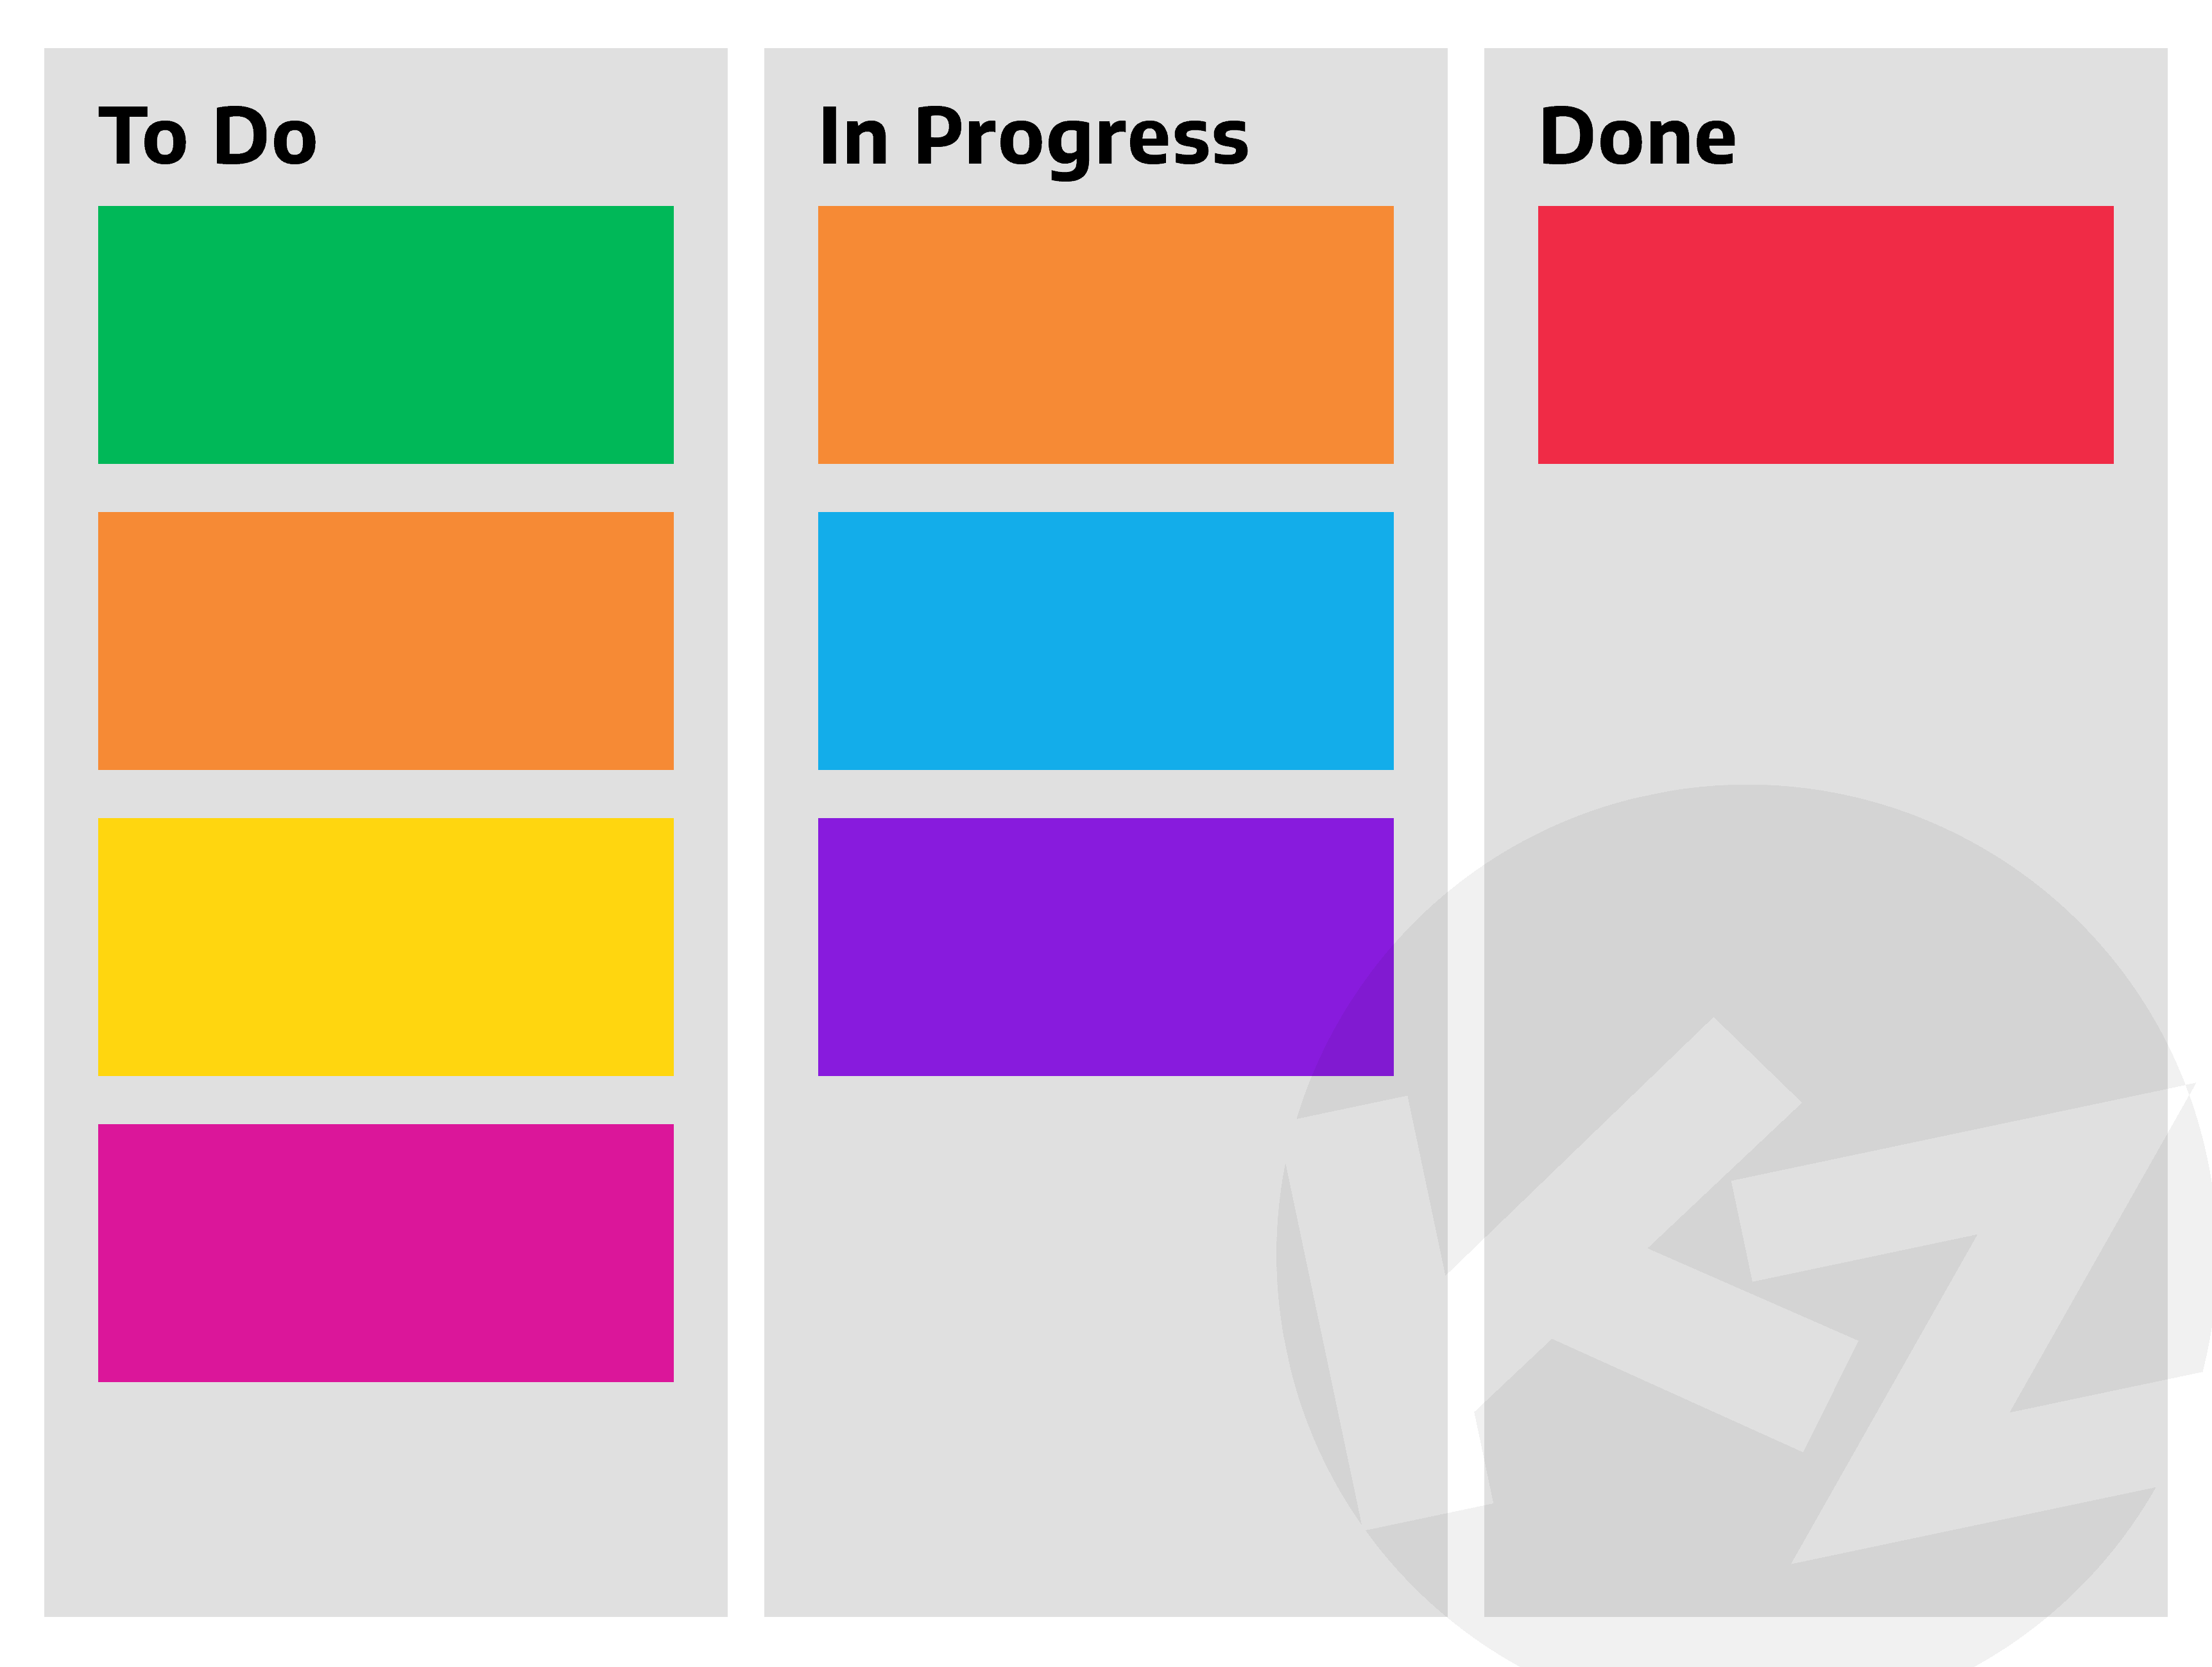
Tasks can be created at any time and may enter the Kanban board at the “In Progress” stage (or as “Done”). Many apps which offer Kanban boards will also allow tasks to be grouped into “Epics” or “Milestones” so that you can track progress towards project deliverables.
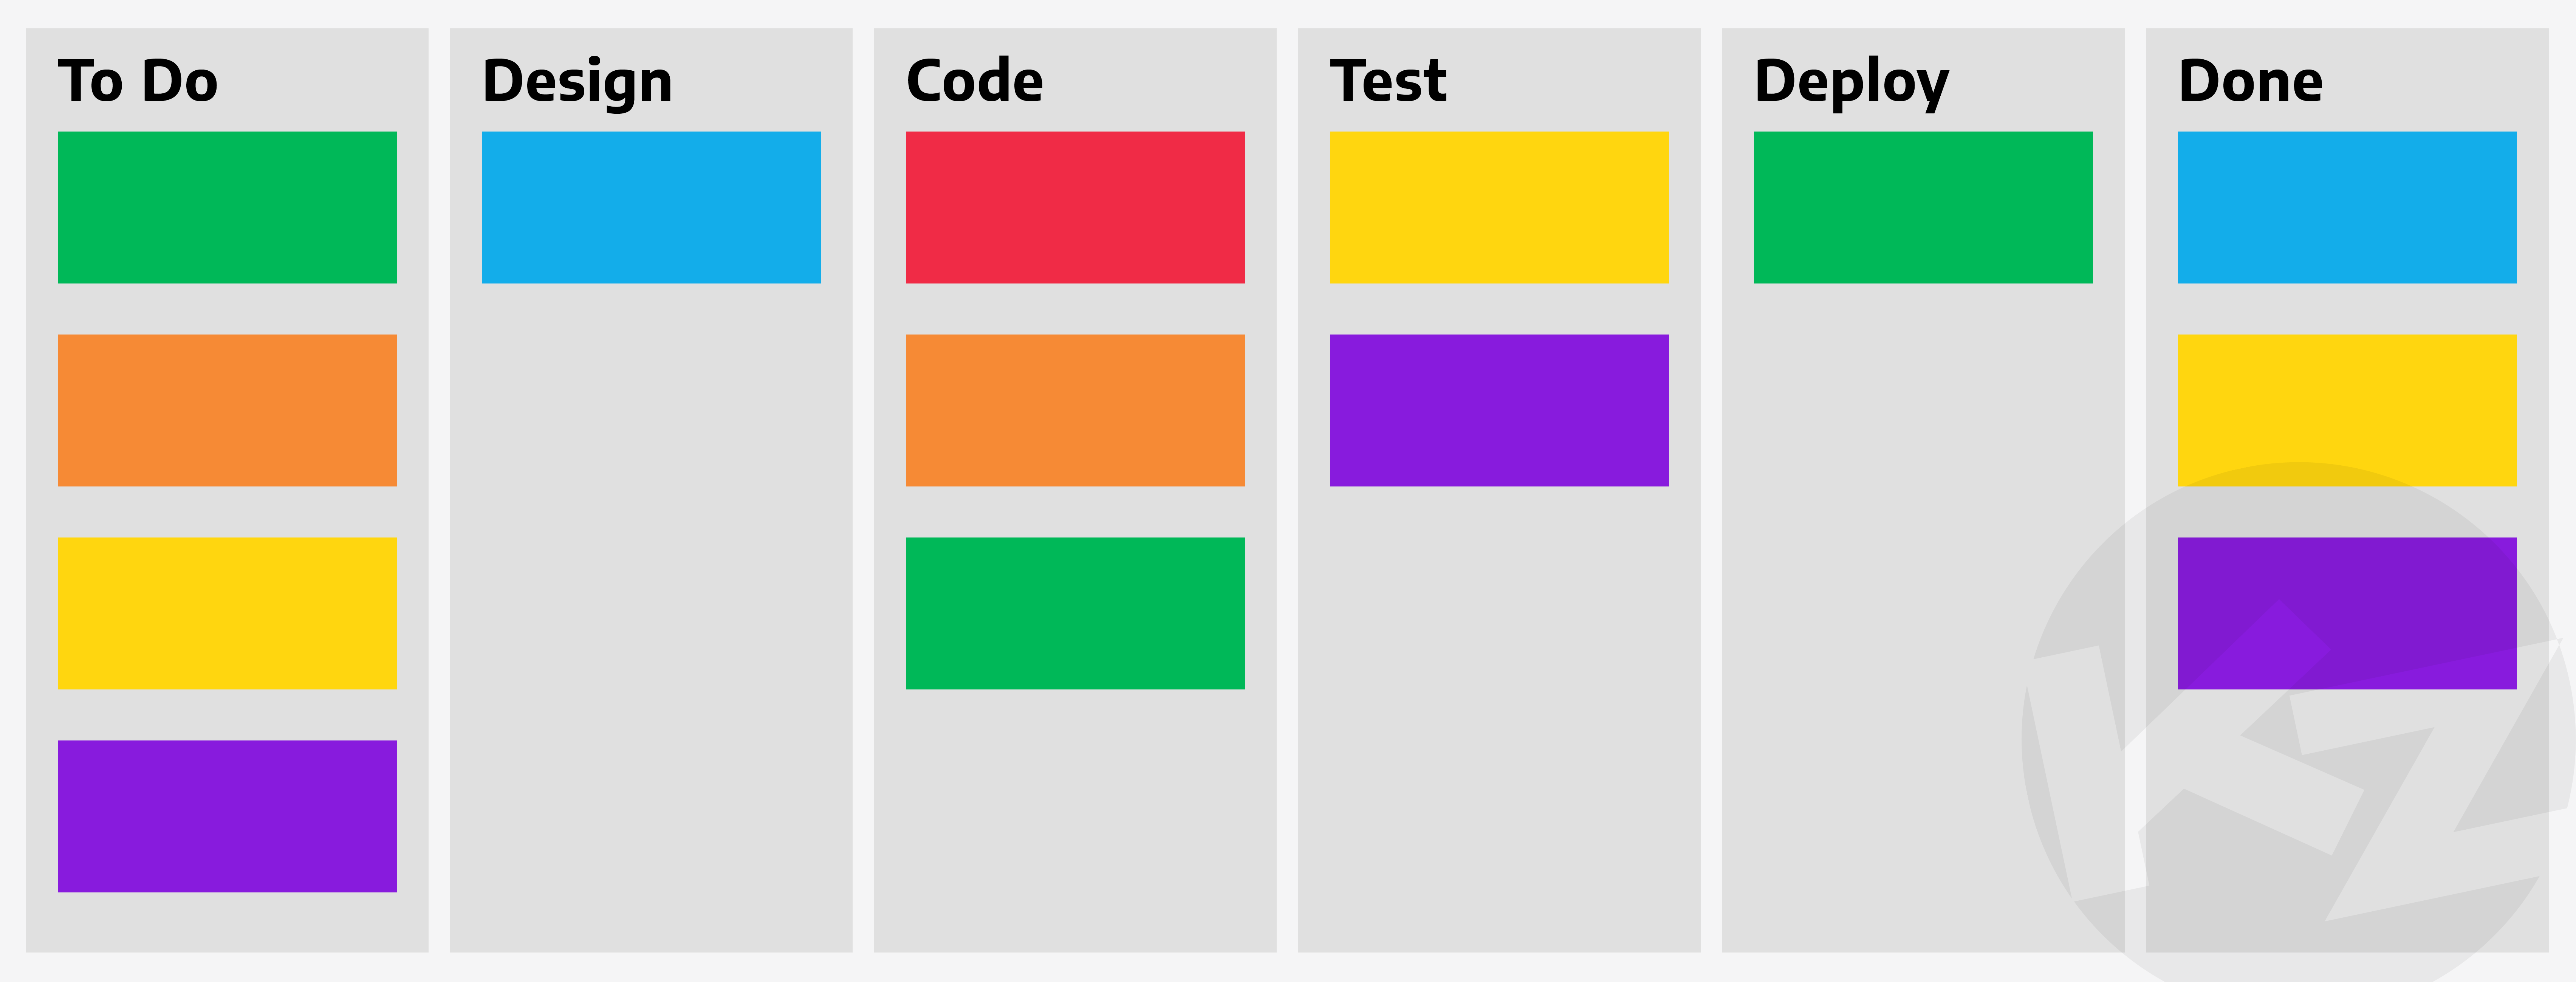
The number and names of the columns can be changed to suit your needs. Here is an example of a software development Kanban board with six columns representing the development cycle of features.
Having an online Kanban board will help your colleagues see what the status of your tasks are and you can upload all version of the figure in one place and get instant feedback without the need for a meeting.
What tools can we use?
In this course we will show you how to use Trello and GitHub to more efficiently collaborate with your colleagues and manage your projects. There are other tools (such as Jira, GitHub Projects and GitLab) that may better suit your projects and we encourage you to try in the future. Once you learn how to use Trello and Github it will be easy to pick up these other tools. We will learn about Trello in the next lesson.
Key Points
Failure to plan is planning to fail - project management is planning for success
Research work fits best with an agile approach to project management
Reflection and adaptation are key to success
Trello
Overview
Teaching: 15 min
Exercises: 10 minQuestions
What is Trello?
How do I keep track of my tasks?
How do I use Trello workspace and boards to collaborate with others?
Objectives
Become familiar with how to use Trello
Trello
Trello is one of the most popular project management applications thanks to it being easy to use, flexible, and free. In this lesson we’ll take you through the process of setting up a new Trello account, creating a workspace and board, and generating an example set of tasks.
If you have not already, create a Trello account here.
Trello basics
Trello organizes your tasks by workspaces and boards. Tasks that relate to a project are grouped into the same boards, and then multiple related boards are grouped into a workspace. For example you may have a different board for each of your research projects, but then group them together based on your collaborations. If you are doing a PhD then you’ll probably just need a single board for your PhD, and a single workspace to hold that board. As an early career researcher you’ll probably have a workspace that is something like “my astro work”, which then has a different board for each of the projects that you are involved in. Many people find it useful to also have a “personal” or “home life” board that they use to track non-work related activities.
Trello uses a Kanban board to track tasks for each of your boards, and this is the default visualization that you’ll see when you create a board. The different columns within a board are referred to as “lists” and items within the list are “cards”. You will have the freedom to create/rename/delete the lists as you see fit, and to move cards between lists as they move through the to-do/doing/done phases that you define.
Now that we have that nomenclature out of the way, lets get started with our Trello accounts.
Making your first workspace and board
When you first make a Trello account, you will see this screen.
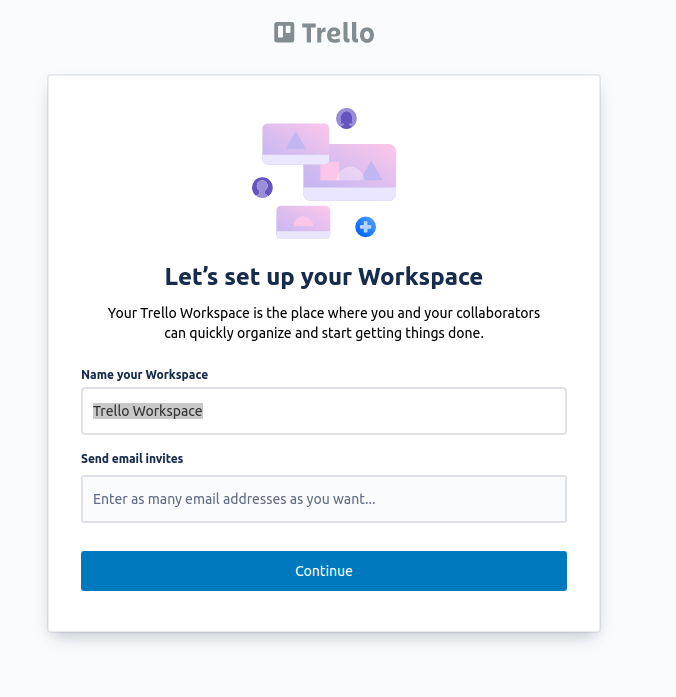
Recall that a Workspace as a collection of boards (or projects). We recommend that you name your first Workspace “Personal” (you can change this later). Click continue and then skip the free trial.
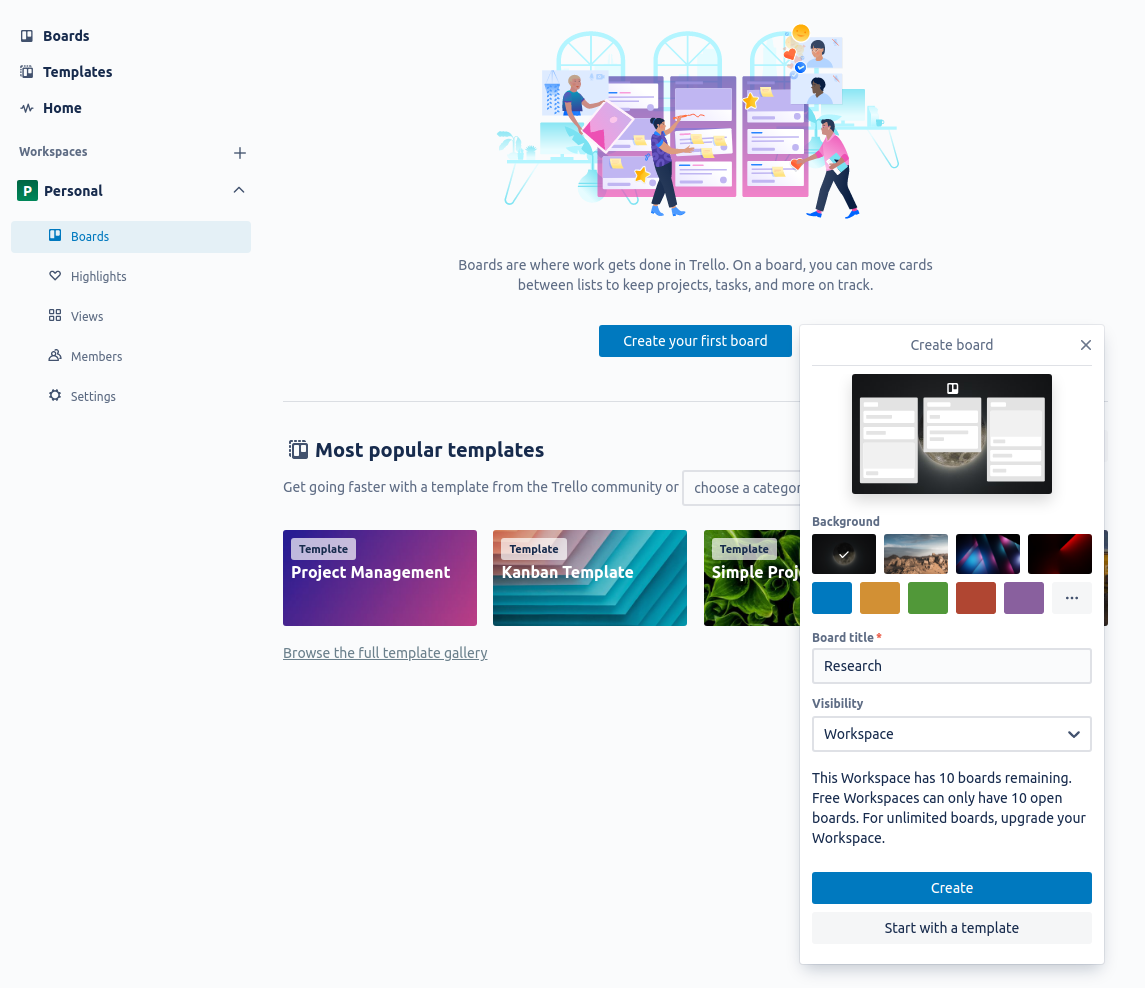
You can then click “Create your first board” and name it something related to your work, like “Research”. Remember that a board as a place where you will manage a single large project (E.g. your PhD, a paper or an enormous processing task). There are several useful templates, but for now, we will show you how to make one from scratch.
Project Plan
Once you have made the project Trello board, the first thing you should do is fill in the description (or a card) with your project plan. This project plan is what will help you keep track of the intent, scope, and timeline of your project, as well as the people and resources that you’ll have access to. You can add a description by pressing “Show Menu” (top right) and clicking on the description. A project plan will help you set a clear goal and ensure you immediately consider things like documentation and data storage. Once the project is complete you can reflect on your project plan to find ways you can improve.
The following is our recommended project plan template (in Markdown style as Trello uses some Markdown styling). Depending on the project, some items will be more important than others but it is still important to consider all items.
#Title

##Description:

##Estimated completion date:

##Collaborators:
- Name, Role, Affiliation, FTE, Email
- @Jocelyn (link to account), Project Lead, CIC, 0.5, jocelyn@gmail.com

##Goals:

##Requirements:
E.g. Supercomputing or telescope time

##Risk and mitigation measures:

##Software:

##Documentation:

##Data storage (Eg. google drive folder):
This project plan is for your internal reference, and it should assist your communication and data management.
Title and description
These can be kept brief and should be used to quickly introduce a new collaborator to what we plan to do and include any relevant plots.
Estimated completion date
In research, there are rarely hard deadlines for project completion, but it is still helpful to estimate how long (or how much effort) a task will be complete so researchers can budget their time.
Collaborators
Stating all the collaborators and their roles will clarify who holds which responsibilities from the beginning. The Full-Time Equivalent (FTE) has two purposes; it will give the project lead an idea of how much work they can assign and for the collaborators’ reference to track how much time they have already committed before accepting new projects.
Goals
When deciding on the next steps, you should consider the project’s goals to ensure that you are not doing work outside the project’s scope. These goals can be brief and straightforward (e.g. publish a paper and process some data) and used to keep the project on track. You should consider the impact and work required for each goal to ensure it is worth the effort. If your goals change midway through the project, it is essential to re-assess the project plan.
Requirements
There are likely supercomputing or telescope requirements for your project. It is important to state these early on to plan proposals and estimate when you will get processed data.
Risks and mitigation measures
If your proposals are not accepted, are there other telescopes or supercomputers you can use? Will you back up your data in case the supercomputer crashes and you lose it? A quick consideration of the risks and what you can do to mitigate them can save you a lot of pain down the road
Software
If you’re developing software as part of this project, you should include the GitHub repository link. If there is software that you depend on or are adapting, it is useful to have those links here. Where possible, you should version control your software within your groups’ GitHub organisation. It is also important to consider how this software will be used in the future and adapt good coding practices from the beginning.
Documentation
Here, you can link the documentation you’re developing or any other helpful documentation. Deciding on what documentation is required will make it easier to develop as you go. It is much more difficult to create documentation at the end of the project when you have forgotten some of your processing decisions.
Data storage
The best method of data storage is very project dependent. Deciding where to store the data initially will make it easier to share data with collaborators during the project. How to access the data should be described here, which could be a link to cloud storage or the directory on a supercomputer. E.g. Google drive, R drive or CloudStor and who has access.
Creating cards
It is helpful to think of each Trello card as a single task (even if that task has several steps). To create a new card, click “Add a card” on one of your lists. Give the card a simple title. You can then click on the card and give it a description.
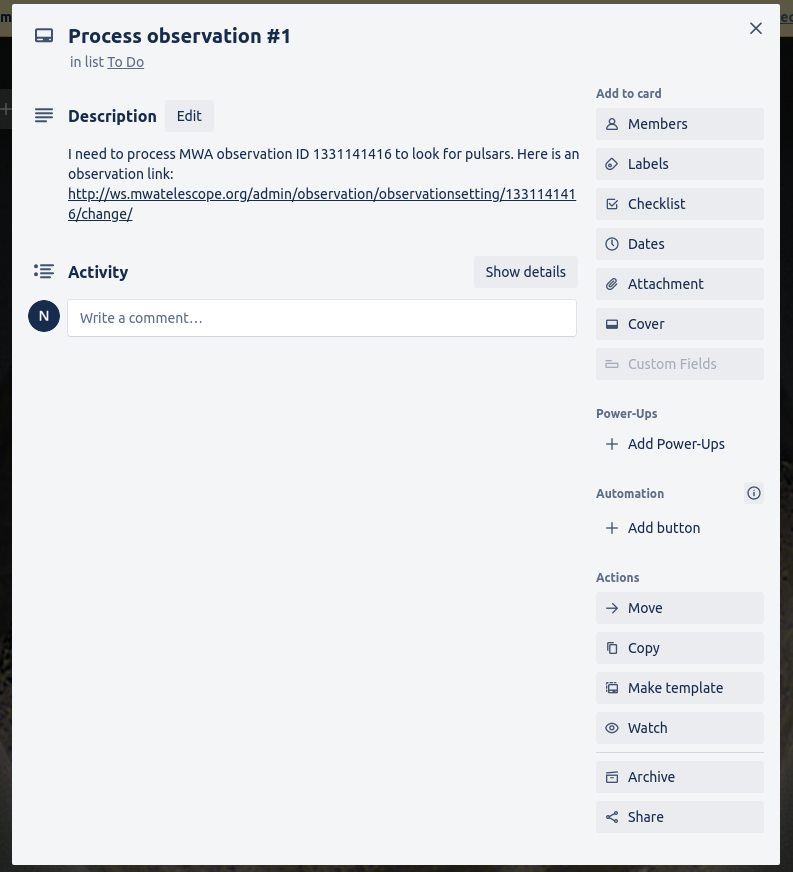
You can then add to the card so it contains more information
- Members: You can assign users to cards so you can easily see who is working on the task.
- Labels: The labels are customizable, so you can use them in any way that you find useful. You can label your cards into types of tasks (Eg. processing, writing, researching) or urgency, for example.
- Checklist: You can use checklists to track which steps you have completed.
- Dates: You can set a due date and set yourself due to date reminders.
- Attachments: You can attach any type of file. You can attach files in the comments so you can explain what changes you’ve made to the image and have a record of all image versions.
- Comment: You can use comments to keep notes of what you’ve done and even commands you’ve run and their output
Here is an example of what the card could look like
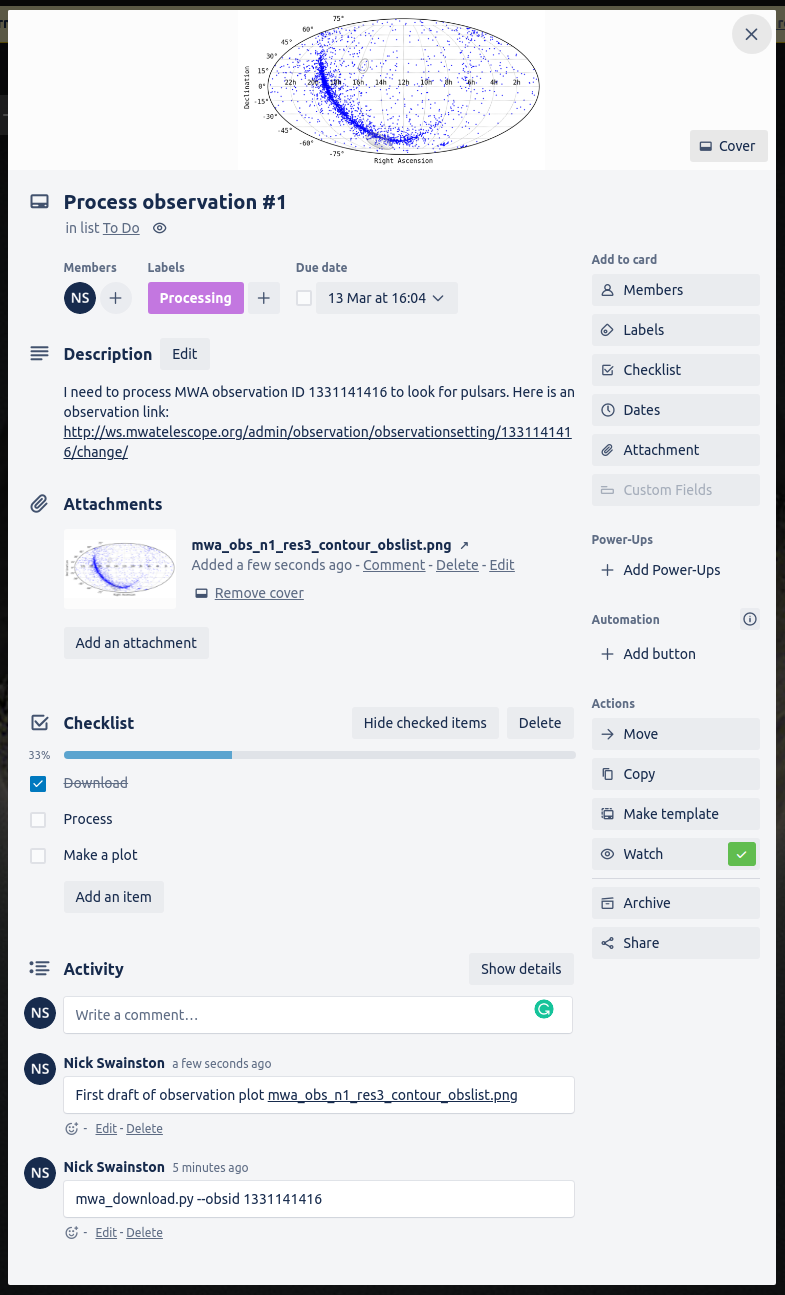
Making card templates
Card templates are useful as reminders of what information to include or save yourself time when you know you will be making many similar cards.
Here is an example of a simple template
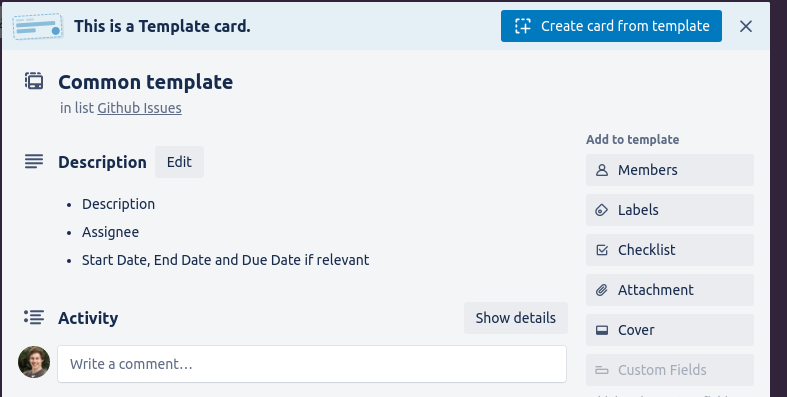 I created this template by filling in the description and clicking “Make template” at the bottom right of the card. You can now make new cards from this template and use the text as a reminder of what you should include.
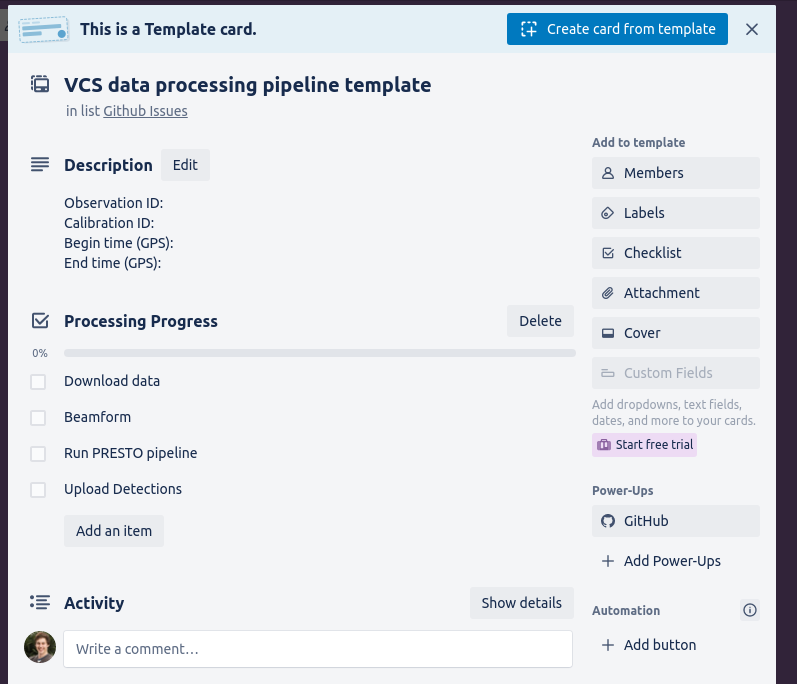
Templates are also useful for keeping track of processing steps. Here is an example of a processing template that will remind you of the data to record and has a checklist to help me keep track of which step you are on.
Creating research group workspaces
You can make a Trello workspace for your research group that will allow all workspace users to access all of the Trello boards within the workspace. You can create a new workspace by clicking Trello and then the new workspace button.
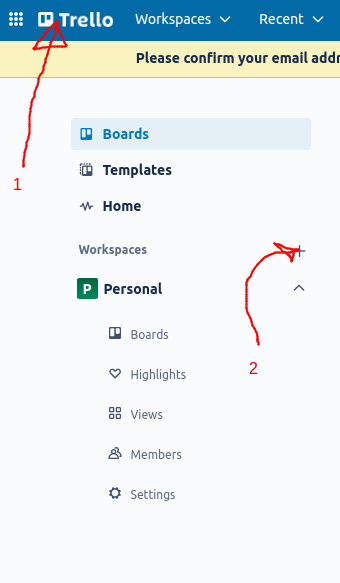
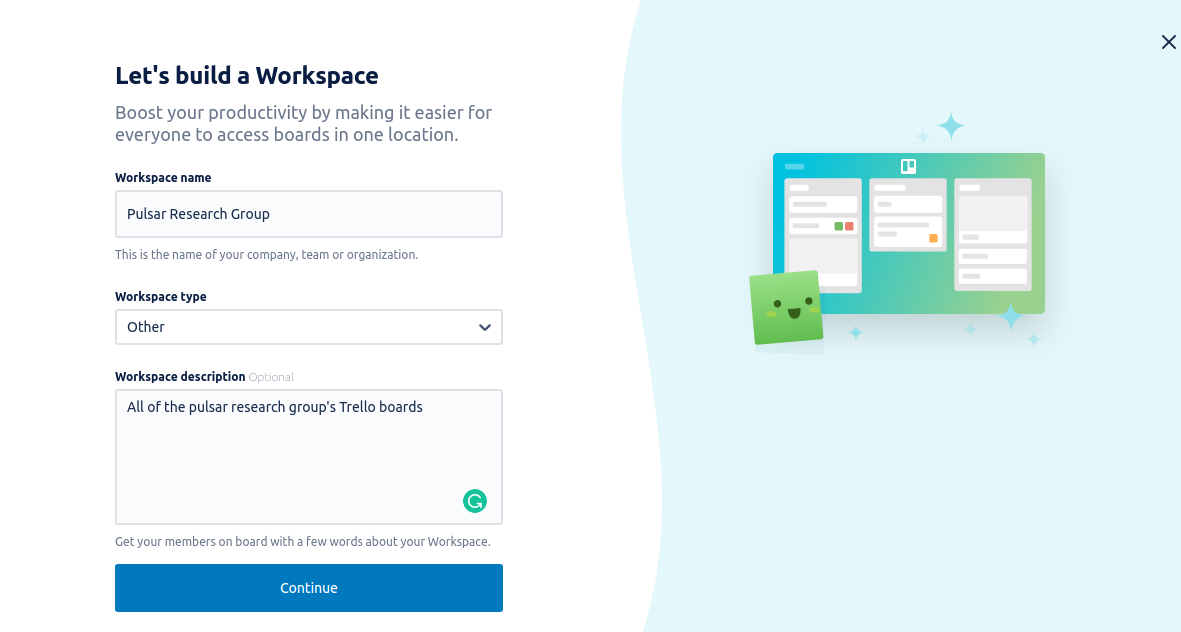
You can then name your workspace whatever you wish.
Then add members by sending them an email invite.

You can then create a board for every large project you have. All members of your workspace will have access to these boards.
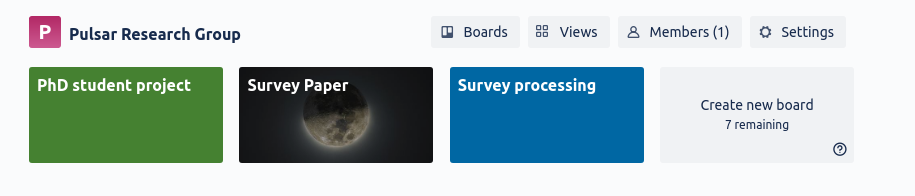
Recommendations on how to use these boards effectively will be covered in the following episodes
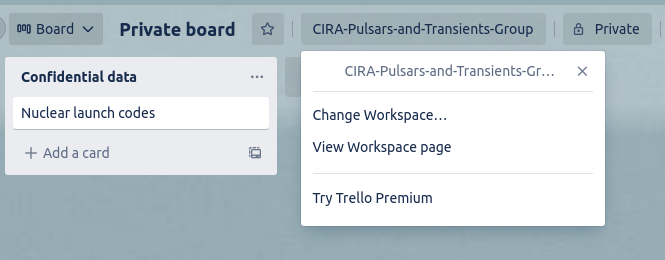
Private boards
By default, all workspace members have access to the boards in the said workspace. If you have private data that you are not ready to share with everyone in your group, you can switch your board to private.
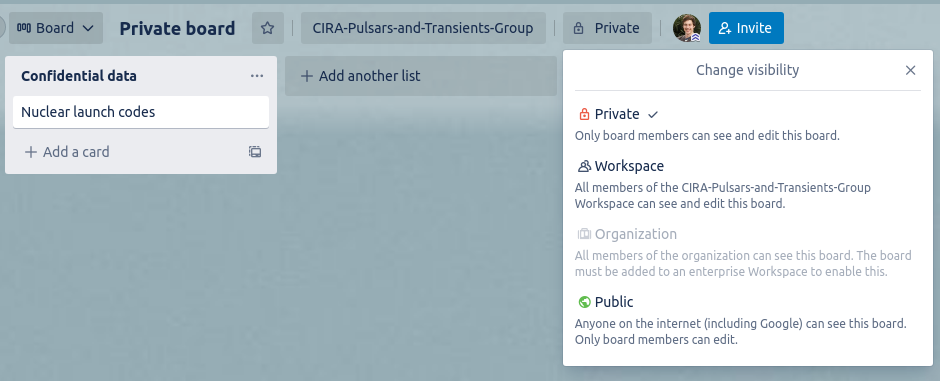
You can also keep it in your personal workspace and move it to the group workspace when you are ready to share the results.
Summary
In this lesson we learned about Trello workspaces, lists, and cards, and how to use Trello to create a Kanban style project management space.
In the next lesson you’ll learn how to use project management for your personal benefit before expanding this to group project management.
Key Points
Trello has a hierarchy of workspace/board/list/card
Lists and cards can be used to make a Kanban board
Templates for cards can save you time
Personal Project Management
Overview
Teaching: 15 min
Exercises: 10 minQuestions
How can I prioritize my tasks?
How can manage my tasks?
What software is available to help?
Objectives
Understand how to prioritize your work
Know how to incorporate priority/importance/impact into your Trello boards
Understand the benefits of time planning and tracking
Personal Project Management
Task Management
When you have a large number of tasks on your plate it can be overwhelming to try to mentally keep track of them. Noting your tasks in an app will free your mind from trying to keep track and will allow you to visualize you tasks.
Task Prioritisation
In most cases you will have more tasks than time available to do said tasks. You will therefore need some way of determining which tasks should be done and which can be left undone or done at a later time. A common metric to decide on the order to do tasks is the priority matrix:
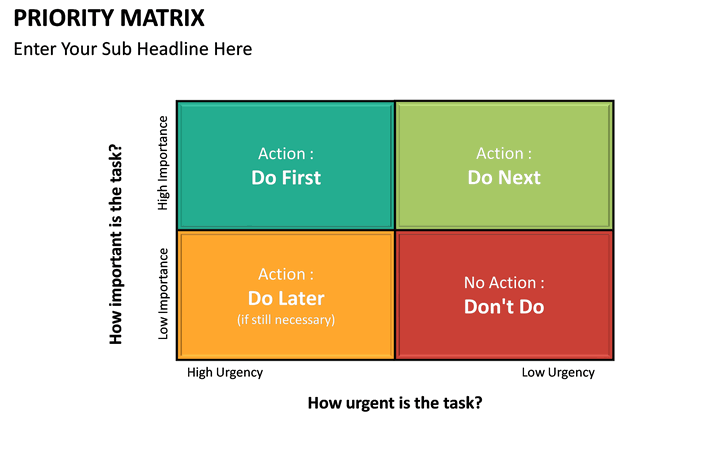
Once you decide on the importance and urgency of all your tasks you can perform them in the following order:
- Important, urgent
- Important, not urgent
- Not important, urgent
- Not important, not urgent
You can display this in Trello in two main ways, using a list for each of part of the priority matrix or by using a list for urgent and not urgent and adding due dates to cards.
Priority focused
Instead of using Trello as a Kanban board, you can rename your lists to be the four priority categories from above.
Cards (tasks) will likely stay within a single category for their life cycle (though maybe they move from non-urget to urgent).
Here is an example of how you can make a list for each of part of the priority matrix.
 In this scheme, you should work from right to left as you decide which task to work on.
It is important with this method to regularly review the cards and move them as they become urgent.
In this scheme, you should work from right to left as you decide which task to work on.
It is important with this method to regularly review the cards and move them as they become urgent.
Kanban style
If you wish to keep your Kanban board style but incorporate task priority, you can do this by using a due date to show the urgency of a task and show the importance of a task by either using labels or separate lists. This will allow you to see what tasks are urgent with the help of Trello.
Below is an example of using two lists to separate your tasks by priority. The backlog list can include your not important tasks (or stretch goals) that will likely only be completed when you have no more Todo items.

You can also use labels to separate tasks by priority if you prefer. In the example below, we used a pink label for important tasks and black for unimportant ones. Remember that you can use the Filter button to only show important tasks if you’d like.
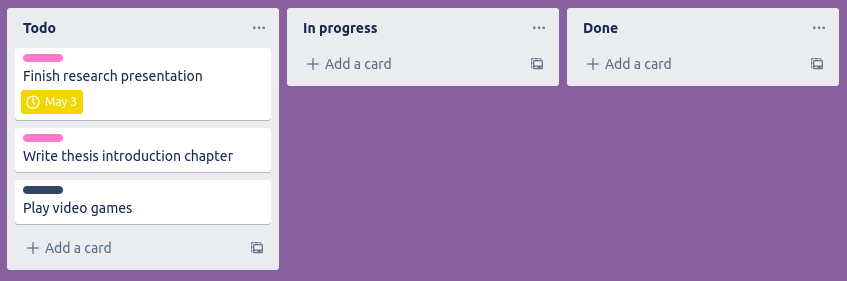
You can see that the “Finish research presentation” is due tomorrow, so you should complete that first. It should be noted that Trello only displays a yellow clock for due the next day and a red clock for overdue. You can also use Filter (top right) and only display items that are due within a certain time range.
Bonus note
As you become more familiar with Trello, you may want to try something more advanced like Jira. One benefit is that you can organise your tasks into different “epics” (you can think of epics as projects) so that you can see your progress in different epics. Here is an example
If you’re interested here is a Jira Fundamentals course
Alternate task metric
Instead of thinking of your priority matrix in terms of importance and urgency, you can instead use impact (research output) and effort (time spent working). This is useful when considering which projects to take on and their goals. Successful researchers are often skilled at choosing projects that are high impact with minimal effort.
Time management
An essential part of organizing the work that you need to do involves estimating the amount of time or effort that is required for each task. This estimation can be difficult to get right, but you can make the process easier by using a data driven approach - tracking the time spent on activities and then using that to inform your future estimates. Time management and time tracking can therefore be central to properly managing your projects.
A common way of tracking/estimating time is to work in hours/days/weeks/months of effort. However you are often not working on a single task at a time so it can be easier to break your total time available (your Full-Time Equivalent or FTE), into fractions, and then assign these fractions to different tasks. By estimating and tracking your FTE over the course of a project you can ensure that you are not spread too thin and you can finish tasks on time. Effective time management will prevent you from taking on more work than you can realistically complete.
For example, someone asks you to help with a project. You look at your project planning app and see that you have two projects you aim to spend 0.4 FTE on and a third you aim to spend 0.2 FTE on. Since this fills up the entire 1.0 FTE, you let them know that you can not assist on their project. You know that your third project will be complete in a month, so you offer to provide help at the level of 0.2 FTE starting in a month.
Deciding where you spend your FTE is only half the battle. You must also track your time to ensure that you are staying on budget, and adjusting if required. Tracking your time can be done through several apps (see the following section) and should give you at least a rough estimate of the time you spend on each project. This basic information will allow you to see how much time tasks and projects take and improve your future estimates. For example, you estimated that it would take you a month to write the first chapter of your thesis, but it took six weeks. You now know to budget more time for the next chapter. Another example is that you budget 0.5 FTE for teaching, but you realize you are using 0.6 FTE, so you will have to cut back on other projects.
How to track your time
There is a large variety of time tracking techniques and software available to help you track your time. Probably the most useful for academic work is an online or mobile app. Some time tracking apps are feature rich with all kinds of integrations and billing options, however they can come with a large time overhead which can be counter productive. If you are spending more than 10 minutes per day tracking your time, it is unlikely to be worth the effort, so we will focus on simple time tracking methods.
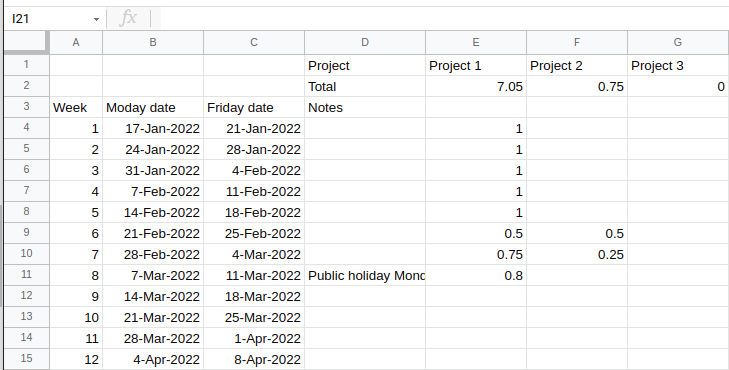
Excel method
Here is a link to a simple Google Sheets template (shown below) of an easy way to track how much time you spend per week on several projects.
At the end of each week, you update the sheet to track the fraction of your time you spent on each project.
Additional projects can be added easily as new columns.
This is effective for when you only care about your fractional FTE at a fairly low resolution.
Chronos app
Chronos is a simple app that will allow you to keep track of your project time.
Simply make a new project with a descriptive name and set the billing type to non-billable.
You can start a timer for the project you are currently working on or manually add how many hours you have spent.
This method is good for when you have many projects that you are swapping between throughout the day, or when you want to be able to track your ‘effective’ work hours within a week.

Timenotes app
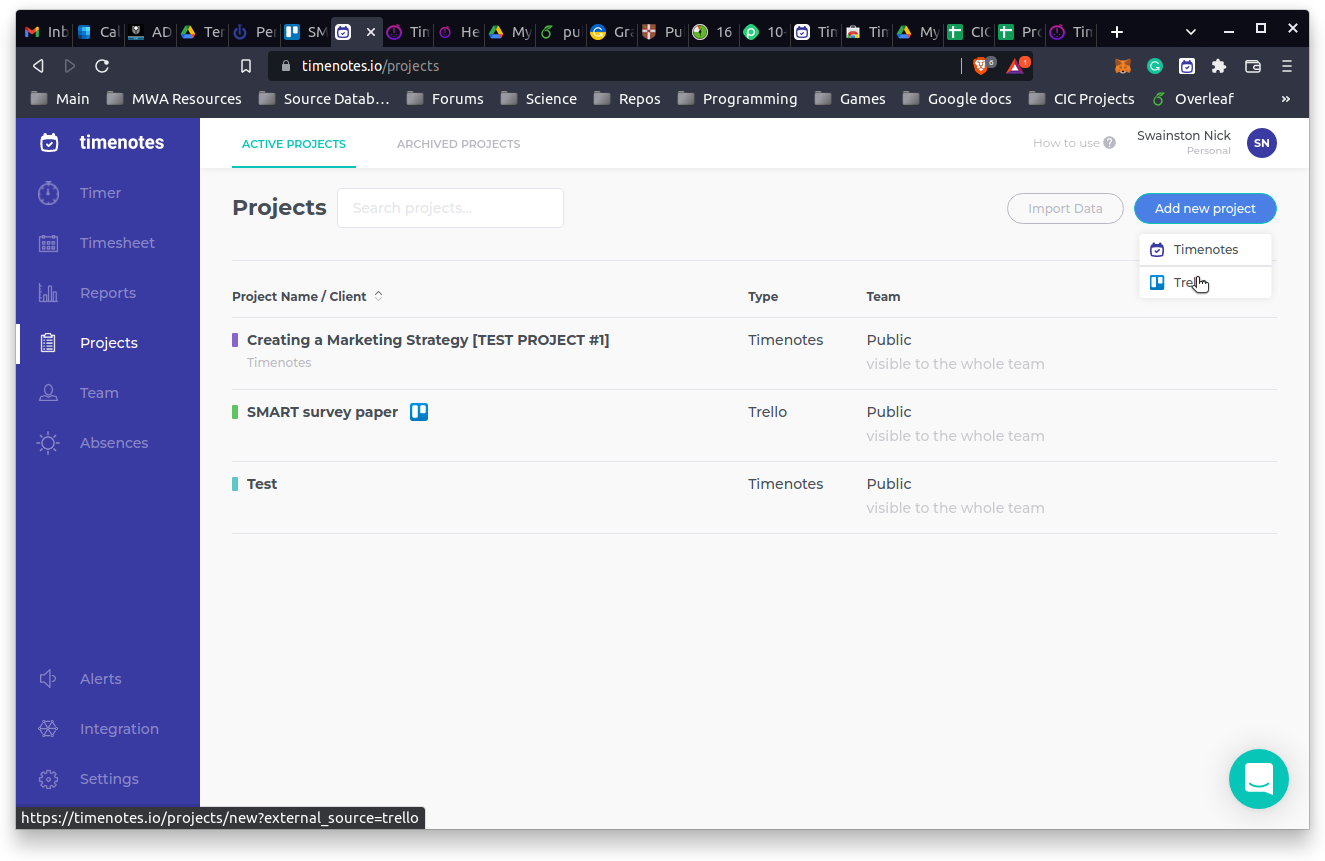
Timenotes is more feature rich option if you want a bit more detail and to be able to integrate with Trello. Once you’ve made an account, you can sync it to your Trello account.
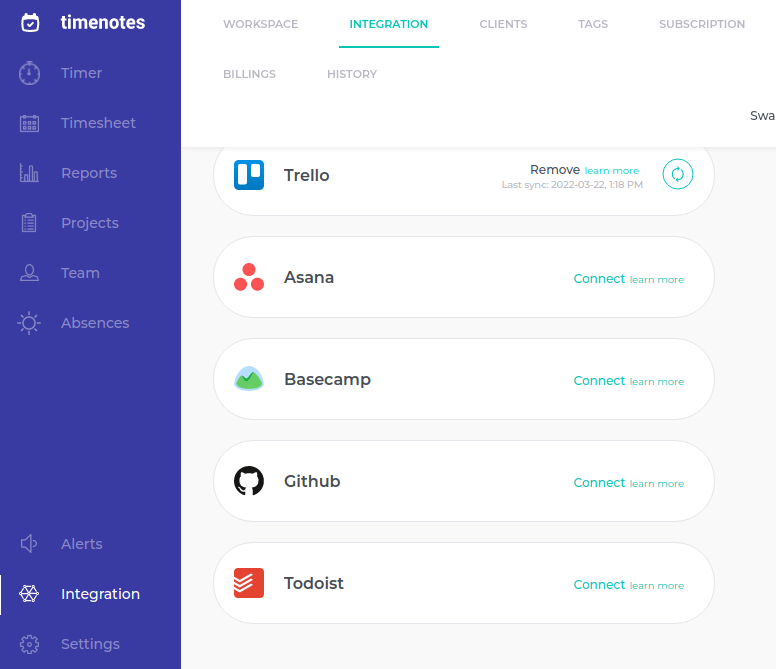
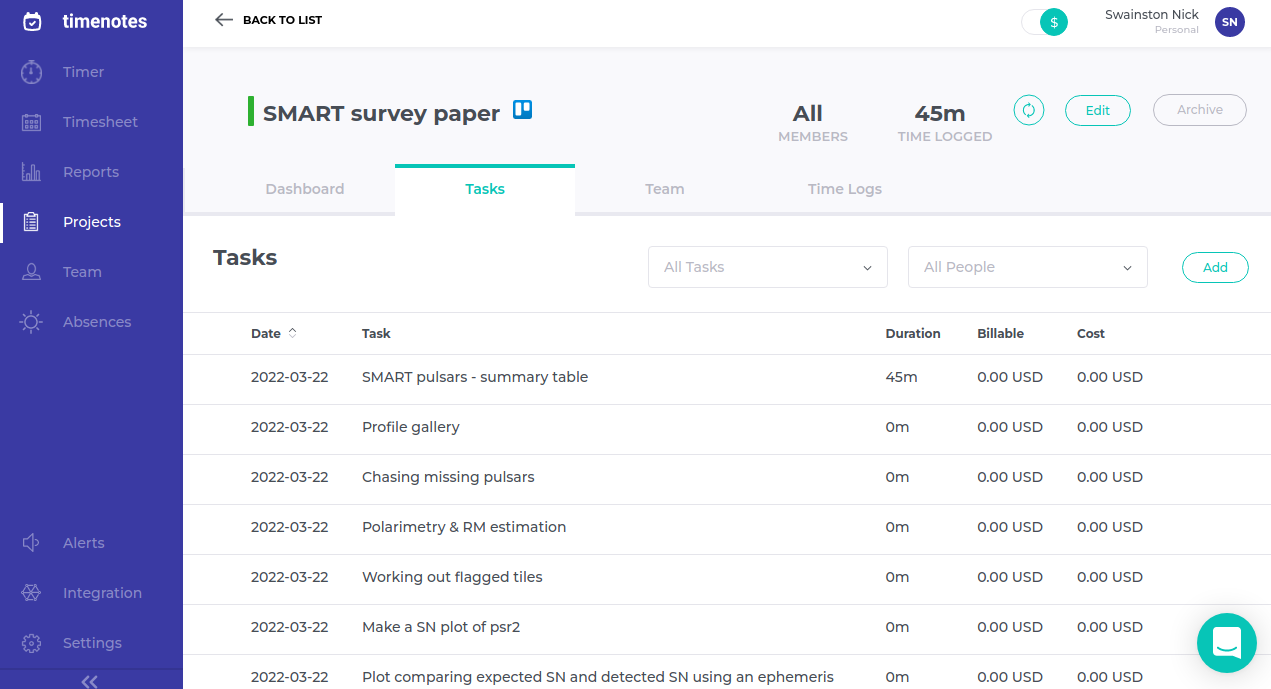
You can then add a Trello board as a Timenotes project.
This will allow you to log time for individual tasks (Trello cards)
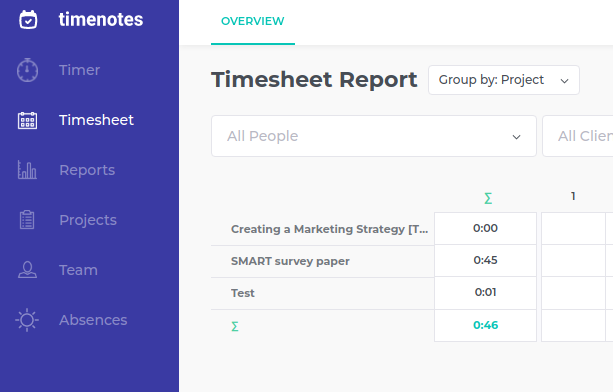
On the Timesheet page you can group the times by Project and see how much time you spend on each project.
Summary
Project management can be useful for teams of 1 as well as teams of 10-100. The key to personal project management is setting priorities, estimating and managing time, and reevaluating your project on a regular basis so that you can adjust your plan or work allocation to keep your projects on track (and to keep yourself sane). By managing your own time and effort effectively you’ll be able to better plan for and respond to unexpected events, and to manage your own and other people’s expectations.
Practising good project management for your own self can help you find the tools that work well for you and to build good habits. From here you can then take these lessons learned and apply them to all your collaborative projects, so that everyone can see increased productivity, more research outputs, clearer communication, and better understood expectations.
Key Points
Project management doesn’t have to be a group effort
Planning, tracking, and reviewing are important practices for effective time management
Explore and choose the apps and tools that are most useful for you
Group Project Management
Overview
Teaching: 10 min
Exercises: 5 minQuestions
How is group project management different?
What does Trello offer to help with group projects?
Objectives
Apply your personal project management skills to your group projects
Group Project Management
Once you become used to using project management for your own projects and tasks, you can then apply these skills to your group projects. The key difference with group project management is that you need to discuss and agree on the plans, and have collaborative reflection times. There will still be meetings (no avoiding them), but they should be more focused and more productive.
In this lesson we’ll focus on the aspects of project management that apply to a group based project.
Group Info Board
A typically group project will involve many people who have contributions and responsibilities that vary throughout the project. New collaborators may join a project part way through. In order to keep everyone on up to date about the current status of the project it is a good idea to create a meta-level board in Trello. This “group info” board serves to direct people to the relevant documentation, documents, processing and storage resources, software requirements and repositories, as well as a list of the projects that are in progress and completed. Note that this board doesn’t act as a Kanban with tasks migrating across (except for the in progress/completed columns), but as a list of resources (mostly links) for people. Here is an example of a Group info board:

A short description of each list is given below.
Documentation
In the documentation list you can include links to all documentation that is useful to your group. If your group maintains the documentation, you can note who is in charge of maintaining the documentation.
Processing Resources
Here you can list all processing resources including super computing clusters and private servers. You should include links to their documentation and where to submit incident tickets.
Databases
Here you can describe all of your groups databases, where you can access them and any documentation. You can also include other databases that your collaborators will find useful.
Software repositories
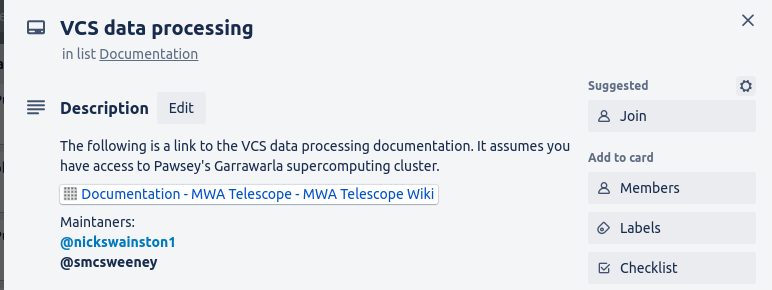
It is best to keep repositories in your group’s GitHub organization but that is not always possible, especially when your collaboration spans multiple institutions. For this reason, listing all of repositories that your group uses is useful. You should include the GitHub and documentations links and the maintainers.
Projects
For each project you can create a card which includes a link to the Trello board for that project and the person leading the project. The lead can include a summary of the project each week to update to the group on it’s progress. Once they’re complete they can be moved to the completed list and links to the final project version can be included for future reference.
Trello workspaces
As you become involved in more and more projects (hopefully still sticking to your FTE budget), you’ll end up with a large number of boards that you need to keep track of. Workspaces are a nice way to group related boards. Even for a smaller number of projects, if you are keeping your projects on separate boards, and have a group info board, it is useful to be able to group all of these together in one place. This is where Trello workspaces come in handy. A Trello workspace is simply a grouping of boards. By default, when you invite someone to join a workspace, they will have access to all the boards within.
It is possible to create a “private” board within a workspace that will only be visible to the people that you explicitly invite to that board. These private boards can be useful for when you have a new project starting that you aren’t (yet) willing to share with the group, but will eventually want to open up to the group. It is also possible to move Trello boards between workspaces.
Recurring tasks
Project management comes with an overhead which, though small, is not zero. To effectively manage a project the following tasks need to be completed:
- An agreement between all interested parties on what the scope, goals, and resourcing for the project will be. This can be as a one off agreement during a kick-off meeting, but typically this is something that will need to be revisited as the scope and available resources change throughout the project.
- Creation of tasks and assignment of people to these tasks. This should include a time/resource estimate, and should coincide with the creation of a task/card in Trello.
- Closing completed or obsolete tasks. Moving completed tasks from in progress to done, and obsolete tasks into the archive (or deleting them).
- Reflecting on progress toward the project deliverables, and adjusting the timeline/resources as required. This will help defend your project against scope creep or resource starvation.
- Manage access to workspaces and boards. Closing boards for completed projects.
It is often a good idea to assign the above responsibilities to one or more people, and have that work be recognized as part of their contribution to the project (make a task for it, assign a fraction of their time to do ti.).
Communication
Though Trello provides an avenue for people to keep up to date on the progress of a project, it is often still beneficial to have a regular meeting schedule for work that needs to be discussed or changes need to be agreed on. Meetings may have become the bane of your existence, however they can actually be useful if you choose an appropriate cadence, set an agenda, and then release people either at the preset meeting end or when you reach the end of the agenda.
Between regular meetings it is often a good idea to identify channels of communication that people should use for various tasks. Low latency communication via Slack can be great for working through a software issue between 2-3 people. Emails are best for broadcast type information sharing which require some form of permanence or traceability.
If you have a slack workspace for your project, a regular meeting time, or an email distribution list, you should include these on your group info board so that everyone knows where to go for help and what to expect.
Key Points
Effective group work requires effective communication
Set clear expectations using tasks with deadlines and resources
Hold meetings as often as is needed and finish as early as possible
Software collaboration with GitHub
Overview
Teaching: 0 min
Exercises: 0 minQuestions
How can I collaborate with GitHub?
Can I use GitHub for project management?
Objectives
Understand GitHub issues and pull requests
Be aware of GitHub projects
Understand how GitHub and Trello can be used together
GitHub
Recap
For this lesson we assume that you already know how to track files on your own computer and that you are comfortable with the basic git workflow:
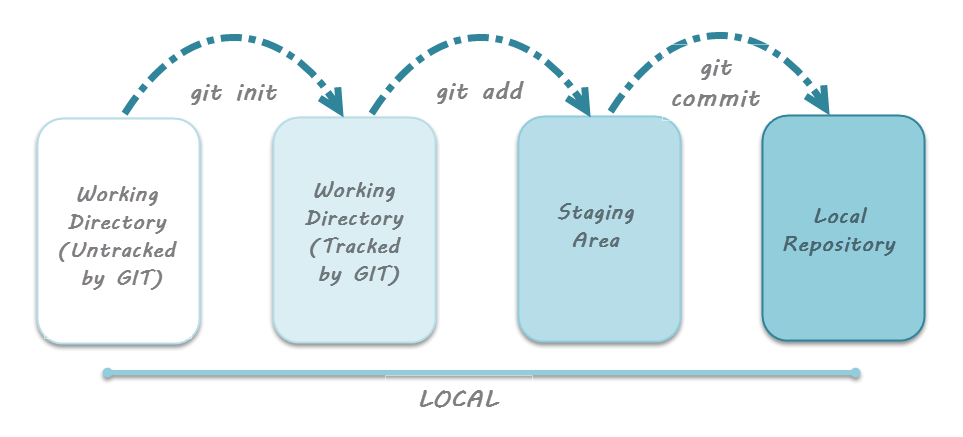
image credit: toolsqa
If you are not familiar with the basics of git or want about git in more detail, you can find more in depth training here.
Working With Remote Repositories
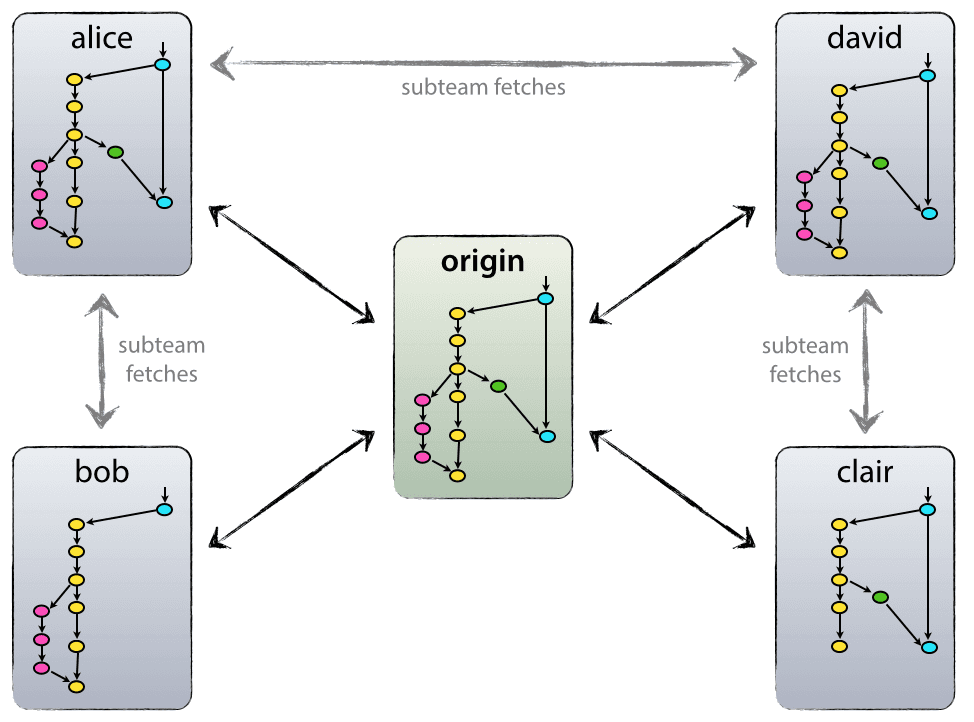
Version control really comes into its own when we begin to collaborate with other people. Git makes collaboration easy as each party has their own complete copy of a repository and can make the required changes independently from a connection to a central repository.
In practice, however, the simplest way to work collaboratively is to use a central copy of the repository (considered to be the “truth”) to which everyone adds their changes. Most programmers use hosting services like GitHub, Bitbucket or GitLab to hold this central copy which is called a remote repository.
To interact with a remote repository the above workflow gets extended by a push and pull step to send and retrieve changes from the remote repo, respectively:
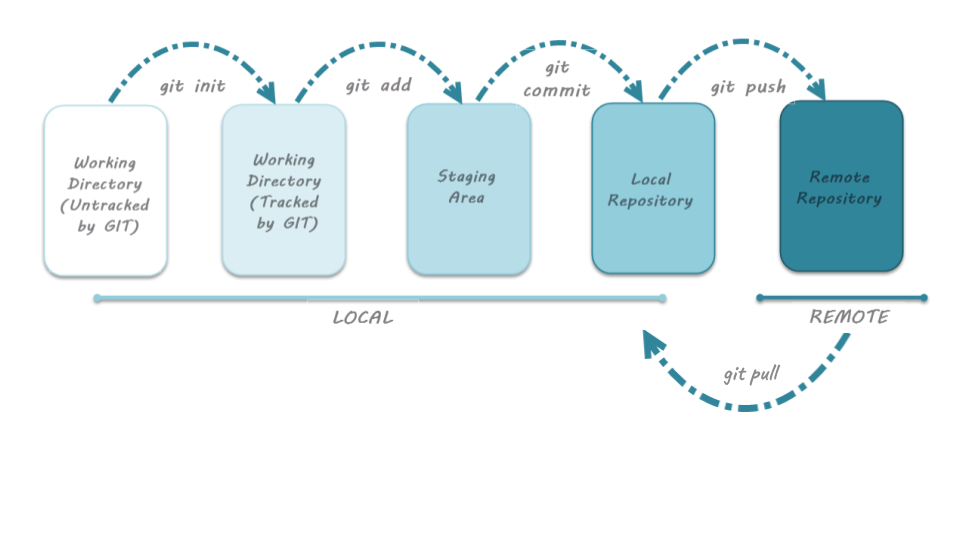 image credit: toolsqa
Working collaboratively
As mentioned above, working remotely and collaboratively is supported by various hosting services.
Everyone has their own complete copy of the entire repository and can make changes as required.
From there changes are committed (pushed) to a central repository and all collaborators can implement these changes in their own local repositories by running the pull command.
To be able to integrate one’s changes in the remote repository the author will need to have write access, if they do not have these they can submit a pull request or merge request and a repository owner/maintainer can then approve and merge these changes.
A Basic Collaborative Workflow
In practice, it is good to be sure that you have an updated version of the repository you are collaborating on, so you should
git pullbefore making changes. The basic collaborative workflow would be:
- update your local repo with
git pull origin main,- make your changes and stage them with
git add,- commit your changes with
git commit -m, and- upload the changes to the remote repo with
git push origin mainIt is better to make many commits with smaller changes rather than of one commit with massive changes: small commits are easier to read and review.
Conflicts
As soon as people can work in parallel, they’ll likely step on each other’s toes. This will even happen with a single person: if we are working on a piece of software on both our laptop and a server in the lab, we could make different changes to each copy. Version control helps us manage these conflicts by giving us tools to resolve overlapping changes.

Sometimes the conflicts are easy to resolve and sometimes they can be down right infuriating. As noted above, a good rule of thumb is to make many commits, and for each commit to contain a small number of changes.
Reducing conflicts
If you find yourself resolving a lot of conflicts in a project, consider these technical approaches to reducing them:
- Pull from upstream more frequently, especially before starting new work
- Use topic
branches to segregate work, merging to main when complete- Make smaller more atomic commits
- Where logically appropriate, break large files into smaller ones so that it is less likely that two authors will alter the same file simultaneously
Conflicts can also be minimized with project management strategies:
- Clarify who is responsible for what areas with your collaborators
- Discuss what order tasks should be carried out in with your collaborators so that tasks expected to change the same lines won’t be worked on simultaneously
- If the conflicts are stylistic churn (e.g. tabs vs. spaces), establish a project convention that is governing and use code style tools (e.g.
pylintorblack) to enforce, if necessaryGit looks at text based changes on a line by line basis. Therefore:
- In a text document break your paragraphs into one sentence per line.
- Latex/Markdown ignore the linebreaks anyway, and it also improves human readability.
- In a code document (script) avoid long lines where possible
- Many languages allow line continuation
- When making changes, stay focused on the purpose of the change.
- Don’t mix grammar and spelling changes with your ordering/layout changes
- If you use a code formatter to style your code, run it first, commit, then make the changes, run it again and commit again.
- Don’t fix multiple bugs at once, or implement multiple features at once. All of the above will help you when you eventually need to roll back some of the changes that you made, or merge your changes with someone elses.
Branching
Git can store multiple concurrent sets of the changes made to the files and directories in a git repo. Each of these parallel instances is called a branch and main is Git’s default working branch.
A new branch can be created from any commit and will have a divergent history starting from this commit. Branches can also be merged together.
Why are branches useful?
Developing software we want to try out some new ideas, but we’re not sure yet whether they’ll work or if we’ll keep them.
While this development work is going on we want to make sure that our working version of the software is unaffected.
To do this we can create a branch, e.g. ‘feature1’, and keep our main branch clean.
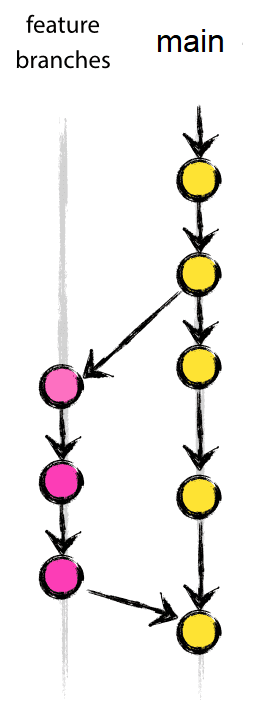
When we’re done developing the feature and we are sure that we want to include it
in our program, we can merge the feature branch with the main branch.
This keeps all the work-in-progress separate from the main branch, which
contains tested, working code.
When we merge our feature branch with main, git creates a new commit which
contains merged files from main and feature1.
After the merge we can continue developing (and making commits) in feature1 as well.
The merged branch is not deleted.
Branching workflows
One popular model is the Gitflow model:

- A
mainbranch, representing a released version of the code - A release branch, representing the beginnings of the next release - a branch where the code is still undergoing testing
- Various feature and/or developer-specific branches representing work-in-progress, new features, bug fixes etc
There are different possible workflows when using Git for code development. If you want to learn more about different workflows with Git, have a look at this discussion on the Atlassian website.
Branch Summary
- A branch is a divergent history from the
mainbranch starting at a specific commit- You can think of them as pointers to a specific commit
- You should develop new code on a branch so that your
mainalways remains in working order- branch early, and branch often
- there is no storage / memory overhead with making many branches, it’s easier to logically divide up your work than have big beefy branches which are more likely to cause merge conflicts.
- Merging creates a new commit that integrates the changes and existing branches are not changed.
- Rebasing moves your changes to the tip of the existing branch and will re-write history to give you a linear workflow. You should not do it in shared branches!
Collaborative software development concepts
Issue tracking
The first point of call is the issue tracker.
In my experience this is the most useful collaborative tool.
You can access the issue tracker from the “Issues” tab of a GitHab repo:
![]() The issues are labeled (number and description), and can have tags to categorize them.
Issues can be assigned to people, and have an inbuilt tracker / conversation associated with them.
The issues are labeled (number and description), and can have tags to categorize them.
Issues can be assigned to people, and have an inbuilt tracker / conversation associated with them.
When creating a new issue you’ll see the following:
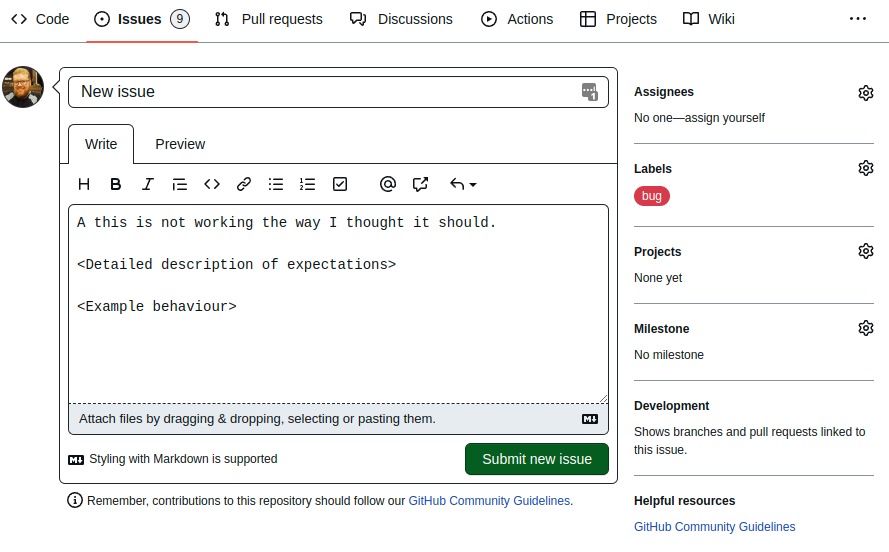
The following items can be set when creating an issue (and all can be updated later):
- Each issue needs to have a short name, but can have a long (very long) description.
- The more detailed the description of the problem/question/request is, the easier it can be for people to resolve. It is good practice to include screen shots or some other example of the behaviour.
- You can assign people to work on the issue. They’ll be notified when you save/update the issue.
- A set of default labels are provided, but you can create your own. Multiple labels can be added to an issue so you can use them for multiple purposes.
- If you have a GitHub project setup you can link to it.
- If you have defined any milestones you can link to that as well (not discussed here).
Below is an example task that was created by a user, and has been worked on by two developers.
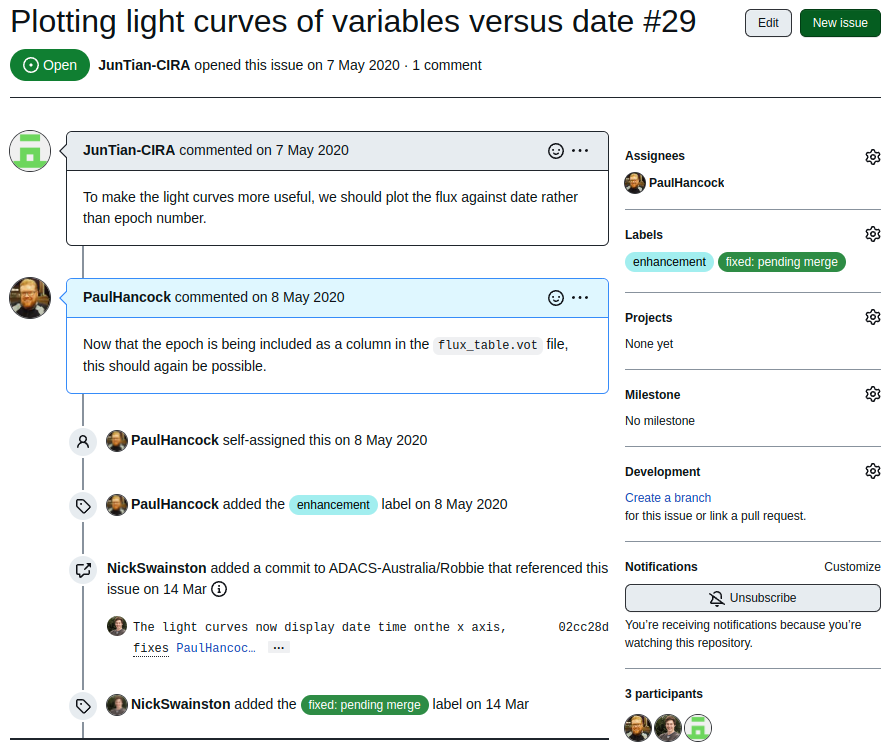 Note the use of tags, and that Github can link particular commits to an issue with in a repository.
A super useful capability to note is that each issue has a unique number (6 in the image above), and that you can make links to that issue in the git commits or other issues, simply by referring to it via #29.
The discussion thread of each issue will then be automatically populated with a link to that commit.
Merge/Pull requests
It is good practice to set one of your branches as THE branch which will always work.
Typically this is the main branch.
In GitHub you can prevent people from committing changes directly to this branch by making it a protected branch.
People will be unable to push changes to a protected branch, the only way to make changes is via a pull request.
A pull request is performed between different branches on a repository. If you have fixed a bug or developed a new feature in your feature branch and want those changes to be included in the main branch then you’ll create a pull request to make this happen.
To begin a pull request we click the pull requests tab, and select “new pull request”.
You’ll then need to select which branches you are going to be merging, and the direction.
In the example below we are creating a pull request between different repositories (one being a copy of the other):
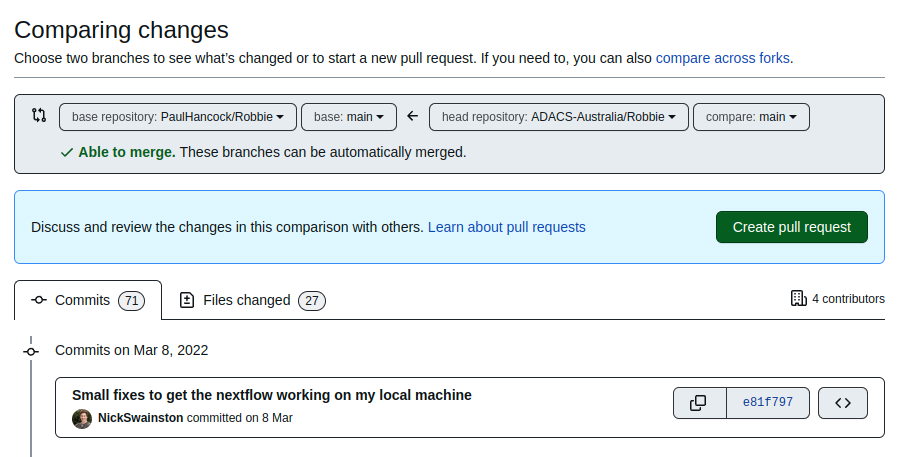 Click the “Create pull request” button and you’ll be taken to a familiar looking interface.
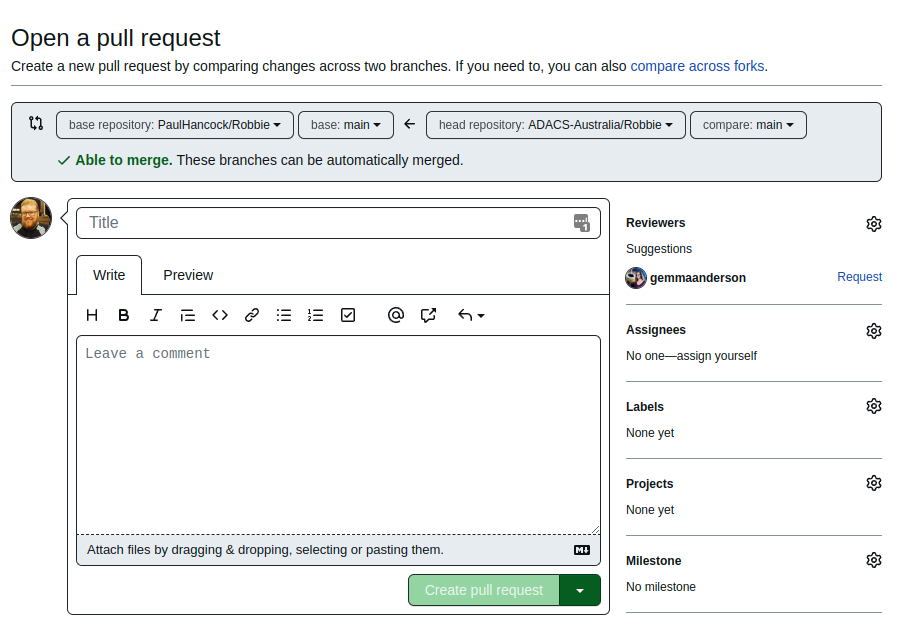
A pull request is treated as a special kind of issue so it’ll get a number just like an issue would, and much of the information that is being requested is the same. You can link to this pull request in the same way you would with an issue. Additionally a pull request can set a reviewer - this is the person that will identify issues, and approve the merge request. See the next section for a short discussion on code review.
Once the merge request has been created GitHub will show you which commits will be included, which files will be changed, and if there are any conflicts.
If there are conflicts that cannot be automatically resolved, you will not be able to do the merge until the conflicts are resolve and the approver has signed off (if assigned).
Behind the scenes a pull request is just doing git merge (or git rebase depending on what you choose).
If there are conflicts you’ll see a note that the branches cannot be merged.
To fix this you should create and push new commits to the branch that is being pulled to resolve these conflicts.
Once there are no conflicts, you’ll get a green tick, and then the option to merge the branches.
Code review
Code review is the process of consciously and systematically checking that new or updated code is up to spec according to a set of standards. Code review is an important phase of the development cycle for any code base, and whilst it will take time to complete, it will save you time and stress in the long term.
Before new code is accepted into the code-base a review takes place to ensure that the code meets the project standards. Standards can include:
- existing tests still pass
- new code has accompanying tests (which pass)
- test coverage for new/changed code is at least 80%
- documentation has been updated to align with adjustments to code
- code is formatted according to project guidelines (eg, PEP8)
It is generally a good idea to document the standards and procedures for accepting a pull request for your code base.
The CONTRIBUTING.md file in the root of your repo is a good place to outline these standards/procedures.
Not only is code review good for your project, but it is good for your developers. By frequently discussing how and why code is being written, and analyzing each other’s code, you will learn new software development skills. In general, academics are rather scared to share their “garbage code” with others, but, just like paper writing, it’s only through peer review and self-reflection that you can improve your skills.
Who performs code review?
GitHub and GitLab both provide an interface for performing code review at the pull/merge request stage. Additionally, CI features (above) can be set up such that they will compile documentation, run tests, and report coverage, for each merge/pull request and then comment with their results.
Even with the above automated features there is usually a final requirement that someone is responsible for signing off on a set of changes. Code review should not just be performed by one person, even if they are the senior developer. Code review is in everyone’s interest and the opportunity/responsibility should be shared.
Forms of code review
Discussion based - where the code is shared among the team and input is sought. Strengths and weaknesses are highlighted along with potential alternatives. This work well for a small group of dedicated people.
Pair programming - where the review is happening during the development phase. You and a buddy work on the same problem or same piece of code and continually share your solutions. This is an excellent way to up-skill new members and introduce them to the procedures and standards of your project.
Informal - where new/changed code is discussed with a colleague over a hot-beverage at your desk. This may break out into pair programming, or be elevated to a larger group discussion, and is thus a great place to start your code-review.
Tool assisted - where much of the review process is done by the computer. Checking that tests pass and coverage quotas are met is a simple task for a computer. Ensuring that code obeys a style guide such as PEP8 can be done by your IDE as you work. Templates for doc-strings and new files to align with project style can also be provided to your IDE.
Software Collaboration
The size and scope of the software will determine which project management tools will best suit your needs.
For a small project you can probably manage all the development using only GitHub issues. However, as the project grows, or as you increase the number of people working on the project you’ll find yourself looking for something like Trello to manage the higher level tasks.
Trello has the option to attach branches, commits, issues and pull requests directly to cards using the GitHub Power-Up.
You can keep all of your internal goals and development discussion in Trello and leave GitHub issues for user suggestions and bug reports.
Bonus note: Optional Issues Sync
The following link describes how to set up a bot that will make a new card an a Trello Board each time a new Issue is created on a GitHub page. www.zzbots.com/community/how-to/sync-new-github-issues-to-trello-1-way-sync
Key Points
Project Collaboration
Overview
Teaching: 0 min
Exercises: 0 minQuestions
How should I store my data so my work is reproducible?
How can I version control my paper?
What is the most efficient way to collaborate with my colleagues?
Objectives
Understand how project management tools apply to paper writing
Project Collaboration
It will be beneficial to project manage any large piece of work, whether it is software, processing or analyzing data. All of which may turn into a paper which you can also manage on the same Trello board.
Project Plan
Your first meeting for the project should involve planning. Filling out the project plan template will likely cover all the important points such as each collaborators roles and FTE commitment, the goals and where software and data will be stored.
Recommended Trello template
The standard to do, in progress and done lists are usually sufficient but feel free to add more. The following labels will likely be helpful.
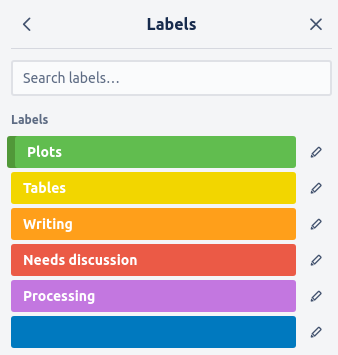
Plots, Tables, and Writing will make it more transparent what the card’s task is and will make it easier to find the task you are looking for. Needs discussion is a helpful label to flag something you are unsure of so you can prioritise discussing the card in the next meeting. Processing is a useful label in case of supercomputer maintenance or outages. You will be able to see which tasks you need to prioritise before the supercomputer is down.
Here is an example of a Trello board used for developing a survey paper.
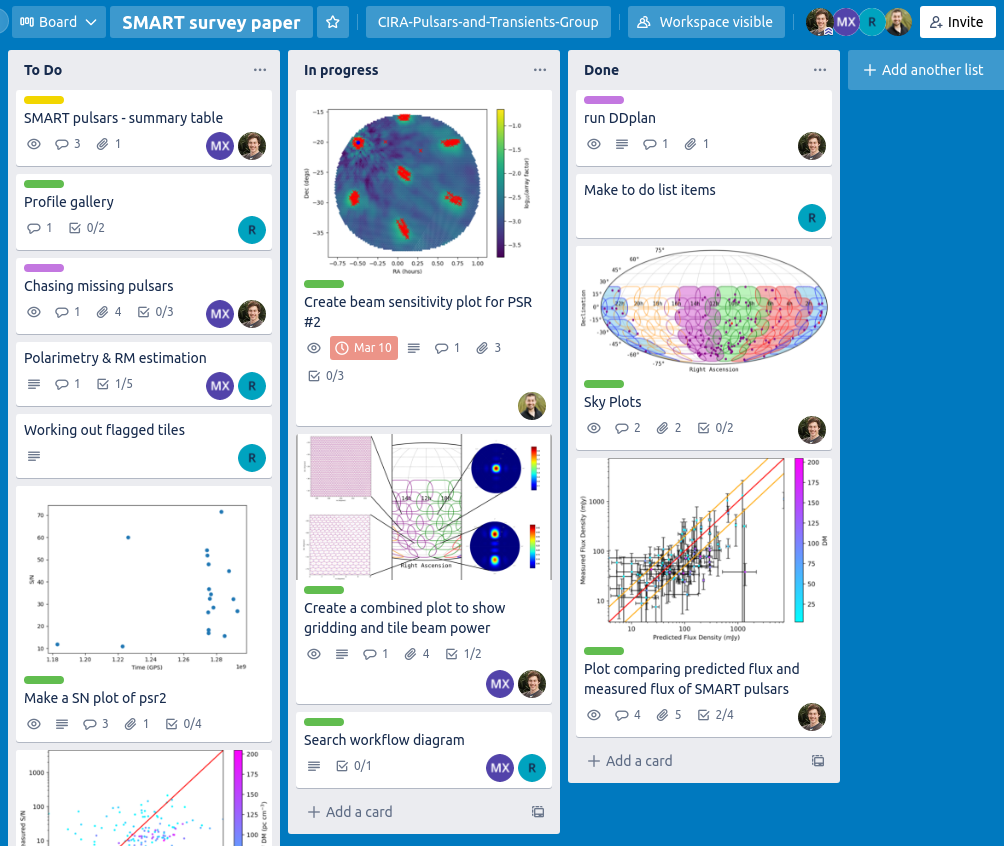
As the board gets busier, you can use filters to find important tasks. For example, the supercomputer is about to go into maintenance for a week, so I want to see all processing tasks assigned to me. I click the filter button in the top right and click “Cards assigned to me” and the Processing label.

I can now see that I have one processing task assigned to me, so I will complete it before the supercomputer is down for maintenance.
Collaborative paper writing
Reproducible data
It is important to make all results reproducible in research. Not only is this good practice so that other researchers can use your work, it will also improve the organisation of your data. You can essure this, first plan where to store your data so it is accessible in the future. The best solution is dependent on the size of your data.
Small data (<1 GB)
If your data is less than a GB then you can store this data on a github repository. This is the easiest solution as you can build the data into your github scripts so you can simply download the data and reproduce your results
Medium data (<~10 GB)
If you data is has several large (100 MB to 2 GB) files you can use git lfs to store large files on github without it storing the differences between the files.
Large data (<1 TB)
This data is too large to store on most online resources so you need to decide a long term place to store it. Some options are
- on a supercomputer
- on a local hard drive
- on a cold storage service
You must then include in your GitHub’s README.md instructions on where the data is, how to download the data and, if it is not available to the public, who can download it on your behalf.
Enormous data (>1 TB)
Some data is too large to store anywhere so instead you must document how to recreate the data. This should include the observations/data location, the software required to process it and what options you used to create the data.
Using a GitHub repo for the paper
It is common use some simple python to create some plots or format a csv into a latex table. When we start collaborating this can bit complicated if we have several versions of these scripts and we’re emailing the scripts back and forth. It is better to make a new GitHub repo so it is easier to collaborate and version controlled. The goal of the repository should be that you can run all of the scripts and reproduce all plots, tables and results from your paper. Not only is this good software practice, it is also good research practice to make it easier for future researchers to recreate your work. A link to the GitHub page should be put in the Trello Boards description.
Paper version control
Proper version control of your paper will allow you to compare with earlier versions (if you want to revert a change) and prevents the need of keeping multiple versions. Overleaf has become hugely popular for collaborating on papers and for the following methods we will assume that is what you are using to write your latex papers. There are several methods of version control with Overleaf, the project lead should choose the method before beginning writing the paper.
Method 1: Overleaf premium
If you, or the paper owner, has Overleaf premium, then Overleaf will keep track of changes for you. To view the history, you click the History button, and you can view all the changes you and your collaborators have made.
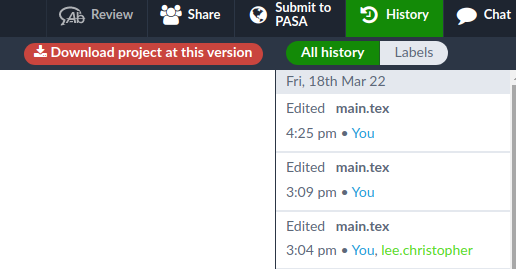
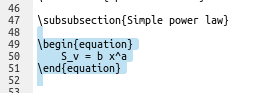
You can see the differences each change made with the “Compare to another version” button in the top left. For example, here is a diff where I can see myself adding an equation.
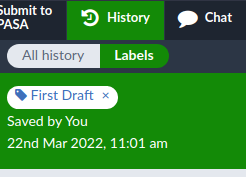
As you can see, most of the version control is automated. The only manual version control required is adding labels (the blue button on the top right in the History tab).
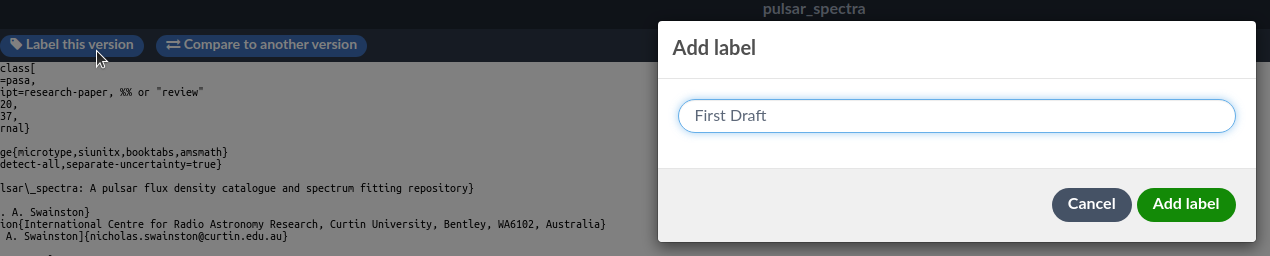
Once you’ve added a label, you can view them in the Labels section of the History tab to compare the differences between versions.
Method 2: Github pull and push
With a free overleaf account, you can make a GitHub repository that overleaf can push and pull to. You can use this to commit changes frequently and even use the GitHub page to tag release versions (first draft, referee response, final etc.).
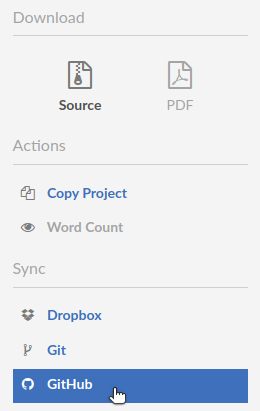
You can create a GitHub repository by clicking the menu in the top right of the paper’s overleaf page
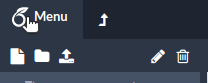
and then click the GitHub button under Sync
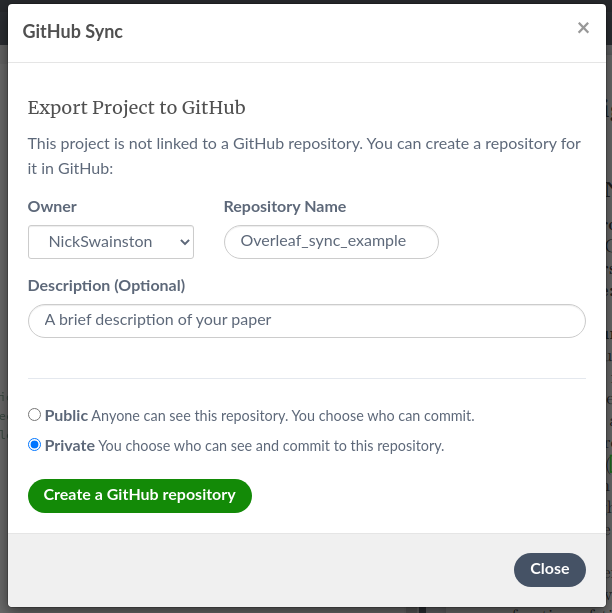
Then give your new GitHub repository a Name and description and click “Create a GitHub repository”. By default, it will make a private repository, and this is usually best to ensure no one accesses your paper before publication.
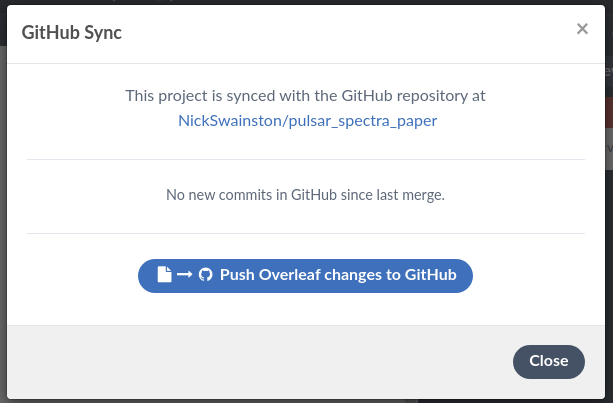
All users should frequently push their changes. You can do this by clicking the menu, GitHub, and then Push.
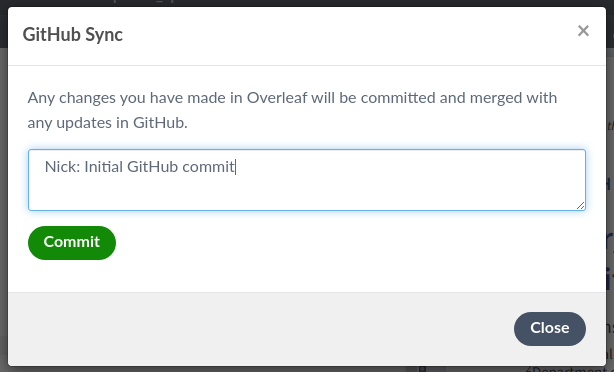
Then write a commit message. Note that GitHub will not know which user created this commit so always include your name in the commit.
Once you have made significant progress and you would like to mark this as a specific version (first draft, referee response, final etc.), you can go to the GitHub page and make a release. You can use these releases (also known as tags) to compare versions with git diff
Reflect
Once the paper is published or the project is completed it is important to have a final meeting to reflect on project. Think if there are things you could improve on for future projects.
Summary
Key Points
‘Projects’ come in all shapes and sizes. eg: software, papers, analysis, outreach.
Project management skills and tools will boost all types of projects
The key is to choose the right tool for the right job