How to Leverage GitHub for Research
Overview
Teaching: 45 min
Exercises: 45 minQuestions
What is GitHub and why is it useful for researchers?
How do I create and manage a repository on GitHub?
What are issues and pull requests, and how can they facilitate collaboration?
What are the benefits of using GitHub for version control in research projects?
Objectives
Understand the fundamental features of GitHub and how they can be applied to enhance research productivity and collaboration.
Research Project Life Cycle
Research is often not a straight shot from idea to publication, but a series of tangents, back-tracks, do-overs, and dead-ends, that eventually land you in a new and interesting place. After the fact we tell a story that follows a clear and logical path, but this less about documenting the actual work, and more about having a compelling narrative. A research project typically involves the following components, though not always in this order:
- developing a hypothesis
- review of literature
- sourcing data
- developing methodologies
- cleaning and processing data
- analyzing data and interpreting results
- preparing posters, presentations, and papers to communicate the results
- documenting all stages of the project work
- storing and archiving data / code / documentation on completion
- being acknowledged / giving acknowledgements for contributions to the project
- project management
- working collaboratively
In previous lessons we learned about how we can automate our research work, how we can reuse previous work, and how to work more efficiently. In this lesson we are going to learn how we can use GitHub throughout the lifecycle of our project.
GitHub Education
GitHub education provides most pro features for free if you have an educational institution email address (eg
@ .edu.au). You need to verify you are a teacher or student each year to renew your education bonus. Features include:
- Unlimited free private repositories
- GitHub Copilot Pro (integrates into VSCode)
- GitHub codespaces (develop and run your code on GitHub resources)
Today’s Focus
Today we will be exploring many of the features of GitHub that are useful for research projects and scientific collaboration. We will be using an example project to explore these features: We are doing a survey of birds in our local area. We are not going to focus on the details of how git works, for that you can see this carpentries lesson. Similarly, we are not going to focus on writing code as that has been covered in many other lessons.
By doing all our work in the open on github it is very easy for us to collaborate with others. People can copy our work, change it, improve it, and then we can pull those changes back into our work again. If you really don’t want people to see your work before it is complete then you’ll need to make a private repository. As a free user, you get limited private repos, but if you register to be part of the education program, you can get unlimited private repos.
In a private repo you can still invite collaborators to join you, however they will not be able to search/see your repo until they have joined it.
Core GitHub Features
GitHub has a number of features which were created for collaborative software development. However, most of these features can be easily adapted for running and managing a research project. For example, GitHub repositories serve as centralized locations for storing and managing all the files related to a research project, including code, data, and documentation. This centralization ensures that all collaborators have access to the latest versions of project materials, reducing confusion and duplication of effort. Issues provide a structured way to track tasks, bugs, and ideas, making it easier to manage project progress and delegate responsibilities within a team. Pull requests facilitate collaborative development by allowing contributors to propose changes, which can then be reviewed, discussed, and merged into the main project. This workflow supports transparency and accountability, as all changes are documented and can be traced back to their origin. Wikis offer a convenient platform for maintaining comprehensive project documentation, such as installation guides, usage instructions, and background information, which is essential for onboarding new collaborators and ensuring reproducibility. Together, these features streamline project management, enhance communication, and foster a collaborative environment that is particularly valuable in research settings.
Our first round of exercises will focus on these four features:
- creating a
repository(repo), - exploring the life cycle of an
issue, - creating and managing a
pull request, - writing documentation in a
wiki.
Creating a new repo
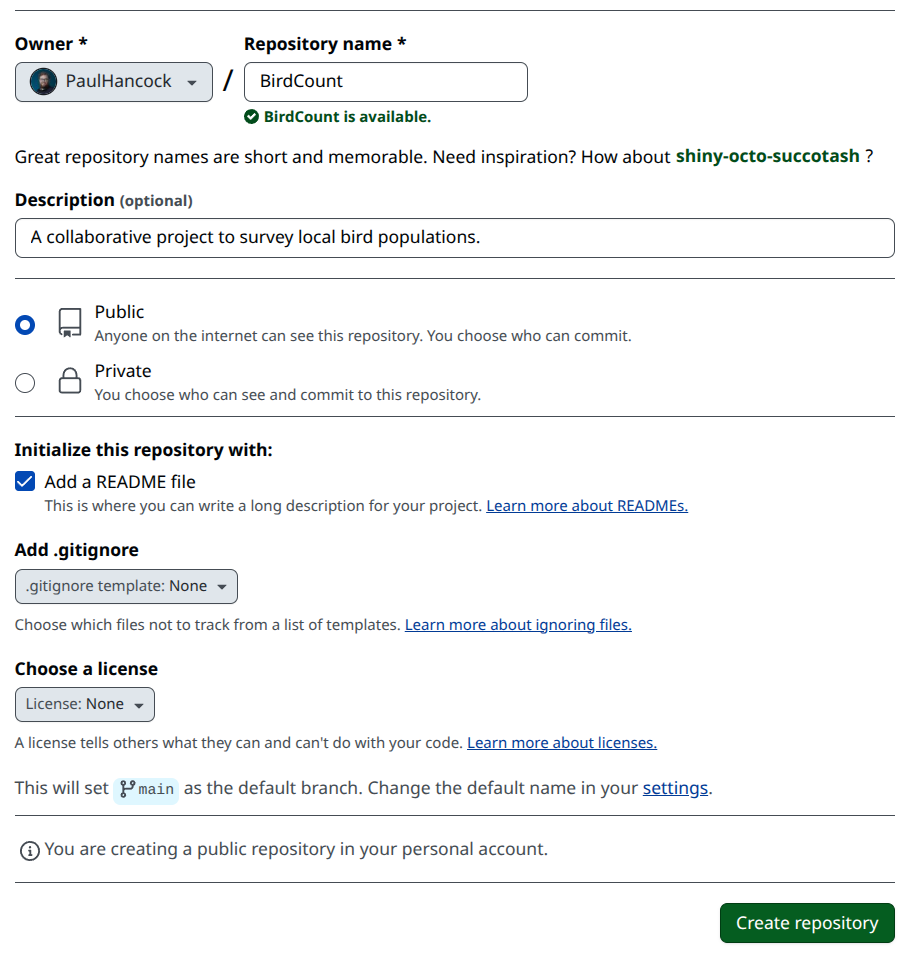
Create a New Repository for “BirdCount”
- Go to github.com and log in to your account.
- Click the + icon in the top right corner and select New repository.
- Enter
BirdCountas the repository name.- (Optional) Add a description, e.g., “A collaborative project to survey local bird populations.”
- Choose to make the repository public or private.
- Initialize the repository with a
README.mdfile.- Click Create repository.
Demonstration
Your new “BirdCount” repository is now ready for you to start adding files, issues, and collaborators!
Markdown
Desptie the name, Markdown is actually a markup language, which was created to be easy for humans to read and write (as compared to HTML for example). GitHub recognizes markdown formatting, and will render the content of
.mdfiles accordingly.
The issue life-cycle
The life-cycle of an issue is typically:
- Identify an question / feature / bug
- Create an
issueon GitHub - Use the issue tracker to discuss the question/feature/bug
- Make changes to the repo to address the issue (answering the question or changing files in the repo)
- Mark the issue as closed
The GitHub issue tracker isn’t just for complaining about bugs. Other very useful uses include:
- A forum for users to ask questions about the code/content,
- A place for people to request new features or additional work,
- A tool for assigning responsibility for different development work,
Creating an issue
Our repository is currently fairly empty so we need to do some basic setup actions. Our first issue is therefore to do some project setup.
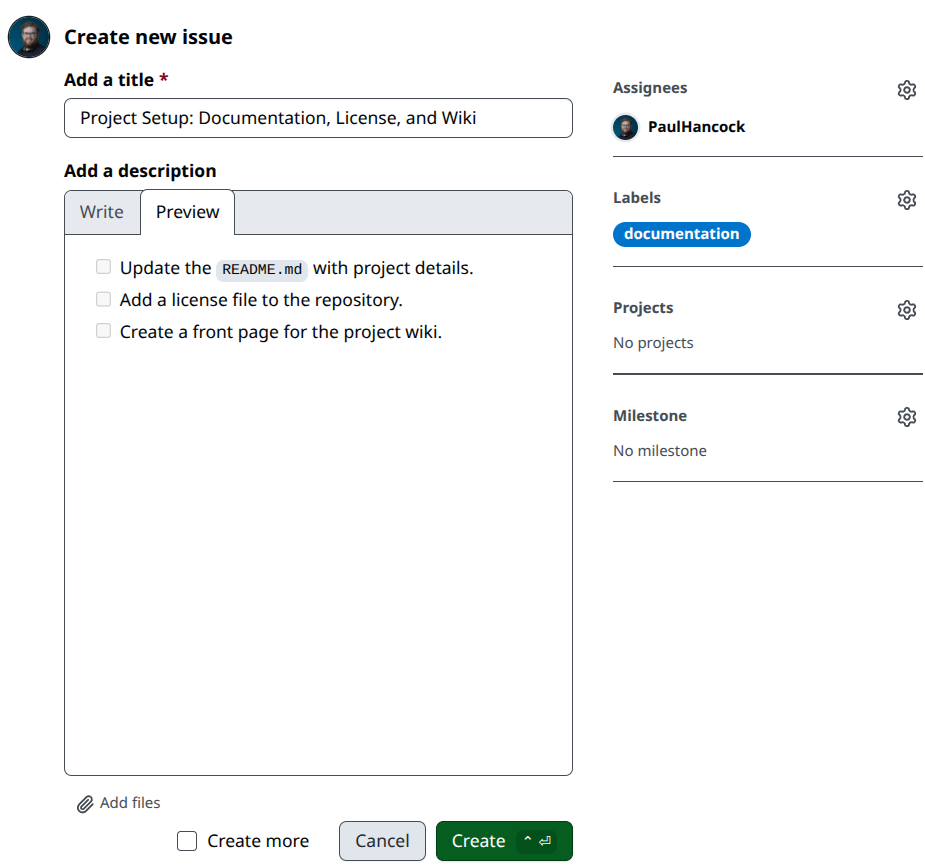
Create a Project Setup Issue
- Go to your “BirdCount” repository on GitHub.
- Click the Issues tab, then select New Issue.
- Title the issue:
Project Setup: Documentation, License, and Wiki- In the description, add:
- [ ] Update the `README.md` with project details.- [ ] Add a license file to the repository.- [ ] Create a front page for the project wiki.- Assign the issue to yourself.
- Add the Documentation label.
- Click Create to save.
Demonstration
Note that when we create an issue it will be auto-assigned a number (#1 in this case). This identifier will be unique within your repo, and can be used to link to the issue in any other issue, pull request, or discussion just by writing
#1.
Projects and Milestones
When we were creating an issue we had the option of assigning the issue to a project or a milestone. GitHub Projects provide Kanban-style boards to organize and prioritize tasks, issues, and pull requests, making it easier to manage workflows and track progress visually. Projects are not part of your repo, but part of your (personal) organization, and can thus track a high level project that involves contributions to multiple repositories. This would be good if you have separate repositories for your data processing code and the publications related to the project. Milestones are specific to a repository, and group related issues and pull requests under a common goal or deadline, helping teams monitor progress toward specific deliverables or phases of a project. We don’t have any projects or milestones yet, but we’ll explore these later on.
Now we have an issue, let’s get to work on doing something about it.
We are going to use a feature branching workflow to manage the changes to this repository.
This means that for each issue we start by making a branch for that issue.
Within that branch we then make all the changes that will satisfy or resolve the issue, and then merge that branch back into main using a pull request.
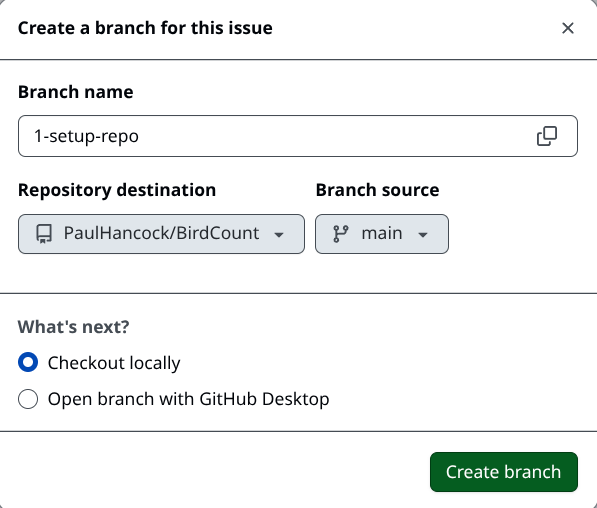
Create a Branch for Issue #1
- Go to your “BirdCount” repository on GitHub.
- Click on the Issues tab and open Issue #1 (
Project Setup: Documentation, License, and Wiki).- Look for the option to create a branch directly from the issue (usually a button or link labeled “Create a branch”).
- Name the branch something descriptive, such as
1-setup-repo.- Confirm that the branch is based on the
mainbranch.- Once created, switch to the new branch to begin working on the tasks listed in the issue.
Making a Branch
Changing Branches
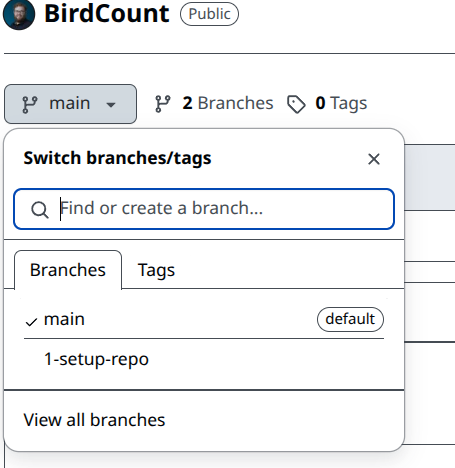
We are now editing files in a parallel branch to main, we can do whatever we like here without affecting the main branch.
Once we are happy with the changes we can merge this branch back into main, or if we change our mind we can delete the branch without merging.
By keeping our work in branches we are able to keep our development work from interfering with other people doing development in other ares, or with people who are using the main version of our repo and don’t want to see changes / bugs / fixes until wee have a new version of the repo.
The README.md file that is in the root of your repository will be rendered by GitHub when people browse your repository.
At the moment it has just the name and a short description of the project.
Let’s update that to be more informative.
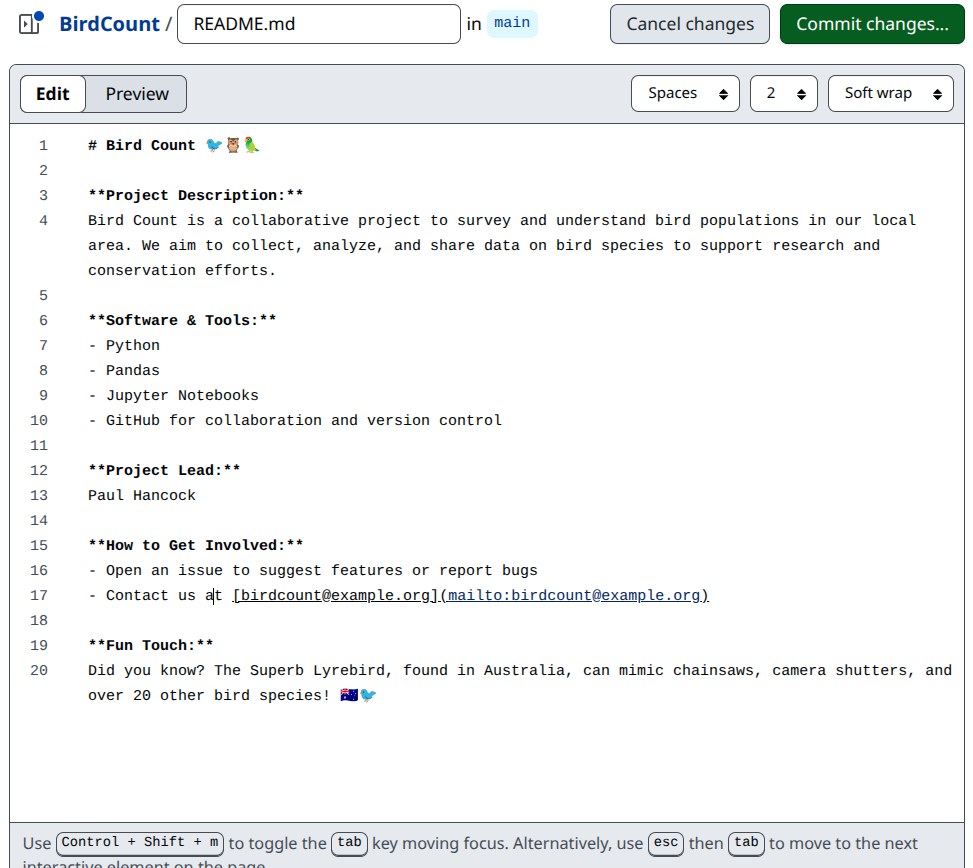
Update the
README.mdwith Project Details
- Open your “BirdCount” repository and navigate to the
README.mdfile.- Click the pencil icon to edit the file.
- Add the following information:
- Project Description: Briefly explain the purpose of the project.
- Software & Tools: List the main technologies you plan to use (e.g., Python, Pandas).
- Project Lead: Add your name as the project lead.
- How to Get Involved: Provide instructions for others to contribute or contact you.
- Fun Touch: Add some bird emojis or a fun fact about birds.
- Commit your changes to the current branch.
Demonstration
Updating our issue
We have made some progress towards our goal of project setup so we should update the issue.
Check The Box
- Return to your “BirdCount” repository on GitHub.
- Click on the Issues tab and open Issue #1 (
Project Setup: Documentation, License, and Wiki).- In the task list, locate the item “Create a README.md file”.
- Click the checkbox next to this item to mark it as complete.
- Commit any additional comments if needed to document your progress.
The next item on our list is to create a License for our repository. This gives people the right expectations for how they can use/reuse our work.
Add a License to Your Repository
- In your “BirdCount” repository, click the Add file button and select Create new file.
- Name the file
LICENSE.- Click the Choose a license template button.
- Select a license that fits your project (e.g., MIT, Apache 2.0, GPL).
- Review the license text and click Review and submit.
- Commit the new license file to then
1-setup-repobranch.- Check the box in our issue.
We have one final task remaining for the project setup: Creating a wiki.
The wiki attached to each repo is not part of the repository itself (it’s not part of any branch), but is connected to the repo by GitHub.
Create a Wiki Page for Your Repository
- Go to your “BirdCount” repository on GitHub.
- Click the Wiki tab at the top of the page.
- Click Create the first page if you haven’t already, or New Page to add another.
- Name your page something like
Project Motivation.- In the content area, write a short paragraph explaining why the project exists and what inspired it.
- Optionally, add headings, bullet points, or images to make the page more engaging.
- Click Save Page to publish your wiki entry.
Demonstration
Welcome to the BirdCount wiki!

# Project Motivation

The Bird Count project was created to better understand the diversity and abundance of bird species in our > > local area.
Inspired by the beauty and variety of Australian birds, our team wanted to encourage citizen science and > > community involvement in ecological monitoring.
By collecting and sharing data on bird sightings, we hope to support research, conservation efforts, and > > public awareness about the importance of protecting bird habitats.

## Why Bird Count?

- Birds are important indicators of environmental health.
- Community-driven data collection increases coverage and engagement.
- Open data supports research, education, and conservation.

:bird:
Once again, it’s time to check that box in our issue.
Our first issue is now addressed and we are ready to merge it into our main branch. Firstly, let’s make a comment on our issue to tell others that it is complete and ready to be merged.
Add a Comment to Issue #1
- Navigate to your “BirdCount” repository on GitHub.
- Click on the Issues tab and open Issue #1 (
Project Setup: Documentation, License, and Wiki).- Scroll to the comment box at the bottom of the issue.
- Write a comment such as:
All setup tasks are complete in the 1-setup-repo branch and ready for review.- Click Comment to post your update.
Resolving the issue
The final part of the branching workflow is to merge the branch into main. When working on a collaborative project we make use of a pull request to do the merge. A pull request (PR) is a feature in GitHub that allows contributors to propose changes to a repository. When you create a pull request, you are asking the repository maintainers to review and potentially merge your changes into the main codebase. In a collaborative environment, pull requests are essential for enabling transparent and organized teamwork. They provide a space for discussion, review, and feedback before any modifications are integrated, ensuring that all changes are vetted and agreed upon by the team. This process helps maintain content quality, prevents conflicts, and documents the history of contributions, making it easier for everyone to track progress and understand the evolution of the project. The PR process should be thought of as a round of peer review, and should be a positive experience where people have the opportunity to learn, to have their concerns heard, and ultimately it should result in a better/stronger project.
Create a Pull Request for Project Setup
- Go to your “BirdCount” repository on GitHub.
- Click the Pull requests tab, then select New pull request.
- Set the base branch to
mainand the compare branch to1-setup-repo.- Enter a descriptive title, such as
Project Setup: Add README, License, and Wiki.- In the description, summarize the changes:
- Added project details to
README.md- Added a license file
- Created the initial wiki page
- Assign yourself as the assignee.
- Request a review from “copilot” (if available) or leave the reviewer blank.
- Click Create pull request.
Demonstration
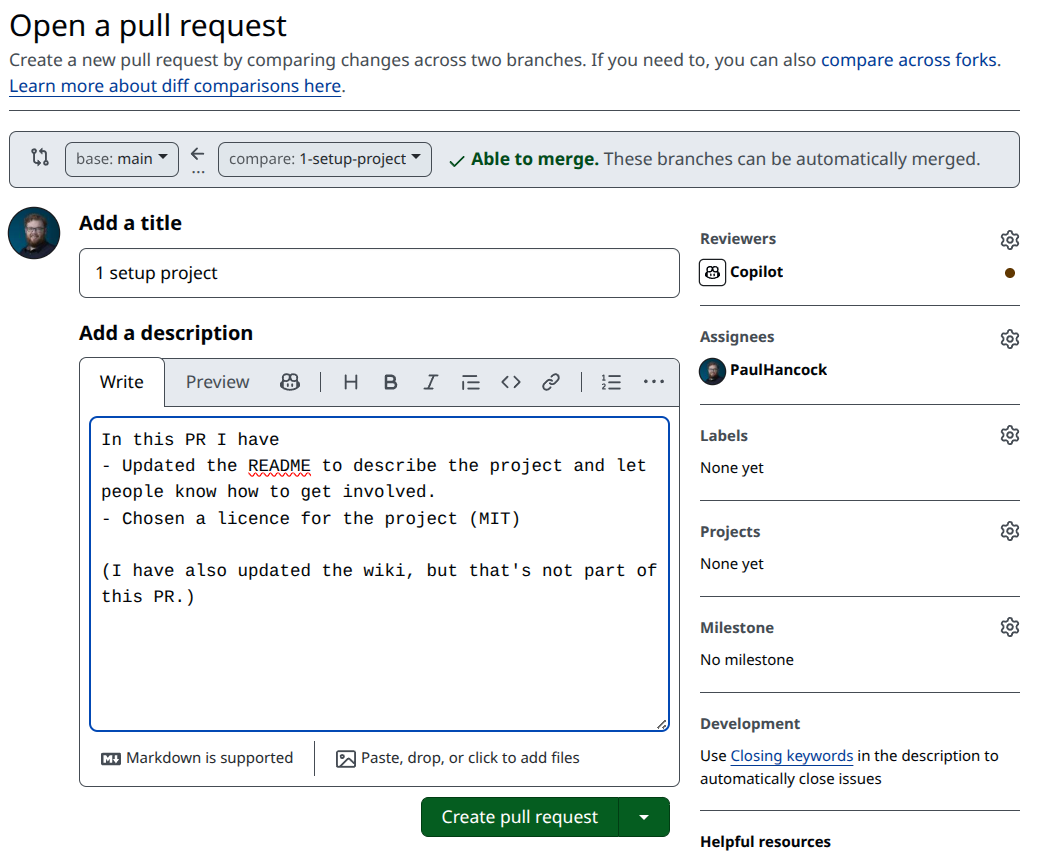
If you have copilot active on your GitHub it will add a comment to your PR. Since this is a very simple set of changes, the comment is just a summary of what we did (not so useful). If we had extensive changes, or if we were adding/editing code, then copilot might give some suggestions relevant to these changes. For example, if you have added new functions, but not added new tests for these functions, copilot might suggest that you add new tests.
A pull request (PR) on GitHub is composed of several key components, each serving a specific purpose in the collaborative review and integration process:
-
Conversation Tab: This is the main discussion area for the PR. Here, contributors and reviewers can leave comments, ask questions, and provide feedback about the proposed changes. The initial PR description summarizes what the PR does, references related issues (using
#issue-number), and outlines any special considerations. All subsequent discussion, clarifications, and review comments are tracked chronologically, providing a transparent record of the review process. -
Commits Tab: This section lists all the commits included in the pull request. Each commit represents a set of changes made to the codebase, with a message describing what was changed. Reviewing the commit history helps collaborators understand the development process, see incremental progress, and identify where specific changes were introduced.
-
Checks Tab: Here, you can see the results of automated checks and continuous integration (CI) workflows, such as tests, code style checks, or build processes. These checks are often powered by GitHub Actions or other CI services. Passing checks indicate that the proposed changes meet the project’s quality standards, while failures highlight issues that need to be addressed before merging.
-
Files Changed Tab: This tab provides a side-by-side diff view of all files modified by the PR. Reviewers can see exactly what lines were added, removed, or updated. Inline comments can be left on specific lines to request changes, ask for clarification, or suggest improvements. This granular review process helps ensure code quality and correctness.
-
Review and Approval: Reviewers can formally approve the PR, request changes, or leave general comments. The PR cannot be merged until all required reviews are complete and any blocking issues are resolved. This ensures that all changes are vetted by the appropriate team members.
-
Merge Controls: Once the PR is approved and all checks have passed, maintainers can merge the changes into the target branch (usually
main). GitHub provides options for different merge strategies (merge commit, squash, or rebase), and often prompts to delete the source branch after merging to keep the repository tidy.
Together, these components make pull requests a powerful tool for collaborative development, enabling transparent discussion, thorough review, and safe integration of new work into a shared codebase.
If changes need to be made before the PR is accepted then we note these changes in the conversation and the people assigned to the PR will address them. The changes are addressed by making additional commits to the branch which is being merged. If we have reviewers or actions associated with the PR, then they will have another review cycle. Once all changes are resolved and the reviewers are happy, we can merge the changes into the main branch.
Merge the Pull Request
- Go to your “BirdCount” repository on GitHub.
- Click the Pull requests tab and open the pull request you just created for project setup.
- Review the changes and ensure all tasks are complete.
- Click the Merge pull request button.
- Confirm the merge when prompted.
- (Optional) Click Delete branch to remove the feature branch after merging.
- Go to issues and confirm that the linked issue has been set to closed, close it if not.
Project Management Tools
GitHub milestones and issues work together as powerful project management tools, especially for research projects that require clear organization and progress tracking. Issues are used to document specific tasks, bugs, questions, or features that need attention. Each issue can be assigned to team members, labeled for categorization, and discussed collaboratively. Milestones, on the other hand, represent larger goals or phases of the project—such as completing a research paper draft or finishing data analysis. By grouping related issues under a milestone, teams can visualize progress toward these broader objectives. As issues are resolved and closed, the milestone’s completion percentage increases, providing a clear overview of how close the team is to reaching its goal. This structure helps research teams prioritize work, delegate responsibilities, and maintain transparency, ensuring that everyone stays aligned and project deadlines are met efficiently.
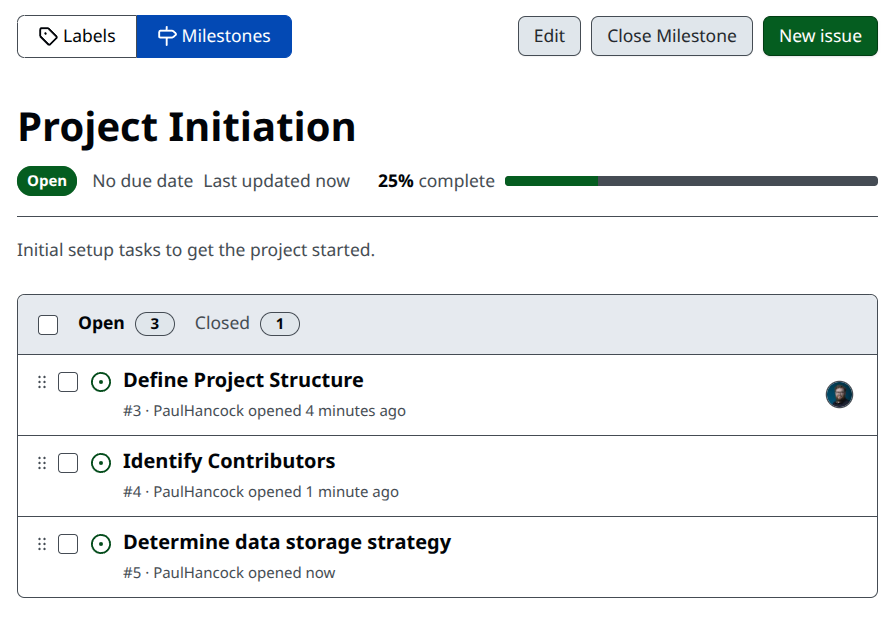
Organize Tasks with Milestones and Issues
- In your “BirdCount” repository, click the Issues tab.
- Click on Milestones (usually near the top right), then select New milestone.
- Name the milestone
Project Initiationand add a short description, such as “Initial setup tasks to get the project started.”- (Optional) Set a due date for the milestone.
- Click Create milestone.
- Go back to your issues, and add our first issue to this milestone.
- Create a new issue titled
Define Project Structure.- In the issue description, outline what needs to be done (e.g., “Document planned file/folder structure”).
- Assign this issue to the
Project Initiationmilestone.- Repeat steps 7–9 to add a few more issues, such as:
Identify contributorsDraft project timelineDetermine data storage formatsYour milestone now tracks all these foundational tasks, helping you monitor progress as you move the project forward.
Example
Self and Project Promotion Tools
GitHub gives us two really nice tools for promoting ourselves and our work - a personal profile, and a project website.
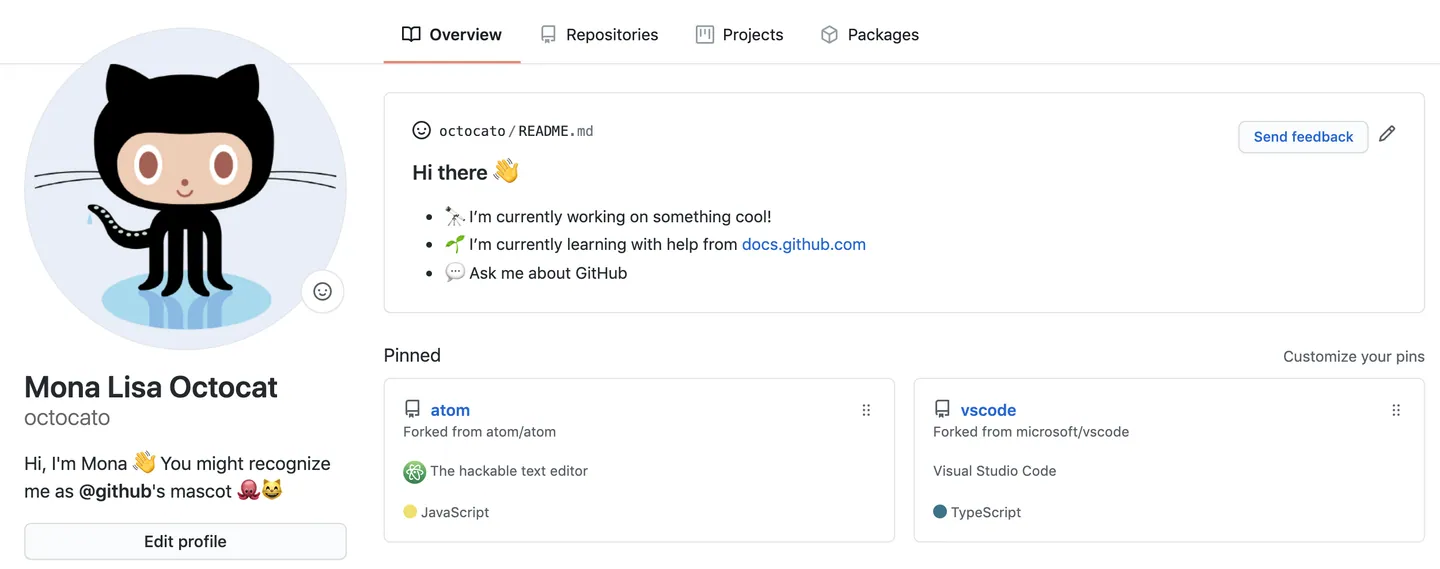
If you have a repository that is the same as your username, and it contains a README.md file, then this file will be rendered as part of your profile.
You can see an example in the image below.
By creating a README.md file in a repository that is the same as your username, you can make yourself an attractive profile page.
Create or Update Your GitHub Profile Page
- Go to github.com and log in to your account.
- Create a new repository named exactly as your GitHub username (e.g., if your username is
janedoe, the repo should bejanedoe).- Initialize the repository with a
README.mdfile.- Edit the
README.mdto include:
- A short bio or introduction
- Your research interests or current projects
- Links to your website, social media, or other relevant profiles
- Fun facts, images, or emojis to personalize your page
- Commit your changes. Your profile README will now appear on your GitHub profile page.
- Link your profile in the collaborative document.
The second the ability to host a website as part of your repository using GitHub Pages. For researchers, this provides a simple way to create project websites, host documentation, share interactive notebooks, or present results and data visualizations. By keeping your website content in the same repository as your code and data, you ensure that your documentation is always up to date and version-controlled. GitHub Pages supports Markdown and Jekyll, making it straightforward to build professional-looking sites without needing advanced web development skills. This enhances the visibility and accessibility of your research, making it easier for collaborators, reviewers, and the broader community to engage with your work.
Create a Project Landing Page with GitHub Pages
- On your project repository, click the Settings tab.
- Scroll down to the Pages section on the left panel.
- Under “Source”, select the branch (usually
main) and the folder (/docs) you want to use for your site, then click Save.- Create an
index.mdorREADME.mdfile in the/docsfolder with:
- A project title and short description
- Key features or goals of your project
- Author information and contact details
- (Optional) Images or links to documentation
- Commit your changes and wait a few minutes for your site to be published.
- Visit the provided URL to see your project’s front page live!
Example
index.htmlfor the Bird Count project<!DOCTYPE html> <html lang="en"> <head> <meta charset="UTF-8"> <title>Bird Count</title> <meta name="viewport" content="width=device-width, initial-scale=1"> <style> body { font-family: 'Segoe UI', Arial, sans-serif; background: #f7fafc; margin: 0; padding: 0; } header { background: #4a90e2; color: white; padding: 2rem 1rem 1rem 1rem; text-align: center; } header h1 { margin: 0; font-size: 2.5rem; letter-spacing: 2px; } header p { font-size: 1.2rem; margin-top: 0.5rem; } main { max-width: 700px; margin: 2rem auto; background: white; border-radius: 8px; box-shadow: 0 2px 8px rgba(0,0,0,0.07); padding: 2rem; } section { margin-bottom: 2rem; } h2 { color: #4a90e2; margin-top: 0; } ul { padding-left: 1.2rem; } .footer { text-align: center; color: #888; font-size: 0.95rem; margin: 2rem 0 1rem 0; } .bird-emoji { font-size: 2rem; margin-right: 0.2em; } </style> </head> <body> <header> <span class="bird-emoji">🐦</span> <span class="bird-emoji">🦉</span> <span class="bird-emoji">🦜</span> <h1>Bird Count</h1> <p>A collaborative project to survey and understand bird populations in our local area.</p> </header> <main> <section> <h2>Project Aims</h2> <ul> <li>Survey and record bird species and populations in the region.</li> <li>Promote citizen science and community engagement.</li> <li>Analyze trends in bird populations over time.</li> <li>Share data and findings openly for research and education.</li> </ul> </section> <section> <h2>Tools & Technologies</h2> <ul> <li>Python & Pandas for data analysis</li> <li>GitHub for collaboration and version control</li> <li>Jupyter Notebooks for interactive exploration</li> <li>GitHub Pages for sharing results</li> </ul> </section> <section> <h2>Get Involved</h2> <ul> <li>Contribute your bird sightings and data</li> <li>Help with data analysis and visualization</li> <li>Join discussions and suggest new features</li> <li>Contact us: <a href="mailto:birdcount@example.org">birdcount@example.org</a></li> </ul> </section> <section> <h2>Meet the Team</h2> <ul> <li>Project Lead: Your Name</li> <li>Contributors: You!</li> </ul> </section> </main> <div class="footer"> © 2025 Bird Count Project — Made with <span class="bird-emoji">🐦</span> </div> </body> </html>
Advanced GitHub Topics
Automating Tasks with GitHub Actions
GitHub Actions is a powerful automation tool that can significantly enhance research workflows by enabling continuous integration and continuous deployment (CI/CD) directly within your repository. For research projects, GitHub Actions can automatically build and deploy documentation whenever changes are pushed, ensuring that project information is always up to date. It can also run tests on code or data analysis scripts, catching errors early and maintaining reproducibility. Researchers can use Actions to automate data validation, generate reports, or even publish results to external platforms. By streamlining repetitive tasks and enforcing quality checks, GitHub Actions helps maintain consistency, saves time, and allows researchers to focus more on their scientific work.
Archiving and Citing Your Research with Zenodo
To make your research outputs citable and ensure long-term preservation, you can archive your GitHub repository with Zenodo, a research data repository developed by CERN. Zenodo integrates directly with GitHub, allowing you to automatically archive releases of your repository and assign each one a Digital Object Identifier (DOI).
To set this up, log in to Zenodo using your GitHub account and authorize Zenodo to access your repositories. In Zenodo, navigate to the “GitHub” section under your account settings and enable the repositories you want to archive. Once enabled, every time you create a new release on GitHub (using the “Releases” tab and clicking “Draft a new release”), Zenodo will archive a snapshot of your repository and mint a unique DOI for that version. This DOI can be included in your papers, documentation, or project website, making your code and data easily citable and discoverable. Zenodo also provides a recommended citation format and ensures your archived materials remain accessible even if the original repository changes or is deleted.
Wrap up
This lesson introduces researchers to the core features of GitHub and demonstrates how they can be leveraged to enhance research productivity, collaboration, and project management. It walks through the entire project lifecycle using a practical example—setting up a “BirdCount” repository—covering essential tasks such as creating repositories, managing issues and milestones, collaborating through branches and pull requests, and documenting work with wikis and project websites. The lesson also highlights the importance of maintaining clear documentation, tracking progress, and promoting both individual and project profiles using GitHub Pages and profile READMEs.
Beyond the basics, the lesson explores advanced topics like automating workflows with GitHub Actions and archiving research outputs with Zenodo for citation and long-term preservation. By following the hands-on exercises and best practices outlined, researchers can streamline their workflows, ensure reproducibility, and increase the visibility and impact of their work within the scientific community.
Please fill in the Post-workshop Survey.
Key Points
GitHub provides a centralized platform for version control and collaboration.
Repositories on GitHub can be used to organize and share research projects.
Issues and pull requests facilitate transparent and efficient collaboration.