Advanced Git
Overview
Teaching: 120 min
Exercises: 0 minQuestions
How should I work with Git?
How can I connect to multiple repositories?
What do all the options on the GitHub pull request mean?
Objectives
Understand branching and git workflows
Understand merge options on GitHub
Learn how to connect to multiple remotes
Git workflows
Git is the most commonly used version control system today. A Git workflow is a recipe or recommendation for how to use Git to accomplish work in a consistent and productive manner. Git workflows encourage developers and DevOps teams to leverage Git effectively and consistently. Git offers a lot of flexibility in how users manage changes. Given Git’s focus on flexibility, there is no standardized process on how to interact with Git. When working with a team on a Git-managed project, it’s important to make sure the team is all in agreement on how the flow of changes will be applied. To ensure the team is on the same page, an agreed-upon Git workflow should be developed or selected. There are several publicized Git workflows that may be a good fit for your team. Here, we will discuss some of these Git workflow options. In this section we’ll discuss a few different ways to use git. We refer to these as a process or workflow which you incorporate into your existing work habits.
What makes a workflow successful?
When evaluating a workflow for your team, it’s most important that you consider your team’s culture. You want the workflow to enhance the effectiveness of your team and not be a burden that limits productivity. Some things to consider when evaluating a Git workflow are:
- Does this workflow scale with team size?
- Is it easy to undo mistakes and errors with this workflow?
- Does this workflow impose any new unnecessary cognitive overhead to the team?
Centralized workflow
In this workflow there is a single repository (usually the one on GitHub) is designated as the central repository. When people want to make changes to the repo they pull the current version, make their changes and then push back to the central repo. This style works well if you have only a few developers who do not work on similar parts of the code at the same time, so the expectation for conflicts is very low. This method is simple to understand and easy to work with. If you are the sole developer/user of your repository then this is probably how you will work.
Atlassian have a deeper discussion about the pro/con of working in this way.

Feature branching workflow
Similar to the centralized workflow except that when changes are going to be made to the repo a developer will create a branch to work on those changes.
As a feature is being developed changes will often break the functionality of the software so keeping all these changes in a branch separate from main will mean that there is always a ‘known working’ version of the code that people can use.
You could consider the local copies of a repo in the centralized workflow to have a similar purpose to the branches in the feature branching workflow.
However, a key difference is that by having the branches stored in the repository, you can have multiple people seeing and working on these branches.
Another difference is that you can make a different branch for each feature, and have multiple features being developed at the same time.
Consider the case where you are working on a new feature for your code.
You pull the main branch from the centralized workflow and start developing that feature.
As you are part way through you find a bug that needs to be fixed in the code.
You now either have to make that bug fix part of the feature development, meaning that you cant push it back to the main repository until your development is complete, or you have to discard your development in order to fix the bug, before retuning.
Now consider how this would work if you used a feature branching workflow.
You make a new branch from main for feature-1 and start working on it.
You notice a bug in the main code so you create a new branch from main called bugfix-1.
You fix the bug in bugfix-1 and then merge it back to main and then also to feature-1 (possibly using a merge rebase main).
You can now return to developing on feature-1 without having to backtrack.

Another advantage to the feature branching workflow is that by having the branches exist in the central repo, you can have multiple people working on (testing/reviewing) them at the same time. The feature branching workflow includes a new operation that isn’t used in the centralized workflow: a pull (or merge) request. A pull request (or PR) is initiated on the central repository (eg, GitHub), and is a request to pull changes from one branch into another. The idea is that developer A will make a bunch of changes in their feature branch, and then when they are happy with the changes, they will create a PR to merge these into another branch (usually main). Good practice is to then have a different developer act as a reviewer for these changes. Developer B will look at what the feature branch is trying to address, what has changed, and check that tests are still passing, new tests have been created, and documentation has been created/updated. Once the reviewer is happy they approve the PR and the feature branch is merged. For solo developers the PR is not always required, but is still sometimes used as it can cause automated testing to be run (see CI/CD later). Even in small teams, it can be very beneficial to require all changes to the main branch to be done via pull requests from a feature branch, with some code review and discussion before the PR is accepted. Again, Atlassian have a more detailed description of the feature branching workflow.
GitFlow
GitFlow takes the feature branching workflow and adds some additional structure. The features are:
- A main branch that is changed only by pull requests from a development branch
- Tagging of the main branch with versions corresponding to updates to the branch
- A pull request onto the main branch is considered a “release”
- A persistent development branch from which all features are branched and then merged back onto
- Feature branches are deleted once merged back into the development branch
- Critical bugs in the main branch can be fixed and merged into both main and development branch. We call this a “hotfix” and it’s considered to be messy.
- Tracking of issues is done via GitHub issues, and to work on an issue you will create a branch with that issue name or number (eg.
114-https-bugfix)

When an issue is resolved, a pull request is made. Linking the issue to the pull request will cause the issue to be closed when the PR is accepted and merged. GitHub will automatically prompt you to delete the branch once it is merged.
This workflow is very good for working in teams as it will allow you to more easily incorporate project management into your development workflow. When working in a team, rules or guides for branch names, testing and documentation requirements, and coding style, should all be agreed on and ideally documented within the repository itself.
Forking a repository
GitHub introduces an action that is similar to branching which is forking. When forking a repository, you are making a copy of that repository into an account that you have write permissions for, but also making a link between the forked version and the original (upstream) version.

Forking a repository is a way of creating your own version to work on in instances where you don’t have permission to create new branches. You can make changes to the repository, test them out and deploy your work, and then submit a pull request back into the original (upstream) repository without needing any permissions from the repo owner.
When working on a fork of a repository, you’ll also have the option to pull changes from the upstream into your version so that you can stay in sync.
When working with a forked repository you’ll potentially have two remote repositories that you wish to push/pull changes to/from. In order to connect your local repository to the upstream repo, you have to add the link manually via:
git remote add upstream https://github.com/<aUser>/<aRepo.git>
Now when you want to fetch changes you can do:
git fetch upstream
to fetch changes from the upstream repo or similarly:
git fetch origin
to fetch changes from the forked repo.
Note that that, since git is natively decentralized, you can add as many remote repositories as you wish, and pull/push from any of them (respecting permissions).
For example, you can have your repository hosted on github with one url, and a mirror of your repo hosted privately or elsewhere at another url.
To do this you just add additional remotes to your repo and then specify your target when doing git pull or git push.
It is common to see sites like github used as a public facing repository for software, with development branches being created in a (private) repository hosted elsewhere, and updates to the github version of the code only occur when releases are made.
For example, see https://github.com/postgres/postgres.
Merging branches
The main thing that trips people up when working with git is the potential for there to be conflicts when you are trying to merge branches, or when you are trying to push/pull from a remote. The golden rule of merge conflict resolution is that avoidance is better than a cure.
Reducing Conflicts
If you find yourself resolving a lot of conflicts in a project, consider these technical approaches to reducing them:
- Pull from upstream more frequently, especially before starting new work
- Use topic branches to segregate work, merging to main when complete
- Make smaller, more atomic commits
- Where logically appropriate, break large files into smaller ones so that it is less likely that two authors will alter the same file simultaneously
Conflicts can also be minimized with project management strategies:
- Clarify who is responsible for what areas with your collaborators
- Discuss what order tasks should be carried out in with your collaborators so that tasks expected to change the same lines won’t be worked on simultaneously
- If the conflicts are stylistic churn (e.g. tabs vs. spaces), establish a project convention that is governing and use code style tools (e.g.
htmltidy,perltidy,rubocop, etc.) to enforce, if necessary
Now with all that said, conflicts will still occur and it’s important to not get disheartened when they do. Dealing with conflicts from the command line can be tedious and error prone. Using an IDE to help you through the process can make things a LOT simpler.
merge vs rebase
When you have resolved all your conflicts and are ready to merge your branches there are a few options. It is recommended that you use the pull request feature on Github to complete the merge process as it’ll give you a run down of weather the merge is possible, give other developers the opportunity to comment or approve the merge, and for any automated testing to be completed (see below).
Once you get the green button that says “Merge pull request” there are a few options to consider:
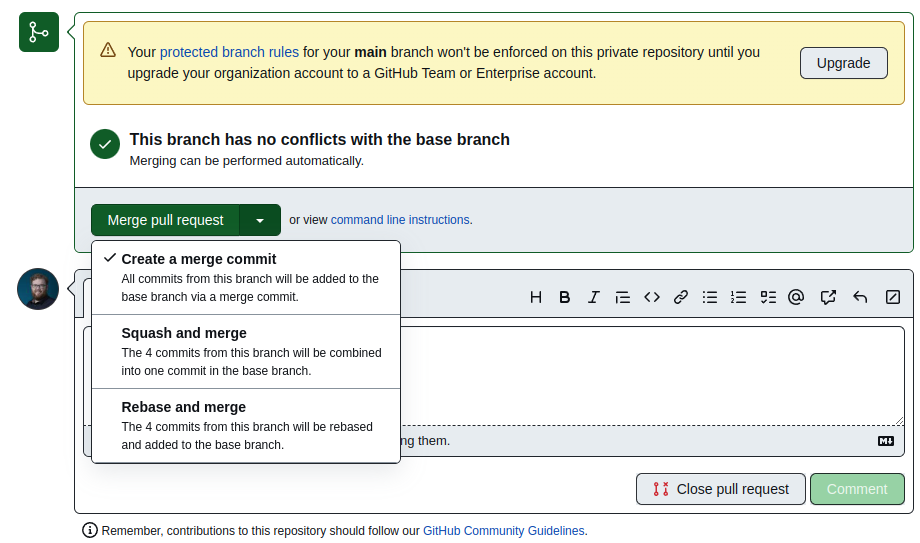
The options are
- Create a merge commit
- All of your commits will be added to the main branch, with a new commit generated to indicate a merge took place
- Squash and merge
- All the commits from the feature branch will be applied as a single (large) commit on the main branch
- Breaks our rule of thumb “make many small commits” but removes a lot of the “bug fix?” type commits you might make to a feature branch
- Rebase and merge
- History is rewritten
- All your commits to the feature branch are un-applied
- The commits on the main branch are applied to your feature branch
- Then all the feature branch commits are re-applied
The question of “which option should I take”, the recommendation is just the default “merge commit”. If you are pedantic about having a ‘nice’ looking history then squash/rebase might be better for you
Using two remote locations
Git is designed as a decentralized version control system meaning that there is no default single source of truth. GitHub has become for many people a central repo that everyone interacts with, but this is just in practice and such a mode of operation is not enforced.
By default your git repository will be connected to zero or one remote repo, depending on how you created your repo (init, vs clone).
git remote -v
origin  git@github.com:ADACS-Australia/KLuken_HPC_training_2022B.git (fetch)
origin  git@github.com:ADACS-Australia/KLuken_HPC_training_2022B.git (push)
git remote add other git@github.com:PaulHancock/redesigned-succotash.git
git push other
Enumerating objects: 676, done.
Counting objects: 100% (676/676), done.
Delta compression using up to 8 threads
Compressing objects: 100% (659/659), done.
Writing objects: 100% (676/676), 3.52 MiB | 1.78 MiB/s, done.
Total 676 (delta 291), reused 241 (delta 10)
remote: Resolving deltas: 100% (291/291), done.
To github.com:PaulHancock/redesigned-succotash.git
 * [new branch]      gh-pages -> gh-pages
In the above you now have two places that you can push to or pull from. One of the (remote) will be the default, and if you want to use the other you’ll have to be explicit about where to push/pull from. While it is possible to set up git so that your push operations will go to both repos at the same time, it is not recommended.
Continuous Integration / Delivery (CI/CD)
Probably the most useful CI/CD for researcher who code (or RSEs) is the ability to have your code and documentation built and tested whenever you push changes to your github repository.
Automated testing and documentation with GitHub actions requires that you first have some testing or documentation in place.
See the lesson Document Test Package from the ADACS Collaborative Code development workshop for details on how to make and run tests using pytest and how to run them locally.
In order to run the tests on GitHub you’ll need to create a workflow description file in a special directory .github/workflows.
Whilst this can be done from your local machine, the easiest way to create a workflow is using a template on the GitHub actions page.
To create a new workflow go to the actions page for your repository and select “New workflow”.
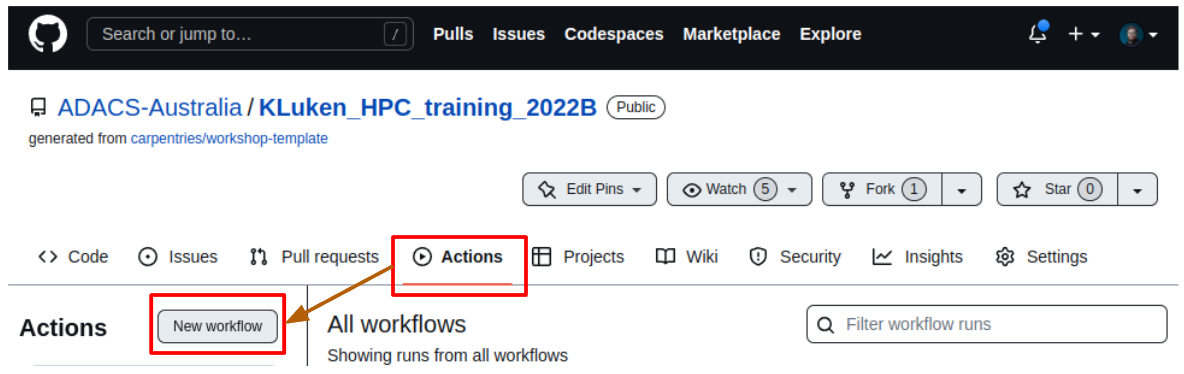
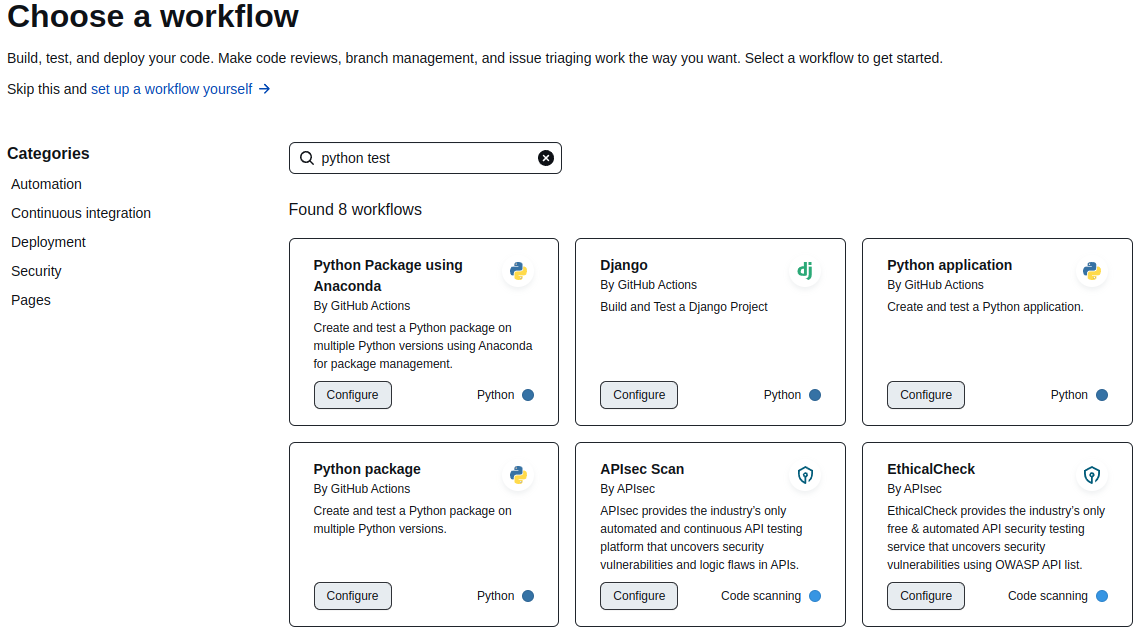
As you’ll see on this page there are a lot of pre-made workflows for a range of languages and for different purposes. We will select the “Python Package” workflow (not the anaconda one though). If you don’t see the tile on your page then search for “python test”. Once you locate the example workflow you should press “configure”
You’ll be presented with a page that is editing a new file called python-package.yml in the directory .github/workflows/.
If you repository has a requirements.txt that holds all your dependencies, and your tests are run using pytest then you won’t have much to change in this example workflow.
You can change which branches the workflow will run on (main/dev/*), and if you want it to run when people push to that branch or only when a pull request is made.
You can make multiple workflows which have different trigger conditions so that, for example, pushing to dev will install and test all code, whilst making a pull requests into main will also build the documentation and be much more strict with the linting options.
Key Points
Choose a workflow that suits your project