Working on an HPC
Overview
Teaching: 15 min
Exercises: 15 minQuestions
How do I access an HPC facility?
How do I run tasks on an HPC?
How do I request resources for my jobs?
How do I access already installed software?
How can I install other software?
Objectives
Understand how to login and submit jobs
Know how to create a workflow with job dependencies and array jobs
Know how to access/install/use software
Logging in
We will be working with the Swinburne HPC cluster called OzSTAR, you should have an account, and be a member of the group oz983.
See the setup page if you need more information.
To connect to a login node you should use ssh:
ssh <user>@ozstar.swin.edu.au
You will be asked for a password each time you connect. If you would prefer to work with ssh keys for password-less login, this tutorial is quite helpful.
Upon login you’ll be greeted with a message of the day:
-----------------------------------------------------------------------------
Website: http://supercomputing.swin.edu.au
------------------------------------------------------------------------------
Please make sure you keep up-to-date with the usage policies outlined within
the website, noting that with the exception of your home directory, NO data on
any OzSTAR filesystems is backed up. Repeat: NOT backed up.

Home directories have a strict 10GB quota. All large data files, such as job
output, should be written to the dagg filesystem at /fred/<project>.

You can use the 'quota' command to check usage on both filesystems.
------------------------------------------------------------------------------
The OzStar cluster login nodes farnarkle1 and 2 are available to use as
interactive nodes for debugging and running small jobs. Login sessions
are limited to 4 cores per user. Login nodes may be rebooted at any
time without notice for updates or for security reasons.
To use the other >4000 cores in OzSTAR you need to go via the batch system.
------------------------------------------------------------------------------
and you’ll either be working on the farnarkle1 or farnarkle2 log-in node.
It doesn’t matter which node you join.
You can check the groups that you are a member of using the groups command:
[phancock@farnarkle2 ~]$ groups
curtin ozstar_users oz983
You probably wont be part of the curtin group, but you should be a member of the oz983 group, as that is the one that we’ll be using for this course.
You have access to two file systems: home and fred.
The home file system holds your home or ~/ directory and files, and is limited to 10GB.
It is backed up but should not be used for frequent file access (don’t do work here).
The fred file system is a large scratch storage for general use.
It is not backed up, but doesn’t have a purge policy, so you can store files here long term.
See these docs for more information on the file system.
Create a personal work folder
Navigate to
/fred/oz983. Create a directory in here with your usernameSolution
cd /fred/oz983
mkdir ${USER}
How do I run tasks on an HPC
Currently you will have only a very minimal set of software loaded. To see what software modules you have loaded:
module list
Currently Loaded Modules:
  1) nvidia/.latest (H,S)   2) slurm/.latest (H,S)

  Where:
   S:  Module is Sticky, requires --force to unload or purge
   H:             Hidden Module
Effectively we start of with just enough tools to submit and monitor jobs.
Remember from last lesson, we need to use a scheduler in order for our jobs to be run on the compute nodes:

Querying the queue system
Before we run any jobs we need to see what resources are available.
One way to do this is using the sinfo command which will report information similar to:
[phancock@farnarkle2 oz983]$ sinfo
PARTITION   AVAIL  TIMELIMIT  NODES  STATE NODELIST
skylake*       up 7-00:00:00      2   resv john[1-2]
skylake*       up 7-00:00:00    114    mix bryan[1-8],john[3-7,9-21,23-110]
skylake*       up 7-00:00:00      2  alloc john[8,22]
skylake-gpu    up 7-00:00:00      2   resv john[1-2]
skylake-gpu    up 7-00:00:00    114    mix bryan[1-8],john[3-7,9-21,23-110]
skylake-gpu    up 7-00:00:00      2  alloc john[8,22]
knl            up 7-00:00:00      4   unk* gina[1-4]
sstar          up 7-00:00:00     10 drain* sstar[107-109,122,130,140,146-147,155,164]
sstar          up 7-00:00:00      1   unk* sstar154
sstar          up 7-00:00:00      2   resv sstar[024,151]
sstar          up 7-00:00:00     45  alloc sstar[011-023,025-032,110-121,123-129,152,165-167,301]
sstar          up 7-00:00:00     31   idle sstar[101-106,131-139,141-145,148-149,153,156-163]
gstar          up 7-00:00:00      2 drain* gstar[101,204]
gstar          up 7-00:00:00     49   unk* gstar[011-059]
gstar          up 7-00:00:00      3   idle gstar[201-203]
datamover      up 1-00:00:00      4   idle data-mover[01-04]
osg            up 7-00:00:00     10   idle clarke[1-10]
The columns are as follows:
-
The PARTITION information. A partition is a logical group of nodes that have been collected together for some common purpose. You can think of a partition as a “queue” on a cluster. Different partitions will have different intended uses. See the documentation for a description of the different partitions.
-
The AVAILability of the given partition. Up = useable, down/drain/inact = not usable.
-
The maximum TIMELIMIT that jobs can have in this queue. Each job can request up to this amount of time. This is not cpu time but regular time measured by a clock on the wall (a.k.a wall time).
-
The number of NODES in this current configuration.
- The STATE of each node.
- Reserved - not in use, but reserved for future use
- Allocated - in use will return to idle when complete
- Mix - Nodes which are partially allocated and partially idle
- Idle - not in use
- Unknown - ?
- Draining - in use but will not be idle when complete (eg going into maintenance or shutdown)
- NODELIST A list of node names (shortened). Check out this FAQ for what the node names mean.
The table has been grouped so that nodes in the same partition and same state will appear on a single line.
In the example above, you can see that the partition called datamover has 4 nodes available, and all of them are currently idle.
The skylake partition has a total of 118 nodes.
Note that the nodes called bryan[1-8] appear in both the skylake and skylake-gpu partition, while the gina[1-4] nodes are only available in the knl partition.
The sinfo command tells us about the state of the different partitions.
If we want to learn about the jobs that have been submitted then we can use squeue.
This will show us what jobs are currently in the queue system.
> squeue
             JOBID PARTITION     NAME     USER ST       TIME  NODES NODELIST(REASON)
          29254695 datamover dd_oss.b  rhumble PD       0:00      1 (Dependency)
          29173490 datamover dd_oss.b  rhumble PD       0:00      1 (Dependency)
          29054140 datamover dd_oss.b  rhumble PD       0:00      1 (Dependency)
        29242343_0   skylake n_polych bgonchar PD       0:00      4 (Resources)
          29279155   skylake full.195     qliu PD       0:00      5 (Priority)
          29054138 skylake-g dd.batch  rhumble PD       0:00      1 (Dependency)
          29290681 skylake-g  KGAT_11      bli  R    1:36:57      1 john96
          29291743 skylake-g      zsh  tdavies  R    1:02:26      1 john8
          29291493 skylake-g Train_NF cchatter  R    1:08:59      1 bryan1
          29054139     sstar dd_oss.b  rhumble PD       0:00      1 (Dependency)
          29292308     sstar SanH2-rD mmanatun  R       8:02     31 sstar[101-106,131-139,141-145,148-149,153,156-163]
          29286615     sstar   0_full avajpeyi  R    2:54:14      1 sstar301
The list above shows us the jobs that are running. Each job has a unique JOBID. Jobs that are waiting to start will have a TIME of 0:00, and then a reason in the final column. Jobs that are currently running will have a TIME that shows the remaining time for the job, and a NODELIST of which nodes the jobs are running on.
Running squeue will often give you a very long list of jobs, far too many to be useful.
Using squeue -u ${USER} will limit the list to only your jobs.
Running Jobs
There are two types of jobs that can be run: either a batch job where SLURM executes a script on your behalf, or an interactive job whereby you are given direct access to a compute node and you can do things interactively.
Interactive jobs
We will start with a simple interactive job.
Use salloc to start an interactive job.
You should see a sequence of output as follows:
[phancock@farnarkle2 oz983]$ salloc
salloc: Pending job allocation 29294281
salloc: job 29294281 queued and waiting for resources
salloc: job 29294281 has been allocated resources
salloc: Granted job allocation 29294281
salloc: Waiting for resource configuration
salloc: Nodes john16 are ready for job
[phancock@farnarkle2 oz983]$ ssh john16
[phancock@john16 ~]$
Note that salloc will create an allocation for us, but not always join us to the relevant node.
To join the node we can use ssh.
Note that my command prompt was still @farnarkle2 (a login node), but i have to join @john16 to access the allocated resources.
When you finish with an interactive session you can exit it using exit or <ctrl>+d to end the ssh session, and then again to exit the job allocation.
[phancock@john16 ~]$ squeue -u ${USER}
             JOBID PARTITION     NAME     USER ST       TIME  NODES NODELIST(REASON)
          29294281   skylake interact phancock  R       1:20      1 john16
[phancock@john16 ~]$ exit
[phancock@farnarkle2 0z983]$ exit
salloc: Job allocation 29294281 has been revoked.
[phancock@farnarkle2 0z983]$
Interactive jobs are good for debugging your code, but usually leave the compute node idle whilst you read/think/code. Interactive jobs should be used sparingly, in preference of batch jobs.
Batch jobs
The most common type of job that you will run on an HPC is a batch job. A batch job requires that you have a script that describes all the processing that you will need to do, as well as an estimate of the resources that you’ll need. With these bits of information the SLURM scheduler can then appropriately assign you resources and execute the work.
Lets run a basic hello world script, watch it run, and then pick apart what happened.
The python script
/fred/oz983/KLuken_HPC_workshop/hello.py#! /usr/bin/env python import os host = os.environ["HOSTNAME"] print(f"Hello from the world of {host}")
The bash script
/fred/oz983/KLuken_HPC_workshop/first_script.sh#! /usr/bin/env bash # #SBATCH --job-name=hello #SBATCH --output=res.txt # #SBATCH --ntasks=1 #SBATCH --time=05:00 #SBATCH --mem-per-cpu=200 # load the python module module load python/3.8.5 # move to the work directory cd /fred/oz983/${USER} # do the work python3 ../KLuken_HPC_workshop/hello.py | tee hello.txt sleep 120
We then submit the batch script to SLURM using the sbatch command from our own directory, and view our job list:
[phancock@farnarkle2 phancock]$ sbatch ../KLuken_HPC_workshop/first_script.sh
Submitted batch job 29294385
[phancock@farnarkle2 phancock]$ squeue -u ${USER}
             JOBID PARTITION     NAME     USER ST       TIME  NODES NODELIST(REASON)
          29294385   skylake    hello phancock PD       0:00      1 (Priority)
Initially our jobs is not running because it doesn’t have high enough priority, but after a minute or so we see:
[phancock@farnarkle2 phancock]$ squeue -u ${USER}
             JOBID PARTITION     NAME     USER ST       TIME  NODES NODELIST(REASON)
          29294385   skylake    hello phancock  R       0:05      1 john3
The script will take a few seconds to run the python script, and then sleep for 2 minutes so that we have a chance to catch it in the queue.
We’ll get the out put ina file called res.txt, which sits in the directory from which we submitted the sbtach job.
[phancock@farnarkle2 phancock]$ more res.txt
Hello from the world of john3
Now let’s review what we did:
- Created a python script which did all the “hard” work.
- Created a bash script which told SLURM about the resources that we needed, and how to invoke our program.
- The
##SBATCHcomments at the top of the bash script are ignored by bash, but are picked up by SLURM.--job-nameis what shows up in thesqueuelisting. It defaults to your script name, but can be renamed here.--outputis the location of the file that will contain all of theSTDOUTfrom the running of your program--error(not used above) is the location of the file that will have theSTDERRfrom your program--ntaskstells SLURM how many tasks you’ll be running at once--timeis the (wall) time that this job requires. If your job does not complete in this time it will be killed.--mem-per-cpuwill tell SLURM how much ram is required per cpu (can also use just--mem) default is in MB, but you can use gb
- Load the software that we’ll need using the
modulesystem - Move to the directory which contains the code we are running
- Run the python code and copy the stdout to a file
- Sleep for 120 to simulate a job that takes more than a few seconds to run
- The
- Submitted the job to the scheduler using
sbatch - Watched the progress of the job by running
squeue -u ${USER}(a few times) - Inspected the ouput once the job completed by viewin
res.txt.
Building a workflow
Once we know how to submit jobs we start thinking about all the jobs that we could run, and quickly we get into a state where we spend all our time writing jobs, submitting them to the queue, monitoring them, and then deciding which jobs need to be done next and submitting them. This is time consuming and it’s something we should get the computers to do for us. If we think about the work that we need to do as discrete jobs, and then join multiple jobs together to form a workflow, then we can implement this workflow on an HPC using the scheduler system.
Below is a generic workflow with just three parts.

The purple boxes represent work that needs to be done, and the arrows represent dependency of tasks. You cannot process the data until you have retrieved the data, and you have to process the data before you do the cleanp.
In the above diagram we would say that there is a dependency between the tasks, as indicated by the arrows.
Slurm allows us to create these dependency links when we schedule jobs so that we don’t have to sit around waiting for something to complete before submitting the next job.
When we schedule a job with sbatch we can use the -d or --dependency flag to indicate these links between our jobs.
Dependency example
Try the following in your directory. Remember to replace the
123456with the actual job id that is returned to you[user@host mydir]$ sbatch ../KLuken_HPC_workshop/first_script.sh Submitted batch job 123456 [user@host mydir]$ sbatch -d afterok:123456 ../KLuken_HPC_workshop/second_script.sh [user@host mydir]$ squeue -u ${USER}Example output
[phancock@farnarkle1 phancock]$ sbatch ../KLuken_HPC_workshop/first_script.sh
Submitted batch job 29442667
[phancock@farnarkle1 phancock]$ sbatch -d afterok:29442667 ../KLuken_HPC_workshop/second_script.sh
Submitted batch job 29442668
[phancock@farnarkle1 phancock]$ squeue -u ${USER}
             JOBID PARTITION     NAME     USER ST       TIME  NODES NODELIST(REASON)
          29442668   skylake no_hello phancock PD       0:00      1 (Dependency)
          29442667   skylake    hello phancock PD       0:00      1 (Priority)
In the above example you’ll see that the first job submitted was not running due to (Priority).
This means that the job in in the queue but that it is waiting for other jobs to complete before it can be run.
The second job, however, is not running due to (Dependency), and this is because it’s waiting for the first job to complete.
Again in the above example, we used the dependency criteria of afterok, but many more options are available:
after: This job starts after the other job has begun or been canceled.afterany: This jobs starts after the other job has finished, regulardless of status.afterok: This job statrts after the other job has finished successfully.afternotok: This job starts after the other job has finished un-successfully (returned error, or was killed by the scheduler).
It is possible to list multiple dependencies by appending multiple job ids.
For example afterok:123:124:125:153
In the case of afterok if the named job fails, then this job will not be run - it will be deleted from the schedule.
Simlarly with the afternotok - if the named job successed then this job will not be run.
By using the afterok and afternotok dependencies it is possible to set up a fork in your workflow, such that when a job fails, a cleanup job will run, but when the job succeeds the next part of your workflow will run.
Plan a job
Use the dependencies listed above to create the following workflow in SLURM:
- Hold a meeting of criminals to plan a heist (3 criminals)
- After the meeting and before the heist, all criminals go home and plan ways to back stab their colleagues
- Heist is enacted
- If the heist is successful book flights to the cayman islands and retire
- If the heist fails enact back-stabbing plans
Possible solution
> sbatch meeting.sh
Submitted batch job 100
> sbatch -d afterany:100 plan1.sh
Submitted batch job 101
> sbatch -d afterany:100 plan2.sh
Submitted batch job 102
> sbatch -d afterany:100 plan3.sh
Submitted batch job 103
> sbatch -d afterany:101,102,103 heist.sh
Submitted batch job 104
> sbatch -d afterok:104 retire.sh
Submitted batch job 105
> sbatch -d afternotok:104 back-stab.sh
Submitted batch job 106
Parallel workflows
We will be discussing parallel computing in lesson 04 in more depth. As a prelude to that lesson lets consider a workflow which has a structure more like the following:
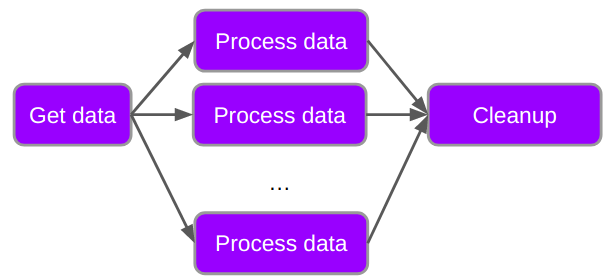
In this workflow we have a single job which fetches all the data that we need to process, and then multiple processing jobs which are independent of each other, followed by a cleanup job. The dependency indicated by the arrows shows that the different processing jobs need to happen after the data retrieval and before the cleanup, but have no reliance on each other. In this case we can set up the dependencies as follows:
- queue start job
- queue processing job1, depends on start job
- queue processing job2, depends on start job
- queue processing job3, depends on start job
- …
- queue processing jobN, depends on start job
- queue cleanup job, depends on all of the processing jobs
In the above case it is highly likely that the processing jobs (1..N) will be copies of each other, with only a small change in the way that the processing is done. For example: the start job can download a lot of data, and the individual processing jobs are processing the same data, but testing different models each time. In this case the parameters of the models are all that is changing in the job files. We could either set up a template system to make a copy of the template job, and then alter the parameters within, and submit them according to the above scheme, or we could get SLURM to do this work for us.
This brings us to the concept of array jobs. In an array job we write a single script that is submitted to SLURM, but we tell it that we want multiple copies of this job to run. Within the job we then identify the ID or job number, and use that to set up the parameters for the job. Let’s explore this idea with a simple example.
We have a process that does some simulation based on initial parameters and we want to run this on various different inputs and collect the results in a summary file. Our workflow is:
- set up the parameters for each of the simulations
- run the simulation on each set of parameters
- colate all the results together in one file
The simulation that we want to run is computing the area and perimeter of a regular polygon (an N-gon) which is inscribed within the unit circle. Our simulation is contained within the following python script:
area_of_ngon.py
#! /usr/bin/env python

import argparse
import math
import sys


def area_perimeter_ngon(n=3):
  """
  Compute the area and perimeter of a regular N-gon
  inscribed within a cirlce of radius 1.
  """
  # Complain if n<3 because those shapes don't exist
  if n<3:
    raise AssertionError(f"Cannot compute area for ngon when n={n}")
  r = 1 # Radius of our circle
  perimeter = 2*n*r * math.sin(math.pi/n)
  area = 0.5 * n * r**2 * math.sin(2*math.pi/n)
  return area, perimeter


if __name__ == "__main__":
  parser = argparse.ArgumentParser()
  parser.add_argument('n', default=None, type=int, help='Number of angles in our n-gon')
  parser.add_argument('--out', dest='out', default='output.txt', type=str, help='output file')
  options = parser.parse_args()
  area, perimeter = area_perimeter_ngon(options.n)

  with open(options.out,'w') as f:
    f.write(f'A {options.n}-gon inscribed within a unit circle has an area of {area:5.3f} and a perimeter of {perimeter:5.3f}\n')
Our script has been built in such a way that we can control it’s behaviour using command line arguments:
area_of_ngon.py --out 3-gon.txt 3
Our setup script is:
start.sh
#! /usr/bin/env bash
#
#SBATCH --job-name=start
#SBATCH --output=/fred/oz983/%u/start_%A_out.txt
#SBATCH --error=/fred/oz983/%u/start_%A_err.txt
#
#SBATCH --ntasks=1
#SBATCH --time=00:05:00
#SBATCH --mem-per-cpu=1G

# move to the directory where the script/data are
cd /fred/oz983/${USER}

#make a file
touch input_data.txt

echo "doing some pre-processing work"

# put some data in
for i in 3 4 5 6 7 8;
do
  echo ${i} >> input_data.txt
done
As you can see this start up script creates a file called intput_data.txt which contains the numbers 3..8.
Also note that we have use %u in the path for the output and error logs.
When we submit the job SLURM will replace %u with the username of the person submitting the job.
Similarly, we have use %A as part of the file name, and SLURM will replace this with the jobid.
The end result is that our error and ouput logs will look like:
/fred/oz983/phancock/start_123456_out.txt
and if we run our script multiple times, the log files wont get over written.
We then create a script that will read one of the lines from this file, and use it to run our python script.
This script is part of an array job.
We use --array=start-end to indicate that this is an array job and what job indicies we would like to use.
branch.sh
#! /usr/bin/env bash
#
#SBATCH --job-name=ngon
#SBATCH --output=/fred/oz983/%u/ngon_%A-%a_out.txt
#SBATCH --error=/fred/oz983/%u/ngon_%A-%a_err.txt
#
#SBATCH --ntasks=1
#SBATCH --time=00:05:00
#SBATCH --mem-per-cpu=1G
#SBATCH --array=1-6

# load modules
module load python/3.8.5

# move to the directory where the script/data are
cd /fred/oz983/${USER}

data_file='input_data.txt'

# read the i-th line of the data file (where i is the array number)
# and stor it as "n"
n=$(sed -n ${SLURM_ARRAY_TASK_ID}p ${data_file})

echo "I'm array job number ${SLURM_ARRAY_TASK_ID}"
echo "My n-gon number is ${n}"

python3 ../KLuken_HPC_workshop/area_of_ngon.py --out ${n}-gon.txt ${n}
The script branch.sh is doing a few new things we should note:
- we use
%ato use the array task id in the filename of the output (egngon_123456-1_out.txt). - we set
--array=1-6to indicate that we want six jobs to run with task ids of 1,2,3,4,5 and 6. - we read the environment variable
${SLURM_ARRA_TASK_ID}to determine the task id - we use sed to print the line from the data file corresponding to our task id and save it as
n - run our simulation script with parameter
${n}
Finally our collect and clean up script looks like:
collect.sh
#! /usr/bin/env bash
#
#SBATCH --job-name=collect
#SBATCH --output=/fred/oz983/%u/collect_%A_out.txt
#SBATCH --error=/fred/oz983/%u/collect_%A_err.txt
#
#SBATCH --ntasks=1
#SBATCH --time=00:05
#SBATCH --mem-per-cpu=200


# move to the directory where the script/data are
cd /fred/oz983/${USER}

# list all the files that we will 'process'
files=$(ls *gon.txt)

# this is where the 'proccessed' data will end up
outfile=collected.txt

echo "collecting outputs from : ${files}"
echo "results will be in: ${outfile}"

# delete the outfile before we write to it
if [[ -e ${outfile} ]]; then rm ${outfile};fi

# do the 'processing' and write to the outfile
for f in ${files}; do
  cat ${f} >> ${outfile}
  # delete the intermediate files to save space
  rm ${f}
done


echo "Phew! Hard work complete..."
There isn’t much new in the collect script, except to note that we also delete the intermediate data files.
With all of the above in place we can then make our workflow run using the following three commands.
[phancock@farnarkle1 phancock]$ sbatch --begin=now+120 ../KLuken_HPC_workshop/start.sh
Submitted batch job 29442061
[phancock@farnarkle1 phancock]$ sbatch -d afterok:29442061 ../KLuken_HPC_workshop/branch.sh
Submitted batch job 29442065
[phancock@farnarkle1 phancock]$ sbatch -d afterok:29442065 ../KLuken_HPC_workshop/collect.sh
Submitted batch job 29442066
The --begin=now+120 tells SLURM that we don’t want the first job to start for another 2 minutes.
This is just gives us time to set up the dependencies before the job runs.
Note: when we set up the dependency for the collect script we just need to refer to the array job id and not all the individual tasks. Slurm will automatically wait until all parts of a job have completed before resolving dependencies.
We can watch the jobs move through different stages of the queue as follows.
[phancock@farnarkle1 phancock]$ watch squeue -u ${USER}
             JOBID PARTITION     NAME     USER ST       TIME  NODES NODELIST(REASON)
          29442061   skylake    start phancock PD       0:00      1 (BeginTime)
          29442066   skylake  collect phancock PD       0:00      1 (Dependency)
    29442065_[1-6]   skylake     ngon phancock PD       0:00      1 (Dependency)
# Start job is waiting to begin, others are waiting for dependency to be resolved

             JOBID PARTITION     NAME     USER ST       TIME  NODES NODELIST(REASON)
          29442061   skylake    start phancock CG       0:04      1 john31
          29442066   skylake  collect phancock PD       0:00      1 (Dependency)
    29442065_[1-6]   skylake     ngon phancock PD       0:00      1 (Dependency)
# start job is running, others are waiting on dependency

             JOBID PARTITION     NAME     USER ST       TIME  NODES NODELIST(REASON)
        29442065_6   skylake     ngon phancock PD       0:00      1 (Priority)
        29442065_5   skylake     ngon phancock PD       0:00      1 (Priority)
        29442065_4   skylake     ngon phancock PD       0:00      1 (Priority)
        29442065_3   skylake     ngon phancock PD       0:00      1 (Priority)
        29442065_2   skylake     ngon phancock PD       0:00      1 (Priority)
          29442066   skylake  collect phancock PD       0:00      1 (Dependency)
        29442065_1   skylake     ngon phancock PD       0:00      1 (Priority)
# start job has completed, the ngon jobs are waiting in the queue ready to start
# the collect job is still waiting on dependencies to be resolved

             JOBID PARTITION     NAME     USER ST       TIME  NODES NODELIST(REASON)
          29442066   skylake  collect phancock PD       0:00      1 (Priority)
# all the ngon jobs are finished and now the collect job is waiting to start

             JOBID PARTITION     NAME     USER ST       TIME  NODES NODELIST(REASON)
# all jobs now complete
We now have an understanding of how to run job on and HPC with SLURM, how to create a workflow, and monitor the status of our jobs. The we will now focus on doing jobs that are a more than just printing things, and for this we’ll need some of our own software.
Requesting additional resources
So far we have been specifying (wall) time, tasks/cpus, and RAM required for our jobs, but additional resources are available.
The two additional resources that we can request on OzSTAR are GPUs and local storage attached to the node.
On any SLURM system you can run sbatch --gres=help to see a list of the resources that can be requested.
GPU resources
Accessing GPU resources can be done using the “generic resource request” which is #SBATCH --gres=<name>[[:type]:count].
For most systems (including OzSTAR) the gpu resource is just labeled gpu.
Some systems have more than one type of GPU available and so you can specify which GPU you want to access using --gres=gpu:type:1.
The sstar partition has 2 x NVIDIA P100 12GB PCIe GPUs per node, which you’ll you can access without having to specify a type.
Once you have specified the number of GPUs for a job the GPU resources will become visible to any programs which you run from within.
Attached storage
Attached storage is typically very fast storage that is physically attached to the compute node making I/O on this device much faster than requesting I/O over the network to another file system.
To request attached storage you can use #SBATCH --tmp=20GB.
The location of the storage directory will then be saved in the environment variable $JOBFS.
How do I install software on an HPC
As noted in a previous lesson, the HPC facility administrators manage a lot of software.
For software that is provided by the HPC facility we can use the module system to load the required software/version.
In the previous exercises you saw this happen when we called module load python/3.8.5.
We will explore the module system in more detail and then learn how to build and install our own software.
The LMOD module system
The LMOD software is designed to allow users of an HPC facility to manage which software they are using at a given time. When a user loads a module, the lmod system will set a bunch of different environment variables that are needed to run the particular software. Additionally, additional modules (dependencies) will be loaded (or unloaded) to minimise version conflicts.
When we first log into OzSTAR we have a farily limited set of modules already loaded:
[phancock@farnarkle1 ~]$ module list

Currently Loaded Modules:
  1) nvidia/.latest (H,S)   2) slurm/.latest (H,S)
If we want to have access to a python interpreter we can try the following:
[phancock@farnarkle1 ~]$ module load python
Lmod has detected the following error:  Couldn't find module with name python, did you mean to load one of the following?
        * python/.3.6.4-numpy-1.14.1
        * python/3.6.4
        * python/.2.7.14-numpy-1.14.1
        * python/3.8.5
        * python/3.7.4
        * python/3.6.9
        * python/2.7.14
        * python/3.10.4
As can be seen from the error message, there are multiple versions of python installed on this system, and none of them are set as the default version.
We need to specify the version that we want to load using module load python/3.8.5
Once we’ve done this we can see that python is now loaded along with a set of dependent libraries:
[phancock@farnarkle1 ~]$ module list

Currently Loaded Modules:
  1) nvidia/.latest (H,S)   3) gcccore/9.2.0     5) gcc/9.2.0     7) openmpi/4.0.2     9) sqlite/3.21.0  11) openssl/1.1.1g
  2) slurm/.latest  (H,S)   4) binutils/2.33.1   6) hwloc/2.0.3   8) imkl/2019.5.281  10) zlib/1.2.11    12) python/3.8.5
In loading python we’ve actually loaded 10 modules. Thankfully we didn’t have to track these dependencies down and load them ourselves!
If we want to see a list of all the modules that are available we can run module avail, but it is a very long and exhaustive list that is hard to browse.
Instead, if we want to search for a library or module we can use module spider <name>.
Find some modules
Use
module spiderto figure out what versions of the scipy python module are available.answer
[phancock@farnarkle1 ~]$ module spider scipy

------------------------------------------------------------------------------------------------------------------------
  scipy:
------------------------------------------------------------------------------------------------------------------------
    Description:
      SciPy is a collection of mathematical algorithms and convenience functions built on the Numpy extension for
      Python.

     Versions:
        scipy/1.0.0-python-2.7.14
        scipy/1.0.0-python-3.6.4
        scipy/1.0.1-python-3.6.4
        scipy/1.3.0-python-3.6.4
        scipy/1.4.1-python-3.7.4
        scipy/1.4.1-python-3.8.5
        scipy/1.6.0-python-3.7.4
        scipy/1.6.0-python-3.8.5
        scipy/1.8.0-python-3.10.4
     Other possible modules matches:
        scipy-bundle

------------------------------------------------------------------------------------------------------------------------
  To find other possible module matches execute:

      $ module -r spider '.*scipy.*'

------------------------------------------------------------------------------------------------------------------------
  For detailed information about a specific "scipy" module (including how to load the modules) use the module's full name.
  For example:

     $ module spider scipy/1.8.0-python-3.10.4
------------------------------------------------------------------------------------------------------------------------
The module spider command will also match partial strings so if you use module spider zip it will show you all the modules with zip in the name.
Once you locate the module you want to use you’ll need to include module load program/version in all of your job scripts before that program can be used.
If you end up in the not so nice situation where you need to run different versions of a program at different parts of your job you can use module unload pogram/version or module swap old_program/version new_program/version to change versions.
This is occasionally needed when the software you rely on was not written/built/installed by you.
Installing or building software on an HPC can be a littel trecherous at times because you need to be careful of:
- where you are building code: the compute nodes might have a different architecture from the head nodes (or each other)
- the modules loaded whilst building: if you load a library while building the code, you’ll need to load that same program/version when running the code so that the library links work properly
- required permissions: some software requires special permissions to build (or does unexpected things that may be not allowed by your admin)
- where the software is installed to: most software will want to live in the
/binor/usr/bindirectory of your local machine, but these are not write-able on an HPC. Even if you can install software in your home directory, this is often not the best choice on an HPC.
Building various types of software is not within the scope of this course, however a solution that is becomming more common in HPC facilities is to allow users to build and run containers with their desired software within.
Containers
Containers provide a way to package software in an isolated environment which may even have a different operating system from the host. The two most popular containerization systems are Singularity/Apptainer and Docker. Docker is primarily used on computers where you have root access such as your laptop/desktop or a compute node in the cloud. HPC facilities will not use Docker as it provides root access to the host system, and instead will use Singularity which does not.
The two systems are largely interpoerable - you can build a Docker container on your desktop, test it out in your workflow, and then convert it to a Singularity image for use on your HPC facility of choice. You can think of a container as a self container operating system which you can build with all the software that you need, which you can then deploy on any computer that you like. In fact you don’t even need to know how to build the containers to use them as there are many available pre-built containers that you can use. Both systems provide an online repository for storing built containers: Docker has DockerHub, while Singularity uses Singularity Container Services (SCS).
For singularity you can pull containers from DockerHub or SCS onto your local machine or HPC. For example the software package AegeanTools, has been containerized and put on DockerHub at hub.docker.com/r/paulhancock/aegean. To pull the image and run it locally we would do the following:
# on OzSTAR the singularity module is called apptainer
module load apptainer/latest

# pull and convert the container
# this will create an image file called aegean_main.sif in the current directory
singularity pull paulhancock/aegean:main

# run the command `aegean` which is provided by the container
singularity run aegean_main.sif aegean
The invocation syntax is singularity run <run options> <image name> <command within image>.
If we want the program inside the container to interact with files that are outside the container we need to provide a binding between the two file systems.
The syntax for this is -B <path on host>:<path witin container>.
It is usually helpful to bind the current working directory to the same name within the container using -B $PWD:$PWD.
If you would normally run my_prog --args file in the current directory then you can use a containerized version of my_prog and run it using: singularity run -B $PWD:$PWD my_prog_image.sif my_prog -args $PWD/file.
On Pawsey we have multiple containers built for the different software pacakages that we run.
They are stored in a common directory so that everyone in the various MWA user groups can access them (reduce duplication).
I source the following script containers.sh in my job scritps so that I can call a container by putting, e.g., ${Crobbie} at the start of the line.
# containers.sh
# `source` this file to have short hand access to all your containers

# Location of common container storage
container_base="/pawsey/mwa/singularity"

# default invocation string
container_exec="singularity exec -B $PWD"

# need to super-hack the path to make sure that the .h5 beam file is found within the right python path within the container
Creduce="${container_exec} -B /pawsey/mwa:/usr/lib/python3/dist-packages/mwapy/data ${container_base}/mwa-reduce/mwa-reduce.img"
# need to pass some environment variables
Cmanta="${container_exec} --env MWA_ASVO_API_KEY=${MWA_ASVO_API_KEY} ${container_base}/manta-ray-client/manta-ray-client_latest.sif"
# these work nice as is
Ccotter="${container_exec} ${container_base}/cotter/cotter_latest.sif"
Cmwalib="${container_exec} ${container_base}/pymwalib/pymwalib_latest.sif"
Crobbie="${container_exec} ${container_base}/robbie/robbie-next.sif"
Since Singularity images are single files, you can share them with others in your project group either by copying them or moving them to a shared directory that you use for common containers.
Key Points
Plan your work and map it onto a workflow for SLURM to execute
Find software with LMOD or Singularity / Docker hub