Git branching
Overview
Teaching: 10 min
Exercises: 10 minQuestions
I heard branches are a thing, what are they?
Objectives
Learn about branching
Branching
We mentioned the term ‘branch’ a few times in the previous lessons, but didn’t describe what branches are.
In git terminology a branch is one of the (possibly many) end points on a path that is describe by the commits of your repository.
Until now our repository has been a linear chain of commits, where each commit builds on the previous one like this:

Note that in the above we represent commits as circles (read left to right), and the “Main” branch of our repository is just a pointer to a given commit along this chian.
However, at any point in our history, we can have two commits, that are both related to the same parent, essentially making a fork or “branch” in our chain of commits.
This means that we can have multiple end points to our chain of commits.
Why would we want to do this?
A common reason is related to the following diagram:

In the branching example above we have three different end points to our chain labelled “Little Feature”, “Main”, and “Big Feature”. As the name suggests each branch serves a particular purpose. When you want to add a new feature or fix a bug you create a new branch to encapsulate your changes. Having multiple branches, and being able to swap between them, means that you can effectively have multiple version of your code in development at once. This might sound scary but you can for example have a main branch that is “always working”, and a development branch that “should work”, and feature branches that are “not working yet”. The thing that makes branches so useful is that you can merge branches onto each other. So when your feature works, you can copy all the commits onto the development branch at once. This is called merging, and it’s really powerful, but has a risk of causing conflicts.
Create a branch
In our skysim repository create a new branch called ‘feature-1’ as follows:
git branch feature-1
git checkout feature-1
Within this branch add a new function to your
sky_sim.pycalledclip_to_radiuswhich is a placeholder for future development.Commit these changes to the
feature-1branch.Use
git checkoutto swap between your two branches and view the history (git log) and content of thesky_sim.pyfile for each branch.When you are happy with the changes push your new branch to github.
Checkout your main branch before moving on.
Merge your branch back into main
Checkout your
mainbranch.Merge changes from your
feature-1branch using:git merge feature-1You will (hopefully) get a message showing the files which were changed during the merge. If there are no conflicts then git will just add the commits from the
feature-1branch to your main branch. We’ll explore the case of conflicts in a latter lesson.Confirm that you have commits to push using
git statusand then push these to github.Now that you have all your changes on GitHub you don’t need your local feature branch so you can delete it with:
git branch -D feature-1Head to GitHub and check that all your changes have been included on the main branch.
In the next lesson we’ll explore how we can incorporate branches into our workflow.
Consolidating Changes
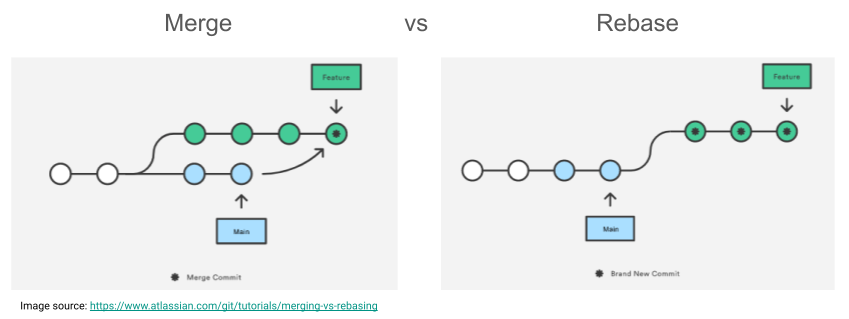
Merging vs Rebasing
In essence, both git merge and git rebase achieve the same thing, that is integrating changes from one branch into another branch.
However, how this is done differs:
-
git mergecreates a new commit that integrates the changes from branch a (e.g.main) into branch b (e.g.feature). The existing branches are not changed in any way. -
git rebasemoves the entire branch b (iefeature) to the tip of branch a (iemain), effectively incorporating all changes from branch a and leaving you with a linear history. Rebasing rewrites your project history!
The image below visualizes the difference between git merge and git rebase.
We will look at using both, but to read a good comparison visit the Atlassian Merging vs. Rebasing page.
Rebase
With GitLab you can:
- rebase from the command line, automatically or interactively, or
- rebase from the UI

Remember: Rebasing rewrites your history
You should not rebase a shared branch as this can lead to complex merge issues.
Key Points
Branches provide a new place to experiment / develop without braking your main branch