Packaging code
Overview
Teaching: 20 min
Exercises: 40 minQuestions
What is a python package or module?
How can I make my own python module?
How can I publish this module on pypi.org?
Objectives
Understand the structure of a python module
Create a python modules which we can pip install
What is a python module?
A python module is a library of code that can be distributed and used by others.
Common modules that you would have used before include numpy, scipy, and astropy.
Modules primarily do one or both of the following:
- to provide functionality to other software (a library)
- to execute a task (a software package)
Because of the above dual purpose people tend to use the words package and module interchangeably.
Common python modules
What other python modules/packages have you used?
List your top 3-5 go-to python modules in the etherpad
Examples
matplotlib
sklearn
pymc3
Why make a module?
A common mantra of software development is don’t repeat yourself (or others). This effectively means that you should write code once, and then use it multiple times. At the most basic level, it means that code that is used many times should be put into a function, which is then called often. This means that you have only one place for the bug to occur/fix, aiding your debug/development cycle.
If you find yourself copying functions between different code that you write, you should consider packaging those functions into a module and then just importing that module.
How are python modules structured?
Python modules can contain a variety of elements including python code, C/Fortran or other language code, data, documentation, scripts, and many other things. The example that we will be dealing with today is the simplest example as it only contains python code.
Python modules mirror the underlying directory/file structure.
If you want to create a module called mymodule all you need to do is create a directory called mymodule and make sure that it has a special file in it called __init__.py.
This file can be empty and you’ll still have defined a module.
Let’s try that out now:
Challenge: make a module
In a previous episode we created a directory called
mymodule. In that directory create an empty file in it called__init__.py. Once this is done, open a python terminal and try toimportyour module.Example
mkdir mymodule # if you didn't do this earlier
touch mymodule/__init__.py # create the empty file
python
Python 3.8.10 (default, Jun  2 2021, 10:49:15)
[GCC 9.4.0] on linux
Type "help", "copyright", "credits" or "license" for more information.
>>> import mymodule
>>> dir(mymodule)
['__builtins__', '__cached__', '__doc__', '__file__', '__loader__', '__name__', '__package__', '__path__', '__spec__']
Note that even with an empty file your module already has a bunch of attributes assigned to it.
The __path__ and __file__ attributes will be the path to the module directory and filename of the __init__.py file that you created.
Try the following to verify:
print(mymodule.__path__, mymodule.__file__)
Congratulations, you have just created a python module. It doesn’t do anything useful yet but we’ll get to that later on. Firstly we should discuss the contents and structure of a typical python package.
Package contents and structure.
For a python project, the recommended content/structure is:
/docs
/mymodule
/mymodule/data
/scripts
/tests
LICENSE
README.md
requirements.txt
setup.py
Compare this to the more generic structure that we discussed in this episode.
Many of the directories are the same, though instead of src we now have mymodule and scripts as separate directories.
The files and directories are as follows:
/docsis where you should store the stand-alone documentation for your package./mymoduleis both the name of your module, and the location that the module code should be kept/mymodule/datais where you should store data that are required by your module. Not always needed. Maybe you have some constants or templates that you use to make your life easier. They should be stored here./scriptsis where you put the scripts that a user will interact with from the command line. Typically without the.pyextension./testsis where you put all the code and data that are required for testing your packageLICENSEis for licensing your code. Be as permissive as possible, check with your institute as to what they recommend you use. (They may not care).README.mdis not documentation. This should contain a high level description of your package. It is what GitHub will display on the front page of your repository.requirements.txtis where you list all of your code dependencies (like numpy etc). This makes it easier for people to install your package.setup.pyis a script that will allow package managers likepipto auto-magically install your package. It can also be run directly.
We’ll come back to each of these things later in this course but for now let’s just focus on the mymodule and scripts directories.
Making a not-empty python package
Now that we have our template python package we will add some super basic functionality to it.
Edit
__init__.pyEdit
mymodule/__init__.pyso that it does two things:
- Prints “Hello from module `mymodule`” when it is run.
- Defines a function called
funcwhich prints “You just ran the function called `func` from module `mymodule`”Expected behavior
python mymodule/__init__pyHello from `mymodule`Python 3.8.10 (default, Jun 2 2021, 10:49:15) [GCC 9.4.0] on linux Type "help", "copyright", "credits" or "license" for more information. >>> import mymodule Hello from `mymodule` >>> dir(mymodule) ['__builtins__', '__cached__', '__doc__', '__file__', '__loader__', '__name__', '__package__', '__path__', '__spec__', 'func'] >>> mymodule.func() You just ran the function called `func` from module `mymodule`
Submodules
Note that some packages like scipy like to use sub-modules to organize code based on functionality.
Sub-modules can be easily created in one of two ways:
- a file within the directory
mymodulecalledsubmod1.py - a directory within
mymodulecalledsubmod2with an__init__.pyfile within it.
Either way the sub-module can be imported as:
from mymodule import submod1, submod2
By default all of the submodules will be imported so you can also access functions within submod1 like this:
import mymodule

mymodule.submod1.func()
To control which sub-modules are imported we can define a variable within the __init__.py file which is __all__ and then define which sub-modules should automatically be imported.
Challenge: automatically import only some modules
- Create two sub-modules of
mymodulecalledsky_simandother.- Edit the
__init__.pyfile so that onlysky_simis imported when you importmymodule- Confirm that
othercan still be explicitly importedSolution
touch mymodule/other.py
echo "__all__ = ['sky_sim']" >> mymodule/__init__.py

python -c "import mymodule; print(dir(mymodule))"
Hello from `mymodule`
['__all__', '__builtins__', '__cached__', '__doc__', '__file__', '__loader__', '__name__', '__package__', '__path__', '__spec__', 'sky_sim']

python -c "from mymodule import sky_sim, other; print(dir())"
Hello from `mymodule`
['__annotations__', '__builtins__', '__doc__', '__loader__', '__name__', '__package__', '__spec__', 'other', 'sky_sim']
By importing only the modules that are going to be used, we can reduce the amount of time taken to load a module, and hide modules/functions that are not part of a public API.
What else is __init__.py good for?
You should consider defining the following in your __init__.py:
- A docstring appropriate for the module,
- “private” variables such as
__version__,__date__,__author__,__citation__ - “public” constants (
IN_ALL_CAPS=True)
Package level scripts
If your package is providing a piece of software that does a thing then you will typically want a command line entry point for users rather than having them write their own code. Essentially a script is just a command line interface for the code in your module.
Challenge write a script
- In the
scriptsfolder create a new file calledrunme.- Copy the
if __main__clause from oursky_sim.pyfile and put it intorunmerunmeshould import functions frommymodule.sky_simas neededSolution
touch scripts/runme # create empty file
chmod ugo+x scripts/runme # set permissions to be executable
In file
runme#! /usr/bin/env python from mymodule import sky_sim import sys print(sky_sim.get_radec()) print(sys.argv) sys.exit()Test by running
./scripts/runmeNote that you may need do the following to get the imports to work
export PYTHONPATH=.:$PYTHONPATHthis is because your package is not installed. We’ll cover this next.
Installing a package
We can make our software package installable by adding some content to the setup.py file.
Currently this file is empty so we shall fill it with some useful content.
Update setup.py so that it contains the following information
#! /usr/bin/env python
"""
Set up for mymodule
"""
from setuptools import setup

requirements = ['numpy>=1.0',
                # others
                ]

setup(
    name='mymodule', # the name of the module
    packages=['mymodule'], # the location of the module
    version=0.1,
    install_requires=requirements,
    python_requires='>=3.8',
    entry_points={'console_scripts':['sky_sim= mymodule.sky_sim:main']}
)
You should now be able to install the package by running:
pip install -e .
Note the -e directive, which means that the module will be ‘editable’ after install.
Normally the code/data/scripts are all copied to some central location when they are installed, however the -e directive will instead link the files to that location.
This means that you don’t have to install your module every time you make a small change.
Additionally, note that we have specified the requirements directly in the setup.py file instead of in a requirements.txt file.
Since the formatting for the two are the same we could create a function get_requirements() that would read the requirements file and use that.
#! /usr/bin/env python
"""
Set up for mymodule
"""
from setuptools import setup
import os

def get_requirements():
    """
    Read the requirements from a file
    """
    requirements = []
    if os.path.exists('requirements.txt'):
        with open('requirements.txt') as req:
            for line in req:
                # skip commented lines
                if not line.startswith('#'):
                    requirements.append(line.strip())
    return requirements

setup(
    name='mymodule', # the name of the module
    packages=['mymodule'], # the location of the module
    version=0.1,
    install_requires=get_requirements(),
    python_requires='>=3.8',
    entry_points={'console_scripts':['sky_sim= mymodule.sky_sim:main']}
)
Now that the module has been installed you should be able to import this module from python regardless of which directory you are working in.
Similarly, because we provided scripts=['scripts/runme'], we should have access to this script from anywhere on our system.
Try it out!
Installing directly from github
If you have the right structure in your repository on github, then pip can install directly from github using the following:
pip install git+https://github.com/[user]/[repo].gitYou can even select a branch by appending
@branchnameto the github link, or@commit-idto select a particular commit.
Publishing a package on pypi
Once your code can be installed locally via
pip install -e .then you are well on your path to being able to publish your code on the pypi.org index. For instructions on how to do this see the instructions on python.org.
Include a README.md
Upon downloading new software, the first point of call for many people is to look for some help on how to install and use the software.
This is where a file such as INSTRUCTIONS, INSTALL, or README can come in handy.
The name of the file says what it is and will attract the attention of the user.
While these files can be in any format, and have any name, a common choice is README.md.
If you have navigated to a GitHub software repository, and seen the nice documentation available on the front page, then this has been generated from the README.md file.
The markdown format (guide here) is a simple to use, future proof, platform independent, document format that can be rendered into a range of other formats. As a bonus, the raw files are easily read and written by humans.
Things to consider for your README.md file
- The name of the project
- A description of the purpose of the software
- Maybe a one liner for each script
- Install instructions
- List some high level dependencies
- Usage instructions
- If you have a CLI then the output of mycode –help is appropriate to include verbatim
- A link to documentation
- Author information and contact details (email, or just a link to github issues)
- A note on how people should credit this work
For example our project readme might look like this:
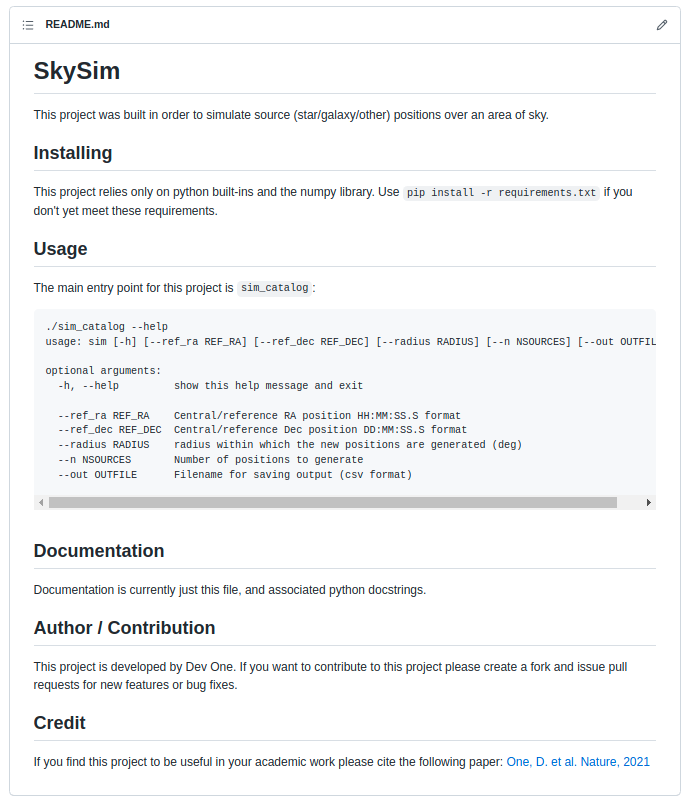
Create a README.md for your project
Based on the above recommendations, write a short readme for this example project
Commit/push this to Github and see how it renders the information. If you are not happy with the results, you can edit them on GitHub, it has a nice ‘preview’ feature that will reduce the number of commits that you’ll generate. Remember to pull these to your local repo to keep them in sync.
Useful project metadata
Previously we used an empty __init__.py file in a directory to cause python to interpret that directory as a module.
There is meta data that we wish to store about our project, and the __init__.py file is an excellent place to do this.
Versioning
One of the most common items to store is the version of your software. For most modules the module.
__version__ is used to store this information.
There are many conventions for software versioning and no one single correct answer.
Versioning is the practice of using unique numbers of names to refer to the different states of a software project or code.
A common choice is to use major/minor/patch versions for the code such as 4.2.1, which is used by most python modules.
See semver.org for a description on the how and why of semantic versioning.
A major version change will usually mean that the code has changed in some fundamental way, and that people should not expect compatibility between the two versions.
For example: there were many changes between the last version of python 2 (2.7) and python 3 that meant not all code would work on both versions.
If you have been using python for a while, or have seen python code from ~10 years ago (or ~2 years ago if it’s astronomers’ code!), then you’ll have seen some of these changes.
Most notable is the change from print "hello" to print("hello").
A minor version change will usually indicate changes have been made that do not break compatibility within the major version. This would usually include the addition of new functionality that is compatible with (but not available in) previous versions of the software.
A patch version is used to distinguish states of development that do not change the intended functionality of the code base. These include bug fixes, security patches, or documentation updates.
Typically version 1.0 is used to represent the first stable/complete version of the software, and so versions such as 0.9 are used to indicate development versions.
Modification date
In addition to a semantic versioning noted above, some developers find it useful to record the date of last change for each version of their software (and indeed each file/module within).
For this purpose we would make use of the module.__date__ attribute.
Date formats are a perpetual problem for people and computers alike so it is recommended that a single format be chosen and used consistently throughout a project.
The format YYYY-MM-DD is recommended as it has the advantage of being time sorted when sorted alphanumerically.
Authors / developers
One method tracking attribution (or blame) in a project is to use the module.__author__ attribute to store the author name as either a string or list.
For a project with few developers this can be handled easily.
For larger groups or projects git blame would be a better method for tracking contributions on a line by line basis.
Citation
For any researcher writing software there is an eternal battle between writing good code and “doing science”.
Acknowledging the use of software is common but not yet standard or required when publishing papers.
To make it easier for people to cite your work you can use an attribute such as module.__citation__ to employer people to cite your work, link to papers or code repositories that should be cited or referenced.
When combined with a --cite command line option, this is a great way for people to properly credit your work.
If your target audience are researchers then it can be very useful to store a bibtex entry in the citation string so that people can just copy/paste into their LaTeX document.
Meta data for an example project
The __init__ file in our example project can be updated to include the above recommendations.
Note the format of the __citation__ string being multi line, and including LaTeX formatting.
# /usr/bin/env python

__author__ = ['Dev One', 'Contrib Two']
__version__ = '0.9'
__date__ = '2021-12-02'
__citation__ = """
% If this work is used to support a publication please
% cite the following publication:
% Description of This code
@ARTICLE{ExcellentCode_2022,
   author = { {One}, D. and {Two}, C. and {People}, O},
    title = "{Awesome sauce code for astronomy projects}",
  journal = {Nature},
 keywords = {techniques: image processing, catalogues, surveys},
     year = 2021,
    month = may,
   volume = 1337,
    pages = {11-15},
      doi = {some.doi/link.in.here}
}

% It is also appropriate to link to the following repository: https://github.com/devone/AwesomeSauce
"""
Licensing your work
By default any creative work is under an exclusive copyright which means that the author(s) of that work have a say in what others can do with it. In general this means that no one can build upon, use, reuse, or distribute your work without your permission. To use or build upon software that has no license requires the new developer/user to contact the original author(s) and get permission. This is time consuming, annoying, and often not done. If you want your work to be used by others your best bet is to provide an explicit software license as part of your project so that people know up front what is allowed and not allowed. A common way of licensing software is to provide a LICENSE (or LICENCE) file in the root of the project. (Alternatively you can provide the license as part of the header for each file, but that’s a lot of repetition, and goes against our good practice of don’t repeat yourself).
Choosing a software license for your project
Your home institute may have opinions/guidelines for appropriate licensing software. Ask around and follow the advice of you local experts.
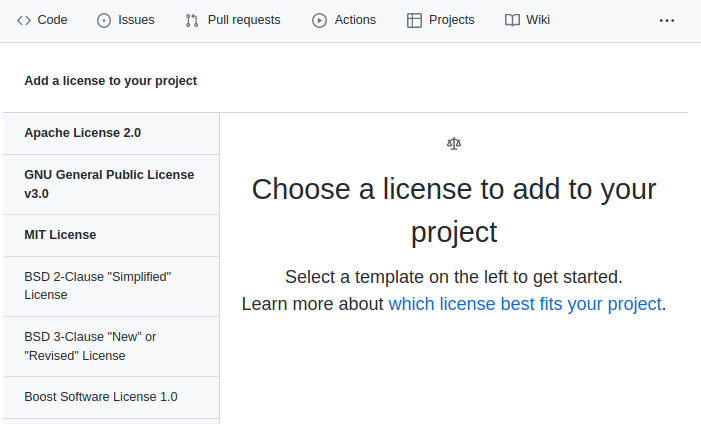
If you don’t have any local constraints on licensing your software you can use one of the many license templates available on Github.
To use a template you need to log into your Github account, navigate to your repository and then click the “add file”->”create new file” button.
You will be presented with a blank text editor and be asked for a file name.
If you use LICENSE.md (or any similar spelling/extension) then you’ll see a new button appear on the right of the screen saying “Choose a license template”.
Click that.

You’ll then see a list of common software licenses that you can choose from. If you are brave you can read each of them in full. Alternatively you can simply read the Github provided summary at the top of what the permissions/limitations are. Choose one that feels right to you and then press “Review and submit”. This will create a new license file.
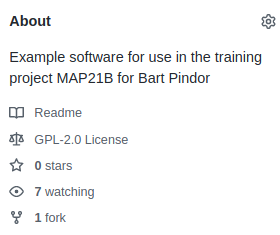
Once you have a license file GitHub will add a badge to the “About” section of your project like this:
License your work
Use the GitHub tools described above to apply a new license to your project.
git pullto your local repository when you are done so that your repos are in sync.
Key Points
Any reusable code can be made into a module
Uploading to pypi isn’t essential for installing via pip