Using GitHub
Overview
Teaching: 15 min
Exercises: 15 minQuestions
Why use an online repo like GitHub or GitLab?
How do I create a new github repo?
How do C sync my existing repo to GitHub?
Objectives
Create an an empty GitHub repo
Connect our local repo the one on GitHub
Synchronize the two repositories
Why use an online repository
There are a number of reasons why an online repository can be useful:
- Having your code on multiple machines reduces the chances of you loosing your work
- Services like GitHub give you control over who sees and can access your work, through private/public listings
- Services like GitHub often come with additional tools that are super useful for development including:
- Automation tools for building/testing/documenting/deploying your work
- A place to store and present documentation
- The ability to connect with third party vendors to provide additional services such as: testing, code review, security warnings, publishing to code indexes, and archiving.
- Pushing your code to a site like github is the simplest way to publish your code and get the recognition you deserve (see our episode on publishing)
Setting up for GitHub
Accounts are free, so signup for one (or just follow along for now).
When we use git on a new computer for the first time, we need to configure a few things.
On a command line, git commands are written as git verb options, where verb is what we actually want to do and options is additional optional information which may be needed for the verb.
So here is how you can setup git for the first time on your computer:
$ git config --global user.name "Paul Hancock"
$ git config --global user.email "paul.hancock@curtin.edu.au"
Please use your own name and email address. This user name and email will be associated with your subsequent Git activity, which means that any changes pushed to GitHub, BitBucket, GitLab or another Git host server after this lesson will include this information. Note that the user name and email are not used for authentication, so you could use my details if you liked, but it would look like I was doing your work!
For this lesson, we will be interacting with GitHub and so the email address used should be the same as the one used when setting up your GitHub account. If you are concerned about privacy, please review GitHub’s instructions for keeping your email address private.
Why –global?
If you want to configure a different username/email for different git repos, then you can omit the
--globalflag and git will set these options only for the current repo.
Creating a GitHub repo
(See this sw carpentries lesson for a more detailed guide, some of which is replicated below.)
Version control really comes into its own when we begin to collaborate with other people. We already have most of the machinery we need to do this; the only thing missing is to copy changes from one repository to another.
Systems like git allow us to move work between any two repositories. In practice, though, it’s easiest to use one copy as a central hub, and to keep it on the web rather than on someone’s laptop. Most programmers use hosting services like GitHub, Bitbucket or GitLab to hold those main copies.
Let’s start by sharing the changes we’ve made to our current project with the world. To this end we are going to create a remote repository that will be linked to our local repository.
1. Create a remote repository
Log in to GitHub, then click on the icon in the top right corner to create a new repository with a name of your choice:
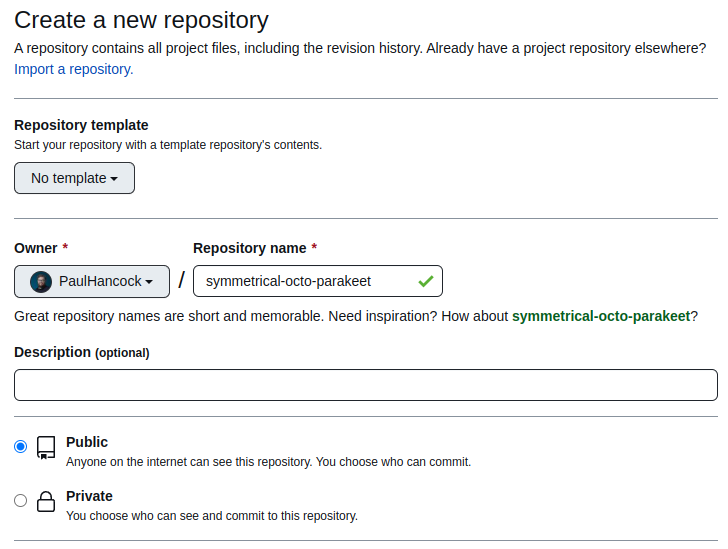
Since this repository will be connected to a local repository, it needs to be empty, so leave all the options in their default (unchecked) state.
As soon as the repository is created, GitHub displays a page with a URL and some information on how to configure your local repository:
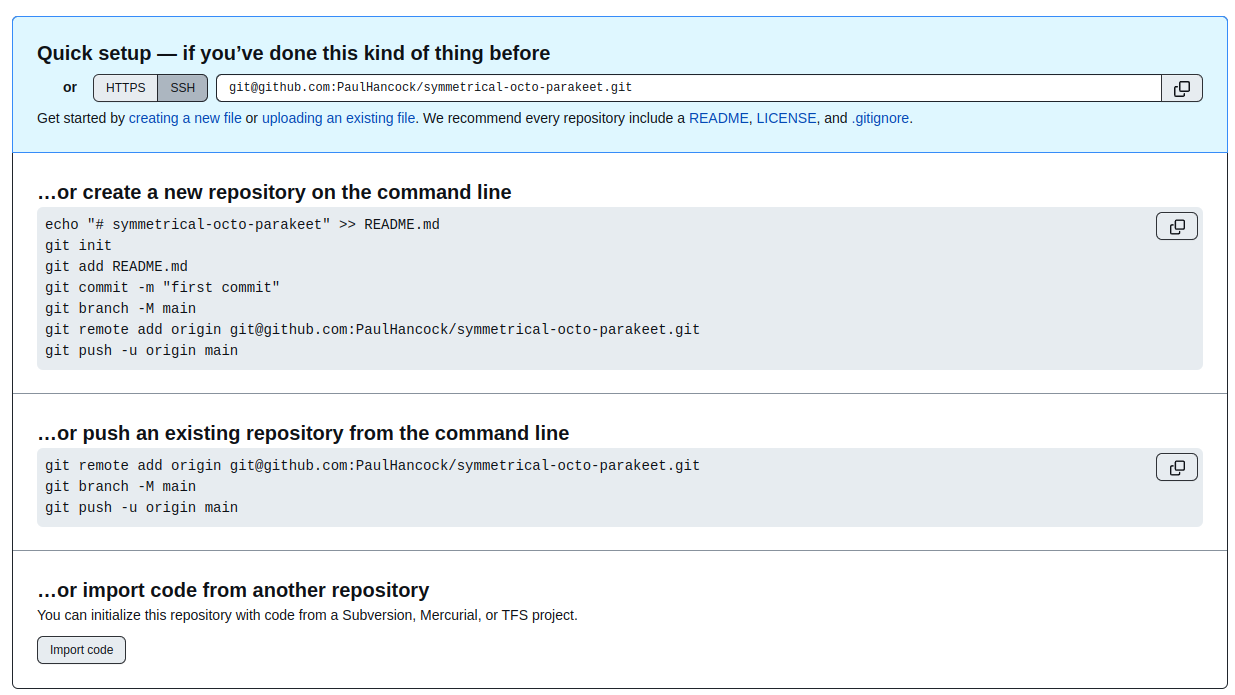
This effectively does the following on GitHub’s servers:
$ mkdir symmetrical-octo-parakeet
$ cd symmetrical-octo-parakeet
$ git init
We now have two repos with the same name in different locations, one is on our local machine and the other is on GitHub. We now want to connect the two repositories so that we can synchronize or work between them.
2. Connect local to remote repository
Now we connect the two repositories.
We do this by making the GitHub repository a remote for the local repository.
The blank repo on GitHub shows us the command that we need to do this:
git remote add origin git@github.com:PaulHancock/symmetrical-octo-parakeet.git
git branch -M main
git push -u origin main
Make sure to use the URL for your repository rather than Paul’s.
origin is a local name used to refer to the remote repository.
It could be called anything, but origin is a convention that is often used by default in git and GitHub, so it’s helpful to stick with this unless there’s a reason not to.
We can check that the command has worked by running git remote -v:
$ git remote -v
origin   git@github.com:PaulHancock/symmetrical-octo-parakeet.git (fetch)
origin   git@github.com:PaulHancock/symmetrical-octo-parakeet.git (push)
3. SSH Background and Setup
Before you can connect to a remote repository, you need to set up a way for his computer to authenticate with GitHub. We will use SSH which is a cryptographic network protocol that allows secure communication between computers using an otherwise insecure network.
SSH uses what is called a key pair. This is two keys that work together to validate access. One key is publicly known and called the public key, and the other key called the private key is kept private. Very descriptive names.
What we will do now is the minimum required to set up the SSH keys and add the public key to a GitHub account.
The first thing we are going to do is check if this has already been done on the computer you’re on. Because generally speaking, this setup only needs to happen once and then you can forget about it.
Keeping your keys secure
You shouldn’t really forget about your SSH keys, since they keep your account secure. It’s good practice to audit your secure shell keys every so often. Especially if you are using multiple computers to access your account.
We will run the list command to check what key pairs already exist on your computer.
ls -al ~/.ssh
Your output is going to look a little different depending on whether or not SSH has ever been set up on the computer you are using.
If you haven’t set up SSH then you’l see something like:
ls: cannot access '~/.ssh': No such file or directory
If SSH has been set up on the computer you’re using, the public and private key pairs will be listed.
The file names are somethign like id_rsa/id_rsa.pub depending on how the key pairs were set up.
3.1 Create an SSH key pair
To create an SSH key pair Vlad uses this command, where the -t option specifies which type of algorithm to use and -C attaches a comment to the key (here, Vlad’s email):
$ ssh-keygen -t ed25519 -C "your_email@example.com"
If you are using a legacy system that doesn’t support the Ed25519 algorithm, use:
$ ssh-keygen -t rsa -b 4096 -C "your_email@example.com"
Generating public/private ed25519 key pair.
Enter file in which to save the key (~/.ssh/id_ed25519):
We want to use the default file, so just press Enter.
Created directory '~/.ssh'.
Enter passphrase (empty for no passphrase):
Unless you are setting up ssh keys on a shared computer, or a computer that is not yours (why?), then you can leave the passphrase blank. Be sure to use something memorable or save your passphrase somewhere, as there is no “reset my password” option.
Enter same passphrase again:
After entering the same passphrase a second time, we receive the confirmation
Your identification has been saved in ~/.ssh/id_ed25519
Your public key has been saved in ~/.ssh/id_ed25519.pub
The key fingerprint is:
SHA256:SMSPIStNyA00KPxuYu94KpZgRAYjgt9g4BA4kFy3g1o your_email@example.com
The key's randomart image is:
+--[ED25519 256]--+
|^B== o.          |
|%*=.*.+          |
|+=.E =.+         |
| .=.+.o..        |
|....  . S        |
|.+ o             |
|+ =              |
|.o.o             |
|oo+.             |
+----[SHA256]-----+
The “identification” is actually the private key. You should never share it. The public key is appropriately named. The “key fingerprint” is a shorter version of a public key.
Now that we have generated the SSH keys, we will find the SSH files when we check.
ls -al ~/.ssh
drwxr-xr-x 1 Vlad Dracula 197121   0 Jul 16 14:48 ./
drwxr-xr-x 1 Vlad Dracula 197121   0 Jul 16 14:48 ../
-rw-r--r-- 1 Vlad Dracula 197121 419 Jul 16 14:48 id_ed25519
-rw-r--r-- 1 Vlad Dracula 197121 106 Jul 16 14:48 id_ed25519.pub
3.2 Copy the public key to GitHub
Now we have a SSH key pair and we can run this command to check if GitHub can read our authentication.
ssh -T git@github.com
The authenticity of host 'github.com (192.30.255.112)' can't be established.
RSA key fingerprint is SHA256:nThbg6kXUpJWGl7E1IGOCspRomTxdCARLviKw6E5SY8.
This key is not known by any other names
Are you sure you want to continue connecting (yes/no/[fingerprint])? y
Please type 'yes', 'no' or the fingerprint: yes
Warning: Permanently added 'github.com' (RSA) to the list of known hosts.
git@github.com: Permission denied (publickey).
Right, we forgot that we need to give GitHub our public key!
First, we need to copy the public key. Be sure to include the .pub at the end, otherwise you’re looking at the private key.
cat ~/.ssh/id_ed25519.pub
ssh-ed25519 AAAAC3NzaC1lZDI1NTE5AAAAIDmRA3d51X0uu9wXek559gfn6UFNF69yZjChyBIU2qKI your_email@example.com
Now, going to GitHub.com, click on your profile icon in the top right corner to get the drop-down menu. Click “Settings,” then on the settings page, click “SSH and GPG keys,” on the left side “Account settings” menu. Click the “New SSH key” button on the right side Now, you can add the title (eg. Laptop, or “ADACS workshop”), paste your SSH key into the field, and click the “Add SSH key” to complete the setup.
Now that we’ve set that up, let’s check our authentication again from the command line.
$ ssh -T git@github.com
Hi <user>! You've successfully authenticated, but GitHub does not provide shell access.
Good! This output confirms that the SSH key works as intended. We are now ready to push our work to the remote repository.
4. Push local changes to a remote
Now that authentication is setup, we can return to the remote. This command will push the changes from our local repository to the repository on GitHub:
$ git push origin main
Enumerating objects: 16, done.
Counting objects: 100% (16/16), done.
Delta compression using up to 8 threads.
Compressing objects: 100% (11/11), done.
Writing objects: 100% (16/16), 1.45 KiB | 372.00 KiB/s, done.
Total 16 (delta 2), reused 0 (delta 0)
remote: Resolving deltas: 100% (2/2), done.
To <repo address>
 * [new branch]      main -> main
Our local and remote repositories are now synchronized!
Key Points
An online git hosting service can act as an off-site back up for your work
If you don’t want to share (or can’t) then you can set the repositories to private
Having your work online makes it easy for you to work from multiple devices
When your work is online you can shamelessly plug it while teaching!